目录
整体流程概述

首先声明,这个架构模型只能是离线分析技术的一个简单的入门级架构。
整个离线分析的总体架构就是使用Flume从FTP服务器上采集日志文件,并存储在Hadoop HDFS文件系统上,再接着用Hadoop的mapreduce清洗日志文件,最后使用HIVE构建数据仓库做离线分析。任务的调度使用Shell脚本完成,当然大家也可以尝试一些自动化的任务调度工具,比如说AZKABAN或者OOZIE等。本次任务调度工具使用OOZIE。分析所使用的点击流日志文件主要来自Nginx的access.log日志文件,需要注意的是在这里并不是用Flume直接去生产环境上拉取nginx的日志文件,而是多设置了一层FTP服务器来缓存所有的日志文件,然后再用Flume监听FTP服务器上指定的目录并拉取目录里的日志文件到HDFS服务器上(具体原因下面分析)。从生产环境推送日志文件到FTP服务器的操作可以通过Shell脚本配合Crontab定时器来实现。一般在WEB系统中,用户对站点的页面的访问浏览,点击行为等一系列的数据都会记录在日志中,每一条日志记录就代表着上图中的一个数据点;而点击流数据关注的就是所有这些点连起来后的一个完整的网站浏览行为记录,可以认为是一个用户对网站的浏览session。比如说用户从哪一个外站进入到当前的网站,用户接下来浏览了当前网站的哪些页面,点击了哪些图片链接按钮等一系列的行为记录,这一个整体的信息就称为是该用户的点击流记录。本次设计的离线分析系统就是收集WEB系统中产生的这些数据日志,并清洗日志内容存储分布式的HDFS文件存储系统上,接着使用离线分析工具HIVE去统计所有用户的点击流信息。

稳妥的采集数据方法
网站会通过前端JS代码或服务器端的后台代码收集用户浏览数据并存储在网站服务器中。一般运维人员会在离线分析系统和真实生产环境之间部署FTP服务器,并将生产环境上的用户数据每天定时发送到FTP服务器上,离线分析系统就会从FTP服务上采集数据而不会影响到生产环境。
采集数据的方式有多种,一种是通过自己编写shell脚本或Java编程采集数据,但是工作量大,不方便维护,另一种就是直接使用第三方框架去进行日志的采集,一般第三方框架的健壮性,容错性和易用性都做得很好也易于维护。本文采用第三方框架Flume进行日志采集,Flume是一个分布式的高效的日志采集系统,它能把分布在不同服务器上的海量日志文件数据统一收集到一个集中的存储资源中,Flume是Apache的一个顶级项目,与Hadoop也有很好的兼容性。现在的flume-ng也是一个高可用的框架。Flume的agent是运行在JVM上的,所以各个服务器上的JVM环境必不可少。每一个Flume agent部署在一台服务器上,Flume会收集web server 产生的日志数据,并封装成一个个的事件发送给Flume Agent的Source,Flume Agent Source会消费这些收集来的数据事件并放在Flume Agent Channel,Flume Agent Sink会从Channel中收集这些采集过来的数据,要么存储在本地的文件系统中要么作为一个消费资源分发给下一个装在分布式系统中其它服务器上的Flume进行处理。Flume提供了点对点的高可用的保障,某个服务器上的Flume Agent Channel中的数据只有确保传输到了另一个服务器上的Flume Agent Channel里或者正确保存到了本地的文件存储系统中,才会被移除。
☆☆☆每一个FTP服务器以及Hadoop的name node服务器上都要部署一个Flume Agent;FTP的Flume Agent采集Web Server的日志并汇总到name node服务器上的Flume Agent,最后由hadoop name node服务器将所有的日志数据下沉到分布式的文件存储系统HDFS上面。
※※※※由于目前没有配置FTP服务器,暂时直接从nginx的access.log拉取日志到HDFS※※※
Spooling Directory Source 和 exec source区别:
当Flume服务down掉的时候Spooling Directory Source能记录上一次读取到的位置,而Exec Source则没有,需要用户自己去处理,当重启Flume服务器的时候如果处理不好就会有重复数据的问题。当然Spooling Directory Source也是有缺点的,会对读取过的文件重命名,所以多架一层FTP服务器也是为了避免Flume“污染”生产环境。Spooling Directory Source另外一个比较大的缺点就是无法做到灵活监听某个文件夹底下所有子文件夹里的所有文件里新追加的内容。关于这些问题的解决方案也有很多,比如选择其它的日志采集工具,像logstash等。
本次按照直接从测试环境拉取nginx的access.log的日志数据下沉到HDFS存储系统。
配置直接采集过程在sheet页Flume中已经完成!!
FTP服务器上的Flume配置文件如下
agent.channels = memorychannel
agent.sinks = target
agent.sources.origin.type = spooldir
agent.sources.origin.spoolDir = /export/data/trivial/weblogs
agent.sources.origin.channels = memorychannel
agent.sources.origin.deserializer.maxLineLength = 2048
agent.sources.origin.interceptors = i2
agent.sources.origin.interceptors.i2.type = host
agent.sources.origin.interceptors.i2.hostHeader = hostname
agent.sinks.loggerSink.type = logger
agent.sinks.loggerSink.channel = memorychannel
agent.channels.memorychannel.type = memory
agent.channels.memorychannel.capacity = 10000
agent.sinks.target.type = avro
agent.sinks.target.channel = memorychannel
agent.sinks.target.hostname = 172.16.124.130
agent.sinks.target.port = 4545
Flume Agent Source可以通过配置deserializer.maxLineLength这个属性来指定每个Event的大小,默认是每个Event是2048个byte。Flume Agent Channel的大小默认等于于本地服务器上JVM所获取到的内存的80%,用户可以通过byteCapacityBufferPercentage和byteCapacity两个参数去进行优化。需要特别注意的是FTP上放入Flume监听的文件夹中的日志文件不能同名,不然Flume会报错并停止工作,最好的解决方案就是为每份日志文件拼上时间戳。
在Hadoop服务器上的配置文件如下:
agent.sources = origin
agent.channels = memorychannel
agent.sinks = target
agent.sources.origin.type = avro
agent.sources.origin.channels = memorychannel
agent.sources.origin.bind = 0.0.0.0
agent.sources.origin.port = 4545
#agent.sources.origin.interceptors = i1 i2
#agent.sources.origin.interceptors.i1.type = timestamp
#agent.sources.origin.interceptors.i2.type = host
#agent.sources.origin.interceptors.i2.hostHeader = hostname
agent.sinks.loggerSink.type = logger
agent.sinks.loggerSink.channel = memorychannel
agent.channels.memorychannel.type = memory
agent.channels.memorychannel.capacity = 5000000
agent.channels.memorychannel.transactionCapacity = 1000000
agent.sinks.target.type = hdfs
agent.sinks.target.channel = memorychannel
agent.sinks.target.hdfs.path = /flume/events/%y-%m-%d/%H%M%S
agent.sinks.target.hdfs.filePrefix = data-%{hostname}
agent.sinks.target.hdfs.rollInterval = 60
agent.sinks.target.hdfs.rollSize = 1073741824
agent.sinks.target.hdfs.rollCount = 1000000
agent.sinks.target.hdfs.round = true
agent.sinks.target.hdfs.roundValue = 10
agent.sinks.target.hdfs.roundUnit = minute
agent.sinks.target.hdfs.useLocalTimeStamp = true
agent.sinks.target.hdfs.minBlockReplicas=1
agent.sinks.target.hdfs.writeFormat=Text
agent.sinks.target.hdfs.fileType=DataStream
round, roundValue,roundUnit三个参数是用来配置每10分钟在hdfs里生成一个文件夹保存从FTP服务器上拉取下来的数据。
其它常见问题
①使用Flume拉取文件到HDFS中会遇到将文件分散成多个1KB-5KB的小文件的问题:
需要注意的是如果遇到Flume会将拉取过来的文件分成很多份1KB-5KB的小文件存储到HDFS上,那么很可能是HDFS Sink的配置不正确,导致系统使用了默认配置。spooldir类型的source是将指定目录中的文件的每一行封装成一个event放入到channel中,默认每一行最大读取1024个字符。在HDFS Sink端主要是通过rollInterval(默认30秒), rollSize(默认1KB), rollCount(默认10个event)3个属性来决定写进HDFS的分片文件的大小。rollInterval表示经过多少秒后就将当前.tmp文件(写入的是从channel中过来的events)下沉到HDFS文件系统中,rollSize表示一旦.tmp文件达到一定的size后,就下沉到HDFS文件系统中,rollCount表示.tmp文件一旦写入了指定数量的events就下沉到HDFS文件系统中。
②使用Flume拉取到HDFS中的文件格式错乱:
这是因为HDFS Sink的配置中,hdfs.writeFormat属性默认为“Writable”会将原先的文件的内容序列化成HDFS的格式,应该手动设置成hdfs.writeFormat=“text”; 并且hdfs.fileType默认是“SequenceFile”类型的,是将所有event拼成一行,应该该手动设置成hdfs.fileType=“DataStream”,这样就可以是一行一个event,与原文件格式保持一致。
应用层代码部署到分布式mycluster1
把前端工程放到hadoop01的/usr/local目录下harFront因为nginx服务在hadoop01这个机器上,实现动静分离,让nginx处理静态文件,所以只能放到hadoop01服务器指定路径下构建集群测试环境参照nginx.conf和tomcat的配置文件server.xml并在mysql的配置文件/etc/my.cnf下加入编译格式utf-8来解决中文乱码问题把后台打包成war,放到五台集群服务器的tomcat的webapps上,重启tomcat,可看到tomcat解压的后台工程。
windows本地系统需要在C:\Windows\System32\drivers\etc目录下的hosts配置域名来切换本地环境和测试环境pom.xml引入包因为以后服务层预算使用spring-cloud,所以目前只使用[大数据包+java源生]开发,之后引入spring-cloud之后,再大数据包+spring-cloud包组合开发hive有些包不能导入pom.xml中会报错,需要添加外部包。
以下是hadoop构建离线处理的第一步--采集数据:
采集数据有很多种方法:
比如采集日志可以用开源框架flume,可以用js写出埋点代码进行采集
比如可以做一个爬虫来来抓取网页的各种信息:
做爬虫也可以采用搜索引擎框架,比如Nutch,也可以自己手写爬虫,比如用python语言由于Nutch框架入手难度较大,所以本次离线暂时采用python写一条简单的网络爬虫来采集数据
以后会在采集数据这个模块使用:Flume+Kafka+Nutch+源生python
数据采集(Flume采集nginx日志)
首先需要了解:
nginx服务所在目录/usr/local/nginx,它的输出日志为logs/access.log
配置设定:flume每小时对nginx数据释放一次上传到hdfs,格式为YY-MM-DD格式.log文件由于是测试,此处选择每一小时自动释放一次,可理解成每小时截断一次。详细配置参照flume定时删除HDFS中过期文件:https://www.cnblogs.com/mengrennwpu/p/6114505.html删除hdfs的logdfs目录下所有文件:bin/hdfs -rm -r /home/hdfs/flume/logdfs/*
此处flume上传给hdfs的文件都是小文件,改变成大些的文件方法参照:
清空文件内容:echo > filename
http://blog.csdn.net/simonchi/article/details/43231891
http://www.it610.com/article/2107322.htm
https://www.cnblogs.com/gxgd/p/7840896.html
https://www.linuxidc.com/Linux/2014-03/98555.htm
☆☆☆☆https://blog.csdn.net/simonchi/article/details/43231891
各参数讲解:http://lxw1234.com/archives/2015/10/527.htm
最终小文件问题解决:
加入以下是关键,详解参照:https://blog.csdn.net/kntao/article/details/49278239
collector2.sinks.k1.hdfs.round=true
collector2.sinks.k1.hdfs.roundValue=3
collector2.sinks.k1.hdfs.roundUnit=minute
采集后的数据存储在hdfs的:
隔一个小时生产一个.log文件
数据采集后的存在hdfs的/home/hdfs/flume/logdfs目录下
Visits数据分析
1)nginx日志字段说明
10.10.100.14 - - [31/May/2018:15:29:50 +0800] "GET /harbour/dispatch_order/getDispatchStatusByShipId?ship_id=231 HTTP/1.1" 200 11 "http://hadoop01/html/hjh_harbour_html_dispatch_management.html" "Mozilla/5.0 (Windows NT 10.0; WOW64) AppleWebKit/537.36 (KHTML, like Gecko) Chrome/66.0.3359.181 Safari/537.36"
格式分析:
1、访客ip地址:10.10.100.14
2、访客用户信息:- -
3、请求时间:[31/May/2018:15:29:50 +0800]
4、请求方式:GET
5、请求的url:/harbour/dispatch_order/getDispatchStatusByShipId?ship_id=231
6、请求所用协议:HTTP/1.1
7、响应码:200
8、返回的数据流量:11
9、访客的来源url:http://hadoop01/html/hjh_harbour_html_dispatch_management.html
10、访客所用浏览器:Mozilla/5.0 (Windows NT 10.0; WOW64) AppleWebKit/537.36 (KHTML, like Gecko) Chrome/66.0.3359.181 Safari/537.36
2)数据模型建立
要对数据仓库中数据进行数据分析,首先需要构建数据仓库的ODS(OperationalData Store)层,数据建模目前可能比较陌生,先了解下数据建模的几种常见方法:
①星型模型
星型模型是数据集市维度建模中推荐的建模方法。星型模型是以事实表为中心,所有的维度表直接连接在事实表上,像星星一样。星型模型的特点是数据组织直观,执行效率高。因为在数据集市的建设过程中,数据经过了预处理,比如按照维度进行了汇总,排序等等,数据量减少,执行的效率就比较高。

②雪花模型
雪花模型也是维度建模中的一种选择。雪花模型的维度表可以拥有其他维度表的,虽然这种模型相比星型模型更规范一些,但是由于这种模型不太容易理解,维护成本比较高,而且性能方面需要关联多层维表,性能也比星型模型要低。所以一般不是很常用。

③范式建模
范式建模是在数据库建模中使用的建模方法,特点是体系化,扩展性好,避免冗余,避免更新异常。所以,在数据仓库的EDW层建模中,我们也提倡使用第三范式建模。但是数据仓库的集成和反映历史变化的特征意味着数据量非常之大,表和表之间的关联效率比较低,所以有些时候完全规范的范式建模并不是最好的选择,通常我们会选择非规范化处理,增加一些冗余的字段来避免表之间关联的次数,这样会节约大量的时间。
④星座模型
星座模型是星型模型延伸而来,星型模型是基于一张事实表的,而星座模型是基于多张事实表的,而且共享维度信息。 通过构建一致性维度,来建设星座模型,也是很好的选择。比如同一主题的细节表和汇总表共享维度,不同主题的事实表,可以通过在维度上互相补充来生成可以共享的维度。

本次使用星型模型来构建数据仓库的ODS(OperationalData Store)层:下面的命令我们可以通过启动Hive的hiveserver2服务器并使用beeline客户端进行操作或者直接写脚本去定时调度。
PageViews
Visits

eclipse执行MR程序,出现错误:
Permission denied: user=Admin, access=EXECUTE, inode="/tmp":root:supergroup:drwx------
windows用户没有hdfs执行权限:
hdfs dfs -chmod -R 777 /tmp
递归加权限~~
再次在eclipse中执行清洗,出现错误:
[2018-06-12 10:39:12.272]Container exited with a non-zero exit code 1. Error file: prelaunch.err.
Last 4096 bytes of prelaunch.err :
/bin/bash: line 0: fg: no job control
此错误的意思就是在windows中跑linux环境,找不到job,需要加入以下配置,此配置只在eclipse的mapred-site.xml配置文件中加!
<property>
<name>mapred.remote.os</name>
<value>Linux</value>
<description>Remote MapReduce framework's OS, can be either Linux or Windows</description>
</property>
<property>
<name>mapreduce.app-submission.cross-platform</name>
<value>true</value>
</property>
之前在eclipse跑wordCount.java时候,在http://hadoop02:8088/cluster侧没有记录的原因是wordcount跑的是单机版,没走配置文件,没走yarn,所以没有记录。

Error: java.lang.RuntimeException: java.lang.ClassNotFoundException: Class com.hjh.datacenter.mapreduce.nginx.NginxLogCleanMR$CleanMap not found

此错误和警告是因为没setjar包导致的,代码中添加:conf.set("mapred.jar", "NginxLogCleanMR.jar");把打好的jar包放在工程的跟目录下,此问题即可解决。
注意:
如果在eclipse的src/main/resources中copy linux系统hadoop的配置文件,配置文件会加载,模拟真实的linux的hadoop系统,所以会找相应jar包如果eclipse的src/main/resources中不copy linux系统hadoop的配置文件,则表示eclipse中的代码不走hadoop环境,所以需要把input路径和output路径指定固定的hdfs://hadoop01:9820/home/hdfs/flume/logdfs/的路径才能找到,这样就不需要找jar包,但是这样也没通过yarn,所以在http://hadoop02:8088/cluster中也看不到跑的任务
注1:在指令中LOCAL关键字用于指定数据从本地加载,如果去掉该关键字,默认从HDFS进行加载!OVERWRITE关键字指定使用覆盖方式进行加载数据,否则使用附加方式进行加载。
注2:如果数据加载到分区表,则必须指定分区列。
所以两种写法,如果不想在eclipse中加入hadoop配置文件,则在代码中需要有改变,比如NginxLogCleanMR.java其它代码一直,只是在main方法中有所改变
public static void main(String[] args) throws Exception {
Configuration conf = new Configuration();
// conf.set("fs.defaultFS", "hdfs://mycluster1");
// conf.set("mapred.jar", "NginxLogCleanMR.jar");
// System.setProperty("HADOOP_USER_NAME", "root");
Job job = Job.getInstance(conf, "NginxLogCleanMR");
job.setJarByClass(NginxLogCleanMR.class);
job.setMapperClass(CleanMap.class);
job.setMapOutputKeyClass(Text.class);
job.setMapOutputValueClass(NullWritable.class);
Date curDate = new Date();
SimpleDateFormat sdf = new SimpleDateFormat("yyyyMMdd");
String dateStr = sdf.format(curDate);
// String inputPath = "/home/hdfs/flume/logdfs" + dateStr + "/*";
String inputPath = "hdfs://hadoop01:9820/home/hdfs/flume/logdfs/20180608/*";
String outputPath = "hdfs://hadoop01:9820/home/hdfs/flume/cleanlogs/" + dateStr + "/";
FileInputFormat.setInputPaths(job, new Path(inputPath));
FileOutputFormat.setOutputPath(job, new Path(outputPath));
boolean res = job.waitForCompletion(true);
System.exit(res ? 0 : 1);
}
如果在eclipse中加入hadoop配置文件,需要在NginxLogCleanMR.java中的main方法中改成
public static void main(String[] args) throws Exception {
Configuration conf = new Configuration();
conf.set("fs.defaultFS", "hdfs://mycluster1");
conf.set("mapred.jar", "NginxLogCleanMR.jar");
System.setProperty("HADOOP_USER_NAME", "root");
Job job = Job.getInstance(conf, "NginxLogCleanMR");
job.setJarByClass(NginxLogCleanMR.class);
job.setMapperClass(CleanMap.class);
job.setMapOutputKeyClass(Text.class);
job.setMapOutputValueClass(NullWritable.class);
Date curDate = new Date();
SimpleDateFormat sdf = new SimpleDateFormat("yyyyMMdd");
String dateStr = sdf.format(curDate);
// String inputPath = "/home/hdfs/flume/logdfs" + dateStr + "/*";
String inputPath = "/home/hdfs/flume/logdfs/20180608/*";
String outputPath = "/home/hdfs/flume/cleanlogs/" + dateStr + "/";
FileInputFormat.setInputPaths(job, new Path(inputPath));
FileOutputFormat.setOutputPath(job, new Path(outputPath));
boolean res = job.waitForCompletion(true);
System.exit(res ? 0 : 1);
}
并把工程打的包NginxLogCleanMR.jar放在工程根目录下。这样就可以在http://hadoop02:8088/cluster看到执行的任务
把NginxLogCleanMR.jar包放到linux集群中执行:
bin/hadoop jar /usr/software/hadoop-3.0.1/NginxLogCleanMR.jar com.hjh.datacenter.mapreduce.nginx.NginxLogCleanMR
bin/hadoop jar /usr/software/hadoop-3.0.1/NginxLogCleanMR.jar com.hjh.datacenter.mapreduce.nginx.NginxLogSessionMR
bin/hadoop jar /usr/software/hadoop-3.0.1/NginxLogCleanMR.jar com.hjh.datacenter.mapreduce.nginx.PageViewsMR
bin/hadoop jar /usr/software/hadoop-3.0.1/NginxLogCleanMR.jar com.hjh.datacenter.mapreduce.nginx.VisitsInfoMR
注:如果在eclipse的环境中把mapred-site.xml配置文件的mapreduce.framework.name设定为yarn-tez,会导致eclipse运行出错,所以eclipse中的mapred-site.xml需要设定mapreduce.framework.name为yarn,然后将工程打包放到linux集群中执行,而linux集群中配置成yarn-tez即可,执行的引擎就为yarn-tez
MapReduce程序,遇到一个问题,map跑完reduce重写方法跑不进去,原因是:
extends Reducer<Text, IntWritable, Text, IntWritable>类中第二个参数需要与extends Mapper<Object, Text, Text, IntWritable>类中第四个参数一致14/Jun/2018:11:40:06 此时间格式:dd/MMM/yyyy:HH:mm:ss
①编写完成四个日志清洗类,日志分析类
NginxLogCleanMR,NginxLogSessionMR,PageViewsMR,VisitsInfoMR
NginxLogAnalysis.java,NginxSessionAnalysis.java,PageViewsAnalysis.java,VisitsInfoAnalysis.java
详细参照我上传的资源:https://download.csdn.net/my
启用桶表,自动控制上一轮reduce的数量从而适配bucket的个数也可以自主设置mapred.reduce.tasks去适配bucket个数推荐使用set hive.enforce.bucketing=true;最终输出结果压缩
set hive.enforce.bucketing=true;
set hive.exec.compress.output=true;
set mapred.output.compress=true;
set hive.mapred.mode=strict; //设置mapreduce模式为严格模式,默认是nonstrict模式
②在hive数据库中创建pageViews相应的数据库表,并导入hdfs中清洗之后的数据
a.先创建PageViews的贴源数据表
分桶表的数据不是直接导入(load)的,是从其他表里面查出来插入的,插入时会在语句中加入约束的语句。
所以先创建一个中间表:
create table pageviews_tmp(session string,ip string,requestdate string,requesttime string,visitpage string, staytime string,step string) comment 'this is the table for pageviews' partitioned by(inputDate string) row format delimited fields terminated by ' ';
load data inpath '/home/hdfs/flume/pageviews/20180614/' overwrite into table pageviews_tmp partition(inputDate='20180614');
如果没有标示是在'Local'本地文件系统中,则会去HDFS中加载数据
select * from pageviews_tmp where inputDate='20180614';验证导入数据成功
select * from pageviews_tmp where step='13744';验证导入数据成功
create table pageviews(session string,ip string,requestdate string,requesttime string,visitpage string, staytime string,step string) comment 'this is the table for pageviews' partitioned by(inputDate string) clustered by(session) sorted by(requestdate,requesttime) into 4 buckets row format delimited fields terminated by ' ';
将中间表中的数据导入到HIVE的PageViews贴源数据表中
insert overwrite table pageviews partition(inputDate='20180614') select session,ip,requestdate,requesttime,visitpage,staytime,step from pageviews_tmp where inputDate='20180614' cluster by session;
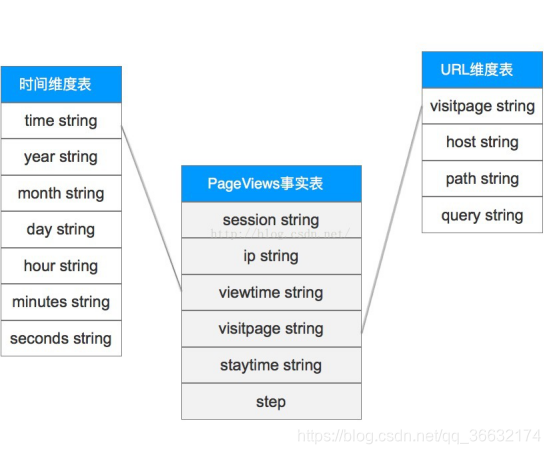
b.根据具体的业务分析逻辑创建ODS层的PageViews事实表,并从PageViews的贴源表中导入数据
create table ods_pageviews(session string,ip string,viewtime string,visitpage string, staytime string,step string) partitioned by(inputDate string) clustered by(visitpage) sorted by(viewtime) into 4 buckets row format delimited fields terminated by ' ';
导入PageViews贴源数据表数据:
insert into table ods_pageviews partition(inputDate='20180614') select pv.session,pv.ip,concat(pv.requestdate,"-",pv.requesttime),pv.visitpage,pv.staytime,pv.step from pageviews as pv where pv.inputDate='20180614';
c.创建PageViews事实表的时间维度表并从当天的事实表里导入数据
create table ods_dim_pageviews_time(pvtime string,year string,month string,day string,hour string,minutes string,seconds string) partitioned by(inputDate String) clustered by(year,month,day) sorted by(pvtime) into 4 buckets row format delimited fields terminated by ' ';
insert overwrite table ods_dim_pageviews_time partition(inputDate='20180614') select distinct pv.viewtime, substring(pv.viewtime,0,4),substring(pv.viewtime,6,2),substring(pv.viewtime,9,2),substring(pv.viewtime,12,2),substring(pv.viewtime,15,2),substring(pv.viewtime,18,2) from ods_pageviews as pv;
d.创建PageViews事实表的URL维度表并从当天的事实表里导入数据
create table ods_dim_pageviews_url(visitpage string,host string,path string,query string) partitioned by(inputDate string) clustered by(visitpage) sorted by(visitpage) into 4 buckets row format delimited fields terminated by ' ';
insert into table ods_dim_pageviews_url partition(inputDate='20180614') select distinct pv.visitpage,b.host,b.path,b.query from pageviews pv lateral view parse_url_tuple(concat('http://hadoop01',pv.visitpage),'HOST','PATH','QUERY') b as host,path,query;
查询每天PV总数前20的页面:
select op.visitpage as path,count(*) as num from ods_pageviews as op join ods_dim_pageviews_url as opurl on (op.visitpage = opurl.visitpage) join ods_dim_pageviews_time as optime on (optime.pvtime = op.viewtime) where optime.year='2018' and optime.month='06' and optime.day='14' group by op.visitpage sort by num desc limit 20;

利用sqoop将计算后查询结果导入到mysql
从hive到出数据到mysql,实际上hive表不能直接导出数据到mysql,hive数据先到出数据到hdfs,再从hdfs导出到mysql
所以,执行查询后,结果输出到hdfs指定路径下:
insert overwrite directory '/user/sqoop/mysql' row format delimited fields terminated by '\t' stored as textfile select op.visitpage as path,count(*) as num from ods_pageviews as op join ods_dim_pageviews_url as opurl on (op.visitpage = opurl.visitpage) join ods_dim_pageviews_time as optime on (optime.pvtime = op.viewtime) where optime.year='2018' and optime.month='06' and optime.day='14' group by op.visitpage sort by num desc limit 20;
mapreduce操作汇总的结果,默认的分隔符是 '\001',否则如果是从HDFS文件导入的则分隔符则应该是'\t'。此处我是hive执行mapreduce分析汇总的结果,所以默认的分隔是'\001'。
从HIVE分区表导入到MySQL,需要依次导入每个分区的数据:(进入$sqoop_home/bin路径下)
sqoop export --connect jdbc:mysql://hadoop01:3306/harbour_user_db --table pv_num --username root -P --hive-partition-key inputDate --hive-partition-value '20180614' --export-dir /user/sqoop/mysql --driver com.mysql.jdbc.Driver --input-fields-terminated-by '\t' --lines-terminated-by '\n'
导入mysql成功!!
e.创建Visits信息的贴源数据表
create table visitsinfo(session string,startdate string,starttime string,enddate string,endtime string,entrypage string,leavepage string,viewpagenum string,ip string,referal string) partitioned by(inputDate string) clustered by(session) sorted by(startdate,starttime) into 4 buckets row format delimited fields terminated by ' ';
将HDFS中的数据导入到HIVE的Visits信息贴源数据表中
f.根据具体的业务分析逻辑创建ODS层的Visits事实表,并从visitsinfo的贴源表中导入数据
create table ods_visits(session string,entrytime string,leavetime string,entrypage string,leavepage string,viewpagenum string,ip string,referal string) partitioned by(inputDate string) clustered by(session) sorted by(entrytime) into 4 buckets row format delimited fields terminated by ' ';
g.创建Visits事实表的时间维度表并从当天的事实表里导入数据
create table ods_dim_visits_time(vtime string,year string,month string,day string,hour string,minutes string,seconds string) partitioned by(inputDate String) clustered by(year,month,day) sorted by(vtime) into 4 buckets row format delimited fields terminated by ' ';
h.创建visits事实表的URL维度表并从当天的事实表里导入数据
create table ods_dim_visits_url(pageurl string,host string,path string,query string) partitioned by(inputDate string) clustered by(pageurl) sorted by(pageurl) into 4 buckets row format delimited fields terminated by ' ';
大数据离线自动执行流程--基于jenkins
1)系统管理->系统设置
用SSH把其它节点连接上

2)写好离线流程的shell
需要写五个shell:
1.列出shell执行步骤
需要验证以下环境:jdk和tomcat不需要验证,因为要能运行jenkins首先需要有jdk和tomcat
①zookeeper集群启动②hadoop集群环境(hdfs+yarn的启动)③flume集群环境④hive⑤mysql集群⑥sqoop验证
在hadoop01节点:/usr/software/shell目录下创建shell:
1.zookeeper集群是否启动,如果未启动执行集群启动
2.hadoop集群是否启动,如果未启动执行集群启动
3.flume集群是否启动,如果未启动执行flume集群启动
4.hive是否启动,如果未启动执行hive启动
5.mysql集群是否启动(包括管理节点+数据存储节点+server节点),如果未启动执行mysql-cluster启动
zookeeper集群批量启动+批量关闭shell:
写shell之前需要了解一些概念:交互式shell和非交互式shell、登录shell和非登录shell
交互式shell:
在终端上执行,shell等待你的输入,并且立即执行你提交的命令。这种模式被称作交互式是因为shell与用户进行交互。这种模式也是大多数用户非常熟悉的:登录、执行一些命令、退出。当你退出后,shell也终止了。
非交互式shell:
以shell script(非交互)方式执行。在这种模式 下,shell不与你进行交互,而是读取存放在文件中的命令,并且执行它们。当它读到文件的结尾EOF,shell也就终止了。
登录shell:
是需要用户名、密码登录后才能进入的shell(或者通过--login”选项生成的shell)。
非登录shell:
当然就不需要输入用户名和密码即可打开的Shell,例如:直接命令“bash”就是打开一个新的非登录shell,在Gnome或KDE中打开一个“终端”(terminal)窗口程序也是一个非登录shell。
总结:
对于Bash来说,登录shell(包括tty1~tty6登录shell和使用“--login”选项的交互shell),它会首先读取和执行/etc/profile全局配置文件中的命令,然后依次查找~/.bash_profile、~/.bash_login 和 ~/.profile这三个配置文件,读取和执行这三个中的第一个存在且可读的文件中命令。在非登录shell里,只读取~/.bashrc(和 /etc/bash.bashrc、/etc/bashrc )文件,不同的发行版里面可能有所不同。进入shell脚本专有目录:cd /usr/software/shell
2.zookeeper集群启动+停止shell
创建zookeeper批量执行脚本(启动+停止):touch zk-cluster.sh
为该shell添加执行权限:chmod u+x zk-cluster.sh
./zk-cluster.sh start
#!/bin/bash
iparray=(hadoop01 hadoop02 hadoop03 hadoop04 hadoop05)
user="root"
echo "$1"
if [ $1 = "start" ]
then
cmd="/usr/software/zookeeper-3.4.11/bin/zkServer.sh start"
fi
if [ $1 = "stop" ]
then
cmd="/usr/software/zookeeper-3.4.11/bin/zkServer.sh stop"
fi
cmd2="jps"
for ip in ${iparray[*]}
do
echo "ssh to $ip"
ssh $user@$ip "$cmd"
echo "jps:"
ssh $user@$ip "$cmd2"
echo
done
ssh -t :就是可以提供一个远程服务器的虚拟tty终端,加上这个参数我们就可以在远程服务器的虚拟终端上输入自己的提权密码了,非常安全,由于集群已经配置过无需密码联机了,所以不需要添加-t
验证程序是否启动,先做一个样例shell:test.sh,为该shell添加执行权限chmod u+x test.sh
#!/bin/bash
b=$(jps) #把jps命令执行结果赋予一个变量b
echo "${b}" #打印出是否赋予成功
if [[ "$b" =~ "NameNode" ]] #利用字符串运算符 =~ 直接判断字符串"$b"中是否包含"NameNode"
#if [[ "$b" =~ "NameNode" && "$b" =~ "Jps"]]
then 注:与[[和]]之间一定要有一个半角空格
echo "包含" #如果条件成立则包含
else
echo "不包含" #如果条件不成立则不包含
fi
Bash Shell脚本根据进程名获取进程pid:
方法一:
脚本名:tesh.sh
#! /bin/bash
process=$1
pid=$(ps -ef | grep $process | grep '/bin/java' | grep -v grep | awk '{print $2}')
echo $pid
执行方式:./tesh.sh myprocessName
方法二:
echo `jps |grep myprocessName|awk '{print $1}'`
或
echo $(jps |grep myprocessName|awk '{print $1}')
在bash中,$( )与` `(反引号)都是用来作命令替换的。
3.flume集群启动+停止shell
创建flume批量执行脚本(启动+停止):touch flume-cluster.sh
为该shell添加执行权限:chmod u+x flume-cluster.sh
关闭flume方法就是杀死flume启动后对应的进程Application
执行flume启动或停止就是在shell后面加上start、stop参数,即可代表开始flume集群和停止flume集群
注:
①由于flume原生启动shell不是在后台运行,并且启动成功后处于悬挂状态,使用ctrl+c可以直接终止程序,这样会导致集群启动时无法持续多台启动,而且直接ctrl+c快捷键直接停止程序使程序不安全,所以此集群shell采用nohup方法,使启动在后端启动,让程序启动安全并且可以集群多台持续启动
②当用ssh远程执行命令时,不识别$,所以需要反编译
在kill -9 \$(jps |grep Application|awk '{print \$1}')的$前面加\反斜杠,否则不识别
./flume-cluster.sh start
#!/bin/bash
iparray=(hadoop04 hadoop05 hadoop01)
user="root"
echo "$1..."
if [ $1 = "start" ]
then
cmd_collector1="nohup /usr/software/flume/bin/flume-ng agent -n collector1 -c conf -f /usr/software/flume/conf/flume-server.properties -Dflume.root.logger=INFO,console > /usr/software/shell-script/nohup.out 2>&1 &"
cmd_collector2="nohup /usr/software/flume/bin/flume-ng agent -n collector2 -c conf -f /usr/software/flume/conf/flume-server.properties -Dflume.root.logger=INFO,console > /usr/software/shell-script/nohup.out 2>&1 &"
cmd_agent1="nohup /usr/software/flume/bin/flume-ng agent -n agent1 -c conf -f /usr/software/flume/conf/flume-client.properties -Dflume.root.logger=INFO,console > /usr/software/shell-script/nohup.out 2>&1 &"
cmd2="jps"
for ip in ${iparray[*]}
do
echo "ssh to $ip"
if [ $ip = "hadoop04" ]
then
echo "$ip collector1...start"
ssh $user@$ip "cd /usr/software/flume/; $cmd_collector1"
sleep 5
echo "$ip collector1...end"
fi
if [ $ip = "hadoop05" ]
then
echo "$ip collector2...start"
ssh $user@$ip "$cmd_collector2"
sleep 5
echo "$ip collector2...end"
fi
if [ $ip = "hadoop01" ]
then
echo "$ip agent1...start"
ssh $user@$ip "$cmd_agent1"
sleep 5
echo "$ip agent1...end"
fi
echo "jps:"
ssh $user@$ip "$cmd2"
echo
done
fi
if [ $1 = "stop" ]
then
cmd2="jps"
for ip in ${iparray[*]}
do
echo "ssh to $ip"
if [ $ip = "hadoop04" ]
then
echo "$ip collector1 kill...start"
ssh $user@$ip "kill -9 \$(jps |grep Application|awk '{print \$1}')"
sleep 2
echo "$ip collector1 kill...end"
fi
if [ $ip = "hadoop05" ]
then
echo "$ip collector2 kill...start"
ssh $user@$ip "kill -9 \$(jps |grep Application|awk '{print \$1}')"
sleep 2
echo "$ip collector2 kill...end"
fi
if [ $ip = "hadoop01" ]
then
echo "$ip agent1 kill...start"
ssh $user@$ip "kill -9 \$(jps |grep Application|awk '{print \$1}')"
sleep 2
echo "$ip agent1 kill...end"
fi
echo "jps:"
ssh $user@$ip "$cmd2"
echo
done
fi
4.mysql-cluster启动+停止shell
参照URL:
https://www.jb51.net/article/75614.htm
https://www.linuxidc.com/Linux/2015-11/125327.htm
https://www.jb51.net/article/85747.htm
https://www.2cto.com/net/201605/513371.html
5.初始化环境shell
创建初始化环境shell:
touch initialEnv.sh
#!/bin/bash
export BASE_HOME=/usr/software
export ZOOKEEPER_HOME=${BASE_HOME}/zookeeper-3.4.11
export HADOOP_HOME=${BASE_HOME}/hadoop-3.0.1
export FLUME_HOME=${BASE_HOME}/flume
export HIVE_HOME=${BASE_HOME}/hive
export SQOOP_HOME=${BASE_HOME}/sqoop
export MYSQL_HOME=/usr/local/mysql
#start hdfs
${HADOOP_HOME}/sbin/start-dfs.sh
#start yarn [[ 0 == $? ]]上一个程序是否执行成功
if [[ 0 == $? ]]
then
/home/ymh/apps/hadoop-2.6.4/sbin/start-yarn.sh
fi
#start flume
#if [[ 0 == $? ]]
#then
#start flume
#$nohup ~/apache-flume-1.6.0-bin/bin/flume-ng agent -n agent -c conf -f ~/apache-flume-1.6.0-bin/conf/flume-conf.properties &
#fi
#start mysql
if [ 0 = $? ]
then
service mysqld start
fi
#start HIVE SERVER
if [ 0 = $? ]
then
$nohup /apps/apache-hive-1.2.1-bin/bin/hiveserver2 &
fi
6.执行离线计算流程shell
此流程中,hive中的表和mysql中表需要手动提前创建完成,所以创建数据库表不在shell中完成
上一步验证完环境之后,flume也在上一步中启动,此步骤进行离线步骤构建:
①flume采集后数据存储在hdfs②执行MapReduce对采集后数据进行清洗
③把清洗后数据导入hive中间表④从hive中间表中把数据插入hive贴源数据表
⑤再分别导入hive的PageViews事实表的时间维度表
⑥再分别导入hive的PageViews事实表的URL维度表
⑦查询每天PV总数前20的页面,并把查询结果保存在HDFS
⑧用sqoop把查询后结果导入mysql
7.把定时shell配置到jenkins


