一、简述
spring security是spring家族的一个安全认证的东西,在spring boot中只要导入maven就行了。该功能可以认证安全登陆的问题,通过连接数据库,拿到用户和密码后验证。还具有等级验证功能,比如VIP1访问VIP3的网页,会弹出错误(怎么弹出其他的还在研究中)。
二、使用方法
- 1、引入
SpringSecurity; - 2、编写SpringSecurity的配置类;
@EnableWebSecurityextends WebSecurityConfigurerAdapter
configure(HttpSecurity http) - 3、控制请求的访问权限:
configure(AuthenticationManagerBuilder auth) - 4、定义认证规则:
- 5、开启自动配置的登陆功能:
http.formLogin(); - 6、注销:http.logout();
- 7、记住我:Remeberme();
1、引入SpringSecurity
<dependency>
    <groupId>org.springframework.boot</groupId>
    <artifactId>spring-boot-starter-security</artifactId>
</dependency>
2、一个HTML的例子
直接用视频中的例子,结构是这样的
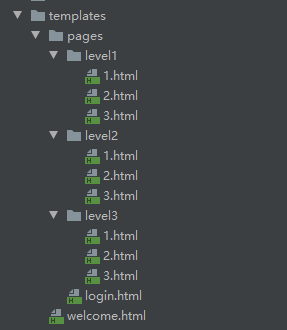

里面的level1/1.html,就是普通武功秘籍中的罗汉拳,level2就是高级武功秘籍,如此类推
然后一个控制类,用来接受请求并且返回某个页面(因为用到了thymeleaf)
KungfuController.java:
@Controller
public class KungfuController {


	private final String PREFIX = "pages/";
	/**
	 * 欢迎页
	 * @return
	 */
	@GetMapping("/")
	public String index() {


		return "welcome";
	}

	/**
	 * 登陆页
	 * @return
	 */
	@GetMapping("/userlogin")
	public String loginPage() {


		return PREFIX+"login";
	}


	/**
	 * level1页面映射
	 * @param path
	 * @return
	 */
	@GetMapping("/level1/{path}")
	public String level1(@PathVariable("path")String path) {


		return PREFIX+"level1/"+path;
	}

	/**
	 * level2页面映射
	 * @param path
	 * @return
	 */
	@GetMapping("/level2/{path}")
	public String level2(@PathVariable("path")String path) {


		return PREFIX+"level2/"+path;
	}

	/**
	 * level3页面映射
	 * @param path
	 * @return
	 */
	@GetMapping("/level3/{path}")
	public String level3(@PathVariable("path")String path) {


		return PREFIX+"level3/"+path;
	}


}
3、编写SpringSecurity的配置类
配置类继承WebSecurityConfigurerAdapter,在类前注解@EnableWebSecurity,该注解包含了@Configuration。
里面有个configure(HttpSecurity http)方法,在里面写授权规则
@EnableWebSecurity
public class MySecurityConfig extends WebSecurityConfigurerAdapter {


    @Override
    protected void configure(HttpSecurity http) throws Exception {


        //定制申请的授权规则
        http.authorizeRequests()
        		.antMatchers("/").permitAll()
                .antMatchers("/level1/**").hasRole("VIP1")
                .antMatchers("/level2/**").hasRole("VIP2")
                .antMatchers("/level3/**").hasRole("VIP3");

        http.formLogin();
    }
}
@EnableWebSecurity:开启spring boot的安全模式- 一定要继承
WebSecurityConfigurerAdapter configure(HttpSecurity http)方法里面写定制的授权规则http.authorizeRequests():跟着写就对了.antMatchers("/").permitAll():就是http://localhost:8080/ 啦,这个网站所有人都能访问,就是没有登陆的人也能访问.antMatchers("/level1/**").hasRole("VIP1"):请求为 /level1 下的所有请求,只能有VIP1 角色的人才能访问,否则就返回 403。以下的如此类推http.formLogin();:这个,包含了好多的东西- 开启自动配置登陆功能。
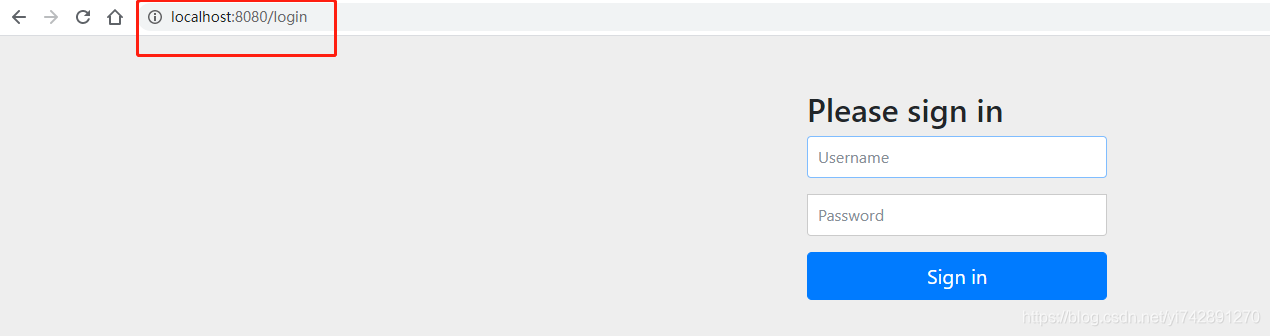
- 点进去一个要角色权限的网站,如果没有登陆,会跳转到
/login页面,这个页面如果没有写,就会进入spring boot自己创建的默认登陆页面。 - 如果登陆失败,重定向至
/login?error,以表示登陆失败 - 后续还可以进行更多的详细规定
4、控制请求的访问权限:
@EnableWebSecurity
public class MySecurityConfig extends WebSecurityConfigurerAdapter {


    //定义认证规则
    @Override
    protected void configure(AuthenticationManagerBuilder auth) throws Exception {


        //
        auth.inMemoryAuthentication().passwordEncoder(new BCryptPasswordEncoder())
                .withUser("123").password(new BCryptPasswordEncoder().encode("123")).roles("VIP1")
                .and()
                .withUser("456").password(new BCryptPasswordEncoder().encode("456")).roles("VIP1","VIP2")
                .and()
                .withUser("789").password(new BCryptPasswordEncoder().encode("789")).roles("VIP1","VIP2","VIP3");

    }
configure(AuthenticationManagerBuilder auth):什么人具有什么样的角色权限,都是在这里面写的auth.inMemoryAuthentication():把那些账号密码,写在内存中(因为没有进行数据库的连接),正常写的话,是通过连接数据库jdbcAuthentication()来写的(怎么通过数据库获得账号密码,还在学习中).passwordEncoder(new BCryptPasswordEncoder()):5.X以上的security,都要求我们输入密码的时候,使用的是密文的。设置这个函数,我们登陆的时候,密码自动通过Bcrypt编码加密。.withUser("123"):账号为123.password(new BCryptPasswordEncoder().encode("123")):password() 设置密码。密码要通过Bcrypt编码加密,所以要用到 new BCryptPasswordEncoder() ,.encode("123")就是配合BCxxx来使用的,让123,进行Bcrypt编码加密- 登陆的时候,输入账户123,密码123。因为开启输入密码自动通过Bcrypt编码加密,所以Java后台那里,通过
new BCryptPasswordEncoder().encode("123")使123也进行加密,然后两个加密的字符进行匹配,匹配对了,才进行登陆
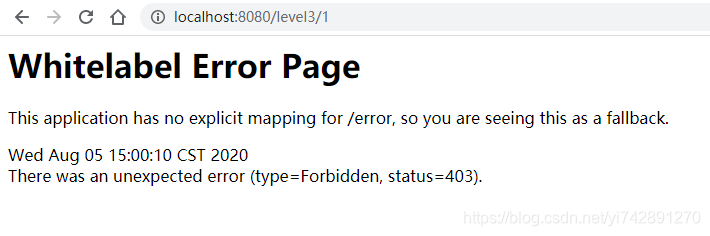
5、目前的登陆流程
随便点一个武功秘籍,就会自动跳转到登陆界面
输入密码后,比如456 ,456。拥有VIP2权限
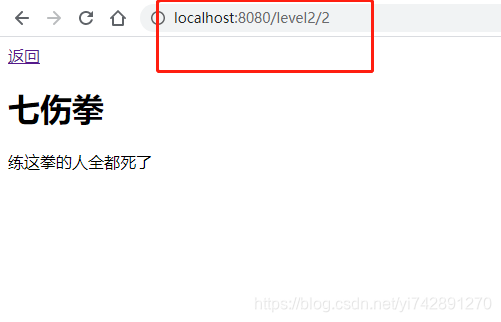
但是没有VIP3权限,点击绝世武功秘籍,会返回403
6、注销
protected void configure(HttpSecurity http) throws Exception {


	//xxx
	http.logout().logoutSuccessUrl("/");
	//xxx
}
- 开启自动配置的注销功能。
logout():访问 /logout 表示用户注销,必须是post请求,清空session,所以,HTML要写action地址与请求方式<form th:action="@{/logout}" method="post"> <input type="submit" value="注销"> </form>logoutSuccessUrl("/"):如果不写这个,注销成功了,会自动返回到/login,如果加了这个函数,那么注销成功后返回到自己定义的地址
7、权限控制
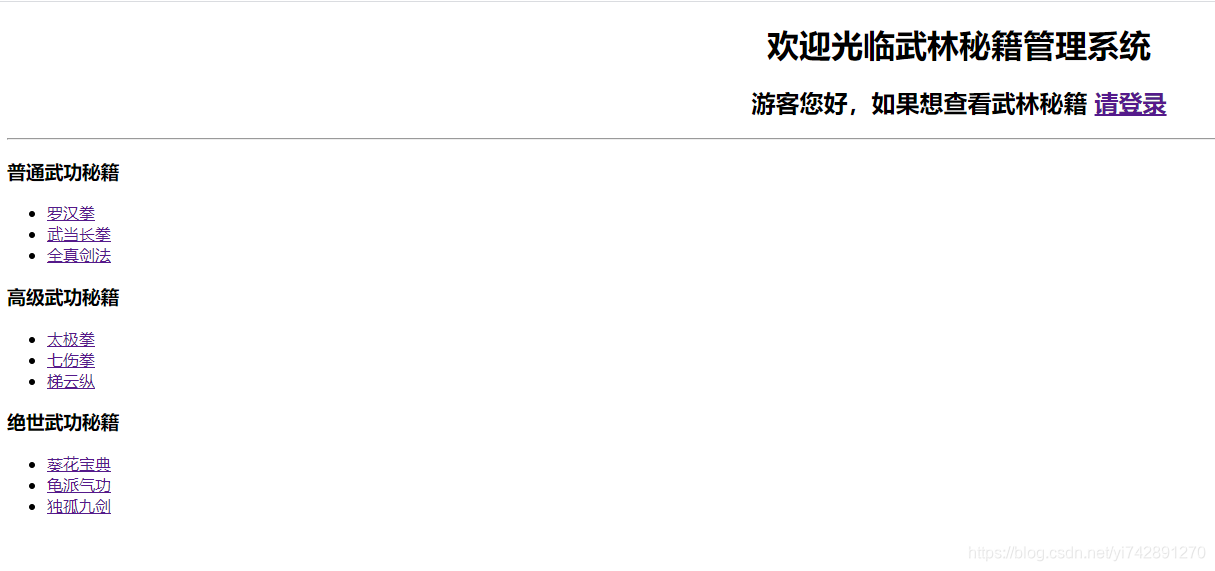
看下这个页面啊
不管我们有没有登陆,都会显示那个: 游客你好xxx,这很不符合逻辑嘛,登陆了肯定就不要显示这些东西啊。
还有,既然如果一个人没有VIP3权限,点VIP3的东西又会返回403,那么我一开始就让没有VIP3权限的人看不到不就好了吗
这里面,就涉及到了很多问题。
我们要通过修改html来进行显示的东西,好在,spring boot有自带的Spring Security和thymeleaf的maven,导入就行了
1)导入thymeleaf-extras-springsecurity5
<dependency>
<groupId>org.thymeleaf.extras</groupId>
<artifactId>thymeleaf-extras-springsecurity5</artifactId>
<version>3.0.4.RELEASE</version>
</dependency>
2)springsecurity在thymeleaf的HTML的语法
-
hasRole(),是否拥有某一个权限
-
hasAnyRole(),多个权限中有一个即可,如 hasAnyRole(“ADMIN”,“USER”)
-
hasAuthority(),Authority 和 Role 很像,唯一的区别就是 Authority 前缀多了 ROLE_ ,如 hasAuthority(“ROLE_ADMIN”) 等价于 hasRole(“ADMIN”) ,可以参考上面 IsUser.java 的写法
-
hasAnyAuthority(),同上,多个权限中有一个即可
-
permitAll(), denyAll(),isAnonymous(), isRememberMe(),通过字面意思可以理解
-
isAuthenticated(), isFullyAuthenticated(),判断是否已经登陆了。这两个区别就是isFullyAuthenticated()对认证的安全要求更高。例如用户通过记住密码功能登入到系统进行敏感操作,isFullyAuthenticated()会返回false,此时我们可以让用户再输入一次密码以确保安全,而 isAuthenticated() 只要是登入用户均返回true。
-
principal(), authentication(),例如我们想获取登入用户的id,可以通过principal() 返回的 Object 获取,实际上 principal() 返回的 Object 基本上可以等同我们自己编写的 CustomUser 。而 authentication() 返回的 Authentication 是 Principal 的父类,相关操作可看 Authentication 的源码。进一步了解可以看后面Controller编写中获取用户数据的四种方法
-
hasPermission(),参考字面意思即可
-
sec:authorize="":写在html元素中,双引号中写上面的表达式来使用。如
<div sec:authorize="isAuthenticated()"> </div>如果登陆了,这个div才生效
3)修改后的html
<!DOCTYPE html>
<html xmlns:th="http://www.thymeleaf.org"
xmlns:sec="http://www.thymeleaf.org/extras/spring-security"> <!--开启thymeleaf-extras-springsecurity得提示功能-->
<head>
<meta http-equiv="Content-Type" content="text/html; charset=UTF-8">
<title>Insert title here</title>
</head>
<body>
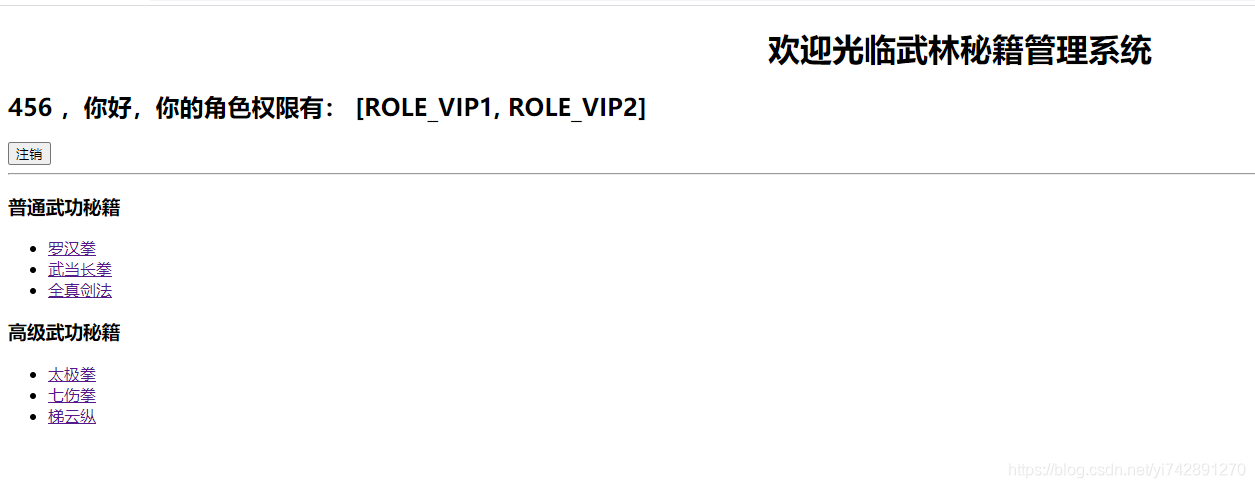
<h1 align="center">欢迎光临武林秘籍管理系统</h1>
<!--如果没有登陆的话-->
<div sec:authorize="!isAuthenticated()">
<h2 align="center">游客您好,如果想查看武林秘籍 <a th:href="@{/login}">请登录</a></h2>
</div>
<!--如果登陆的话-->
<div sec:authorize="isAuthenticated()">
<h2>
<span sec:authentication="name"></span>
,你好,你的角色权限有:
<span sec:authentication="principal.authorities"></span>
</h2>
<form th:action="@{/logout}" method="post">
	<input type="submit" value="注销">
</form>
</div>
<hr>
<div sec:authorize="hasRole('VIP1')">
<h3>普通武功秘籍</h3>
<ul>
<li><a th:href="@{/level1/1}">罗汉拳</a></li>
<li><a th:href="@{/level1/2}">武当长拳</a></li>
<li><a th:href="@{/level1/3}">全真剑法</a></li>
</ul>
</div>
<div sec:authorize="hasRole('VIP2')">
<h3>高级武功秘籍</h3>
<ul>
<li><a th:href="@{/level2/1}">太极拳</a></li>
<li><a th:href="@{/level2/2}">七伤拳</a></li>
<li><a th:href="@{/level2/3}">梯云纵</a></li>
</ul>
</div>
<div sec:authorize="hasRole('VIP3')">
<h3>绝世武功秘籍</h3>
<ul>
<li><a th:href="@{/level3/1}">葵花宝典</a></li>
<li><a th:href="@{/level3/2}">龟派气功</a></li>
<li><a th:href="@{/level3/3}">独孤九剑</a></li>
</ul>
</div>
</body>
</html>
- 第三行:开启thymeleaf-extras-springsecurity的提示功能
- 11行:
sec:authorize="!isAuthenticated()":sec:,表明这个元素用到了thymeleaf和springsecurity之间要用到的元素。authorize="",准备判断。!isAuthenticated(),如果没有登陆的话。合起来就是,当没有登陆的时候,这个元素才会显示出来 - 17行:
sec:authentication="name":当前登陆的账号名字是? - 19行:
sec:authentication="principal.authorities":当前账号拥有的角色权限是? - 28行:
sec:authorize="hasRole('VIP1')":判断。如果当前拥有角色VIP1 的时候,才会显示这个标签
4)效果
没有登陆的情况下,没有注销按钮,没有显示用户信息,也没有显示武功秘籍

登陆了一个账户,拥有VIP1和VIP2角色。没有显示VIP3角色对应的东西。显示当前用户名字和权限。并且游客访问消息
8、记住我
就在configure(HttpSecurity http)加一行代码,就OK了
http.rememberMe();
使用cookie进行保存,默认保存15天

9、定制页面
上面的那些,登陆,记住我之类的东西,都是spring boot的官方自动生成的前端样式,实际开发当然不能用默认的。
在控制类中看到
@GetMapping("/userlogin")
public String loginPage() {


	return PREFIX+"login";
}
1)改变要登陆的地方
GET请求方式的/userlogin,返回的是我们自定义的login.html页面
那么我们就要改
http.formLogin().loginPage("/userlogin");
loginPage():登陆的请求为什么
同时,也要概念前端中前往登陆的地方
2)登陆的请求
根据那个函数说明,定制了要去登陆界面请求为GET类型的userlogin请求。登陆验证什么东西的,是POST类型的userlogin请求。注意这里的userlogin,是因为我们用了loginPage()改变的,如果不改,他默认是login请求,而且我们不能用定制。
登陆界面
<!DOCTYPE html>
<html xmlns:th="http://www.thymeleaf.org">
<head>
<meta charset="UTF-8">
<title>Insert title here</title>
</head>
<body>
	<h1 align="center">欢迎登陆武林秘籍管理系统</h1>
	<hr>
	<div align="center">
		<form th:action="@{/userlogin}" method="post">
			用户名:<input name="user"/><br>
			密码:<input name="pwd"><br/>
			<input type="submit" value="登陆">
		</form>
	</div>
</body>
</html>
但是这样,还没有完成,因为是用你自己定制的页面,spring boot并不知道哪个框是账号哪个框是密码,所以还要加上两个函数。html的,我们知道登陆的name是user,密码的name是pwd。
http.formLogin().usernameParameter("user").passwordParameter("pwd").loginPage("/userlogin");//
usernameParameter():html中,账号的框的name为什么,密码的同理
如果没有usernameParameter和passwordParameter,那么默认认为账号框的name是username,密码框的name是password,那么我们改变html中的name就行了
3)自定义页面:记住我
还是在http中改
http.rememberMe().rememberMeParameter("remember");//记住我
rememberMeParameter():html中,记住我的框的name为什么
<!DOCTYPE html>
<html xmlns:th="http://www.thymeleaf.org">
<head>
<meta charset="UTF-8">
<title>Insert title here</title>
</head>
<body>
	<h1 align="center">欢迎登陆武林秘籍管理系统</h1>
	<hr>
	<div align="center">
		<form th:action="@{/userlogin}" method="post">
			用户名:<input name="user"/><br>
			密码:<input name="pwd"><br/>
			<input type="checkbox" name="remember">记住我 <br>
			<input type="submit" value="登陆">
		</form>
	</div>
</body>
</html>