先看看我做的登录页面的效果:

- 常用的登录页面就是校验用户名、密码、确认密码、勾选性别、个人描述等等。但是原理大同小异。校验这些条件的时候还需要考虑到用户的体验是否好。下面就以上的表单验证说说我的做法。
文章目录
1.前言
表单需要用到的知识点:CSS+div页面布局+js
2.页面背景图
页面背景图就是将原图片按照一定比列占满整个浏览器。
body {
				background-image: url(img/bg_268dc65.jpg);
				background-size: 100% 100%;
	 }
3.登录页面的布局
登录页面的布局始终固定在浏览器的中间位置。
.wrap {
				width: 500px;
				height: 450px;
				margin: 100px auto;
				text-align: center;
				background-color: #6c8cff;
				opacity: 0.8;
				border: 0px black solid;
	 }

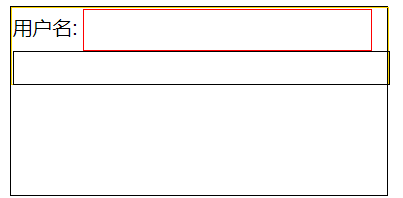
4.form表单的布局
现以一个input标签为例。其他标签依次类推的布局。
<!DOCTYPE html>
<html>
	<head>
		<meta charset="utf-8">
		<title></title>
		<style type="text/css">
			.wrap{


				width: 300px;
				height: 150px;
				border: 1px black solid;
			}
			.big{


				width: 100%;
				height: 60px;
				border: 1px gold solid;
			}
			#userBlur{


			/* input标签的宽度占div标签的75% 如果超过这个范围就会元素换行 */
				width: 75%;
				height:30px;
				border: 1px red solid;
			}
			#small{


				width: 100%;
				height: 25px;
				border: 1px black solid;
			}
		</style>
	</head>
	<body>
		<div class="wrap">
			<form action="#" method="get">
				<div class="big">
					<span>用户名:</span>
					<input type="text" name="username" value="" id="userBlur"/>
						<!-- 这个div标签是为了提示用户输入格式! -->
					<div id="small"></div>
				</div>
			</form>
		</div>
	</body>
</html>
下面展示我全部的登录布局代码:
- CSS代码
<style type="text/css">
			body {


				background-image: url(img/bg_268dc65.jpg);
				background-size: 100% 100%;
			}
			.wrap {


				width: 500px;
				height: 450px;
				margin: 100px auto;
				text-align: center;
				background-color: #6c8cff;
				opacity: 0.8;
				border: 0px black solid;
			}
			#wrap_01 {


				width: 100%;
				height: 30px;
				border: 1px black solid;
				margin-top: 10px;
			}
			#userBlur {


				width: 80%;
				height: 30px;
				border: 1px black solid;
			}
			#wrap_02 {


				margin-top: 30px;
				width: 100%;
				height: 30px;
				border: 0px black solid;
			}
			#pwdBlur {


				width: 80%;
				height: 30px;
				border: 0px black solid;
			}
			#wrap_03 {


				margin-top: 30px;
				width: 100%;
				height: 30px;
				border: 0px black solid;
			}
			#pwdBlur2 {


				width: 80%;
				height: 30px;
				border: 0px black solid;
			}
			#wrap_04 {


				margin-top: 30px;
				width: 100%;
				height: 30px;
				border: 0px black solid;
			}
			#wrap_05 {


				width: 100%;
				height: 150px;
				border: 0px black solid;
				text-align: center;
				margin-left: 24px;
			}
			#wrap_06 {


				margin-top: 8px;
				width: 100%;
				height: 30px;
				border: 0px black solid;
				text-align: center;
				line-height: 30px;
			}
		</style>
- form表单代码
<div class="wrap">
<!-- οnsubmit="return false" 可以阻止表单提交-->
<form action="#" method="get" onsubmit="return submitForm()" id="formSet">
<span id="p_login" style="width: 100%; height: 30px; font-family: 隶书; font-size: 30px; ">欢迎登录</span>
<div id="wrap_01">
<span>用 户 名: </span>
<!-- onblur就是鼠标失去焦点的时候会触发事件这个逻辑需要你自己来写 -->
<input type="text" id="userBlur" value="" name="username" placeholder="请输入用户名" onblur="check_username()" oninput="input_content()" />
<div id="p_context" style="width:230px; height: 25px; border: 0px black solid; margin: auto;"></div>
</div>
<div id="wrap_02">
<span>密 码: </span>
<input type="password" id="pwdBlur" value="" name="password" placeholder="请输入密码" onblur="check_password()" oninput="input_content2()" />
<div id="p_context2" style="width:200px; height: 25px; border: 0px black solid; margin: auto;"></div>
</div>
<div id="wrap_03">
<span>确认密码:</span>
<input type="password" id="pwdBlur2" placeholder="确认密码" onblur="check_password2()" />
<div id="p_context3" style="width:200px; height: 25px; border: 0px black solid; margin: auto;"></div>
</div>
<div id="wrap_04">
<span>性别:</span>
<input type="radio" name="sex" value="male" id="sex_01" onclick="clickSex()">男
<input type="radio" name="sex" value="female" id="sex_02" onclick="clickSex()" style="display: inline;">女
<div id="p_context5" style="width:230px; height: 25px; border: 0px black solid;margin-left: 280px; margin-top: -22px;" ></div>
</div>
<div id="wrap_05">
<div id="move">个人描述:</div>
<textarea cols="50" rows="7" onblur="checkText()" id="text_area"></textarea>
<div id="p_context4" style="width:200px; height: 25px; border: 0px black solid; margin: auto;"></div>
</div>
<div id="wrap_06">
<input type="submit" value="注册" id="check_pwd" />
<input type="button" value="重置" onclick="formReset()" />
</div>
</form>
</div>
5.js对表单的校验
用户名、密码、确认密码、性别、个人描述都填写表单才能提交,否则提示用户根据具体的要求填写资料。需要用到 onsubmit事件 返回结果是true则提交表单数据 否则按照格式填写。
5.1校验用户名
知识点:1.onblur事件 鼠标离开输入框触发事件
知识点:2.oninput事件 用户输入内容触发事件
我们只需要拿到用户名输入的用户名 使用正则表达式校验是否符合自己定的表达式的规则,符和就显示用户名正确否则显示用户名格式错误。也可以使用oninput事件在用户名输入的时候显示用户名的格式;这样用户的体验会好一点。
//校验用户名
		function check_username() {
			//获取DOM对象
			var username = document.getElementById("userBlur").value;
			//用户名的正则表达式
			var regx = /^[a-zA-Z0-9]{4,16}$/;
			//校验用户名符不符合条件 返回true 或者 false
			var result = regx.test(username);
			if (!result) {
				document.getElementById("p_context").innerHTML = "<div style='color: red;'>用户名格式不正确!</div>"
				document.getElementById("userBlur").style = "border:2px red solid"
			} else {
				document.getElementById("p_context").innerHTML = "<div>用户名格式正确!</div>"
				document.getElementById("userBlur").style = "border:2px black solid"
			}
			return result;
		}

     //提示用户输入用户名的格式
		function input_content() {
			document.getElementById("p_context").innerHTML = "<div>用户名必须为4-16位数字或字母</div>"
		}
5.2.校验密码
校验密码和校验用户名一致!
	var password;
		var res;
		//校验密码
		function check_password() {
			//获取DOM对象
			password = document.getElementById("pwdBlur").value;
			//密码的正则表达式
			var regx = /^[1-9]{6,10}$/;
			//校验密码符不符合条件 返回true 或者 false test() 方法用于检测一个字符串是否匹配某个模式.
			res = regx.test(password);
			if (!res) {
				document.getElementById("p_context2").innerHTML = "<div style='color: red;'>密码必须为6-10位数字!</div>"
				document.getElementById("pwdBlur").style = "border:2px red solid"
			} else {
				document.getElementById("p_context2").innerHTML = "<div>密码格式正确!</div>"
				document.getElementById("pwdBlur").style = "border:2px black solid"
			}
			return res;
		}
	//提示用户输入密码的格式
		function input_content2() {
			document.getElementById("p_context2").innerHTML = "<div>密码必须为6-10位数字</div>"
	}
5.3二次校验密码
再次确认用户名填写的密码时需要将第一次的密码提升作用域,否则二次校验的时候拿不到第一次的密码,这里主要判断了确认密码是否为空,和是否两次密码不一致。
//第二次校验密码
		var pwd;
		function check_password2() {
			pwd = document.getElementById("pwdBlur2").value;
			if (pwd.length == 0) {
				document.getElementById("p_context3").innerHTML = "<div style='color: red;'>密码不能为空!</div>"
				document.getElementById("pwdBlur2").style = "border:2px red solid"
				return false;
			} else if (pwd != password) {
				document.getElementById("p_context3").innerHTML = "<div style='color: red;'>两次密码不一致!</div>"
				document.getElementById("pwdBlur2").style = "border:2px red solid"
				return false;
			} else {
				document.getElementById("p_context3").innerHTML = "<div>两次密码一致!</div>"
				document.getElementById("pwdBlur2").style = "border: 2px black solid"
				return true;
			}
		}
5.4校验用户名是否勾选
知识点:checked 如果选中触发事件
如果用户没有勾选提示用户勾选性别但是提交不了表单,直达勾选才可以进行下一步。
function clickSex() {
			//如果选中了就返回true
			if (document.getElementById("sex_01").checked) {
				document.getElementById("p_context5").innerHTML = ""
				return true;
			} else if (document.getElementById("sex_02").checked) {
				document.getElementById("p_context5").innerHTML = ""
				return true;
			} else {
				document.getElementById("p_context5").innerHTML = "<div style='color: red;'>未选择性别!</div>"
				return false;
			}
		}
5.5校验文本域的字数不小于50字
校验字数的时候需要使用trim()方法去除点空格然后获取长度 根据长度判断少于50字提示用户并且不能提交表单数据,直到正确为止。
//校验文本域的字数
		function checkText() {
			var len = document.getElementById("text_area").value.trim().length;
			if (len < 50) {
				document.getElementById("p_context4").innerHTML = "<div style='color: red;'>个人描述不能少于50字!</div>"
				document.getElementById("text_area").style = "border:2px red solid"
				return false;
			} else {
				document.getElementById("p_context4").innerHTML = ""
				document.getElementById("text_area").style = "border:2px black solid"
				return true;
			}
		}
5.6重置表单数据
// 重置表单
		function formReset() {
			document.getElementById("formSet").reset()
		}
如果不填写数据或者一项不符合格式要求则无法提交表单。

6总结:
对于form表单的验证主要时布局和对于事件的灵活应用以及用户的体验。
- 掌握DOM
- 掌握一些常用的事件
- 对于页面布局的技巧
- 代码的复用性和逻辑性
本篇博客也有许多不足之处请多多指教,如有问题欢迎一起交流,增进知识。