本人之前也从来没接触过canvas,但是由于对canvas写出来的各种酷炫效果非常仰慕,所以对canvas抱有浓厚的兴趣。今天尝试用canvas写一个最常用的环形进度条,算是我对于canvas的入门。
下面先看效果图:

直接上代码:
wxml:
 <view class='content'>
  <canvas canvas-id='bgCanvas'  class='canvasI'></canvas>
  <canvas canvas-id="runCanvas" class='canvasII'></canvas>
  <button size='mini' type='default' class='btn' catchtap='canvasTap'>点击绘制</button>
 </view>
wxss:
.content{
  width: 90%;
  height: 600rpx;
  background-color: #666;
  margin: 0 auto;
  margin-top: 100rpx;
  position: relative;
}
.canvasI{
  width: 400rpx;
  height: 400rpx;
  position: absolute;
  left: 0;
  top: 0;
  bottom: 0;
  right: 0;
  margin: auto auto;
}
.canvasII{
  width: 400rpx;
  height: 400rpx;
  position: absolute;
  left: 0;
  top: 0;
  bottom: 0;
  right: 0;
  margin: auto auto;
}
.btn{
  position: absolute;
  width: 200rpx;
  bottom: 30rpx;
  left: 0;
  right: 0;
  margin: 0 auto;
}
js:
const ctx = wx.createCanvasContext("bgCanvas"); //创建一个全局的canvas绘图上下文
const ctx2 = wx.createCanvasContext("runCanvas");
let mytime = "";
let n=0;
Page({

  /**
   * 页面的初始数据
   */
  data: {
    score:100, //传入的进度, 0~100,绘制到此参数处停止。
  },
  run(e){
    let that = this;
    let src = that.data.src; //每个间隔所需绘制的弧度
    let allSrc = that.data.allSrc; //总共需要绘制的弧度
    n++;
    if (src*n>allSrc){
      clearInterval(mytime);  //如果绘制完成,停掉计时器,绘制结束
      n =0;
      return;
    }
    console.log(n);
    let grade = Math.round(src * n / 1.5 * 100); //百分数
    ctx2.arc(100, 100, 92, 0.75 * Math.PI, (0.75 + src*n) * Math.PI); //每个间隔绘制的弧度
    ctx2.setStrokeStyle("#84D944");
    ctx2.setLineWidth("8");
    ctx2.setLineCap("round");
    ctx2.stroke();
    ctx2.beginPath();
    ctx2.setFontSize(40); //注意不要加引号
    ctx2.setFillStyle("#84D944");
    ctx2.setTextAlign("center");
    ctx2.setTextBaseline("middle");
    ctx2.fillText(grade + "%", 100,100);


    ctx2.draw();
  },
  canvasTap(){
    let that = this;
    clearInterval(mytime);
    mytime = setInterval(that.run, 50)
  },

  /**
   * 生命周期函数--监听页面加载
   */
  onLoad: function (e) {
    let that = this;
    let allSrc = 0.015*that.data.score;//应该绘制的弧度
    let src = allSrc/100 //计算出每个间隔应该绘制多少弧度。
    that.setData({
      src:src,
      allSrc:allSrc
    })
  },

  /**
   * 生命周期函数--监听页面初次渲染完成
   */
  onReady: function () {
    ctx.arc(100, 100, 92, 0.75 * Math.PI, 2.25 * Math.PI); //绘制圆形弧线
    ctx.setStrokeStyle("#dddddd"); //设置填充线条颜色
    ctx.setLineWidth("8");    //设置线条宽度
    ctx.setLineCap("round");       //设置线条端点样式
    ctx.stroke();    //对路径进行描边,也就是绘制线条。
    ctx.draw();      //开始绘制
  }
})
代码思路:
1、创建两个canvas,一个作为背景,绘制灰色的进度条,一个作为进度采用亮色的进度条对进度进行绘制。
2、用定位使两个画布重合。采用定时器让画布进行逐帧绘制。
注意:
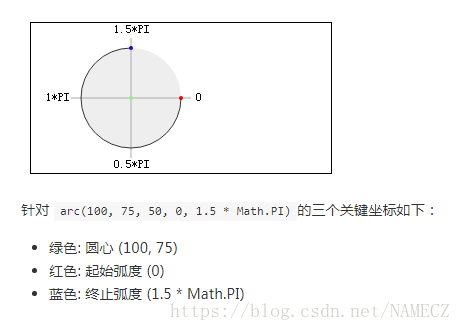
1、利用arc绘制圆形,arc的参数依次为(圆心X坐标,圆心Y坐标,半径,起始位置,终点位置);
起始点和终止点可以参考下图:
2、让canvas中绘制的文字居中的方法:
ctx2.setTextAlign(
"center"); 让创建的文字水平居中
ctx2.setTextBaseline(
"middle"); 让创建的文字垂直居中
ctx2.fillText(
"文字"
,
100,
100);
在设置好文字水平垂直居中后,最重要的一步,要在fillText中的后两个位置参数中写上canvas的中心坐标。
很粗糙的一篇文章,希望能帮到大家,希望大家能给我点个赞~~~