一.工程代码
1.本文调试代码文件夹截图为:

2.代码细节:
a.h:
#ifndef A_H_
#define A_H_

class A
{
  public:
	A(){}
	~A(){}

	void readImg(const char* path);

};

#endif
a.cpp:
#include<opencv2/opencv.hpp>
#include <iostream>
#include "a.h"
using namespace std;
void A::readImg(const char* path)
{
cv::Mat img = cv::imread(path);
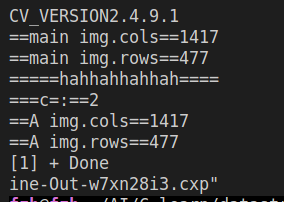
cout<<"==A img.cols=="<<img.cols<<endl;
cout<< "==A img.rows=="<<img.rows<<endl;
}main.cpp
#include<opencv2/opencv.hpp>
#include<iostream>
#include<string>
#include"a.h"
using namespace std;
int main(){

    cout<<"CV_VERSION"<<CV_VERSION<<endl;
    const char* imgPath = "/home/fzh/AI/C_learn/datastruct/opencv/test.jpg";
    cv::Mat img = cv::imread(imgPath);
    cout<<"==main img.cols=="<<img.cols<<endl;
    cout<< "==main img.rows=="<<img.rows<<endl;
    int a = 1;
    int b = 1;
    int c;
    c = a + b;
    cout<<"=====hahhahhahhah===="<<endl;
    cout<<"===c=:=="<<c<<endl;
    A *A1 = new A();
    A1->readImg(imgPath);
    delete A1;
    A1 = nullptr;
    return 0;
}
二.开始调试
1.给vs code安装C/C++插件.

2.按F5开始调试会自动生成.vscode文件夹,launch.json和tasks.json
其中tasks.json作用是执行编译,launch.json作用是执行编译后的文件
2.1其中tasks.json内容:

{
    // See https://go.microsoft.com/fwlink/?LinkId=733558
    // for the documentation about the tasks.json format
    //作用:执行编译
    "version": "2.0.0",
    "tasks": [
        {
            "label": "g++ build active file",//任务名称 注意要与launch.json文件的"preLaunchTask"关键字一致
            "type": "shell",
            "command": "g++",//终端命令 为g++
            //file:当前打开正在编辑的文件名,包括绝对路径,文件名,文件后缀名
            //fileDirname:当前打开的文件所在的绝对路径,不包括文件名
            //fileBasenameNoExtension:当前打开的文件的文件名,不包括路径和后缀名
            "args": [ //终端命令附加参数
                // "-g", "-std=c++11", "${file}", "-o", "${fileDirname}/${fileBasenameNoExtension}",
                "-g", "-std=c++11", "${fileDirname}/*.cpp", "-o", "${fileDirname}/${fileBasenameNoExtension}", //调试运行多个.cpp文件
                "-I", "/usr/include",
                "-I", "/usr/include/opencv",
                "-I", "/usr/include/opencv2",
                "-L", "/usr/local/lib",
                "-l", "opencv_core",
                "-l", "opencv_imgproc",
                "-l", "opencv_video",
                "-l", "opencv_ml",
                "-l", "opencv_highgui",
                "-l", "opencv_objdetect",
                "-l", "opencv_flann",
                "-l", "opencv_photo"
            ],
            "group": {
                "kind": "build",
                "isDefault": true
            },
            "presentation": {
                "reveal": "silent"
            },
            "problemMatcher": "$msCompile"
        }
    ]
}
${file}:当前打开正在编辑的文件名,包括绝对路径,文件名,文件后缀名
${fileDirname}:当前打开的文件所在的绝对路径,不包括文件名
${fileBasenameNoExtension}:当前打开的文件的文件名,不包括路径和后缀名
${workspaceFolder}:当前打开的文件夹的绝对路径
注意:
label为任务名称,要与launch.json文件的"preLaunchTask"关键字一致
command为终端命令:为g++
args: 终端命令附加参数,对于单个文件调试 "-g", "-std=c++11", "${file}", "-o", "${fileDirname}/${fileBasenameNoExtension}", “-I”是头文件所在路径,注意安装的opencv路径,这样才能#include<opencv2/opencv.hpp>,“-L”是库文件所在路径,“-l” 是库的名字。
多文件调试: "-g", "-std=c++11", "${fileDirname}/*.cpp", "-o", "${fileDirname}/${fileBasenameNoExtension}", //调试运行多个.cpp文件
2.2launch.json内容如下:
{
    // Use IntelliSense to learn about possible attributes.
    // Hover to view descriptions of existing attributes.
    // For more information, visit: https://go.microsoft.com/fwlink/?linkid=830387
    //作用:执行编译后的文件
    "version": "0.2.0",
    "configurations": [
        {
            "name": "g++ - Build and debug active file",
            "type": "cppdbg",
            "request": "launch",
            // "program": "${workspaceFolder}/opencv/main",
            //workspaceFolder:当前打开的文件夹的绝对路径
            //fileDirname:当前打开的文件所在的绝对路径,不包括文件名
            //fileBasenameNoExtension:当前打开的文件的文件名,不包括路径和后缀名
            "program": "${fileDirname}/${fileBasenameNoExtension}",
            // "program": "${workspaceFolder}/opencv/${fileBasenameNoExtension}",
            "args": [],
            "stopAtEntry": false,
            "cwd": "${workspaceFolder}",
            "environment": [],
            "externalConsole": false,//用外部终端吗?为false的话就用vscode终端
            "MIMode": "gdb",
            "setupCommands": [
                {
                    "description": "Enable pretty-printing for gdb",
                    "text": "-enable-pretty-printing",
                    "ignoreFailures": true
                }
            ],
            "preLaunchTask": "g++ build active file",//预编译任务名称 注意与tasks.json中的"label"关键字要一样
            "miDebuggerPath": "/usr/bin/gdb"  //调试gdb路径
        }
    ]
}
注意:
preLaunchTask为预编译任务名称 注意与tasks.json中的"label"关键字要一样,其他的就不用动了,看上面也有了注释。
上面两个.json配置好以后就可以调试普通的c++程序;
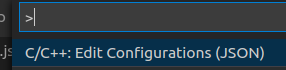
2.3调试opencv需要配置c_cpp_properties.json
ctrl+shift+p选中这个即可生成c_cpp_properties.json
c_cpp_properties.json内容:
就在生成的基础上添加includePath的opencv路径
//作用:添加一些头文件
{
    "configurations": [
        {
            "name": "Linux",
            "includePath": [
                "${workspaceFolder}/**",
                "/usr/include/opencv2",
                "/usr/include/opencv",
                "/usr/include"

            ],
            "defines": [],
            "compilerPath": "/usr/bin/gcc",
            "cStandard": "gnu11",
            "cppStandard": "c++17",
            "intelliSenseMode": "clang-x64"
        }
    ],
    "version": 4
}
然后就可以调试main.cpp了。