使用Gan实现MNIST数据集手写数字生成(pytorch版)
1. 描述
使用对抗式生成网络基于MNIST的手写数字数据集实现自动生成手写数字,基于pytorch实现。
数据集来源:Kaggle数据集
部分训练结构参考来源:GAN生成MNIST数据集(pytorch版)
测试了一些其它博客中的代码,但是发现很多收敛效果都不是很好,达不到博主给出的效果图的水平,而且收敛步数也太多……因此试着做了一些修改。
对训练网络进行了单边平滑,标签随机交换等改进,保证更好的收敛效果。
生成器提供了基于线性层和基于反卷积的两种实现方式,可以通过在config中的配置项切换。
生成器与判别器内部网络结构均为个人俺寻思式 涂改产物,如有不合理结构欢迎大佬指出错误帮助改进。
2. 代码
代码分为模型代码model.py与训练代码main.py两个文件,已经完成详细注释,需要将数据集中的csv文件重命名为MNIST.csv。
2.1 模型代码
import torch
import torch.nn as nn


# 生成器,基于线性层
class G_net_linear(nn.Module):
    def __init__(self):
        super(G_net_linear, self).__init__()
        self.gen = nn.Sequential(
            nn.Linear(256, 256),
            nn.BatchNorm1d(256),
            nn.Dropout(0.5),
            nn.LeakyReLU(0.2),
            nn.Linear(256, 512),
            nn.BatchNorm1d(512),
            nn.Dropout(0.5),
            nn.LeakyReLU(0.2),
            nn.Linear(512, 1024),
            nn.BatchNorm1d(1024),
            nn.Dropout(0.5),
            nn.LeakyReLU(0.2),
            nn.Linear(1024, 784),
            # 将输出约束到[-1,1]
            nn.Tanh()
        )

    def forward(self, img_seeds):
        output = self.gen(img_seeds)
        # 将线性数据重组为二维图片
        output = output.view(-1, 1, 28, 28)
        return output


# 生成器,基于上采样
class G_net_conv(nn.Module):
    def __init__(self):
        super(G_net_conv, self).__init__()
        # 扩张数据量
        self.expand = nn.Sequential(
            nn.Linear(256, 484),
            nn.BatchNorm1d(484),
            nn.Dropout(0.5),
            nn.LeakyReLU(0.2),
            nn.Linear(484, 484),
            nn.BatchNorm1d(484),
            nn.Dropout(0.5),
            nn.LeakyReLU(0.2),
        )
        self.gen = nn.Sequential(
            # 反卷积扩张尺寸
            nn.ConvTranspose2d(1, 4, kernel_size=3),
            nn.BatchNorm2d(4),
            nn.LeakyReLU(0.2),
            nn.ConvTranspose2d(4, 8, kernel_size=3),
            nn.BatchNorm2d(8),
            nn.LeakyReLU(0.2),
            nn.ConvTranspose2d(8, 4, kernel_size=3),
            nn.BatchNorm2d(4),
            nn.LeakyReLU(0.2),
            # 1x1卷积压缩维度
            nn.Conv2d(4, 1, kernel_size=1),
            nn.BatchNorm2d(1),
            nn.LeakyReLU(0.2),
            # 将输出约束到[-1,1]
            nn.Tanh()
        )

    def forward(self, img_seeds):
        img_seeds = self.expand(img_seeds)
        # 将线性数据重组为二维图片
        img_seeds = img_seeds.view(-1, 1, 22, 22)
        output = self.gen(img_seeds)
        return output


# 根据生成器的配置返回对应的模型
def get_G_model(from_old_model, device, model_path, G_type):
    if G_type == "Linear":
        model = G_net_linear()
    elif G_type == "ConvTranspose":
        model = G_net_conv()
    # 从磁盘加载之前保存的模型参数
    if from_old_model:
        model.load_state_dict(torch.load(model_path))
    # 将模型加载到用于运算的设备的内存
    model = model.to(device)

    return model


# 判别器
class D_net(nn.Module):
    def __init__(self):
        super(D_net, self).__init__()
        self.features = nn.Sequential(
            nn.Conv2d(1, 32, kernel_size=3),
            nn.BatchNorm2d(32),
            nn.LeakyReLU(0.2),
            nn.Conv2d(32, 64, kernel_size=3),
            nn.BatchNorm2d(64),
            nn.LeakyReLU(0.2),
        )

        self.classifier = nn.Sequential(
            nn.Linear(36864, 1024),
            nn.LeakyReLU(0.2),
            nn.Linear(1024, 1024),
            nn.LeakyReLU(0.2),
            nn.Linear(1024, 1),
            nn.Sigmoid(),
        )

    def forward(self, img):
        # 提取特征
        features = self.features(img)
        # 展平二维矩阵
        features = features.view(features.shape[0],-1)
        # 使用线性层分类
        output = self.classifier(features)
        return output


# 返回判别器的模型
def get_D_model(from_old_model, device, model_path):
    model = D_net()
    # 从磁盘加载之前保存的模型参数
    if from_old_model:
        model.load_state_dict(torch.load(model_path))
    # 将模型加载到用于运算的设备的内存
    model = model.to(device)

    return model
2.2 训练代码
import pandas as pd
from torch.utils.data import Dataset, DataLoader
import time
from torch.optim import AdamW
import numpy as np
from model import *
from torchvision import transforms
from torchvision.utils import save_image
import random
from torch.autograd import Variable
import os


# ------------------------------------config------------------------------------
class config:
    # 设置种子数,配置是否要固定种子数
    seed = 26
    use_seed = True

    # 配置是否要从磁盘加载之前保存的模式参数继续训练
    from_old_model = False

    # 运行多少个epoch之后停止
    epochs = 100
    # 配置batch size
    batchSize = 64

    # 配置喂入生成器的随机正态分布种子数有多少维(如果改动,需要在model中修改网络对应参数)
    img_seed_dim = 256

    # 有多大概率在训练判别器D时交换正确图片的标签和伪造图片的标签
    D_train_label_exchange = 0.05

    # 保存模型参数文件的路径
    G_model_path = "G_model.pth"
    D_model_path = "D_model.pth"

    # 配置使用哪一种生成器模型,将不用的一种注释掉
    # 基于纯线性层的生成器
    G_type = "Linear"
    # 基于反卷积层的生成器
    # G_type = "ConvTranspose"

    # 损失函数
    # 使用二分类交叉熵损失函数
    criterion = nn.BCELoss()
    # 使用均方差损失函数,经过测试也能训练,但是要跑更多epoch才能看到效果
    # criterion = nn.MSELoss()

    # ------------------------------------路径配置------------------------------------
    # 数据集来源,使用来自kaggle的mnist数据集,改名为MNIST.csv,从csv文件中读取手写数字的数据
    # 数据集下载链接:https://www.kaggle.com/c/digit-recognizer/data
    data_path = "MNIST.csv"
    # 输出图片的文件夹路径
    output_path = "output_images/"


# 固定随机数种子
def seed_all(seed):
    random.seed(seed)
    torch.manual_seed(seed)
    torch.cuda.manual_seed(seed)
    torch.cuda.manual_seed_all(seed)
    torch.backends.cudnn.deterministic = True


if config.use_seed:
    seed_all(seed=config.seed)


# ------------------------------------dataset------------------------------------
class Digit_train_Dataset(Dataset):
    def __init__(self, data_csv, transform):
        # 因为数据集很小,所以将所有数据保存在内存中
        self.imgs = []
        for index in range(len(data_csv)):
            # 从csv文件中读取像素数据
            img = np.array(data_csv.iloc[index, 1:785]).astype("uint8")
            # 将一维数据重新重组为二维的手写体图片
            img = img.reshape((28, 28))
            # 将图片的数据缩放到[-1,1]的区间内,并转换为tensor类型
            img = transform(img)
            # 将图片保存到内存中
            self.imgs.append(img)

    def __getitem__(self, index):
        # 按照索引取出内存中已经预处理完成的图片
        return self.imgs[index]

    def __len__(self):
        return len(self.imgs)


# ------------------------------------main------------------------------------
def main():
    # 如果可以使用GPU运算,则使用GPU,否则使用CPU
    device = torch.device('cuda:0' if torch.cuda.is_available() else 'cpu')
    print("Use " + str(device))

    # 图片预处理的方法
    img_transform = transforms.Compose([
        # 将图片转换为tensor类型并缩放到[0,1]的区间内
        transforms.ToTensor(),
        # 将图片再缩放到[-1.1]的区间内
        transforms.Normalize((0.5,), (0.5,)),
    ])

    # 创建输出文件夹
    if not os.path.exists(config.output_path):
        os.mkdir(config.output_path)

    # 创建dataset
    mnist_dataset = Digit_train_Dataset(pd.read_csv("MNIST.csv"), transform=img_transform)

    # 创建dataloader
    mnist_loader = DataLoader(dataset=mnist_dataset, batch_size=config.batchSize, shuffle=True)

    # 从model中获取判别器D和生成器G的网络模型
    G_model = get_G_model(config.from_old_model, device, config.G_model_path, config.G_type)
    D_model = get_D_model(config.from_old_model, device, config.D_model_path)

    # 定义G和D的优化器,此处使用AdamW优化器,学习率为1e-4
    G_optimizer = AdamW(G_model.parameters(), lr=1e-4, weight_decay=1e-6)
    D_optimizer = AdamW(D_model.parameters(), lr=1e-4, weight_decay=1e-6)

    # 损失函数
    criterion = config.criterion

    # 记录训练时间
    train_start = time.time()

    # 开始训练的每一个epoch
    for epoch in range(config.epochs):
        print("start epoch "+str(epoch+1)+":")
        # 定义一些变量用于记录进度和损失
        batch_num = len(mnist_loader)
        D_loss_sum = 0
        G_loss_sum = 0
        count = 0

        # 从dataloader中提取数据
        for index, images in enumerate(mnist_loader):
            count += 1
            # 将图片放入运算设备的内存
            images = images.to(device)

            # 定义真标签,使用标签平滑的策略,生成0.9到1之间的随机数作为真实标签
            real_labels = (1 - torch.rand(config.batchSize, 1)/10).to(device)

            # 定义假标签,单向平滑,因此不对生成器标签进行平滑处理,全0
            fake_labels = Variable(torch.zeros(config.batchSize, 1)).to(device)

            # 将随机的初始数据喂入生成器生成假图像
            img_seeds = torch.randn(config.batchSize, config.img_seed_dim).to(device)
            fake_images = G_model(img_seeds)

            # 记录真假标签是否被交换过
            exchange_labels = False

            # 有一定概率在训练判别器时交换label
            if random.uniform(0, 1) < config.D_train_label_exchange:
                real_labels, fake_labels = fake_labels, real_labels
                exchange_labels = True

            # 训练判断器D
            D_optimizer.zero_grad()
            # 用真样本输入判别器
            real_output = D_model(images)
            # 对于数据集末尾的数据,长度不够一个batch size时需要去除过长的真实标签
            if len(real_labels) > len(real_output):
                D_loss_real = criterion(real_output, real_labels[:len(real_output)])
            else:
                D_loss_real = criterion(real_output, real_labels)
            # 用假样本输入判别器
            fake_output = D_model(fake_images)
            D_loss_fake = criterion(fake_output, fake_labels)
            # 将真样本与假样本损失相加,得到判别器的损失
            D_loss = D_loss_real + D_loss_fake
            D_loss_sum += D_loss.item()

            # 重置优化器
            D_optimizer.zero_grad()
            # 用损失更新判别器D
            D_loss.backward()
            D_optimizer.step()

            # 如果之前交换过标签,此时再换回来
            if exchange_labels:
                real_labels, fake_labels = fake_labels, real_labels

            # 训练生成器G
            # 将随机种子数喂入生成器G生成假数据
            img_seeds = torch.randn(config.batchSize, config.img_seed_dim).to(device)
            fake_images = G_model(img_seeds)
            # 将假数据输入判别器
            fake_output = D_model(fake_images)
            # 将假数据的判别结果与真实标签对比得到损失
            G_loss = criterion(fake_output, real_labels)
            G_loss_sum += G_loss.item()

            # 重置优化器
            G_optimizer.zero_grad()
            # 利用损失更新生成器G
            G_loss.backward()
            G_optimizer.step()

            # 打印程序工作进度
            if (index + 1) % 200 == 0:
                print("Epoch: %2d, Batch: %4d / %4d" % (epoch + 1, index + 1, batch_num))

        # 在每个epoch结束时保存模型参数到磁盘文件
        torch.save(G_model.state_dict(), config.G_model_path)
        torch.save(D_model.state_dict(), config.D_model_path)

        # 在每个epoch结束时输出一组生成器产生的图片到输出文件夹
        img_seeds = torch.randn(config.batchSize, config.img_seed_dim).to(device)
        fake_images = G_model(img_seeds).cuda().data
        # 将假图像缩放到[0,1]的区间
        fake_images = 0.5 * (fake_images + 1)
        fake_images = fake_images.clamp(0, 1)
        # 连接所有生成的图片然后用自带的save_image()函数输出到磁盘文件
        fake_images = fake_images.view(-1, 1, 28, 28)
        save_image(fake_images, config.output_path+str(epoch+1)+'.png')

        # 打印该epoch的损失,时间等数据用于参考
        print("D_loss:", round(D_loss_sum / count, 3))
        print("G_loss:", round(G_loss_sum / count, 3))
        current_time = time.time()
        pass_time = int(current_time - train_start)
        time_string = str(pass_time // 3600) + " hours, " + str((pass_time % 3600) // 60) + " minutes, " + str(
            pass_time % 60) + " seconds."
        print("Time pass:", time_string)
        print()

    # 运行结束
    print("Done.")


if __name__ == '__main__':
    main()
3. 效果
经过测试,BCELoss与MSELoss均能收敛,但交叉熵收敛更快。
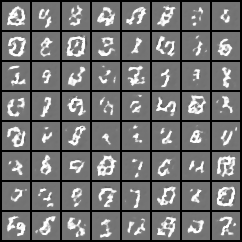
反卷积与线性层生成器经过对比,发现线性层生成器在当前数据集中表现的效果更好,收敛也更快,可能是由于MNIST数据集比较简单的缘故。
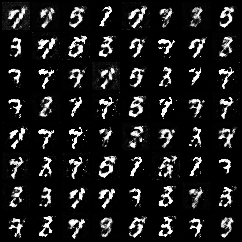
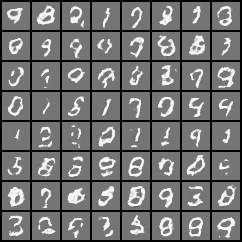
3.1 线性层生成器训练效果
5个epcoh:
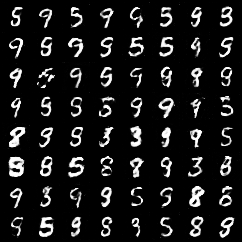
15个epcoh:
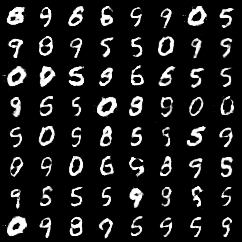
25个epoch:
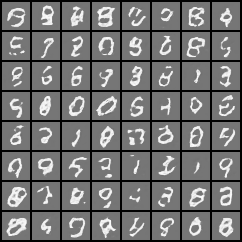
3.2 反卷积生成器训练效果
5个epcoh:
15个epcoh:
25个epoch:
经过多次测试,修改之后的代码应该可以达到稳定收敛与复现的效果。