尚医通
一、管理平台前端搭建
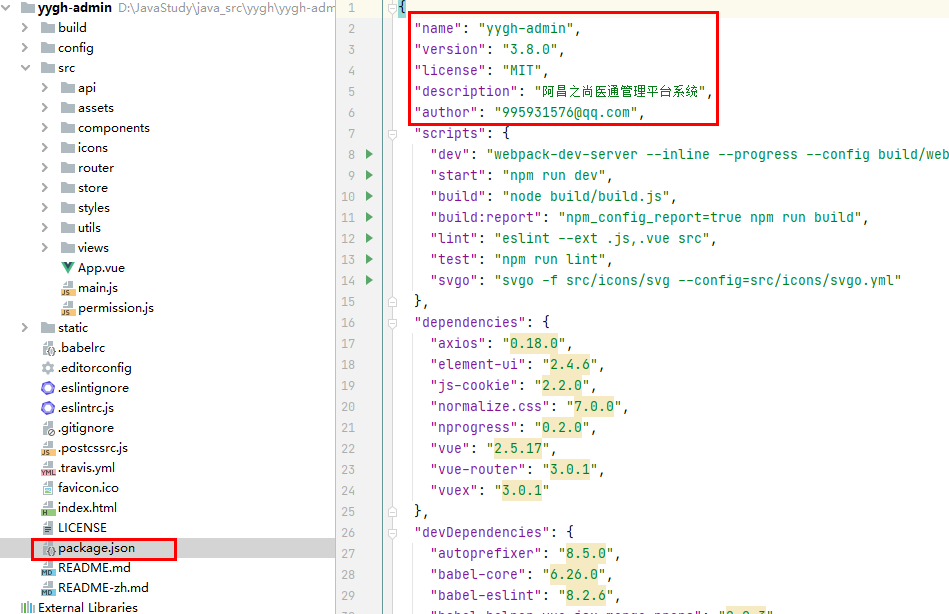
1、项目名称
解压vue-admin-template-master.zip,项目重命名:yygh-admin
2、修改package.json
{


  "name": "yygh-admin",
  "version": "3.8.0",
  "license": "MIT",
  "description": "阿昌之尚医通管理平台系统",
  "author": "[email protected]",
    ...
}
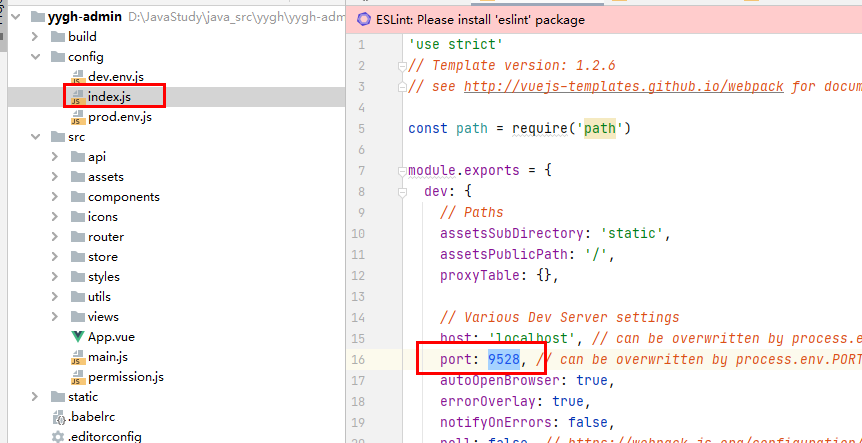
3、如果需要修改端口号
config/index.js中修改
port: 9528
4、项目的目录结构
├── build // 构建脚本
├── config // 全局配置
├── node_modules // 项目依赖模块
├── src //项目源代码
├── static // 静态资源
└── package.jspon // 项目信息和依赖配置

src
├── api // 各种接口
├── assets // 图片等资源
├── components // 各种公共组件,非公共组件在各自view下维护
├── icons //svg icon
├── router // 路由表
├── store // 存储
├── styles // 各种样式
├── utils // 公共工具,非公共工具,在各自view下维护
├── views // 各种layout
├── App.vue //项目顶层组件
├── main.js //项目入口文件
└── permission.js //认证入口
5、运行项目
npm insall:安装依赖
npm run dev:运行项目
6、登录页修改
将登陆相关请求接口改为静态数据,不请求接口
修改文件:\src\store\modules\user.js
注释掉:Login、GetInfo、LogOut三个方法,替换为如下代码:
替换为固定的数据,做零时登录
  actions: {


    // 登录
    Login({

     commit }, userInfo) {


      const data = {

    "token":"admin"}
      setToken(data.token)
      commit('SET_TOKEN',data.token)

      // const username = userInfo.username.trim()
      // return new Promise((resolve, reject) => {


      //   login(username, userInfo.password).then(response => {


      //     const data = response.data
      //     setToken(data.token)
      //     commit('SET_TOKEN', data.token)
      //     resolve()
      //   }).catch(error => {


      //     reject(error)
      //   })
      // })
    },

    // 获取用户信息
    GetInfo({

     commit, state }) {


      const data = {

    "roles":"admin","name":"admin","avatar":"http://pic.ik123.com/uploads/allimg/160903/12-160Z3103031.gif"}
      if (data.roles && data.roles.length > 0) {

     // 验证返回的roles是否是一个非空数组
        commit('SET_ROLES', data.roles)
      } else {


        reject('getInfo: roles must be a non-null array !')
      }
      commit('SET_NAME', data.name)
      commit('SET_AVATAR', data.avatar)

      // return new Promise((resolve, reject) => {


      //   getInfo(state.token).then(response => {


      //     const data = response.data
      //     if (data.roles && data.roles.length > 0) { // 验证返回的roles是否是一个非空数组
      //       commit('SET_ROLES', data.roles)
      //     } else {


      //       reject('getInfo: roles must be a non-null array !')
      //     }
      //     commit('SET_NAME', data.name)
      //     commit('SET_AVATAR', data.avatar)
      //     resolve(response)
      //   }).catch(error => {


      //     reject(error)
      //   })
      // })
    },

    // 登出
    LogOut({

     commit, state }) {


      commit('SET_TOKEN', '')
      commit('SET_ROLES', [])
      removeToken()
      // return new Promise((resolve, reject) => {


      //   logout(state.token).then(() => {


      //     commit('SET_TOKEN', '')
      //     commit('SET_ROLES', [])
      //     removeToken()
      //     resolve()
      //   }).catch(error => {


      //     reject(error)
      //   })
      // })
    },

    // 前端 登出
    FedLogOut({

     commit }) {


      commit('SET_TOKEN', '')
      removeToken()
      // return new Promise(resolve => {


      //   commit('SET_TOKEN', '')
      //   removeToken()
      //   resolve()
      // })
    }
  }
说明:token是我们手动配置的,如果过期后续自行生成,后续会有TokenHelper类生成token,在此不用关注
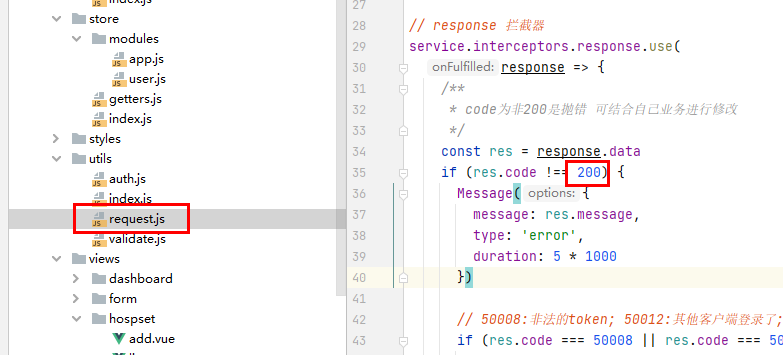
修改\src\util\request.js
config.headers['token'] = getToken()
二、医院设置管理
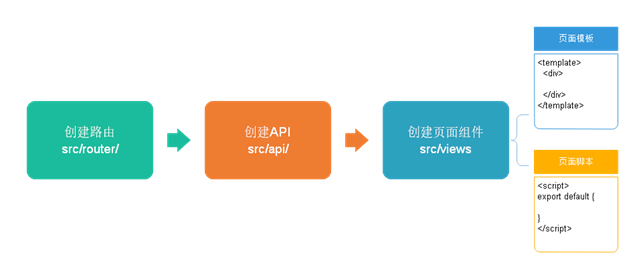
1、项目开发流程
- config/dev.env.js
'use strict'
const merge = require('webpack-merge')
const prodEnv = require('./prod.env')

module.exports = merge(prodEnv, {


  NODE_ENV: '"development"',
  // BASE_API: '"https://easy-mock.com/mock/5950a2419adc231f356a6636/vue-admin"',
  BASE_API: '"http://localhost:8201"',
})
- 修改为对应的状态码
1.1 定义路由模块
src/router/index.js
配置医院设置管理相关路由
  {


    path: '/hospSet',
    component: Layout,
    redirect: '/hospSet/list',
    name: '医院设置管理',
    meta: {

     title: '医院设置管理', icon: 'example' },
    children: [
      {


        path: 'list',
        name: '医院设置列表',
        component: () => import('@/views/hospset/list.vue'),
        meta: {

     title: '医院设置列表', icon: 'table' }
      },
      {


        path: 'add',
        name: '医院设置添加',
        component: () => import('@/views/hospset/add.vue'),
        meta: {

     title: '医院设置添加', icon: 'tree' }
      },
      {


        path: 'edit/:id',
        name: '医院设置编辑',
        component: () => import('@/views/hospset/add.vue'),
        meta: {

     title: '医院设置编辑', icon: 'tree' },
        hidden:true
      }
    ]
  },
1.2 定义api模块
创建文件 src/api/hospitalSet.js
import request from '@/utils/request'

//多条件分页查询
export default {


  getHospSetList(page,limit,searchObj) {


    return request({


      url: `/admin/hosp/hospitalSet/findPageCondition/${

      page}/${

      limit}`,
      method: 'post',
      data: searchObj //使用json传递
    })
  }
}
1.3 定义页面组件脚本
src/views/hosp/hospitalSet/list.vue
<script>
import hospset from "../../api/hospset";
export default {
name: "list.vue",
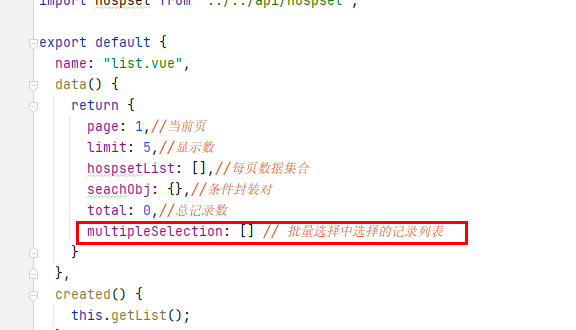
data() {
return {
page:1,//当前页
limit:5,//显示数
hospsetList:[],//每页数据集合
seachObj:{
},//条件封装对
total:0,//总记录数
}
},
created() {
this.getList();
},
methods:{
//医院设置列表
getList(){
hospset.getHospSetList(this.page,this.limit,this.seachObj).then(resp=>{
//返回数据集合
this.hospsetList=resp.data.records
//总记录数
this.total=resp.data.total
}).catch(error=>{
console.log(error)
})
}
}
}
</script>
1.4 定义页面组件模板
<template>
<div class="app-container">
<!-- banner列表 -->
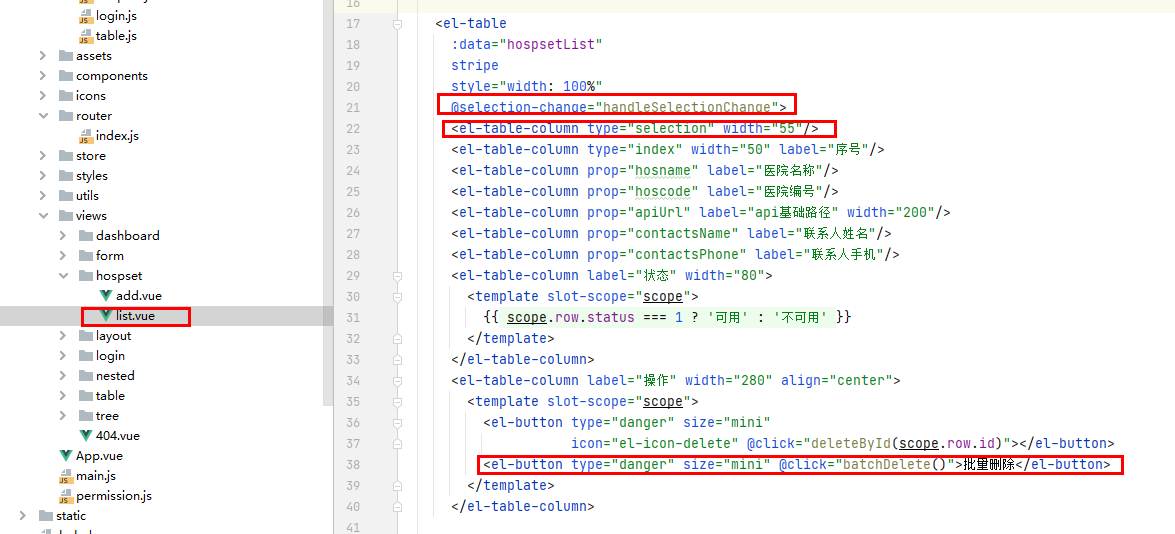
<el-table
:data="hospsetList"
stripe
style="width: 100%">
<el-table-column type="index" width="50" label="序号"/>
<el-table-column prop="hosname" label="医院名称"/>
<el-table-column prop="hoscode" label="医院编号"/>
<el-table-column prop="apiUrl" label="api基础路径" width="200"/>
<el-table-column prop="contactsName" label="联系人姓名"/>
<el-table-column prop="contactsPhone" label="联系人手机"/>
<el-table-column label="状态" width="80">
<template slot-scope="scope">
{
{ scope.row.status === 1 ? '可用' : '不可用' }}
</template>
</el-table-column>
</el-table>
</div>
</template>
1.5 配置分页插件

@Configuration
@MapperScan("com.achang.yygh.hosp.mapper")
public class HospConfig {


    //分页插件
    @Bean
    public PaginationInterceptor paginationInterceptor(){


        return new PaginationInterceptor();
    }
}
1.6 测试数据通信
启动项目
命令行执行:npm run dev
打开浏览器调试状态
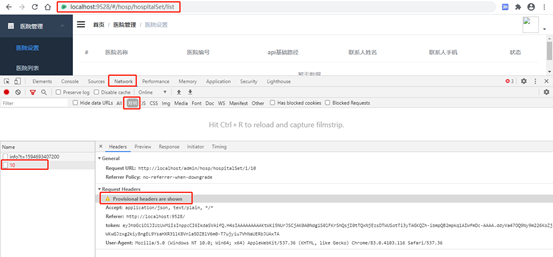
测试失败,接口请求了,但是没有返回结果,这是为什么呢?其实这就是跨域的问题,
1.7 跨域处理
跨域:浏览器对于javascript的同源策略的限制 。
以下情况都属于跨域:
| 跨域原因说明 | 示例 |
|---|---|
| 域名不同 | www.jd.com 与 www.taobao.com |
| 域名相同,端口不同 | www.jd.com:8080 与 www.jd.com:8081 |
| 二级域名不同 | item.jd.com 与 miaosha.jd.com |
如果域名和端口都相同,但是请求路径不同,不属于跨域,如:
www.jd.com/item
www.jd.com/goods
http和https也属于跨域
而我们刚才是从localhost:3000去访问localhost:8201,这属于端口不同,跨域了。
如何解决呢?
Spring早就给我们提供了解决方案,我们只需要在对应controller上添加一个标签就可以了@CrossOrigin
我们在HospitalSetController类上添加跨域标签@CrossOrigin,再进行测试,则测试成功!
使用网关统一转发也可以解决
2、分页查询
2.1 定义页面组件脚本
src/views/hosp/hospitalSet/list.vue
  methods: {


    //医院设置列表
    getList(page=1) {


      this.page=page
      hospset.getHospSetList(this.page, this.limit, this.seachObj).then(resp => {


        //返回数据集合
        this.hospsetList = resp.data.records
        //总记录数
        this.total = resp.data.total
      }).catch(error => {


        console.log(error)
      })
    }
  }
2.2 定义页面组件模板
在table组件下面添加分页组件
<!-- 分页 -->
<el-pagination
               :current-page="page"
               :page-size="limit"
               :total="total"
               style="padding: 30px 0; text-align: center;"
               layout="total, prev, pager, next, jumper"
               @current-change="getList"
               />
- 效果

2.3 表单查询
<!--表单查询栏-->
<el-form :inline="true" class="demo-form-inline">
    <el-form-item>
        <el-input  v-model="seachObj.hosname" placeholder="医院名称"/>
    </el-form-item>
    <el-form-item>
        <el-input v-model="seachObj.hoscode" placeholder="医院编号"/>
    </el-form-item>
    <el-button type="primary" icon="el-icon-search" @click="getList()">查询</el-button>
    <el-button type="danger" icon="el-icon-delete" @click="getClear()">清空</el-button>
</el-form>
- js
  methods: {


    //医院设置列表
    getList(page=1) {


      this.page=page
      hospset.getHospSetList(this.page, this.limit, this.seachObj).then(resp => {


        //返回数据集合
        this.hospsetList = resp.data.records
        //总记录数
        this.total = resp.data.total
      }).catch(error => {


        console.log(error)
      })
    },
    //清空表单查询栏
    getClear(){


      this.seachObj={

    };
      this.getList();
    }
  }
- 效果

3、删除
3.1 定义api模块
在 src/api/hospitalSet.js添加方法
  //根据id删除数据
  removeDataById(id) {


    return request({


      url: `/admin/hosp/hospitalSet/deleteHospitalById/${

      id}`,
      method: 'delete'
    })
  }
3.2 定义页面组件模板
在table组件中添加删除列
<el-table-column label="操作" width="280" align="center">
    <template slot-scope="scope">
        <el-button type="danger" size="mini"
icon="el-icon-delete" @click="deleteById(scope.row.id)"> </el-button>
</template>
</el-table-column>
3.3 定义页面组件脚本
//根据id删除医院设置
deleteById(id){


    this.$confirm('此操作将永久删除该医院设置信息, 是否继续?', '提示', {


        confirmButtonText: '确定',
        cancelButtonText: '取消',
        type: 'warning'
    }).then(() => {


        //删除医院设置信息
        hospset.removeDataById(id).then(resp=>{


            this.$message({


                type: 'success',
                message: '删除成功!'
            });
            //刷新页面
            this.getList();
        })
    }).catch(() => {


        this.$message({


            type: 'info',
            message: '已取消删除'
        });
    });
}
}
4、批量删除
4.1 定义api模块
在 src/api/hospitalSet.js添加方法
  //批量删除
  batchRemove(idList){


    return request({


      url: `/admin/hosp/hospitalSet/deleteBatch`,
      method: 'delete',
      data:idList
    })
  }
4.2定义页面模版
4.3页面js脚本
    // 当表格复选框选项发生变化的时候触发
    handleSelectionChange(selection) {


      this.multipleSelection = selection
    },
    //批量删除
    batchDelete() {


      this.$confirm('此操作将永久【批量删除】该医院设置信息, 是否继续?', '提示', {


        confirmButtonText: '确定',
        cancelButtonText: '取消',
        type: 'warning'
      }).then(() => {


        //从multipleSelection中获取每个选中的id值
        var idList = [];
        for (var i = 0; i <this.multipleSelection.length; i++) {


            var obj = this.multipleSelection[i];
            var id = obj.id;
            //封装带idList中
            idList.push(id);
        }
        //删除医院设置信息
        hospset.batchRemove(idList).then(resp => {


          this.$message({


            type: 'success',
            message: '删除成功!'
          });
          //刷新页面
          this.getList();
        })
      }).catch(() => {


        this.$message({


          type: 'info',
          message: '已取消删除'
        });
      });
    }
5、锁定与取消锁定
5.1 定义api模块
在 src/api/hospitalSet.js添加方法
  //医院设置锁定和解锁
  lockHospitalSet(id,status){


    return request({


      url: `/admin/hosp/hospitalSet/lockHospitalSet/${

      id}/${

      status}`,
      method: 'put'
    })
  }
5.2 定义页面组件模板
<el-table-column label="操作" width="280" align="center">
    <template slot-scope="scope">
        <el-button type="danger" size="mini"
                   icon="el-icon-delete" @click="deleteById(scope.row.id)"></el-button>
        <el-button v-if="scope.row.status==1" type="primary" size="mini"
                   icon="el-icon-delete" @click="lockHostSet(scope.row.id,0)">锁定</el-button>
        <el-button v-if="scope.row.status==0" type="primary" size="mini"
                   icon="el-icon-delete" @click="lockHostSet(scope.row.id,1)">解锁</el-button>
    </template>
</el-table-column>
5.3 定义页面组件脚本
医院设置锁定和解锁
lockHostSet(id,status){


    hospset.lockHospitalSet(id,status).then(resp=>{


        if (status===1){


            this.$message({


                type: 'success',
                message: '解锁成功!'
            });
        }
        if (status===0){


            this.$message({


                type: 'success',
                message: '锁定成功!'
            });
        }
        //刷新列表
        this.getList();
    })
}
6、添加医院设置
6.1 定义api模块
//添加医院设置信息
addHospSet(hospitalSet){


    return request({


        url: `/admin/hosp/hospitalSet/addHospitalSet`,
        method: 'post',
        data:hospitalSet
    })
},
6.2 定义页面组件脚本
src/views/hosp/hospitalSet/form.vue,完善data定义
<script>
import hospset from "../../api/hospset";

export default {


  data() {


    return {


      hospitalSet: {

    }
    };
  },
  methods: {


    addHospSet() {


      hospset.addHospSet(this.hospitalSet).then(resp => {


        this.$message({


          type: 'success',
          message: '添加成功!'
        });
        this.$router.push({

    path: '/hospSet/list'})
      })
    },
    resetForm() {


      this.hospitalSet = {

    }
    }
  }
}
</script>
6.3 定义页面组件模板
src/views/hosp/hospitalSet/form.vue
<template>
    <div>
        <el-form :model="hospitalSet" label-width="100px" class="demo-ruleForm">
            <el-form-item label="医院名称">
                <el-input v-model="hospitalSet.hosname"/>
            </el-form-item>
            <el-form-item label="医院编号">
                <el-input v-model="hospitalSet.hoscode"/>
            </el-form-item>
            <el-form-item label="api基础路径">
                <el-input v-model="hospitalSet.apiUrl"/>
            </el-form-item>
            <el-form-item label="联系人姓名">
                <el-input v-model="hospitalSet.contactsName"/>
            </el-form-item>
            <el-form-item label="联系人手机">
                <el-input v-model="hospitalSet.contactsPhone"/>
            </el-form-item>

            <el-form-item>
                <el-button type="primary" @click="addHospSet()">创建</el-button>
                <el-button @click="resetForm()">重置</el-button>
            </el-form-item>
        </el-form>
    </div>
</template>
7、显示医院设置
7.1 定义api模块
在 src/api/hospitalSet.js添加方法
//根据id查询医院设置信息
getHospInfoById(id){


    return request({


        url: `/admin/hosp/hospitalSet/getHospitalSetById/${

      id}`,
        method: 'get'
    })
}
7.2 定义页面组件脚本
src/views/hosp/hospitalSet/form.vue,methods中定义回显方法
//根据id查询医院设置信息
getHospInfoById(id) {


    hospset.getHospInfoById(id).then(resp=>{


        this.hospitalSet=resp.data
    })
}
7.3 定义页面组件模板
src/views/hosp/hospitalSet/list.vue
<router-link :to="'/hospSet/edit/'+scope.row.id">
   <el-button type="primary" size="mini" icon="el-icon-edit"></el-button>
</router-link>
8、更新医院设置
8.1 定义api模块
在 src/api/hosp/hospitalSet.js添加方法
//修改医院设置信息
updateHospInfo(hospitalSet){


    return request({


        url: `/admin/hosp/hospitalSet/updateHospital`,
        method: 'post',
        data:hospitalSet
    })
8.2 定义页面组件脚本
src/views/hosp/hospitalSet/form.vue,methods中定义hospitalSet
//根据id修改医院设置信息
updateHospInfo() {


    hospset.updateHospInfo(this.hospitalSet).then(resp=>{


        this.$message({


            type: 'success',
            message: '修改成功!'
        });
        this.$router.push({

    path: '/hospSet/list'})
    })
},
完善saveOrUpdate方法
updateOrAdd(){


    //判断是否有id值
    if (this.hospitalSet.id){


        this.updateHospInfo()
    }else {


        this.addHospSet()
    }
}

- 获取地址上的id,并根据id查询用户信息,并回显数据
created() {


    //获取路由id值 调用接口得到医院设置信息
    if (this.$route.params && this.$route.params.id){


        const id = this.$route.params.id
        this.getHospInfoById(id);
    }else {


      //清空表单数据
      this.hospitalSet={

    }
    }
}
9、组件重用问题
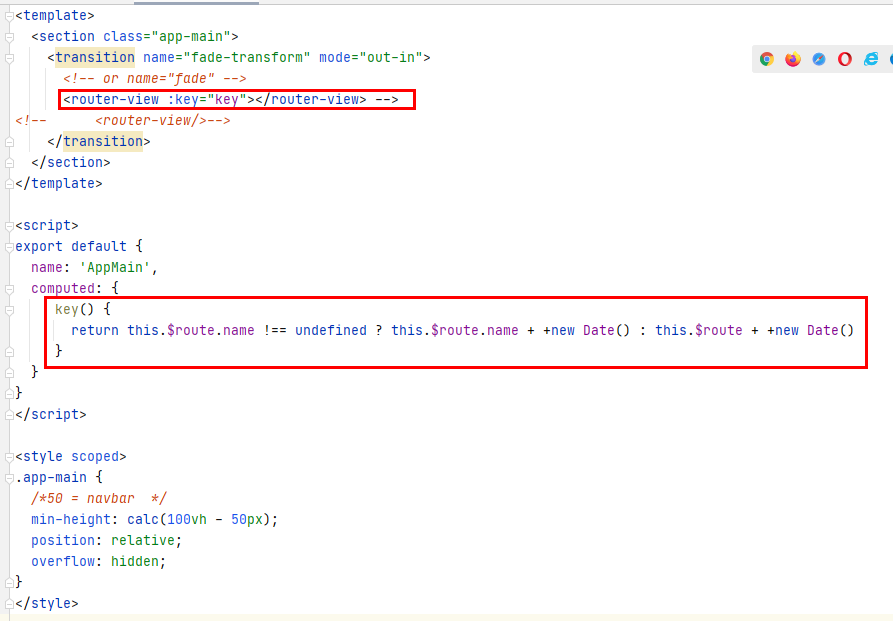
**问题:**vue-router导航切换 时,如果两个路由都渲染同个组件,
组件的生命周期方法(created或者mounted)不会再被调用, 组件会被重用,显示上一个路由渲染出来的自建
**解决方案:**可以简单的在 router-view上加上一个唯一的key,来保证路由切换时都会重新触发生命周期方法,确保组件被重新初始化。
修改 src/views/layout/components/AppMain.vue 文件如下:
<router-view:key="key"></router-view>

computed: {


    key() {


        return this.$route.name !== undefined ? this.$route.name + +new Date() : this.$route + +new Date()
    }
}