尚医通
一、配置nginx
由于我们后端有很多服务模块,每个模块都有对应的访问路径与端口,为了提供统一的api接口,所以使用nginx作为反向代理服务器;
反向代理,其实客户端对代理是无感知的,因为客户端不需要任何配置就可以访问,我们只需要将请求发送到反向代理服务器,由反向代理服务器去选择目标服务器获取数据后,在返回给客户端,此时反向代理服务器和目标服务器对外就是一个服务器,暴露的是代理服务器地址,隐藏了真实服务器IP地址
1,下载安装nginx(window版)
2,配置nginx
server {


listen       80;
server_name  localhost;

location /admin/hosp/ {


proxy_pass http://localhost:8201;
}
location /admin/cmn/ {


proxy_pass http://localhost:8205;
}

}
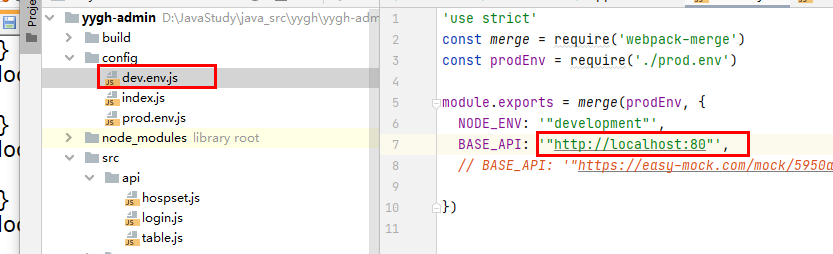
3,调整/config/dev.env.js中的BASE_API
BASE_API: ‘http://localhost:80’
说明:
1、后续添加service模块自行添加nginx配置,不做说明
2、后续我们将了Spring Cloud Gateway网关,将替代nginx网关
二、数据字典介绍
何为数据字典?数据字典就是管理系统常用的分类数据或者一些固定数据,例如:省市区三级联动数据、民族数据、行业数据、学历数据等,由于该系统大量使用这种数据,所以我们要做一个数据管理方便管理系统数据,一般系统基本都会做数据管理。
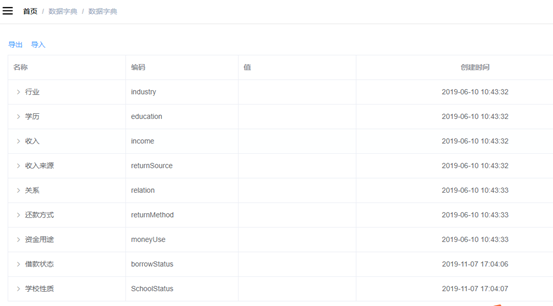
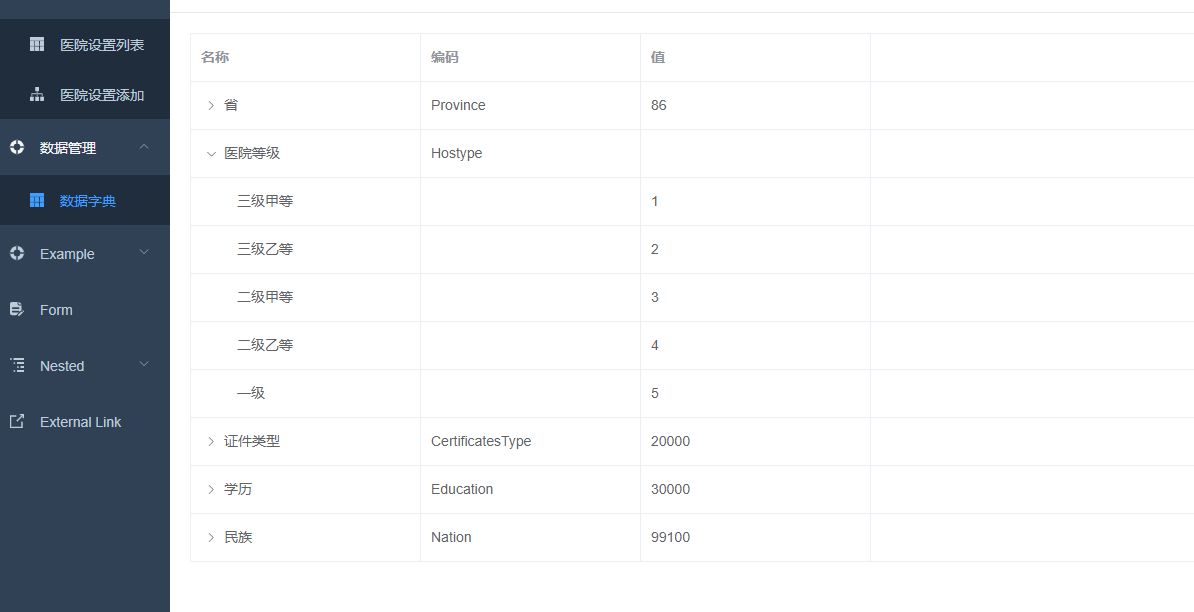
1、页面效果
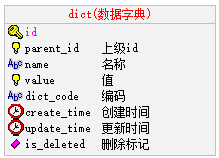
2、表设计
#
# Database "yygh_cmn"
#

CREATE DATABASE IF NOT EXISTS `yygh_cmn` CHARACTER SET utf8;
USE `yygh_cmn`;

#
# Structure for table "dict"
#

CREATE TABLE `dict` (
  `id` bigint(20) NOT NULL DEFAULT '0' COMMENT 'id',
  `parent_id` bigint(20) NOT NULL DEFAULT '0' COMMENT '上级id',
  `name` varchar(100) NOT NULL DEFAULT '' COMMENT '名称',
  `value` bigint(20) DEFAULT NULL COMMENT '值',
  `dict_code` varchar(20) DEFAULT NULL COMMENT '编码',
  `create_time` timestamp NOT NULL DEFAULT CURRENT_TIMESTAMP COMMENT '创建时间',
  `update_time` timestamp NOT NULL DEFAULT CURRENT_TIMESTAMP ON UPDATE CURRENT_TIMESTAMP COMMENT '更新时间',
  `is_deleted` tinyint(3) NOT NULL DEFAULT '1' COMMENT '删除标记(0:不可用 1:可用)',
  PRIMARY KEY (`id`),
  KEY `idx_dict_code` (`dict_code`),
  KEY `idx_parent_id` (`parent_id`)
) ENGINE=InnoDB DEFAULT CHARSET=utf8 COMMENT='组织架构表';
3、数据分析

parent_id:
上级id,通过id与parent_id构建上下级关系,例如:我们要获取所有行业数据,那么只需要查询parent_id=20000的数据
name:名称,例如:填写用户信息,我们要select标签选择民族,“汉族”就是数据字典的名称
value:值,例如:填写用户信息,我们要select标签选择民族,“1”(汉族的标识)就是数据字典的值
dict_code:编码,编码是我们自定义的,全局唯一,例如:我们要获取行业数据,我们可以通过parent_id获取,但是parent_id是不确定的,所以我们可以根据编码来获取行业数据
说明:系统中会使用省市区三级联动数据,该数据我们来自“国家统计局”官方数据,地址:http://www.stats.gov.cn/tjsj/tjbz/tjyqhdmhcxhfdm/2019/index.html
4,根据页面效果分析数据接口
数据字典是树形展示,由于数据众多,我们使用“树形数据与懒加载”的方式展现数据列表,其他就是对数据的新增、修改与删除操作,因此需要提供的接口如下:
1,根据上级id获取下级数据(构造树形数据),参考文档:https://element.eleme.cn/#/zhCN/component/table,页面搜索:树形数据与懒加载
2,导入接口
3,导出接口
接下来我们封装服务器端数据接口,接口测试通过后再做页面渲染
三、数据字典开发
1,搭建service-cmn模块
1.1 搭建service-cmn模块
搭建过程参考service-hosp模块
1.2 修改配置
修改pom.xml
<?xml version="1.0" encoding="UTF-8"?>
<project xmlns="http://maven.apache.org/POM/4.0.0"
         xmlns:xsi="http://www.w3.org/2001/XMLSchema-instance"
         xsi:schemaLocation="http://maven.apache.org/POM/4.0.0 http://maven.apache.org/xsd/maven-4.0.0.xsd">
    <parent>
        <artifactId>service</artifactId>
        <groupId>com.achang</groupId>
        <version>0.0.1-SNAPSHOT</version>
    </parent>
    <modelVersion>4.0.0</modelVersion>
    <packaging>jar</packaging>
    <artifactId>service-cmn</artifactId>

    <dependencies></dependencies>

    <build>
        <finalName>service-cmn</finalName>
        <plugins>
            <plugin>
                <groupId>org.springframework.boot</groupId>
                <artifactId>spring-boot-maven-plugin</artifactId>
            </plugin>
        </plugins>
    </build>

</project>
1、添加配置文件application.properties
# 服务端口
server.port=8205
# 服务名
spring.application.name=service-cmn

# 环境设置:dev、test、prod
spring.profiles.active=dev

# mysql数据库连接
spring.datasource.driver-class-name=com.mysql.jdbc.Driver
spring.datasource.url=jdbc:mysql://localhost:3306/yygh_cmn?characterEncoding=utf-8&useSSL=false
spring.datasource.username=root
spring.datasource.password=00000

#返回json的全局时间格式
spring.jackson.date-format=yyyy-MM-dd HH:mm:ss
spring.jackson.time-zone=GMT+8
1.3 启动类
package com.achang.yygh;

@SpringBootApplication
@ComponentScan("com.achang")
public class ServiceCmnMain8205 {


    public static void main(String[] args) {


        SpringApplication.run(ServiceCmnMain8205.class,args);
    }
}
- 配置类
package com.achang.yygh.config;

@Configuration
@MapperScan("com.achang.yygh.mapper")
public class HospConfig {


    //分页插件
    @Bean
    public PaginationInterceptor paginationInterceptor(){


        return new PaginationInterceptor();
    }
}
2、数据字典列表
根据element组件要求,返回列表数据必须包含hasChildren字典,如图:
https://element.eleme.cn/#/zh-CN/component/table

2.1 数据字典列表接口
2.1.1 model模块添加数据字典实体
在model模块查看实体:com.achang.yygh.model.cmn.Dict
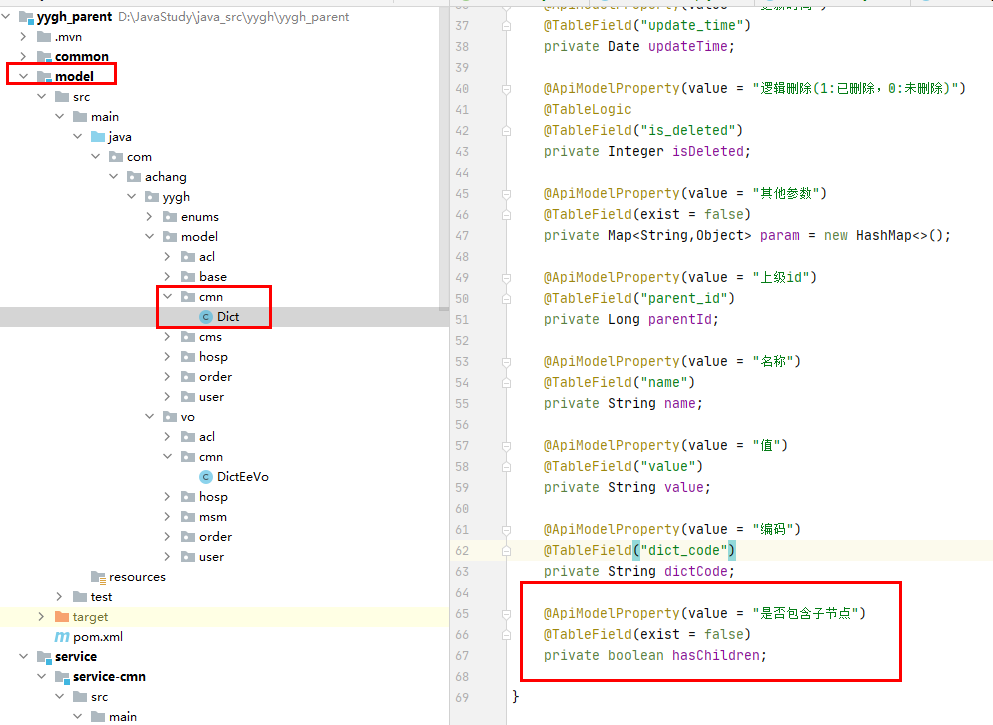
说明:hasChildren为树形组件所需字典,标识为数据库表中不存在该字段,所以在entity对象中添加这个属性,因为element-ui使用层级关系需要用到这个属性来判断是否有下一级
2.1.2 添加数据字典mapper
com.achang.yygh.mapper
package com.achang.yygh.mapper;

public interface DictMapper extends BaseMapper<Dict> {


}
2.1.3 添加数据字典service
1、添加com.achang.yygh.service.DictService
public interface DictService extends IService<Dict> {


    根据id查询子节点数据列表
    List<Dict> findByParentId(Long id);
}
2、添加com.achang.yygh.service.impl.DictServiceImpl接口实现
@Service
public class DictServiceImpl extends ServiceImpl<DictMapper, Dict> implements DictService {


    //根据id查询子节点数据列表
    @Override
    public List<Dict> findByParentId(Long id) {


        QueryWrapper<Dict> wrapper = new QueryWrapper<>();
        wrapper.eq("parent_id",id);
        List<Dict> dictList = baseMapper.selectList(wrapper);

        for (Dict dict : dictList) {


            Long dictId = dict.getId();
            boolean hasChild = this.hasChild(dictId);
            dict.setHasChildren(hasChild);
        }
        return dictList;
    }


    //判断id下面是否有子节点
    private boolean hasChild(Long id){


        QueryWrapper<Dict> wrapper = new QueryWrapper<>();
        wrapper.eq("parent_id",id);
        Integer count = baseMapper.selectCount(wrapper);
        return count > 0;
    }
}
2.1.4 添加数据字典controller
添加com.achang.yygh.controller.DictController
@RestController
@RequestMapping("/admin/cmn/dict")
public class DictController {


    @Autowired
    private DictService dictService;

    //根据id查询子节点数据列表
    @GetMapping("/findByParentId/{id}")
    public Result findByParentId(@PathVariable Long id){


        List<Dict> list = dictService.findByParentId(id);
        return Result.ok(list);
    }

}
2.2 数据字典列表前端
2.2.1 添加路由
在 src/router/index.js 文件添加路由
  {


    path: '/cmn',
    component: Layout,
    redirect: '/cmn/list',
    name: '数据管理',
    meta: {

     title: '数据管理', icon: 'example' },
    children: [
      {


        path: 'list',
        name: '数据字典',
        component: () => import('@/views/dict/list'),
        meta: {

     title: '数据字典', icon: 'table' }
      }
    ]
  }
说明:列表与查看都添加了
2.2.2 定义api
创建文件 src/api/cmn/dict.js
import request from '@/utils/request'

export default {


  //根据id查询子节点数据列表
  getHospSetList(id) {


    return request({


      url: `/admin/cmn/dict/findByParentId/${

      id}`,
      method: 'get'
    })
  },

}
2.2.3 方法调用
<script>
import dict from '../../api/dict'
export default {


name: "list",
  created() {


    this.getListById(1)
  },
  methods:{


    //根据id查询子节点列表
    getListById(id){


      dict.getHospSetList(id).then(resp=>{


          this.dictList = resp.data;
      })
    },
    //查询下面层级内容
    //element-ui帮我们封装了,tree为每次查找的id值
    getChildrens(tree, treeNode, resolve) {


      dict.getHospSetList(tree.id).then(response => {


        resolve(response.data)
      })
    },

  },
  data() {


    return {


      dictList:[],
    }
  },

}
</script>
2.2.3 表格渲染
<template>
  <div class="app-container">
    <el-table
      :data="dictList"
      style="width: 100%"
      row-key="id"
      border
      lazy
      :load="getChildrens"
      :tree-props="{children: 'children', hasChildren: 'hasChildren'}">
      <el-table-column label="名称" width="230" align="left">
        <template slot-scope="scope">
          <span>{

   { scope.row.name }}</span>
        </template>
      </el-table-column>

      <el-table-column label="编码" width="220">
        <template slot-scope="{row}">
          {

   { row.dictCode }}
        </template>
      </el-table-column>
      <el-table-column label="值" width="230" align="left">
        <template slot-scope="scope">
          <span>{

   { scope.row.value }}</span>
        </template>
      </el-table-column>
      <el-table-column label="创建时间" align="center">
        <template slot-scope="scope">
          <span>{

   { scope.row.createTime }}</span>
        </template>
      </el-table-column>
    </el-table>
  </div>
</template>
- 效果
3、EasyExcel介绍
Java解析、生成Excel比较有名的框架有Apache poi、jxl。但他们都存在一个严重的问题就是非常的耗内存,poi有一套SAX模式的API可以一定程度的解决一些内存溢出的问题,但POI还是有一些缺陷,比如07版Excel解压缩以及解压后存储都是在内存中完成的,内存消耗依然很大。easyexcel重写了poi对07版Excel的解析,能够原本一个3M的excel用POI sax依然需要100M左右内存降低到几M,并且再大的excel不会出现内存溢出,03版依赖POI的sax模式。在上层做了模型转换的封装,让使用者更加简单方便。
EasyExcel是一个基于Java的简单、省内存的读写Excel的开源项目。在尽可能节约内存的情况下支持读写百M的Excel。
文档地址:https://alibaba-easyexcel.github.io/index.html
github地址:https://github.com/alibaba/easyexcel
3.1 导出示例
示例链接:https://alibaba-easyexcel.github.io/quickstart/write.html
3.2 导入示例
示例链接:https://alibaba-easyexcel.github.io/quickstart/read.html
3.3 EasyExcel集成
3.3.1 添加依赖
1,添加依赖
<dependencies>
    <!-- https://mvnrepository.com/artifact/com.alibaba/easyexcel -->
    <dependency>
        <groupId>com.alibaba</groupId>
        <artifactId>easyexcel</artifactId>
        <version>2.1.1</version>
    </dependency>
</dependencies>
说明:我们已经在yygh-parent中的pom.xml中添加了所有依赖管理
2,导入导出需要定义对象,对象上需要引用easyexcel标签,所以model模块需要引入
scope:provided
<dependency>
    <groupId>com.alibaba</groupId>
    <artifactId>easyexcel</artifactId>
    <scope>provided </scope>
</dependency>
3,导入导出我们会把它封装成工具类,放在common-util中,所有模块公用,所以该模块也得引入
<dependency>
    <groupId>com.alibaba</groupId>
    <artifactId>easyexcel</artifactId>
</dependency>
4、数据字典导出
4.1 导出接口封装
4.1.1 在model模块添加导出实体
在model模块查看实体:com.achang.yygh.vo.cmn.DictEeVo
@ExcelProperty设置excel表头的内容
@Data
public class DictEeVo {


	@ExcelProperty(value = "id" ,index = 0)
	private Long id;

	@ExcelProperty(value = "上级id" ,index = 1)
	private Long parentId;

	@ExcelProperty(value = "名称" ,index = 2)
	private String name;

	@ExcelProperty(value = "值" ,index = 3)
	private String value;

	@ExcelProperty(value = "编码" ,index = 4)
	private String dictCode;

}
4.1.2 在service-cmn模块添加service方法
1、在DictService类添加接口
public interface DictService extends IService<Dict> {


    //导出数据字典接口
    void exportDictData(HttpServletResponse response);
}
2、在DictServiceImpl类添加接口实现类
//导出数据字典接口
@Override
public void exportDictData(HttpServletResponse response) {


    try{


        //设置编码集
        response.setCharacterEncoding("utf-8");
        //设置输出的文件格式
        response.setContentType("application/vnd.ms-excel");
        //设置文件名
        String fileName = "dict";
        //拼接输出的文件名和文件格式
        response.setHeader("Content-disposition","attachment;filename="+fileName+".xlsx");

        //查询数据库数据
        List<Dict> dictList = baseMapper.selectList(null);
        ArrayList<DictEeVo> voArrayList = new ArrayList<>(dictList.size());
        //将查询数据库的数据封装到对应的vo类中,并装到vo集合中
        for (Dict dict : dictList) {


            DictEeVo dictEeVo = new DictEeVo();
            BeanUtils.copyProperties(dict,dictEeVo,DictEeVo.class);
            voArrayList.add(dictEeVo);
        }

        EasyExcel.write(response.getOutputStream(),DictEeVo.class)
            .sheet("数据字典")
            .doWrite(voArrayList);

    }catch (IOException e){


        e.printStackTrace();
    }

}
4.1.3 在service-cmn模块添加controller方法
在DictController类添加方法
//导出数据字典接口
@GetMapping("/exportData")
public Result exportData(HttpServletResponse response){


    dictService.exportDictData(response);
    return Result.ok();
}
4.1.4 测试
直接通过浏览器导出数据:http://localhost:8205/admin/cmn/dict/exportData
4.2 导出前端实现
4.2.1 列表页面添加导出按钮
src/views/cmn/dict/list.vue
<el-button type="primary" plain @click="exportDict">导出字典数据</el-button>
4.2.2 添加导出方法
//导出数据字典数据
exportDict(){


//直接去请求接口
window.location.href="http://localhost:8205/admin/cmn/dict/exportData"
},
4.2.1 测试
5、数据字典导入
5.1 导入接口封装
5.1.1 创建回调监听器
package com.achang.yygh.listener;

public class DictListener extends AnalysisEventListener<DictEeVo> {


    private DictMapper mapper;

    //通过构造器获取到mapper对象操作数据库
    public DictListener(DictMapper mapper){


        this.mapper=mapper;
    }

    //一行一行读
    @Override
    public void invoke(DictEeVo dictEeVo, AnalysisContext analysisContext) {


        Dict dict = new Dict();
        BeanUtils.copyProperties(dictEeVo,dict);
        //加入数据库
        mapper.insert(dict);
    }

    @Override
    public void doAfterAllAnalysed(AnalysisContext analysisContext) {


    }
}
5.1.2 在service-cmn模块添加service方法
- 接口
public interface DictService extends IService<Dict> {


    //导入数据字典接口
    void importData(MultipartFile file);
}
- impl
//导入数据字典接口
@Override
public void importData(MultipartFile file) {


    try {


        EasyExcel.read(file.getInputStream(),DictEeVo.class,new DictListener(baseMapper))
            .sheet()
            .doRead();
    } catch (IOException e) {


        e.printStackTrace();
    }
}
5.1.3 在service-cmn模块添加controller方法
在DictController类添加方法
//导入数据字典接口
@PostMapping("/importData")
public Result importData(MultipartFile file){


    dictService.importData(file);
    return Result.ok();
}
5.2 导入前端实现
5.2.1 列表页面添加导入按钮
src/views/cmn/dict/list.vue
<el-button type="success" @click="importDict">导入字典数据</el-button>
5.2.2 添加导入弹出层
<!--导入弹出框-->
<el-dialog title="导入" :visible.sync="dialogImportVisible" width="480px">
    <el-form label-position="right" label-width="170px">

        <el-form-item label="文件">
            <el-upload
                       :multiple="false"
                       :on-success="onUploadSuccess"
                       :action="'http://localhost:8205/admin/cmn/dict/importData'"
                       class="upload-demo">
                <el-button size="small" type="primary">点击上传</el-button>
                <div slot="tip" class="el-upload__tip">只能上传excel文件,且不超过500kb</div>
            </el-upload>
        </el-form-item>

    </el-form>
    <div slot="footer" class="dialog-footer">
        <el-button @click="dialogImportVisible = false">
            取消
        </el-button>
    </div>
</el-dialog>
5.2.3 添加弹出可见模型
data() {


    return {


        dictList:[],
        dialogImportVisible: false,
        listLoading: true,
    }
}
5.2.4 添加方法
methods:{


    onUploadSuccess(response, file){


        this.$message.info('上传成功')
        //关闭弹框
        this.dialogImportVisible = false
        //刷新页面
        this.getListById(1)
    },
        //出入数据字典数据
        importDict(){


            //显示弹出框
            this.dialogImportVisible=true
        }
}
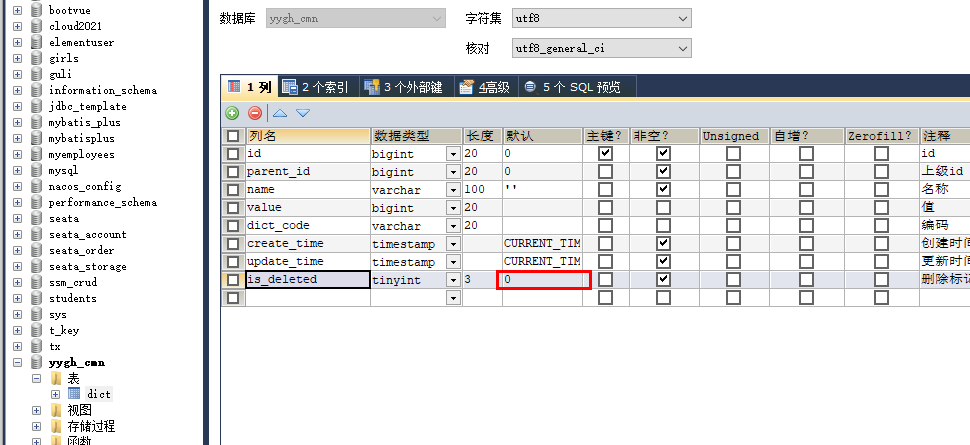
- 注意,阿昌这里测试,读取导入excel文件,前端一直不显示
后面发现是数据库isDelete逻辑删除字段默认的值为1,也就是说我导入的数据,他默认就是被删除的,所以再查询的时候就不会查询我导入的数据,所有就显示不出来
- 解决方法
将默认值改为0
四、Spring Cache + Redis 缓存数据
Spring Cache 是一个非常优秀的缓存组件。自Spring 3.1起,提供了类似于@Transactional注解事务的注解Cache支持,且提供了Cache抽象,方便切换各种底层Cache(如:redis)
使用Spring Cache的好处:
1,提供基本的Cache抽象,方便切换各种底层Cache;
2,通过注解Cache可以实现类似于事务一样,缓存逻辑透明的应用到我们的业务代码上,且只需要更少的代码就可以完成;
3,提供事务回滚时也自动回滚缓存;
4,支持比较复杂的缓存逻辑;
1、项目集成Spring Cache + Redis
因为缓存也是公共使用,所有的service模块都有可能使用缓存,所以我们把依赖与部分配置加在service-util模块,这样其他service模块都可以使用了
1.1 service-util添加依赖
在service-util模块的pom.xml添加依赖
<!-- redis -->
<dependency>
    <groupId>org.springframework.boot</groupId>
    <artifactId>spring-boot-starter-data-redis</artifactId>
</dependency>
<!-- spring2.X集成redis所需common-pool2-->
<dependency>
    <groupId>org.apache.commons</groupId>
    <artifactId>commons-pool2</artifactId>
    <version>2.6.0</version>
</dependency>
1.2 service-util添加配置类
创建com.achang.yygh.common.config.RedisConfig
package com.achang.yygh.common.config;

import com.fasterxml.jackson.annotation.JsonAutoDetect;
import com.fasterxml.jackson.annotation.PropertyAccessor;
import com.fasterxml.jackson.databind.ObjectMapper;
import org.springframework.cache.CacheManager;
import org.springframework.cache.annotation.EnableCaching;
import org.springframework.cache.interceptor.KeyGenerator;
import org.springframework.context.annotation.Bean;
import org.springframework.context.annotation.Configuration;
import org.springframework.data.redis.cache.RedisCacheConfiguration;
import org.springframework.data.redis.cache.RedisCacheManager;
import org.springframework.data.redis.connection.RedisConnectionFactory;
import org.springframework.data.redis.core.RedisTemplate;
import org.springframework.data.redis.serializer.Jackson2JsonRedisSerializer;
import org.springframework.data.redis.serializer.RedisSerializationContext;
import org.springframework.data.redis.serializer.RedisSerializer;
import org.springframework.data.redis.serializer.StringRedisSerializer;

import java.lang.reflect.Method;
import java.time.Duration;

/******
 @author 阿昌
 @create 2021-03-20 16:20
 *******
 */
@Configuration
@EnableCaching
public class RedisConfig {


    /**
     * 自定义key规则
     * @return
     */
    @Bean
    public KeyGenerator keyGenerator() {


        return new KeyGenerator() {


            @Override
            public Object generate(Object target, Method method, Object... params) {


                StringBuilder sb = new StringBuilder();
                sb.append(target.getClass().getName());
                sb.append(method.getName());
                for (Object obj : params) {


                    sb.append(obj.toString());
                }
                return sb.toString();
            }
        };
    }


    /**
     * 设置RedisTemplate规则
     * @param redisConnectionFactory
     * @return
     */
    @Bean
    public RedisTemplate<Object, Object> redisTemplate(RedisConnectionFactory redisConnectionFactory) {


        RedisTemplate<Object, Object> redisTemplate = new RedisTemplate<>();
        redisTemplate.setConnectionFactory(redisConnectionFactory);
        Jackson2JsonRedisSerializer jackson2JsonRedisSerializer = new Jackson2JsonRedisSerializer(Object.class);

        //解决查询缓存转换异常的问题
        ObjectMapper om = new ObjectMapper();
        // 指定要序列化的域,field,get和set,以及修饰符范围,ANY是都有包括private和public
        om.setVisibility(PropertyAccessor.ALL, JsonAutoDetect.Visibility.ANY);
        // 指定序列化输入的类型,类必须是非final修饰的,final修饰的类,比如String,Integer等会跑出异常
        om.enableDefaultTyping(ObjectMapper.DefaultTyping.NON_FINAL);
        jackson2JsonRedisSerializer.setObjectMapper(om);

        //序列号key value
        redisTemplate.setKeySerializer(new StringRedisSerializer());
        redisTemplate.setValueSerializer(jackson2JsonRedisSerializer);
        redisTemplate.setHashKeySerializer(new StringRedisSerializer());
        redisTemplate.setHashValueSerializer(jackson2JsonRedisSerializer);

        redisTemplate.afterPropertiesSet();
        return redisTemplate;
    }

    /**
     * 设置CacheManager缓存规则
     * @param factory
     * @return
     */
    @Bean
    public CacheManager cacheManager(RedisConnectionFactory factory) {


        RedisSerializer<String> redisSerializer = new StringRedisSerializer();
        Jackson2JsonRedisSerializer jackson2JsonRedisSerializer = new Jackson2JsonRedisSerializer(Object.class);

        //解决查询缓存转换异常的问题
        ObjectMapper om = new ObjectMapper();
        om.setVisibility(PropertyAccessor.ALL, JsonAutoDetect.Visibility.ANY);
        om.enableDefaultTyping(ObjectMapper.DefaultTyping.NON_FINAL);
        jackson2JsonRedisSerializer.setObjectMapper(om);

        // 配置序列化(解决乱码的问题),过期时间600秒
        RedisCacheConfiguration config = RedisCacheConfiguration.defaultCacheConfig()
                .entryTtl(Duration.ofSeconds(600))
                .serializeKeysWith(RedisSerializationContext.SerializationPair.fromSerializer(redisSerializer))
                .serializeValuesWith(RedisSerializationContext.SerializationPair.fromSerializer(jackson2JsonRedisSerializer))
                .disableCachingNullValues();

        RedisCacheManager cacheManager = RedisCacheManager.builder(factory)
                .cacheDefaults(config)
                .build();
        return cacheManager;
    }

}
说明:
@EnableCaching:标记注解 @EnableCaching,开启缓存,并配置Redis缓存管理器。@EnableCaching 注释触发后置处理器, 检查每一个Spring bean 的 public 方法是否存在缓存注解。如果找到这样的一个注释, 自动创建一个代理拦截方法调用和处理相应的缓存行为。
1.3 service-cmn添加redis配置
#redis配置
spring.redis.host=47.120.237.184
spring.redis.port=6379
spring.redis.password=ach2ng@123356
spring.redis.database= 0
spring.redis.timeout=1800000

#redis池设置
spring.redis.lettuce.pool.max-active=20
spring.redis.lettuce.pool.max-wait=-1
#最大阻塞等待时间(负数表示没限制)
spring.redis.lettuce.pool.max-idle=5
spring.redis.lettuce.pool.min-idle=0
2、使用Spring Cache
2.1 常用缓存标签
2.1.2 缓存@Cacheable
根据方法对其返回结果进行缓存,下次请求时,如果缓存存在,则直接读取缓存数据返回;如果缓存不存在,则执行方法,并把返回的结果存入缓存中。一般用在查询方法上。
查看源码,属性值如下:
| 属性/方法名 | 解释 |
|---|---|
| value | 缓存名,必填,它指定了你的缓存存放在哪块命名空间 |
| cacheNames | 与 value 差不多,二选一即可 |
| key | 可选属性,可以使用 SpEL 标签自定义缓存的key |
2.1.2 缓存@CachePut
使用该注解标志的方法,每次都会执行,并将结果存入指定的缓存中。其他方法可以直接从响应的缓存中读取缓存数据,而不需要再去查询数据库。一般用在新增方法上。
查看源码,属性值如下:
| 属性/方法名 | 解释 |
|---|---|
| value | 缓存名,必填,它指定了你的缓存存放在哪块命名空间 |
| cacheNames | 与 value 差不多,二选一即可 |
| key | 可选属性,可以使用 SpEL 标签自定义缓存的key |
2.1.3 缓存@CacheEvict
使用该注解标志的方法,会清空指定的缓存。一般用在更新或者删除方法上
查看源码,属性值如下:
| 属性/方法名 | 解释 |
|---|---|
| value | 缓存名,必填,它指定了你的缓存存放在哪块命名空间 |
| cacheNames | 与 value 差不多,二选一即可 |
| key | 可选属性,可以使用 SpEL 标签自定义缓存的key |
| allEntries | 是否清空所有缓存,默认为 false。如果指定为 true,则方法调用后将立即清空所有的缓存 |
| beforeInvocation | 是否在方法执行前就清空,默认为 false。如果指定为 true,则在方法执行前就会清空缓存 |
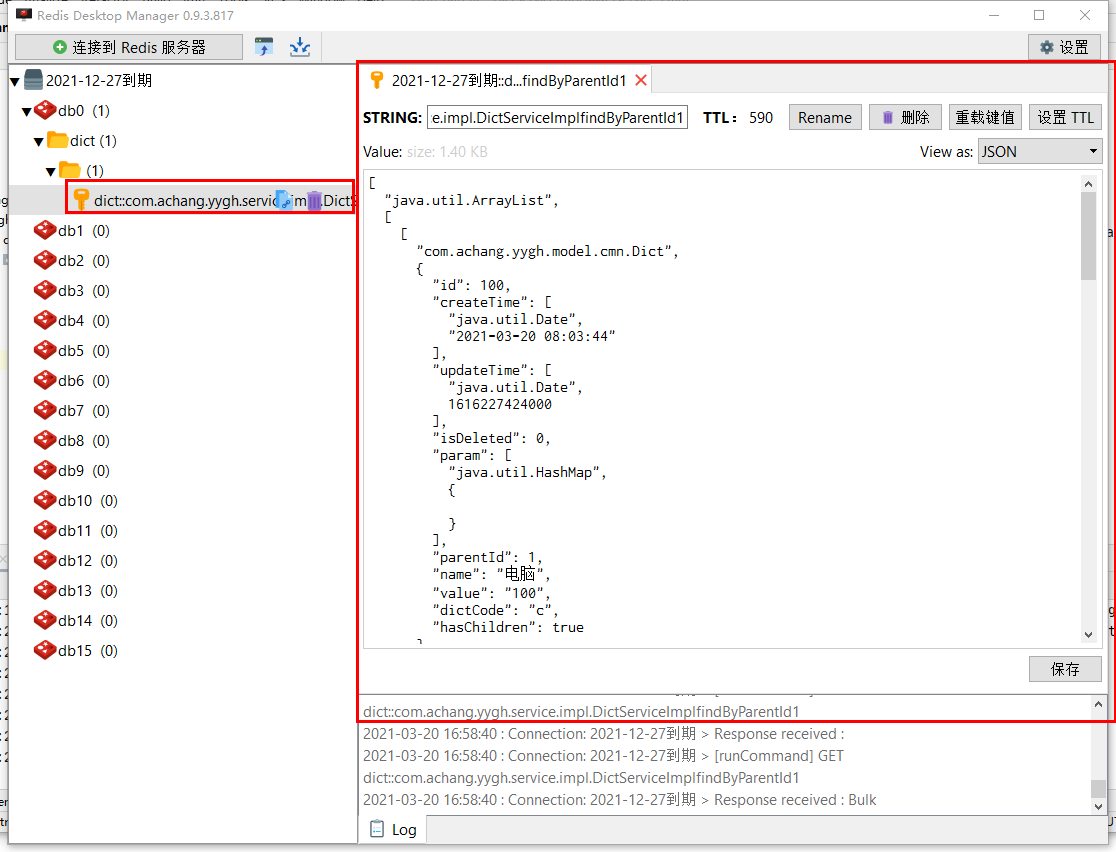
2.2 数据字典应用
改造com.achang.yygh.cmn.service.impl.DictServiceImpl类方法
@Service
public class DictServiceImpl extends ServiceImpl<DictMapper, Dict> implements DictService {


    //根据id查询子节点数据列表
    //keyGenerator:key的生成个规则,指定为我们上面redisconfig配置类中指定的生成规则
    @Cacheable(value = "dict",keyGenerator = "keyGenerator")
    @Override
    public List<Dict> findByParentId(Long id) {


        QueryWrapper<Dict> wrapper = new QueryWrapper<>();
        wrapper.eq("parent_id",id);
        List<Dict> dictList = baseMapper.selectList(wrapper);

        for (Dict dict : dictList) {


            Long dictId = dict.getId();
            boolean hasChild = this.hasChild(dictId);
            dict.setHasChildren(hasChild);
        }
        return dictList;
    }

    //导入数据字典接口
    @Override
    //allEntries = true: 方法调用后清空所有缓存
    @CacheEvict(value = "dict", allEntries=true)
    public void importData(MultipartFile file) {


        try {


            EasyExcel.read(file.getInputStream(),DictEeVo.class,new DictListener(baseMapper))
                    .sheet()
                    .doRead();
        } catch (IOException e) {


            e.printStackTrace();
        }
    }

}
- 测试