尚医通
一、医院管理
目前我们把医院、科室和排班都上传到了平台,那么管理平台就应该把他们管理起来,在我们的管理平台能够直观的查看这些信息。
1、 医院管理效果展示
1、列表
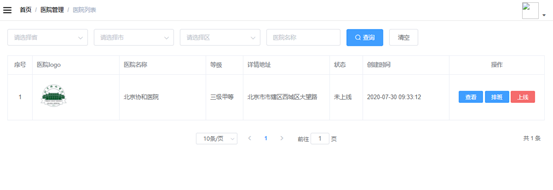
2、 详情

二、注册中心与服务调用
目前在医院列表中需要医院的信息和等级信息,而两段信息属于不同的的模块,service-hosp和service-cmn,所以我们需要使用到远程调用。
1、Nacos概述
1.1 什么是Nacos
Nacos 是阿里巴巴推出来的一个新开源项目,这是一个更易于构建云原生应用的动态服务发现、配置管理和服务管理平台。
Nacos 致力于帮助您发现、配置和管理微服务。Nacos 提供了一组简单易用的特性集,帮助您快速实现动态服务发现、服务配置、服务元数据及流量管理。
Nacos 帮助您更敏捷和容易地构建、交付和管理微服务平台。 Nacos 是构建以“服务”为中心的现代应用架构 (例如微服务范式、云原生范式) 的服务基础设施
1.2 常见的注册中心
-
Eureka(原生,2.0遇到瓶颈,停止维护)
-
Zookeeper(支持,专业的独立产品。例如:dubbo)
-
Consul(原生,GO语言开发)
-
Nacos
相对于 Spring Cloud Eureka 来说,Nacos 更强大。
Nacos = Spring Cloud Eureka + Spring Cloud Config
Nacos 可以与 Spring, Spring Boot, Spring Cloud 集成,并能代替 Spring Cloud Eureka, Spring Cloud Config。
-
通过 Nacos Server 和 spring-cloud-starter-alibaba-nacos-config 实现配置的动态变更。
-
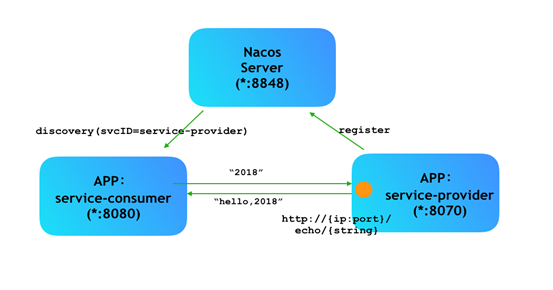
通过 Nacos Server 和 spring-cloud-starter-alibaba-nacos-discovery 实现服务的注册与发现。
1.3 Nacos结构图
1.4 Nacos下载和安装
下载地址:https://github.com/alibaba/nacos/releases
下载版本:nacos-server-1.1.4.tar.gz或nacos-server-1.1.4.zip,解压任意目录即可
启动Nacos服务
Linux/Unix/Mac
启动命令(standalone代表着单机模式运行,非集群模式)
启动命令:sh startup.sh -m standalone
Windows
启动命令:cmd startup.cmd 或者双击startup.cmd运行文件。
访问:http://localhost:8848/nacos
用户名密码:nacos/nacos
2、注册服务
2.1 Nacos注册service-hosp
第一步:在service模块pom文件引入依赖
<!-- 服务注册 -->
<dependency>
    <groupId>com.alibaba.cloud</groupId>
    <artifactId>spring-cloud-starter-alibaba-nacos-discovery</artifactId>
</dependency>
第二步:在service-hosp的配置文件添加nacos服务地址
#nacos服务地址
spring.cloud.nacos.discovery.server-addr=localhost:8848
第三步:在service-hosp的启动类添加注解
@EnableDiscoveryClient 开启服务发现
@SpringBootApplication
@ComponentScan("com.achang")//扫描swagger
@EnableDiscoveryClient //开启服务发现
public class ServiceHospMain8201 {


    public static void main(String[] args) {


        SpringApplication.run(ServiceHospMain8201.class,args);
    }
}
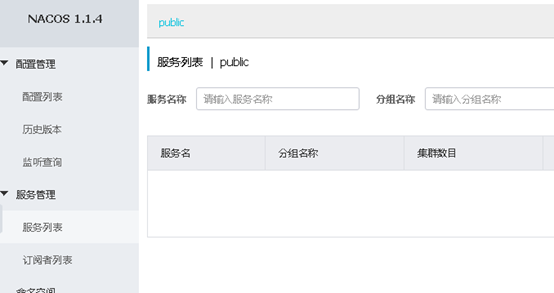
启动service-hosp服务,在Nacos管理界面的服务列表中可以看到注册的服务
service-cmn注册过程和service-hosp相同(省略)

三、医院管理实现
1、医院列表
1.1 医院列表api接口
1.1.1 添加service分页接口与实现
在HospitalService类添加分页接口
- 接口
public interface HospitalService {


    //多条件分页查询
    Page<Hospital> getPage(Integer page, Integer limit, HospitalQueryVo hospitalQueryVo);
}
- impl
//多条件分页查询
@Override
public Page<Hospital> getPage(Integer page, Integer limit, HospitalQueryVo hospitalQueryVo) {


    //构建排序规则
    Sort sort = Sort.by(Sort.Direction.DESC, "createTime");
    //构建分页规则
    PageRequest pageRequest = PageRequest.of(page-1, limit, sort);
    //构建匹配规则
    ExampleMatcher matching = ExampleMatcher.matching();
    //改变默认字符串匹配方式:模糊查询
    ExampleMatcher stringMatcher = matching.withStringMatcher(ExampleMatcher.StringMatcher.CONTAINING);
    //改变默认大小写忽略方式:忽略大小写
    stringMatcher.withIgnoreCase(true);

    Hospital hospital = new Hospital();
    BeanUtils.copyProperties(hospitalQueryVo,hospital);


    //构建规则
    Example<Hospital> example = Example.of(hospital, stringMatcher);

    return hospitalRepository.findAll(example, pageRequest);
}
1.1.2 添加controller方法
添加com.achang.yygh.hosp.controller.HospitalController类
@RestController
@CrossOrigin
@RequestMapping("/admin/hosp/hospital")
public class HospitalController {


    @Autowired
    private HospitalService hospitalService;


    //多条件分页查询
    @GetMapping("/pageList/{page}/{limit}")
    public Result pageList(@PathVariable Integer page,
                           @PathVariable Integer limit,
                           @RequestBody(required = false) HospitalQueryVo hospitalQueryVo){


        Page<Hospital> pageList = hospitalService.getPage(page,limit,hospitalQueryVo);
        return Result.ok(pageList);
    }


}
1.2 service-cmn模块提供接口
由于我们的医院等级、省市区地址都是取的数据字典value值,因此我们在列表显示医院等级与医院地址时要根据数据字典value值获取数据字典名称
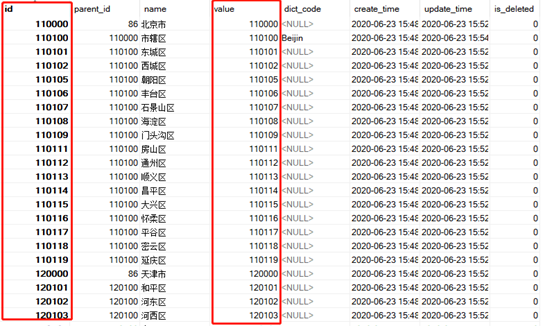
通过学习数据字典我们知道,根据上级编码与value值可以获取对应的数据字典名称,如果value值能够保持唯一(不一定唯一),我们也可以直接通过value值获取数据字典名称,目前省市区三级数据我们使用的是国家统计局的数据,数据编码我们就是数据字典的id与value,所以value能够唯一确定一条数据字典,如图:
1.2.1添加service接口与实现
在DictService类添加接口
- 接口
public interface DictService extends IService<Dict> {


    //根据【dictCode可选】、value获取dictName
    String getDictName(String dictCode, String value);
}
- impl
    //根据【dictCode可选】、value获取dictName
    @Override
    public String getDictName(String dictCode, String value) {


        //判断是否有传dictCode
        if (StringUtils.isEmpty(dictCode)){


            //没传dictCode
            QueryWrapper<Dict> wrapper = new QueryWrapper<>();
            wrapper.eq("value",value);
            Dict dict = baseMapper.selectOne(wrapper);
            return dict.getName();
        }else {


            //有传dictCode
            Dict dict = this.getDictByDictcode(dictCode);
            Long parentId = dict.getId();
            Dict finalDict = baseMapper.selectOne(new QueryWrapper<Dict>().
                    eq("parent_id", parentId).
                    eq("value", value));
            return finalDict.getName();
        }
1.2.2添加controller方法
DictController类添加方法
//根据dictcode和value查询,获取数据字典名称
@GetMapping("/getName/{dictCode}/{value}")
public String getName(@PathVariable String dictCode,
                      @PathVariable String value){


    return dictService.getDictName(dictCode,value);
}

//根据value查询
@GetMapping("/getName//{value}")
public String getName(@PathVariable String value){


    return dictService.getDictName("",value);
}
说明:提供两个api接口,如省市区不需要上级编码,医院等级需要上级编码
1.3封装Feign服务调用
1.3.1搭建service-client父模块
搭建过程如service父模块
修改pom.xml文件
<?xml version="1.0" encoding="UTF-8"?>
<project xmlns="http://maven.apache.org/POM/4.0.0"
         xmlns:xsi="http://www.w3.org/2001/XMLSchema-instance"
         xsi:schemaLocation="http://maven.apache.org/POM/4.0.0 http://maven.apache.org/xsd/maven-4.0.0.xsd">
    <parent>
        <artifactId>yygh_parent</artifactId>
        <groupId>com.achang</groupId>
        <version>0.0.1-SNAPSHOT</version>
    </parent>
    <modelVersion>4.0.0</modelVersion>
    <packaging>pom</packaging>
    <artifactId>service-client</artifactId>

    <dependencies>
        <dependency>
            <groupId>com.achang</groupId>
            <artifactId>common-util</artifactId>
            <version>0.0.1-SNAPSHOT</version>
        </dependency>
        <dependency>
            <groupId>com.achang</groupId>
            <artifactId>model</artifactId>
            <version>0.0.1-SNAPSHOT</version>
        </dependency>
        <dependency>
            <groupId>org.springframework.boot</groupId>
            <artifactId>spring-boot-starter-web</artifactId>
            <scope>provided </scope>
        </dependency>

        <!-- 服务调用feign -->
        <dependency>
            <groupId>org.springframework.cloud</groupId>
            <artifactId>spring-cloud-starter-openfeign</artifactId>
            <scope>provided </scope>
        </dependency>
    </dependencies>

</project>
1.3.2 搭建service-cmn-client模块
搭建过程如service-hosp模块
1.3.2.1修改pom.xml文件
<?xml version="1.0" encoding="UTF-8"?>
<project xmlns="http://maven.apache.org/POM/4.0.0"
         xmlns:xsi="http://www.w3.org/2001/XMLSchema-instance"
         xsi:schemaLocation="http://maven.apache.org/POM/4.0.0 http://maven.apache.org/xsd/maven-4.0.0.xsd">
    <parent>
        <artifactId>service-client</artifactId>
        <groupId>com.achang</groupId>
        <version>0.0.1-SNAPSHOT</version>
    </parent>
    <modelVersion>4.0.0</modelVersion>
    <packaging>jar</packaging>
    <name>service-cmn-client</name>
    <description>service-cmn-client</description>
    <artifactId>service-cmn-client</artifactId>

</project>
1.3.2.2添加Feign接口类
@FeignClient(value = "service-cmn")
@Service
public interface DictFeignClient {


    //根据dictcode和value查询,获取数据字典名称
    @GetMapping("/admin/cmn/dict/getName/{dictCode}/{value}")
    public String getName(@PathVariable String dictCode,
                          @PathVariable String value);

    //根据value查询,获取数据字典名称
    @GetMapping("/admin/cmn/dict/getName//{value}")
    public String getName(@PathVariable String value);

}
1.4医院接口远程调用数据字典
1.4.1 service模块引入依赖
在pom.xml添加依赖
<!-- 服务调用feign -->
<dependency>
    <groupId>org.springframework.cloud</groupId>
    <artifactId>spring-cloud-starter-openfeign</artifactId>
</dependency>
1.4.2 操作service-hosp模块
1.4.2.1在service-hosp添加依赖
<dependency>
    <groupId>com.atguigu.yygh</groupId>
    <artifactId>service-cmn-client</artifactId>
    <version>1.0</version>
</dependency>
1.4.2.2 启动类开启服务调用
@SpringBootApplication
@ComponentScan("com.achang")//扫描swagger
@EnableDiscoveryClient //开启服务发现
@EnableFeignClients(basePackages = "com.achang")//开启远程调用
public class ServiceHospMain8201 {


    public static void main(String[] args) {


        SpringApplication.run(ServiceHospMain8201.class,args);
    }
}
1.4.2.3调整service方法
修改HospitalServiceImpl类实现分页
    //多条件分页查询
    @Override
    public Page<Hospital> getPage(Integer page, Integer limit, HospitalQueryVo hospitalQueryVo) {


        //构建排序规则
        Sort sort = Sort.by(Sort.Direction.DESC, "createTime");
        //构建分页规则
        PageRequest pageRequest = PageRequest.of(page-1, limit, sort);
        //构建匹配规则
        ExampleMatcher matching = ExampleMatcher.matching();
        //改变默认字符串匹配方式:模糊查询
        ExampleMatcher stringMatcher = matching.withStringMatcher(ExampleMatcher.StringMatcher.CONTAINING);
        //改变默认大小写忽略方式:忽略大小写
        stringMatcher.withIgnoreCase(true);

        Hospital hospital = new Hospital();
        BeanUtils.copyProperties(hospitalQueryVo,hospital);


        //构建规则
        Example<Hospital> example = Example.of(hospital, stringMatcher);

        Page<Hospital> all = hospitalRepository.findAll(example, pageRequest);

        all.getContent().stream().forEach(item->{


            this.setHospitalHostType(item);
        });
        return all;
    }
    private Hospital setHospitalHostType(Hospital item){


        //根据dictCode和value获取医院等级名称
        String hospitalRankName = dictFeignClient.getName("Hostype", item.getHostype());
        //查询省、市、地区
        String provinceName = dictFeignClient.getName(item.getProvinceCode());
        String districtName = dictFeignClient.getName(item.getDistrictCode());
        String cityName = dictFeignClient.getName(item.getCityCode());

        item.getParam().put("provinceName",provinceName);
        item.getParam().put("districtName",districtName);
        item.getParam().put("cityName",cityName);
        item.getParam().put("hospitalRankName",hospitalRankName);
        item.getParam().put("fullAddress",provinceName+districtName+cityName);

        return item;
    }
- 测试
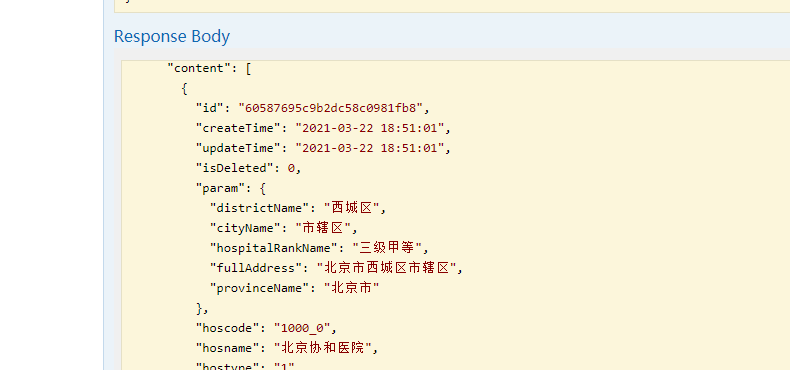
1.5 添加数据字典显示接口
1.5.1 编写controller
根据dicode查询下层节点
    //根据dictCode获取下级节点
    @GetMapping("/findByDictCode/{dictCode}")
    public Result findByDictCode(@PathVariable String dictCode){


        List<Dict> list = dictService.findByDictCode(dictCode);
        return Result.ok(list);
    }
1.5.2 编写service
根据dicode查询下层节点
import com.achang.exception.YyghException;
import com.achang.result.ResultCodeEnum;
import com.achang.yygh.listener.DictListener;
import com.achang.yygh.mapper.DictMapper;
import com.achang.yygh.model.cmn.Dict;
import com.achang.yygh.service.DictService;
import com.achang.yygh.vo.cmn.DictEeVo;
import com.alibaba.excel.EasyExcel;
import com.baomidou.mybatisplus.core.conditions.query.QueryWrapper;
import com.baomidou.mybatisplus.extension.service.impl.ServiceImpl;
import org.springframework.beans.BeanUtils;
import org.springframework.cache.annotation.CacheEvict;
import org.springframework.cache.annotation.Cacheable;
import org.springframework.stereotype.Service;
import org.springframework.util.StringUtils;
import org.springframework.web.multipart.MultipartFile;

import javax.servlet.http.HttpServletResponse;
import java.io.IOException;
import java.util.ArrayList;
import java.util.List;

@Service
public class DictServiceImpl extends ServiceImpl<DictMapper, Dict> implements DictService {


    //根据dictCode获取下级节点
    @Override
    public List<Dict> findByDictCode(String dictCode) {


        //根据dictCode获取对应的id
        Dict dict = this.getDictByDictcode(dictCode);
        Long id = dict.getId();
        //根据id获取下层节点
        return this.findByParentId(id);
    }

    //根据dict_code获取对象
    private Dict getDictByDictcode(String dictCode){


        QueryWrapper<Dict> wrapper = new QueryWrapper<>();
        wrapper.eq("dict_code",dictCode);
        return baseMapper.selectOne(wrapper);
    }


    //判断id下面是否有子节点
    private boolean hasChild(Long id){


        QueryWrapper<Dict> wrapper = new QueryWrapper<>();
        wrapper.eq("parent_id",id);
        Integer count = baseMapper.selectCount(wrapper);
        return count > 0;
    }

    //根据id查询子节点数据列表
    //keyGenerator:key的生成个规则,指定为我们上面redisconfig配置类中指定的生成规则
    @Cacheable(value = "dict",keyGenerator = "keyGenerator")
    @Override
    public List<Dict> findByParentId(Long id) {


        QueryWrapper<Dict> wrapper = new QueryWrapper<>();
        wrapper.eq("parent_id",id);
        List<Dict> dictList = baseMapper.selectList(wrapper);

        for (Dict dict : dictList) {


            Long dictId = dict.getId();
            boolean hasChild = this.hasChild(dictId);
            dict.setHasChildren(hasChild);
        }
        return dictList;
    }
}
- 测试
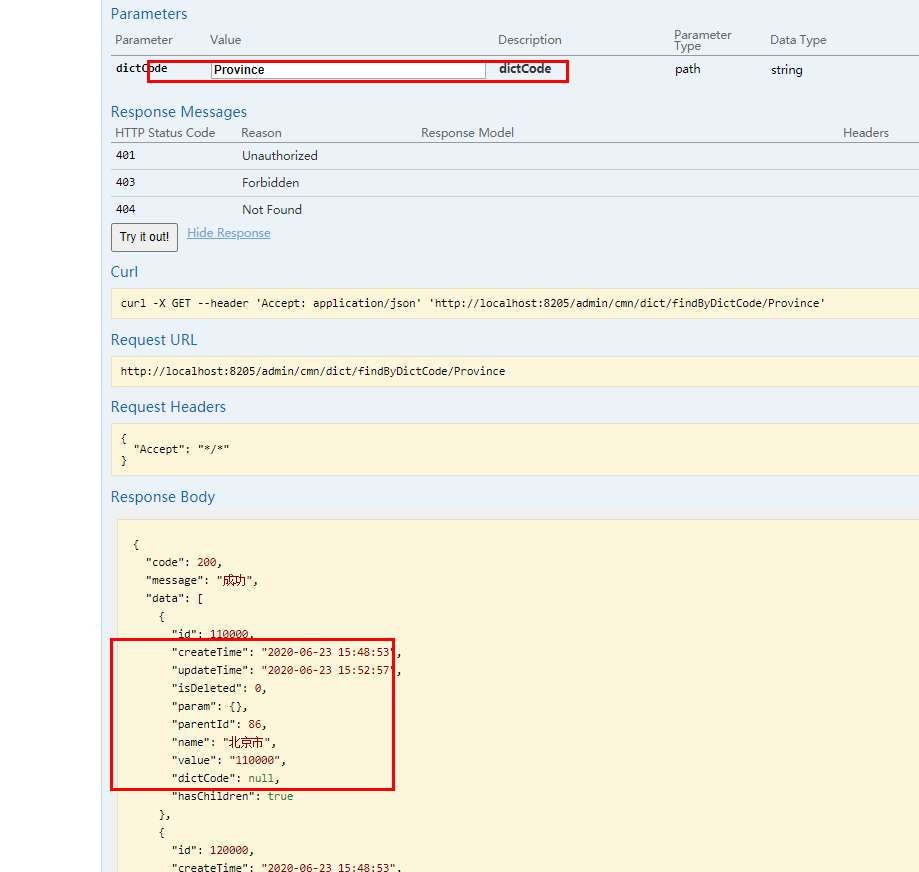
1.6 医院列表前端
1.6.1 添加路由
在 src/router/index.js 文件添加路由
{


    path: 'hosp/list',
        name: '医院列表',
            component: () => import('@/views/hosp/list.vue'),
                meta: {

     title: '医院列表', icon: 'tree' }
}
1.6.2封装api请求
创建/api/hosp.js
import request from '@/utils/request'


export default {


  //多条件分页查询
  getHospPageList(page,limit,searchObject) {


    return request({


      url: `/admin/hosp/hospital//pageList/${

      page}/${

      limit}`,
      method: 'get',
      params:searchObject,
    })
  },
  //根据dictCode查询下级数据字典
  findByDictCode(dictCode){


    return request({


      url: `/admin/cmn/dict/findByDictCode/${

      dictCode}`,
      method: 'get'
    })
  },
  //根据数据id查询子节点数据
  findByParentId(id){


    return request({


      url: `/admin/cmn/dict//findByParentId/${

      id}`,
      method: 'get'
    })
  },

}
1.6.3 添加组件
创建/views/hosp/hospital/list.vue组件
<template>
  <div class="app-container">
    <el-button type="primary" @click="exportDict">导出字典数据</el-button>
    <el-button type="success" @click="importDict">导入字典数据</el-button>
    <el-table
      :data="dictList"
      style="width: 100%"
      row-key="id"
      border
      lazy
      :load="getChildrens"
      :tree-props="{children: 'children', hasChildren: 'hasChildren'}">
      <el-table-column label="名称" width="230" align="left">
        <template slot-scope="scope">
          <span>{

   { scope.row.name }}</span>
        </template>
      </el-table-column>

      <el-table-column label="编码" width="220">
        <template slot-scope="{row}">
          {

   { row.dictCode }}
        </template>
      </el-table-column>
      <el-table-column label="值" width="230" align="left">
        <template slot-scope="scope">
          <span>{

   { scope.row.value }}</span>
        </template>
      </el-table-column>
      <el-table-column label="创建时间" align="center">
        <template slot-scope="scope">
          <span>{

   { scope.row.createTime }}</span>
        </template>
      </el-table-column>
    </el-table>
    <!--导入弹出框-->
    <el-dialog title="导入" :visible.sync="dialogImportVisible" width="480px">
      <el-form label-position="right" label-width="170px">

        <el-form-item label="文件">
          <el-upload
            :multiple="false"
            :on-success="onUploadSuccess"
            :action="'http://localhost:8205/admin/cmn/dict/importData'"
            class="upload-demo">
            <el-button size="small" type="primary">点击上传</el-button>
            <div slot="tip" class="el-upload__tip">只能上传excel文件,且不超过500kb</div>
          </el-upload>
        </el-form-item>

      </el-form>
      <div slot="footer" class="dialog-footer">
        <el-button @click="dialogImportVisible = false">
          取消
        </el-button>
      </div>
    </el-dialog>

  </div>

</template>


<script>
import dict from '../../api/dict'
export default {


name: "list",
  created() {


    this.getListById(1)
  },
  methods:{


    onUploadSuccess(response, file){


      this.$message.info('上传成功')
      //关闭弹框
      this.dialogImportVisible = false
      //刷新页面
      this.getListById(1)
    },
    //出入数据字典数据
    importDict(){


      //显示弹出框
      this.dialogImportVisible=true
    },
    //导出数据字典数据
    exportDict(){


      //直接去请求接口
      window.location.href="http://localhost:8205/admin/cmn/dict/exportData"
    },
    //根据id查询子节点列表
    getListById(id){


      dict.getHospSetList(id).then(resp=>{


          this.dictList = resp.data;
      })
    },
    //查询下面层级内容
    //element-ui帮我们封装了,tree为每次查找的id值
    getChildrens(tree, treeNode, resolve) {


      dict.getHospSetList(tree.id).then(response => {


        resolve(response.data)
      })
    },

  },
  data() {


    return {


      dictList:[],
      dialogImportVisible: false,
      listLoading: true,
    }
  },


}
</script>

<style scoped></style>
- 测试
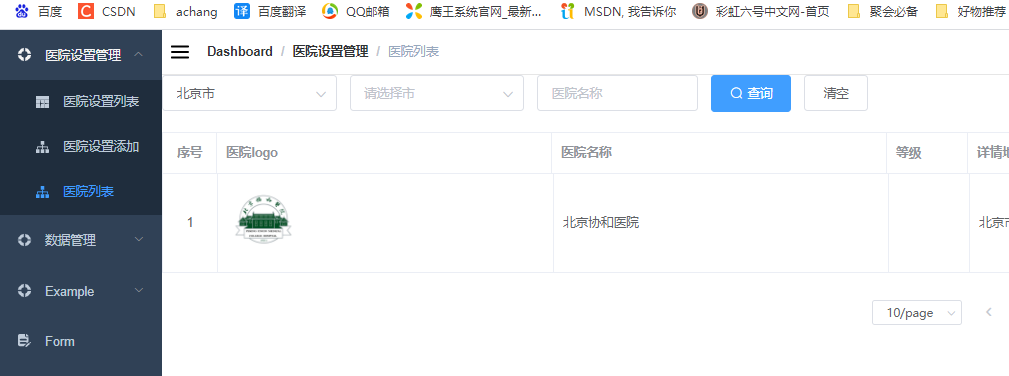
2、更新医院上线状态
2.1 api接口
2.1.1 添加service接口
在HospitalService类添加接口
- impl
    //更新医院的上线状态
    @Override
    public void updateHospStatus(String id, int status) {


        //根据医院id获取对应数据
        Hospital hospital = hospitalRepository.findById(id).get();
        hospital.setStatus(status);
        hospital.setUpdateTime(new Date());
        //设置状态值
        hospitalRepository.save(hospital);
    }
- 接口
    //更新医院的上线状态
    void updateHospStatus(String id, int status);
2.1.2 添加controller方法
在HospitalController类添加方法
//更新医院的上线状态
@GetMapping("/updateHospStatus/{id}/{status}")
public Result updateHospStatus(@PathVariable String id, @PathVariable int status){


    hospitalService.updateHospStatus(id,status);
    return Result.ok();
}
2.2 更新上线状态前端
2.2.1封装api请求
在/api/hosp/hospital.js文件添加方法
//修改医院状态
updateHospStatus(id,status){


    return request({


        url: `/admin/hosp/hospital/updateHospStatus/${

      id}/${

      status}`,
        method: 'get'
    })
}
2.2.2 修改组件
修改/views/hosp/list.vue组件
<el-table-column label="操作" width="230" align="center">
    <template slot-scope="scope">
        <el-button v-if="scope.row.status === 1" type="danger" @click="updateStatus(scope.row.id,0)">下线</el-button>
        <el-button v-else type="primary" @click="updateStatus(scope.row.id,1)">上线</el-button>
    </template>
</el-table-column>
- js代码
//根据id修改状态
updateStatus(id,status){


    hosp.updateHospStatus(id,status).then(resp=>{


        this.$message({


            showClose: true,
            message: '恭喜你,修改状态成功',
            type: 'success'
        });
        //刷新页面
        this.getPageList()
    })
}
- 测试


3、医院详情
3.1 api接口
3.1.1 添加service接口
在HospitalService类添加接口
    //根据id获取医院数据
    Map<String,Object> getById(String id);
HospitalServiceImpl类实现
    //更新医院的上线状态
    @Override
    public void updateHospStatus(String id, int status) {


        //根据医院id获取对应数据
        Hospital hospital = hospitalRepository.findById(id).get();
        hospital.setStatus(status);
        hospital.setUpdateTime(new Date());
        //设置状态值
        hospitalRepository.save(hospital);
    }
3.1.2 添加controller方法
在HospitalController类添加方法
    //根据医院id,获取医院数据
    @GetMapping("/getById/{id}")
    public Result getById(@PathVariable String id){
        Map<String, Object> map = hospitalService.getById(id);
        return Result.ok(map);
    }
3.2 医院详情前端
3.2.1添加隐藏路由
      {


        path: 'hosp/list/:id',
        name: '查看',
        component: ()=> import('@/views/hosp/show.vue'),
        meta:{

    title: '查看',icon:'table',nocache:'true'},
        hidden: true
      }
3.2.2修改医院列表组件

          <el-table-column label="操作" width="230" align="center">
            <template slot-scope="scope">
              <router-link :to="'/hospSet/hosp/list/'+scope.row.id">
                <el-button type="success">详细页面</el-button>
              </router-link>
              <el-button v-if="scope.row.status === 1" type="danger" @click="updateStatus(scope.row.id,0)">下线</el-button>
              <el-button v-else type="primary" @click="updateStatus(scope.row.id,1)">上线</el-button>
            </template>
          </el-table-column>
3.2.3封装api请求
  //根据id获取医院信息
  getById(id){


    return request({


      url: `/admin/hosp/hospital/getById/${

      id}`,
      method: 'get'
    })
  }
3.2.4 修改显示页面组件
添加/views/hosp/show.vue组件
<template>
  <div class="app-container">
    <h4>基本信息</h4>
    <table class="table table-striped table-condenseda table-bordered" width="100%">
      <tbody>
      <tr>
        <th width="15%">医院名称</th>
        <td width="35%"><b style="font-size: 14px">{

   { hospital.hosname }}</b> | {

   { hospital.param.hostypeString }}</td>
        <th width="15%">医院logo</th>
        <td width="35%">
          <img :src="'data:image/jpeg;base64,'+hospital.logoData" width="80">
        </td>
      </tr>
      <tr>
        <th>医院编码</th>
        <td>{

   { hospital.hoscode }}</td>
        <th>地址</th>
        <td>{

   { hospital.param.fullAddress }}</td>
      </tr>
      <tr>
        <th>坐车路线</th>
        <td colspan="3">{

   { hospital.route }}</td>
      </tr>
      <tr>
        <th>医院简介</th>
        <td colspan="3">{

   { hospital.intro }}</td>
      </tr>
      </tbody>
    </table>

    <h4>预约规则信息</h4>
    <table class="table table-striped table-condenseda table-bordered" width="100%">
      <tbody>
      <tr>
        <th width="15%">预约周期</th>
        <td width="35%">{

   { bookingRule.cycle }}天</td>
        <th width="15%">放号时间</th>
        <td width="35%">{

   { bookingRule.releaseTime }}</td>
      </tr>
      <tr>
        <th>停挂时间</th>
        <td>{

   { bookingRule.stopTime }}</td>
        <th>退号时间</th>
        <td>{

   { bookingRule.quitDay == -1 ? '就诊前一工作日' : '就诊当日' }}{

   { bookingRule.quitTime }} 前取消</td>
      </tr>
      <tr>
        <th>预约规则</th>
        <td colspan="3">
          <ol>
            <li v-for="item in bookingRule.rule" :key="item">{

   { item }}</li>
          </ol>
        </td>
      </tr>
      <br>
      <el-row>
        <el-button @click="back">返回</el-button>
      </el-row>
      </tbody>
    </table>
  </div>

</template>
3.2.5 引入详情样式文件
改样式文件是控制详情展示的css布局文件
1,将/show.css文件引入yygh-admin/src/styles目录
2,在src/main.js文件添加引用
<script>
import hosp from '../../api/hosp.js'
export default {


  name: "show.vue",
  data(){


    return{


      hospital:null,//医院信息
      bookingRule:null,//预定信息
      id:""
    }
  },
  created(){


    //获取路由id
    this.id = this.$route.params.id
    this.findByid(this.id)

  },
  methods:{


    //通过id获取医院数据
    findByid(id){


      hosp.getById(id).then(resp=>{


        this.hospital = resp.data.hospital
        this.bookingRule = resp.data.bookingRule
      })
    },
    //返回列表页面
    back(){


      this.$router.push({

    path: '/hospSet/hosp/list'})
    }

  }
}
</script>

<style scoped></style>
- 测试
