目录
nginx 配置 --with-http_ssl_module 报错
8.安装 gitblit(Java 的 git 可视化管理工具)
1.安装 node
下载 node 包,选择 Linux Binaries (x64) 版本:https://nodejs.org/en/download/
解压
tar -xvf node-v14.15.0-linux-x64.tar.xz配置环境变量
vim /etc/profile
往 .bash_profile 新增环境变量(在末尾)
export NODEJS_HOME=/usr/local/node/node-v14.15.0-linux-x64
export PATH=$PATH:$NODEJS_HOME/bin
保存.bash_profile
:wq!提交
source /etc/profile检查是否安装成功
node -v

npn -v
【参考文章】
2.安装 nginx
在安装 nginx 前首先要确认系统中安装了 gcc、pcre-devel、zlib-devel、openssl-devel。
linux下检查是否安装过某软件包
nginx下载地址:https://nginx.org/download/
## 解压
tar -zxvf nginx-1.8.0.tar.gz
## 进入nginx目录
cd nginx-1.8.0
## 配置环境
./configure --prefix=/usr/local/nginx --with-http_gzip_static_module
## 编译 && 安装
make && make install
## cd到刚才配置的安装目录 测试是否安装成功
cd /usr/local/nginx/sbin
./nginx -t
注释:
--prefix=/usr/local/nginx 代表安装路径
--with-http_gzip_static_module 是 nginx 开启 gzip_static 所需要的模块
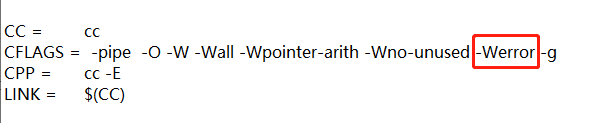
安装过程可能遇到的错误
错误一

解决方法:删除 objs/Makefile 中的 -Werror
错误二
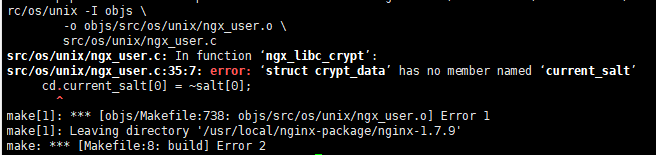
解决方法:将该行代码注释

nginx 配置 --with-http_ssl_module 报错
nginx 配置 https 时,需要这个模块(如果你没有配https可以跳过),这里由于我重新安装了一个低版本的 openssl 1.0.1 用于兼容 nginx 版本,所以安装 nginx 的时候找不到 openssl 的正确路径 。错误信息如下:
./configure: error: SSL modules require the OpenSSL library.
You can either do not enable the modules, or install the OpenSSL library
into the system, or build the OpenSSL library statically from the source
with nginx by using --with-openssl=<path> option.
重新执行
./configure --prefix=/usr/local/nginx --with-http_gzip_static_module --with-openssl=/usr/local/ssl
然后仍然报错:
/bin/sh: line 2: ./config: No such file or directory
make[1]: *** [/usr/local/ssl/.openssl/include/openssl/ssl.h] Error 127
经查看,我的 /usr/local/ssl/ (openssl 1.0.1默认安装于这个路径)下根本没有 .openssl 这个文件夹,所以找到nginx解压文件 /usr/local/nginx-package/nginx-1.8.0/auto/lib/openssl/conf 文件,有如下内容:
CORE_INCS="$CORE_INCS $OPENSSL/.openssl/include"
CORE_DEPS="$CORE_DEPS $OPENSSL/.openssl/include/openssl/ssl.h"
CORE_LIBS="$CORE_LIBS $OPENSSL/.openssl/lib/libssl.a"
CORE_LIBS="$CORE_LIBS $OPENSSL/.openssl/lib/libcrypto.a"
CORE_LIBS="$CORE_LIBS $NGX_LIBDL"
需要删除掉 .openssl 路径,然后重新执行 ./configure。
【参考文章】
3.nginx的启动、停止与重启
启动
/usr/local/nginx/sbin/nginx -c /usr/local/nginx/conf/nginx.conf
启动并测试 nginx.conf 配置文件是否正确
/usr/local/nginx/sbin/nginx -t -c /usr/local/nginx/conf/nginx.conf
停止
*从容停止
1)查看进程号
ps -ef|grep nginx

2)杀死进程
kill -QUIT 109724
*快速停止
// 略
*强行停止
// 略
重启
1)验证 nginx.conf 配置文件是否正确
cd /usr/local/nginx/sbin
./nginx -t
2)重启 nginx 服务(也需要在 sbin 目录下)
./nginx -s reload
开机自启动
自定义systemd service方式
1)在 /usr/lib/systemd/system 目录下创建 nginx.service 文件
[Unit]
Description=nginx server
Documentation=http://nginx.org/en/docs/
# 依赖服务,仅当依赖的服务启动之后再启动自定义的服务
After=network.target remote-fs.target nss-lookup.target

[Service]
# 启动类型,包括simple、forking、oneshot、notify、dbus
Type=forking
# pid文件路径
PIDFile=/usr/local/nginx/logs/nginx.pid
# 启动前执行的操作
ExecStartPre=/usr/local/nginx/sbin/nginx -t -c /usr/local/nginx/conf/nginx.conf
# 启动命令
ExecStart=/usr/local/nginx/sbin/nginx -c /usr/local/nginx/conf/nginx.conf
# 重载命令
ExecReload=/usr/local/nginx/sbin/nginx -s reload
# 停止命令
ExecStop=/usr/local/nginx/sbin/nginx -s stop
# 是否给服务分配独立的临时空间
PrivateTmp=true

[Install]
# 服务安装的用户模式,一般使用multi-user即可
WantedBy=multi-user.target
2)开启开机自启动
systemctl enable nginx.service【参考文章】
4.安装 pm2
npm install -g pm2安装 pm2 是用于做进程守护,通过 pm2 方式启动 nuxt 项目,以防止该进程被意外关闭。
5.将 vue(SPA) 与 nuxt 项目上传到服务器
这里我们要部署一个单页应用与一个服务端渲染应用。

dist 是 SPA 项目,直接将打包生成的文件拷贝到服务器就ok
mh 是 nuxt 项目,打包后将以下文件拷贝到服务器

上传到服务器后需要切换到该目录下进行 npm install 安装依赖。
配置 nginx.conf
worker_processes  1;

events {
    worker_connections  1024;
}

http {
    include       mime.types;
    default_type  application/octet-stream;

    sendfile        on;

    keepalive_timeout  65;

    gzip on; # 开启 gzip 压缩
    gzip_static on; # 若存在静态 gz 文件,则使用该文件
    gzip_min_length 10k; # 设置允许压缩的页面最小字节数
    gzip_buffers 16 8k; # 设置用于处理请求压缩的缓冲区数量和大小
    gzip_comp_level 1; # 设置压缩级别 1-9,数字越大,压缩后的大小越小,也越占用CPU,花费时间越长
	# 对特定的 MIME 类型生效, 其中'text/html’被系统强制启用
    gzip_types application/javascript text/css font/ttf font/x-woff;
    gzip_vary on; # 是否在 http header中 添加 Vary:Accept-Encoding, on | off
    gzip_http_version 1.1; # 在 http/1.1 的协议下不开启压缩

    upstream nodenuxt {
        server 127.0.0.1:3000; # nuxt 项目监听PC端端口
        keepalive 64;
    }

    server {
        listen       80;
        server_name  localhost;

        location / {
            proxy_pass http://nodenuxt;
        }

        location /dist {
            alias   html/dist;
            index  index.html index.htm;
        }

        error_page   500 502 503 504  /50x.html;
        location = /50x.html {
            root   html;
        }
    }
}
这样我们就能访问两个应用了。通过 ip 访问 nuxt 项目,通过 ip + '/dist' 访问单页应用。
这里有个隐藏 bug:当 nuxt 项目的路由中包含 ip + '/distxxxxx' 的路由时,刷新该页面会 404。因此,需要改变该 nuxt 项目的路由,防止和 nginx 配置冲突。
当然,线上的 nginx 配置还没这么简单,可能还要配置
- https 访问
- http 请求自动转 https 请求
- 后端 api 接口代理
- 禁止 ip 方式访问
- 设置文件缓存方式(带hash或时间戳的缓存,没带的不缓存,比如index.html。目的是避免浏览器缓存导致用户需要强制刷新)等
【参考文章】
6.通过 pm2 启动 nuxt 项目
启动前需要配置 ecosystem.config.js 文件,放入项目目录中:

ecosystem.config.js 文件内容
module.exports = {
  apps: [
    {
      name: 'mh',
      exec_mode: 'cluster',
      instances: 'max', // Or a number of instances
      script: './node_modules/nuxt/bin/nuxt.js',
      args: 'start',
    },
  ],
}
启动 nuxt 项目
切换到项目目录:cd /usr/local/nginx/html/mh,然后执行下面命令
pm2 start --watch--watch 代表代码发生变化时 pm2 会重启。
pm2 其他命令
pm2 list
pm2 show 0                           #查看进程详细信息,0为PM2进程id
pm2 stop all                         #停止PM2列表中所有的进程
pm2 stop 0                           #停止PM2列表中进程为0的进程
pm2 reload all                       #重载PM2列表中所有的进程
pm2 reload 0                         #重载PM2列表中进程为0的进程
pm2 delete 0                         #删除PM2列表中进程为0的进程
pm2 delete all #删除PM2列表中所有的进程此部分参考官网文档:https://nuxtjs.org/faq/deployment-pm2
开机自启动 pm2
1)执行 pm2 start --watch
2)执行 pm2 save 保存现有列表数据
3)执行 pm2 startup 设置开机启动
【参考文章】
7.安装 git
我们可以将打包后的项目文件放入到git服务器中,然后在项目服务器中拉取文件,以实现平滑的项目更新。
查看版本
git --version
安装 git
yum -y install git
查看 git 版本
git --version
创建 git 用户
[root@localhost home]# id git

id: git:无此用户

[root@localhost home]# useradd git

[root@localhost home]# passwd git
这里创建了一个用户名和密码都为 git 的用户
创建 git 仓库
设置 /home/data/git/gittest.git 为 Git 仓库,然后把 Git 仓库的 owner 修改为 git
[root@localhost home]# mkdir -p data/git/gittest.git

[root@localhost home]# git init --bare data/git/gittest.git

Initialized empty Git repository in /home/data/git/gittest.git/

[root@localhost home]# cd data/git/

[root@localhost git]# chown -R git:git gittest.git/
clone git 仓库
git clone [email protected]:/home/data/gittest.git
【参考文章】
8.安装 gitblit(Java 的 git 可视化管理工具)
1)下载安装包
http://gitblit.github.io/gitblit/
2)解压安装包
安装包上传到服务器后进行解压
tar -zxvf gitblit-1.9.1.tar.gz
3)修改配置文件
- data/defaults.properties 文件
server.httpBindInterface 与 server.httpsBindInterface 这里我都没配置(我配置httpBindInterface后不能外网访问),配置 server.httpPort = 10101(配置一个没有被占用的端口即可,阿里服务器也要开启该端口)。
- service-centos.sh 文件
# change theses values (default values)
GITBLIT_PATH=/usr/local/gitblit-1.9.1 # 安装目录
GITBLIT_BASE_FOLDER=/usr/local/gitblit-1.9.1/data
GITBLIT_HTTP_PORT=10101 # 确保一致
GITBLIT_HTTPS_PORT=8443 #
GITBLIT_LOG=/var/log/gitblit.log
4)启动
执行 /usr/local/gitblit-1.9.1/gitblit.sh
这种方式启动缺点在于退出命令工具后服务也会断开
5)后台启动
- 修改 gitblit.sh 前
java -cp "gitblit.jar:ext/*" com.gitblit.GitBlitServer --baseFolder data
- 修改 gitblit.sh 后
nohup java -cp "gitblit.jar:ext/*" com.gitblit.GitBlitServer --baseFolder data &
然后再执行 gitblit.sh 文件即可
9.一些 Linux 指令
文件或文件夹的复制 cp
cp dir1/a.doc dir2 表示将dir1下的a.doc文件复制到dir2目录下
cp -r dir1 dir2 表示将dir1及其dir1下所包含的文件复制到dir2下
cp -r dir1/. dir2 表示将dir1下的文件复制到dir2,不包括dir1目录
文件或文件夹的移动 mv
格式:
mv [选项(option)] 源文件或目录 目标文件或目录
mv /usr/lib /zone
是将 /usr/lib下所有的东西移到/zone中。
mv /usr/lib/*.txt /zone
是将lib下以txt结尾的所有文件移到/zone中。
文件或文件夹的删除 rm
删除文件夹实例:
rm -rf /var/log/httpd/access
将会删除/var/log/httpd/access目录以及其下所有文件、文件夹
删除文件使用实例:
rm -f /var/log/httpd/access.log
将会强制删除/var/log/httpd/access.log这个文件