前言
RDD(Resilient Distributed Dataset)叫做弹性分布式数据集,是 Spark 中最基的数据处理模型。代码中是一个抽象类,它代表一个弹性的、不可变、可分区、里面的元素可并行计算的集合。
RDD通过数据的分区达到并行计算,来提高计算的速度。但是RDD是如何分区呢?
一、集合分区
1.设置分区
代码如下(示例)
def main(args: Array[String]): Unit = {
val sparkconf = new SparkConf().setMaster("local[*]").setAppName("test")
// 设定分区
//sparkconf.set("spark.default.parallelism","3")
var sc = new SparkContext(sparkconf);
// makeRDD 后面2 说明分为2个分区
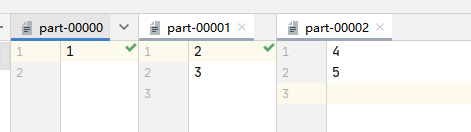
val value = sc.makeRDD(List(1,2,3,4,5))
// val value = sc.makeRDD(List(1,2,3,4,5),2)
// 将分区的信息输出为当前目录的output文件夹
value.saveAsTextFile("output")
}
分区结果如下:有8个分区,这一点点的数据分了8个分区,为什么要8个分区呢?
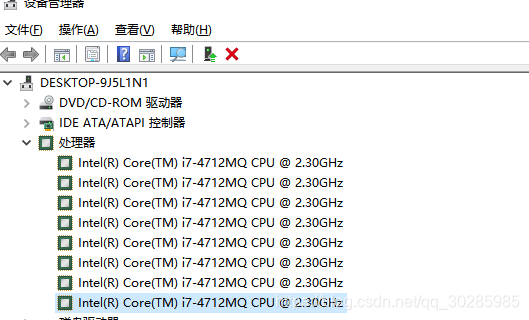
使用makeRDD方法,如果不指定分区,会使用scheduler.conf.getInt("spark.default.parallelism", totalCores)控制分区,如果这个也没有配置,则会使用当前环境的最大核心数。如上代码,使用本地环境,我的电脑cpu是8核心,则会有8个分区数。
2. 数据分配源码解析
可是设置分区之后,就要疑惑数据是如何分到固定的分区呢?比如List(1,2,3,4,5)要分到3个分区中,那怎么分呢?那到底是哪些分区中要存放2条数据呢?好疑惑,只能看源码了。
从makeRDD一路向下查看。
代码如下(ParallelCollectionPartition.getPartitions):
  override def getPartitions: Array[Partition] = {


  	// 这里要进行数据分区,data是数据,numSlices是要分区数量。
    val slices = ParallelCollectionRDD.slice(data, numSlices).toArray
    slices.indices.map(i => new ParallelCollectionPartition(id, i, slices(i))).toArray
  }
代码如下(ParallelCollectionRDD.slice):
  def slice[T: ClassTag](seq: Seq[T], numSlices: Int): Seq[Seq[T]] = {


   // 分区数小于1,抛异常,肯定不能小于1
    if (numSlices < 1) {


      throw new IllegalArgumentException("Positive number of partitions required")
    }
    // Sequences need to be sliced at the same set of index positions for operations
    // like RDD.zip() to behave as expected
    def positions(length: Long, numSlices: Int): Iterator[(Int, Int)] = {


      (0 until numSlices).iterator.map {

     i =>
        val start = ((i * length) / numSlices).toInt
        val end = (((i + 1) * length) / numSlices).toInt
        (start, end)
      }
    }
    //数据格式匹配,此文实例不是range类型, 因此走最后
    seq match {


      case r: Range =>
        positions(r.length, numSlices).zipWithIndex.map {

     case ((start, end), index) =>
          // If the range is inclusive, use inclusive range for the last slice
          if (r.isInclusive && index == numSlices - 1) {


            new Range.Inclusive(r.start + start * r.step, r.end, r.step)
          }
          else {


            new Range(r.start + start * r.step, r.start + end * r.step, r.step)
          }
        }.toSeq.asInstanceOf[Seq[Seq[T]]]
      case nr: NumericRange[_] =>
        // For ranges of Long, Double, BigInteger, etc
        val slices = new ArrayBuffer[Seq[T]](numSlices)
        var r = nr
        for ((start, end) <- positions(nr.length, numSlices)) {


          val sliceSize = end - start
          slices += r.take(sliceSize).asInstanceOf[Seq[T]]
          r = r.drop(sliceSize)
        }
        slices
      case _ =>
        // 变成数组数据
        val array = seq.toArray // To prevent O(n^2) operations for List etc
        //传入数组长度,分区数
        positions(array.length, numSlices).map {

     case (start, end) =>
            // 数组进行切分
            array.slice(start, end).toSeq
        }.toSeq
    }
  }
    // 这里进入真正的分区,根据数组长度和分区数进行分区
    // 计算数组切分起始位置和结束位置
    def positions(length: Long, numSlices: Int): Iterator[(Int, Int)] = {


      (0 until numSlices).iterator.map {

     i =>
        val start = ((i * length) / numSlices).toInt
        val end = (((i + 1) * length) / numSlices).toInt
        (start, end)
      }
    }
传入数组List(1,2,3,4,5) 则length为5,分区数为3。
i=0时,start = ((0*5)/3).toInt = 0; 从0开始。end = (((0+1)5)/3).toInt=1
i=1时,start = ((05)/3).toInt = 1 。end = (((0+1)5)/3).toInt=3
i=2时,start = ((05)/3).toInt = 3 。end = (((0+1)*5)/3).toInt=4
上面位置包括起始位置,不包括结束位置。
二、文件分区
1.设置分区
代码如下(示例):
import numpy as np
  def main(args: Array[String]): Unit = {


    val sparkconf = new SparkConf().setMaster("local[*]").setAppName("test")

    var sc =  new SparkContext(sparkconf);
    // 这种没有指定分区的,会有默认分区
    val value = sc.textFile("data/wordcount/1.txt")

    value.saveAsTextFile("output")
  }
在使用sc.textFile("data/wordcount/1.txt")这种写法时,没有指定分区,会使用默认分区,这个默认分区和集合的默认分区不同,进入方法即可看到minPartitions最小分区数量。这个最小分区数量源于如下代码。
def defaultMinPartitions: Int = math.min(defaultParallelism, 2)
我本机的环境为8核,在使用local[*] 的时候defaultParallelism为8,这时2小,则默认2个分区。
使用sc.textFile("data/wordcount/1.txt",4),后面数字就是自定义的分区数
2.Hadoop 读取文件1.1概念
spark读取文件,使用hadoop的文件读取方式。在使用hadoop读取的时候,如果剩余的分区大小大于10%则新加一个分区。示例:
代码如下(示例):
  def main(args: Array[String]): Unit = {


    val sparkconf = new SparkConf().setMaster("local[*]").setAppName("test")

    var sc =  new SparkContext(sparkconf);

    val value = sc.textFile("data/wordcount/1.txt",2)

    value.saveAsTextFile("output")
  }
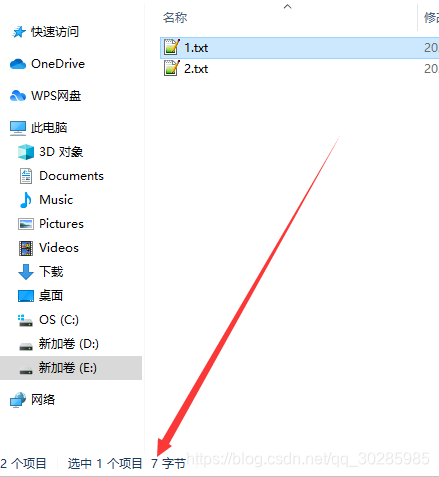
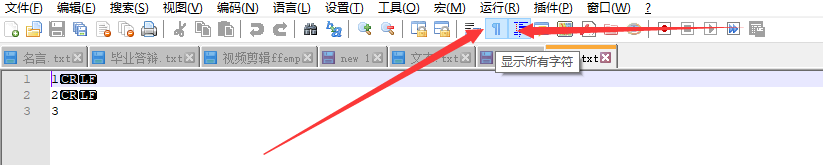
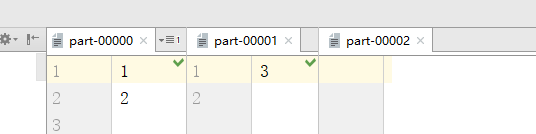
1.txt中数据。
1
2
3
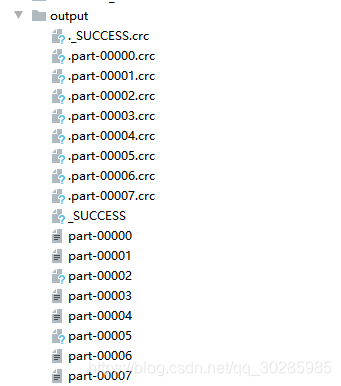
在textFile中设置了2个分区,则一般认为是2个分区,但是,实时却有3个分区。
好郁闷, 看源码喽!
代码如下(FileInputFormat.getSplits):
public InputSplit[] getSplits(JobConf job, int numSplits) throws IOException {


        Stopwatch sw = (new Stopwatch()).start();
        FileStatus[] files = this.listStatus(job);
        job.setLong("mapreduce.input.fileinputformat.numinputfiles", (long)files.length);
        //统计字节数
        long totalSize = 0L;
        FileStatus[] arr$ = files;
        int len$ = files.length;
	    //统计文件字节数
        for(int i$ = 0; i$ < len$; ++i$) {


            FileStatus file = arr$[i$];
            if(file.isDirectory()) {


                throw new IOException("Not a file: " + file.getPath());
            }

            totalSize += file.getLen();
        }
        //计算分区数量
        long goalSize = totalSize / (long)(numSplits == 0?1:numSplits);
        long minSize = Math.max(job.getLong("mapreduce.input.fileinputformat.split.minsize", 1L), this.minSplitSize);
  			/**
                    此处省略部分代码
            **/
        long splitSize = this.computeSplitSize(goalSize, minSize, blockSize);

        long bytesRemaining;
        String[][] splitHosts;
        //1.1倍计算逻辑
          for(bytesRemaining = length; (double)bytesRemaining / (double)splitSize > 1.1D; bytesRemaining -= splitSize) {


              splitHosts = this.getSplitHostsAndCachedHosts(blkLocations, length - bytesRemaining, splitSize, clusterMap);
              splits.add(this.makeSplit(path, length - bytesRemaining, splitSize, splitHosts[0], splitHosts[1]));
          }
                    /**
                    此处省略部分代码
                    **/
    }
     protected long computeSplitSize(long goalSize, long minSize, long blockSize) {


        return Math.max(minSize, Math.min(goalSize, blockSize));
    }
注:文件中有1,2,3 不能认为是3个字节,具体几个字节呢?windows 中点击即可看到7个字节。因为要考虑换行符