继天空、陆地之后,用于构建游戏场景的另一个必须的元素莫过于河流~
本节我们基于特定的特效文件Water.fx来完成水面模块的构建。
以下是该特效文件的HLSL代码:
// Technique: Water(水面)
//
// 作者: www.riemers.net
//
// 来自: http://shiba.hpe.sh.cn/jiaoyanzu/WULI/soft/xna.aspx?classId=4 (上海八中物理组Xna游戏开发专栏)
//
// --------------------------------------------------------------------------------------------------------
shared uniform extern float4x4 gProjection : PROJECTION; // 共享的投影矩阵
shared uniform extern float gTime; // 共享的时间变量
shared uniform extern int gTotalLights; // 共享的光源数量
// 包含光源数据的结构
struct Light
{
float enabled; // 光源是否打开
float lightType; // 光源类型
float3 color; // 光源颜色
float3 position; // 光源位置
float3 direction; // 光线方向
float4 spotData; // 四个分量分别保存range,falloff,theta,phi数据
};
// 光源数组
shared Light gLights[ 8];
shared uniform extern float3 gCameraPos; // 相机位置
shared uniform extern float4x4 gView : VIEW; // 视矩阵
uniform extern float4x4 gReflectionView; // 反射视矩阵
uniform extern float4x4 gWorld : WORLD; // 世界矩阵
uniform extern float gWaveHeight; // 振幅
uniform extern float gWindForce; // 风力大小,即波速
uniform extern float3 gWindDirection; // 风向,即水流方向
uniform extern texture gTexture1; // 水面的凹凸贴图
uniform extern float gTexture1UVTile; // 凹凸纹理的平铺次数
sampler BumpMapSampler = sampler_state {
texture = <gTexture1> ; magfilter = LINEAR; minfilter = LINEAR; mipfilter=LINEAR; AddressU = mirror; AddressV = mirror;
};
uniform extern texture gReflectionMap; // 反射贴图
sampler ReflectionSampler = sampler_state {
texture = <gReflectionMap> ; magfilter = LINEAR; minfilter = LINEAR; mipfilter=LINEAR; AddressU = mirror; AddressV = mirror;
};
uniform extern texture gRefractionMap; // 折射贴图
sampler RefractionSampler = sampler_state {
texture = <gRefractionMap> ; magfilter = LINEAR; minfilter = LINEAR; mipfilter=LINEAR; AddressU = mirror; AddressV = mirror;
};
struct VS_OUTPUT
{
float4 Position : POSITION;
float4 ReflectionMapSamplingPos : TEXCOORD1;
float2 BumpMapSamplingPos : TEXCOORD2;
float4 RefractionMapSamplingPos : TEXCOORD3;
float4 WorldPosition : TEXCOORD4;
};
VS_OUTPUT WaterVS(float4 inPos : POSITION, float2 inTex: TEXCOORD)
{
VS_OUTPUT Output = (VS_OUTPUT) 0;
float4x4 preViewProjection = mul (gView, gProjection);
float4x4 preWorldViewProjection = mul (gWorld, preViewProjection);
Output.Position = mul(inPos, preWorldViewProjection);
Output.WorldPosition = mul(inPos, gWorld);
// 计算反射纹理的采样坐标
float4x4 preReflectionViewProjection = mul (gReflectionView, gProjection);
float4x4 preWorldReflectionViewProjection = mul (gWorld, preReflectionViewProjection);
Output.ReflectionMapSamplingPos = mul(inPos, preWorldReflectionViewProjection);
// 设置纹理的采样坐标
Output.RefractionMapSamplingPos = mul(inPos, preWorldViewProjection);
// 归一化水流方向
float3 windDir = normalize(gWindDirection);
// 获取垂直于水流的方向
float3 perpDir = cross(gWindDirection, float3( 0, 1, 0));
// 获取经水流方向修正的纹理uv坐标
float ydot = dot(inTex, gWindDirection.xz);
float xdot = dot(inTex, perpDir.xz);
float2 moveVector = float2(xdot, ydot);
// 让纹理的v坐标随时间移动
moveVector.y += gTime*gWindForce;
// 获取最终的凹凸纹理采样坐标
Output.BumpMapSamplingPos = moveVector*gTexture1UVTile;
return Output;
}
float4 WaterPS(VS_OUTPUT Input):COLOR0
{
// 采样凹凸纹理颜色
float4 bumpColor = tex2D(BumpMapSampler, Input.BumpMapSamplingPos);
float2 perturbation = gWaveHeight*(bumpColor.rg - 0.5f)* 2.0f;
// 将反射贴图采样坐标从2D屏幕空间映射到纹理坐标
float2 ProjectedReflectTexCoords;
ProjectedReflectTexCoords.x = Input.ReflectionMapSamplingPos.x/Input.ReflectionMapSamplingPos.w/ 2.0f + 0.5f;
ProjectedReflectTexCoords.y = -Input.ReflectionMapSamplingPos.y/Input.ReflectionMapSamplingPos.w/ 2.0f + 0.5f;
float2 perturbatedTexCoords = ProjectedReflectTexCoords + perturbation;
float4 reflectiveColor = tex2D(ReflectionSampler, perturbatedTexCoords);
// 将折射贴图采样坐标从2D屏幕空间映射到纹理坐标
float2 ProjectedRefrTexCoords;
ProjectedRefrTexCoords.x = Input.RefractionMapSamplingPos.x/Input.RefractionMapSamplingPos.w/ 2.0f + 0.5f;
ProjectedRefrTexCoords.y = -Input.RefractionMapSamplingPos.y/Input.RefractionMapSamplingPos.w/ 2.0f + 0.5f;
float2 perturbatedRefrTexCoords = ProjectedRefrTexCoords + perturbation;
float4 refractiveColor = tex2D(RefractionSampler, perturbatedRefrTexCoords);
// 从凹凸贴图获取法线向量
float3 eyeVector = normalize(gCameraPos - Input.WorldPosition);
float3 normalVector = (bumpColor.rbg- 0.5f)* 2.0f;
// 计算菲涅尔系数,并根据这个系数混合反射和折射颜色
float fresnelTerm = dot(eyeVector, normalVector);
float4 combinedColor = lerp(reflectiveColor, refractiveColor, fresnelTerm);
// 在水面再添加蓝灰色让它变得“脏”一点
float4 dullColor = float4( 0.3f, 0.3f, 0.5f, 1.0f);
// 将蓝灰色混合到最终颜色
float4 color = lerp(combinedColor, dullColor, 0.2f);
// 设置光源方向,为简化起见,只使用场景中的单向光方向
float3 gLightDirection = float3( 5, - 1, - 2);
// ----------------------------
// 遍历所有光源
// ----------------------------
for( int i= 0; i < gTotalLights; i++)
{
// 只处理可用的光源
if(gLights[i].enabled&&gLights[i].lightType== 0)
{
gLightDirection=gLights[i].direction;
}
}
// 添加水面的镜面反射颜色
float3 reflectionVector = reflect(-gLightDirection, normalVector);
float specular = pow(dot(normalize(reflectionVector), normalize(eyeVector)), 1024);
color.rgb += specular;
return color;
}
technique Water
{
pass Pass0
{
VertexShader = compile vs_3_0 WaterVS();
PixelShader = compile ps_3_0 WaterPS();
}
}
该源码由http://www.riemers.net/保留原创版权,引子老师原创的StunEngine(based on Xna)引擎V0.4版本,如有转载或引用,敬请显式标明http://www.riemers.net/及StunEngine等字样,以示尊重!
老师已在代码中给大家添加了详细的注释。本节我们不要求掌握其中的原理,只需懂得如何运用其构建水面特效即可,这也是我在题目前加注星号的原因。
好,有了现成的Shader做支撑,下面我们着手准备CWater的实现。
首先依然是纹理的准备:
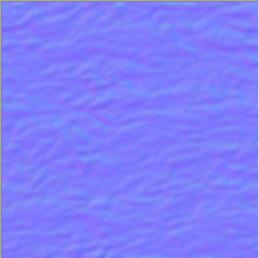 WaterWav.dds
哎?不要想歪,它可不是水面的基本纹理,因为水本是无色的~
这张图我们称之为“法线贴图”,其作用类似于上一节的高度图,不过不是用来生成高度数据,而是用于生成各个点的法线数据。
“法线贴图”的巧妙运用能很好的细化物体表面,在使用较少资源的前提下使改善画面渲染品质得到质的飞跃,是次世代游戏中广泛使用的一种实用技术~
法线贴图的相关计算在Shader中进行,这里我们不再深入讨论,只留个印象就可以,感兴趣的朋友可以自行查阅相关资料。
然后,我们来着手完成CWater的构建:
代码清单:Water.h
来自: http://www.cnblogs.com/kenkao
------------------------------------- */
#include " D3DEffect.h "
#pragma once
class CWater
{
public:
CWater( void);
~CWater( void);
public:
bool Create( // 构建水面
float iSizeX, // 水面长
float iSizeY, // 水面宽
float iPosX = 0.0f, // 横坐标
float iPosY = 0.0f, // 纵坐标
float iHeight = 0.0f // 水面高度
);
void Draw( float gameTick); // 绘制水面
void Release(); // 资源释放
void BeginReflect(); // 开启反射绘制
void EndReflect(); // 停止反射绘制
void BeginRefract(); // 开启折射绘制
void EndRefract(); // 停止折射绘制
private:
bool LoadContent(); // 加载资源
void CreateWaterVertices(); // 生成顶点
void GetParamHandles(); // 获取特效参数句柄
void SetDefultParamValues(); // 设置特效参数默认值
void ReSetParamValues(); // 重设特效参数值
void FetchSurfaces(); // 获取反射、折射表面
private:
CD3DEffect* m_pWaterEffect; // 水面特效
IDirect3DTexture9* m_pWaterWavTexture; // 波纹纹理
IDirect3DTexture9* m_pReflectTexture; // 反射纹理
IDirect3DTexture9* m_pRefractTexture; // 折射纹理
IDirect3DSurface9* m_pReflectSurface; // 反射表面
IDirect3DSurface9* m_pRefractSurface; // 折射表面
IDirect3DSurface9* m_pOriginSurface; // 原始表面
IDirect3DVertexBuffer9* m_pVB; // 顶点缓冲
D3DXPLANE m_waterPlane; // 水平面
D3DXPLANE m_refWaterPlane; // 反向水平面
D3DXMATRIX m_worldMatrix; // 原始世界坐标
private:
D3DXHANDLE m_hWorldMatrix; // 世界矩阵
D3DXHANDLE m_hViewMatrix; // 摄影矩阵
D3DXHANDLE m_hProjMatrix; // 投影矩阵
D3DXHANDLE m_hCameraPos; // 摄影机位置
D3DXHANDLE m_hReflectMatrix; // 反射矩阵
D3DXHANDLE m_hWaveHeight; // 水波振幅
D3DXHANDLE m_hWindForce; // 风力(水波流速)
D3DXHANDLE m_hWindDirect; // 风向
D3DXHANDLE m_hWavTexture; // 水波纹理
D3DXHANDLE m_hWavTextureUVTile; // 水波纹理平铺次数
D3DXHANDLE m_hReflectTexture; // 反射纹理
D3DXHANDLE m_hRefractTexture; // 折射纹理
D3DXHANDLE m_hTimeTick; // 全局时间
};
代码清单:Water.cpp
来自: http://www.cnblogs.com/kenkao
------------------------------------- */
#include " StdAfx.h "
#include " Water.h "
#include " D3DGame.h "
#include " D3DCamera.h "
extern IDirect3DDevice9 *g_pD3DDevice;
extern CD3DCamera *g_pD3DCamera;
extern D3DPRESENT_PARAMETERS g_D3DPP;
extern D3DXMATRIX g_matProjection;
D3DXVECTOR4 Vector3To4( const D3DXVECTOR3& vector3){ return D3DXVECTOR4(vector3.x,vector3.y,vector3.z, 0.0f);}
CWater::CWater( void) : m_pWaterEffect(NULL),
m_pWaterWavTexture(NULL),
m_pReflectTexture(NULL),
m_pRefractTexture(NULL),
m_pReflectSurface(NULL),
m_pRefractSurface(NULL),
m_pOriginSurface(NULL),
m_pVB(NULL)
{
m_pWaterEffect = new CD3DEffect;
}
CWater::~CWater( void)
{
}
bool CWater::Create( float iSizeX, float iSizeY, float iPosX, float iPosY, float iHeight)
{
// 加载Shader及纹理
if(!LoadContent())
return false;
// 获得折射、反射渲染表面
FetchSurfaces();
// 创建顶点缓冲
g_pD3DDevice->CreateVertexBuffer(
6 * sizeof(VertexPositionTex),
D3DUSAGE_WRITEONLY,
VertexPositionTex::FVF,
D3DPOOL_MANAGED,
&m_pVB,
0);
VertexPositionTex* pVertices;
m_pVB->Lock( 0, 0,( void**)&pVertices, 0);
pVertices[ 0] = VertexPositionTex(iPosX, iHeight, iPosY + iSizeY, 0, 0);
pVertices[ 1] = VertexPositionTex(iPosX + iSizeX, iHeight, iPosY + iSizeY, 1, 0);
pVertices[ 2] = VertexPositionTex(iPosX, iHeight, iPosY, 0, 1);
pVertices[ 3] = VertexPositionTex(iPosX + iSizeX, iHeight, iPosY + iSizeY, 1, 0);
pVertices[ 4] = VertexPositionTex(iPosX + iSizeX, iHeight, iPosY, 1, 1);
pVertices[ 5] = VertexPositionTex(iPosX, iHeight, iPosY, 0, 1);
m_pVB->Unlock();
// 设置摄影机反射面
g_pD3DCamera->SetReflectPlane(iHeight);
// 创建折射、反射横切面
D3DXPlaneFromPointNormal(&m_waterPlane, &D3DXVECTOR3(iPosX,iHeight,iPosY), &D3DXVECTOR3_UP);
D3DXPlaneNormalize(&m_waterPlane, &m_waterPlane);
}
bool CWater::LoadContent()
{
// 加载水体渲染特效
if(!m_pWaterEffect->LoadEffect( " Water.fx "))
return false;
// 创建纹理
HRESULT hr = D3DXCreateTextureFromFile(g_pD3DDevice, " WaterWav.dds ",&m_pWaterWavTexture);
if(FAILED(hr))
return false;
// 获得并设置默认特效参数
GetParamHandles();
SetDefultParamValues();
return true;
}
void CWater::FetchSurfaces()
{
// 创建反射纹理并获得其渲染表面
D3DXCreateTexture(g_pD3DDevice, g_D3DPP.BackBufferWidth, g_D3DPP.BackBufferHeight, 1,
D3DUSAGE_RENDERTARGET, D3DFMT_A8R8G8B8, D3DPOOL_DEFAULT, &m_pReflectTexture);
m_pReflectTexture->GetSurfaceLevel( 0, &m_pReflectSurface);
// 创建折射纹理并获得其渲染表面
D3DXCreateTexture(g_pD3DDevice, g_D3DPP.BackBufferWidth, g_D3DPP.BackBufferHeight, 1,
D3DUSAGE_RENDERTARGET, D3DFMT_A8R8G8B8, D3DPOOL_DEFAULT, &m_pRefractTexture);
m_pRefractTexture->GetSurfaceLevel( 0, &m_pRefractSurface);
// 之后将渲染表面设置为渲染目标即可针对纹理进行绘制
}
void CWater::GetParamHandles()
{
m_hWorldMatrix = m_pWaterEffect->GetEffect()->GetParameterByName( 0, " gWorld ");
m_hViewMatrix = m_pWaterEffect->GetEffect()->GetParameterByName( 0, " gView ");
m_hProjMatrix = m_pWaterEffect->GetEffect()->GetParameterByName( 0, " gProjection ");
m_hCameraPos = m_pWaterEffect->GetEffect()->GetParameterByName( 0, " gCameraPos ");
m_hReflectMatrix = m_pWaterEffect->GetEffect()->GetParameterByName( 0, " gReflectionView ");
m_hWaveHeight = m_pWaterEffect->GetEffect()->GetParameterByName( 0, " gWaveHeight ");
m_hWindForce = m_pWaterEffect->GetEffect()->GetParameterByName( 0, " gWindForce ");
m_hWindDirect = m_pWaterEffect->GetEffect()->GetParameterByName( 0, " gWindDirection ");
m_hWavTexture = m_pWaterEffect->GetEffect()->GetParameterByName( 0, " gTexture1 ");
m_hWavTextureUVTile = m_pWaterEffect->GetEffect()->GetParameterByName( 0, " gTexture1UVTile ");
m_hReflectTexture = m_pWaterEffect->GetEffect()->GetParameterByName( 0, " gReflectionMap ");
m_hRefractTexture = m_pWaterEffect->GetEffect()->GetParameterByName( 0, " gRefractionMap ");
m_hTimeTick = m_pWaterEffect->GetEffect()->GetParameterByName( 0, " gTime ");
}
void CWater::SetDefultParamValues()
{
D3DXHANDLE WaterTechnique = m_pWaterEffect -> GetEffect() -> GetTechniqueByName( " Water ");
m_pWaterEffect->GetEffect()->SetTechnique(WaterTechnique);
m_pWaterEffect->GetEffect()->SetTexture(m_hWavTexture,m_pWaterWavTexture);
m_pWaterEffect->GetEffect()->SetFloat(m_hWavTextureUVTile, 10.0f);
m_pWaterEffect->GetEffect()->SetFloat(m_hWaveHeight, 0.3f);
m_pWaterEffect->GetEffect()->SetFloat(m_hWindForce, 0.02f);
m_pWaterEffect->GetEffect()->SetVector(m_hWindDirect,&Vector3To4(D3DXVECTOR3_OUTWARD));
}
void CWater::ReSetParamValues()
{
g_pD3DDevice->GetTransform(D3DTS_WORLD,&m_worldMatrix);
m_pWaterEffect->GetEffect()->SetMatrix(m_hWorldMatrix,&m_worldMatrix);
m_pWaterEffect->GetEffect()->SetMatrix(m_hViewMatrix,&g_pD3DCamera->GetViewMatrix());
m_pWaterEffect->GetEffect()->SetMatrix(m_hProjMatrix,&g_matProjection);
m_pWaterEffect->GetEffect()->SetVector(m_hCameraPos,&Vector3To4(g_pD3DCamera->GetCameraPos()));
m_pWaterEffect->GetEffect()->SetMatrix(m_hReflectMatrix,&g_pD3DCamera->GetReflectMatrix());
m_pWaterEffect->GetEffect()->SetTexture(m_hReflectTexture,m_pReflectTexture);
m_pWaterEffect->GetEffect()->SetTexture(m_hRefractTexture,m_pRefractTexture);
}
void CWater::Draw( float gameTick)
{
// 重置特效参数
ReSetParamValues();
m_pWaterEffect->GetEffect()->SetFloat(m_hTimeTick,gameTick/ 800);
// 应用特效
UINT numPasses;
m_pWaterEffect->BeginEffect(numPasses);
for(UINT i= 0;i<numPasses;i++)
{
m_pWaterEffect->GetEffect()->BeginPass(i);
// 顶点绘制
g_pD3DDevice->SetStreamSource( 0,m_pVB, 0, sizeof(VertexPositionTex));
g_pD3DDevice->SetFVF(VertexPositionTex::FVF);
g_pD3DDevice->DrawPrimitive(D3DPT_TRIANGLELIST, 0, 2);
m_pWaterEffect->GetEffect()->EndPass();
}
m_pWaterEffect->EndEffect();
}
void CWater::BeginReflect()
{
// 设定摄影矩阵为摄影机反视矩阵
g_pD3DDevice->SetTransform(D3DTS_VIEW,&g_pD3DCamera->GetReflectMatrix());
// 设定3D设备横切面,仅反射水面之上的景象
g_pD3DDevice->SetClipPlane( 0, m_waterPlane);
g_pD3DDevice->SetRenderState(D3DRS_CLIPPLANEENABLE, D3DCLIPPLANE0);
// 保留原始渲染目标
g_pD3DDevice->GetRenderTarget( 0, &m_pOriginSurface);
// 设定新渲染目标为反射贴图表面
g_pD3DDevice->SetRenderTarget( 0, m_pReflectSurface);
// 清空反射表面缓存
g_pD3DDevice->Clear( 0, NULL, D3DCLEAR_TARGET | D3DCLEAR_ZBUFFER, D3DCOLOR_RGBA( 100, 149, 237, 255), 1.0f, 0);
}
void CWater::EndReflect()
{
// 还原渲染目标
g_pD3DDevice->SetRenderTarget( 0, m_pOriginSurface);
// 禁用横切面
g_pD3DDevice->SetRenderState(D3DRS_CLIPPLANEENABLE, 0);
// 还原摄影矩阵
g_pD3DDevice->SetTransform(D3DTS_VIEW,&g_pD3DCamera->GetViewMatrix());
}
void CWater::BeginRefract()
{
// 设定3D设备横切面,仅折射水面以下的景象
g_pD3DDevice->SetClipPlane( 0, -m_waterPlane);
g_pD3DDevice->SetRenderState(D3DRS_CLIPPLANEENABLE, D3DCLIPPLANE0);
// 保留原始渲染目标
g_pD3DDevice->GetRenderTarget( 0, &m_pOriginSurface);
// 设定新渲染目标为折射贴图表面
g_pD3DDevice->SetRenderTarget( 0, m_pRefractSurface);
// 清空折射表面缓存
g_pD3DDevice->Clear( 0, NULL, D3DCLEAR_TARGET | D3DCLEAR_ZBUFFER, D3DCOLOR_RGBA( 100, 149, 237, 255), 1.0f, 0);
}
void CWater::EndRefract()
{
// 还原渲染目标
g_pD3DDevice->SetRenderTarget( 0, m_pOriginSurface);
// 禁用横切面
g_pD3DDevice->SetRenderState(D3DRS_CLIPPLANEENABLE, 0);
}
void CWater::Release()
{
// 释放设备资源
ReleaseCOM(m_pVB);
ReleaseCOM(m_pReflectSurface);
ReleaseCOM(m_pRefractSurface);
ReleaseCOM(m_pReflectTexture);
ReleaseCOM(m_pRefractTexture);
ReleaseCOM(m_pWaterWavTexture);
ReleaseCOM(m_pWaterEffect);
}
由具体的实现代码我们不难看出,本节中实现的水面,其实只是在场景中画了两个三角形构成了一个方形表面,而该表面各个点的颜色全部由相应的Shader计算得出~
值得一提的是,我刚刚提到的水本为无色,其实并非是真正的无色,水体表面各点颜色其实是反射色跟折射色的一个叠加,借以虚拟透明效果。
那么我们如何来获得水面个点的反射色跟折射色呢?方法也很简单。
首先,构建一个与屏幕同样大小的纹理:
D3DXCreateTexture(g_pD3DDevice, g_D3DPP.BackBufferWidth, g_D3DPP.BackBufferHeight, 1,
D3DUSAGE_RENDERTARGET, D3DFMT_A8R8G8B8, D3DPOOL_DEFAULT, &m_pReflectTexture);
而后,获得其渲染表面:
m_pReflectTexture->GetSurfaceLevel(0, &m_pReflectSurface);
之后,将渲染表面设定为设备新的渲染目标:
g_pD3DDevice->SetRenderTarget(0, m_pReflectSurface);
最后进行绘制,场景便会自动绘制到最初创建的纹理之上。而该纹理位于后台缓冲而并非显存之中,不会在屏幕立刻显现出来。所以我们可以依照此方法,事先将反射跟折射之后的场景绘制到两个后台纹理之上,而后交由Shader纹理采样,即可获得水面各点反射与折射之后应呈现的颜色。另外需要注意的是,绘制反射、折射贴图时,我们需要裁掉水面之下或之上的物体,以免出现奇怪的景象 ^ ^
来看主体代码:
代码清单:D3DGame.cpp
来自: http://www.cnblogs.com/kenkao
------------------------------------- */
#include " StdAfx.h "
#include " D3DGame.h "
#include " D3DCamera.h "
#include " D3DEffect.h "
#include " CoordCross.h "
#include " SimpleXMesh.h "
#include " Texture2D.h "
#include " D3DSprite.h "
#include " Skybox.h "
#include " SpriteBatch.h "
#include " BaseTerrain.h "
#include " Water.h "
#include <stdio.h>
// ---通用全局变量
HINSTANCE g_hInst;
HWND g_hWnd;
D3DXMATRIX g_matProjection;
D3DPRESENT_PARAMETERS g_D3DPP;
// ---D3D全局变量
IDirect3D9 *g_pD3D = NULL;
IDirect3DDevice9 *g_pD3DDevice = NULL;
CMouseInput *g_pMouseInput = NULL;
CKeyboardInput *g_pKeyboardInput = NULL;
CD3DCamera *g_pD3DCamera = NULL;
CSkybox *g_pSkybox = NULL;
CBaseTerrain *g_pBaseTerrain = NULL;
CWater *g_pWater = NULL;
// 场景绘制
void DrawScene( bool isReflect, bool isRefract);
void Initialize(HINSTANCE hInst, HWND hWnd)
{
g_hInst = hInst;
g_hWnd = hWnd;
InitD3D(&g_pD3D, &g_pD3DDevice, g_D3DPP, g_matProjection, hWnd);
g_pMouseInput = new CMouseInput;
g_pMouseInput->Initialize(hInst,hWnd);
g_pKeyboardInput = new CKeyboardInput;
g_pKeyboardInput->Initialize(hInst,hWnd);
g_pD3DCamera = new CD3DCamera;
}
void LoadContent()
{
g_pD3DCamera->SetCameraPos(D3DXVECTOR3( 600.0f, 0.0f, 600.0f));
g_pSkybox = new CSkybox;
g_pSkybox->Create( " Skybox_0.JPG ", " Skybox_1.JPG ", " Skybox_2.JPG "
, " Skybox_3.JPG ", " Skybox_4.JPG ", " Skybox_5.JPG ");
g_pBaseTerrain = new CBaseTerrain;
g_pBaseTerrain->Create( 128, 128, 10, " HeightData_128x128.raw ", " Grass.dds ");
g_pWater = new CWater;
g_pWater->Create( 1280, 1280, 0.0f, 0.0f, 40.0f);
}
void Update( float gameTick)
{
g_pMouseInput->GetState();
g_pKeyboardInput->GetState();
// 更新摄影机高度
D3DXVECTOR3 CameraPos = g_pD3DCamera->GetCameraPos();
float roleHeight = 25.0f;
float Ty = g_pBaseTerrain->GetExactHeightAt(CameraPos.x,CameraPos.z) + roleHeight;
g_pD3DCamera->SetCameraPos(D3DXVECTOR3(
CameraPos.x,
Ty,
CameraPos.z));
g_pD3DCamera->Update();
}
void Draw( float gameTick)
{
g_pD3DDevice->SetTransform(D3DTS_VIEW,&g_pD3DCamera->GetViewMatrix());
if(SUCCEEDED(g_pD3DDevice->BeginScene()))
{
// 开启反射绘制
g_pWater->BeginReflect();
// 绘制场景
DrawScene( true, false);
// 结束反射绘制
g_pWater->EndReflect();
// 开启折射绘制
g_pWater->BeginRefract();
// 绘制场景
DrawScene( false, true);
// 结束折射绘制
g_pWater->EndRefract();
g_pD3DDevice->Clear( 0, NULL, D3DCLEAR_TARGET | D3DCLEAR_ZBUFFER, D3DCOLOR_RGBA( 100, 149, 237, 255), 1.0f, 0);
// 真正的绘制场景
DrawScene( false, false);
// 绘制水体表面
g_pWater->Draw(gameTick);
g_pD3DDevice->EndScene();
}
g_pD3DDevice->Present(NULL, NULL, NULL, NULL);
}
void DrawScene( bool isReflect, bool isRefract)
{
g_pSkybox->Draw(isReflect,isRefract);
g_pBaseTerrain->Draw();
}
void UnloadContent()
{
ReleaseCOM(g_pWater);
ReleaseCOM(g_pBaseTerrain);
ReleaseCOM(g_pSkybox);
}
void Dispose()
{
ReleaseCOM(g_pD3DCamera);
ReleaseCOM(g_pKeyboardInput);
ReleaseCOM(g_pMouseInput);
ReleaseCOM(g_pD3DDevice);
ReleaseCOM(g_pD3D);
}
由此不难看出,水面效果的实现,其实前后总共绘制了3次场景,反射、折射各一次,最后一次是绘制真正的场景绘制。
最后需要补充说明两点:
1>需要摄影机提供反射数据计算。
UpdateCamera函数最后,我们补充如下代码:
//---计算镜像数据
m_reflectPosition = m_cameraPosition;
m_reflectPosition.y = 2 * m_refPlaneHeight - m_reflectPosition.y;
D3DXVECTOR3 m_reTarget = m_cameraTarget;
m_reTarget.y = 2 * m_refPlaneHeight - m_reTarget.y;
D3DXVECTOR3 m_reUp = m_cameraUp;
D3DXVec3TransformCoord(&m_reUp,&D3DXVECTOR3_UP,&diff);
D3DXMatrixLookAtLH(&m_reflectMatrix,&(m_reflectPosition + Adiff),&m_reTarget,&m_reUp);
2>天空盒要对反射动作、裁剪动作做出“适应”。
如我们所知,天空盒并非一个无限大的区域;正相反,其实只是一个【很小的区域】【永远跟随摄影机移动】而已。因此,渲染反射贴图时,天空盒所处位置应为摄影机景象位置。渲染反射跟折射贴图时,天空盒要“无视”裁剪动作。
void CSkybox::Draw(bool isReflect,bool isRefract)
{
// 绘制之前,根据摄影机位置,更新世界矩阵
D3DXVECTOR3 centerPos;
D3DXPLANE refPlane;
// 如果需要反射则重置天空中心为摄影机镜像位置
if(isReflect)
centerPos = g_pD3DCamera->GetReflectPos();
else
centerPos = g_pD3DCamera->GetCameraPos();
D3DXMatrixTranslation(&m_WorldTransMatrix,centerPos.x,centerPos.y,centerPos.z);
g_pD3DDevice->GetTransform(D3DTS_WORLD, &m_OriWorldTransMatrix);
g_pD3DDevice->SetTransform(D3DTS_WORLD, &m_WorldTransMatrix);
// 禁用深度缓冲
g_pD3DDevice->SetRenderState(D3DRS_ZENABLE, D3DZB_FALSE);
// 禁用背面剔除
g_pD3DDevice->SetRenderState(D3DRS_CULLMODE, D3DCULL_NONE);
// 横切面设置对天空盒无效
if(isReflect||isRefract)
{
g_pD3DDevice->GetClipPlane(0, (float*)&refPlane);
g_pD3DDevice->SetRenderState(D3DRS_CLIPPLANEENABLE, 0);
}
// 更改采样方式,平滑纹理间过度
g_pD3DDevice->SetSamplerState(0, D3DSAMP_ADDRESSU, D3DTADDRESS_CLAMP);
g_pD3DDevice->SetSamplerState(0, D3DSAMP_ADDRESSV, D3DTADDRESS_CLAMP);
// 分6次绘制天空盒6个面
for (int i=0;i<6;i++)
{
// 应用纹理
g_pD3DDevice->SetTexture(0, m_ppTextureArray[i]->GetTexture());
// 应用顶点格式
g_pD3DDevice->SetFVF(VertexSkybox::FVF);
// 绘制一个面的4个顶点
g_pD3DDevice->DrawIndexedPrimitiveUP(D3DPT_TRIANGLELIST, 0, 4, 2, &m_pIndices[0],
D3DFMT_INDEX16, &m_pVertex[i * 4], sizeof(VertexSkybox));
}
// 还原默认采样方式
g_pD3DDevice->SetSamplerState(0, D3DSAMP_ADDRESSU, D3DTADDRESS_WRAP);
g_pD3DDevice->SetSamplerState(0, D3DSAMP_ADDRESSV, D3DTADDRESS_WRAP);
if(isReflect||isRefract)
{
g_pD3DDevice->SetClipPlane(0, refPlane);
g_pD3DDevice->SetRenderState(D3DRS_CLIPPLANEENABLE, D3DCLIPPLANE0);
}
// 重用背面剔除
g_pD3DDevice->SetRenderState(D3DRS_CULLMODE, D3DCULL_CCW);
// 重用深度缓冲
g_pD3DDevice->SetRenderState(D3DRS_ZENABLE, D3DZB_TRUE);
// 还原世界矩阵
g_pD3DDevice->SetTransform(D3DTS_WORLD, &m_OriWorldTransMatrix);
}
最后是效果图:
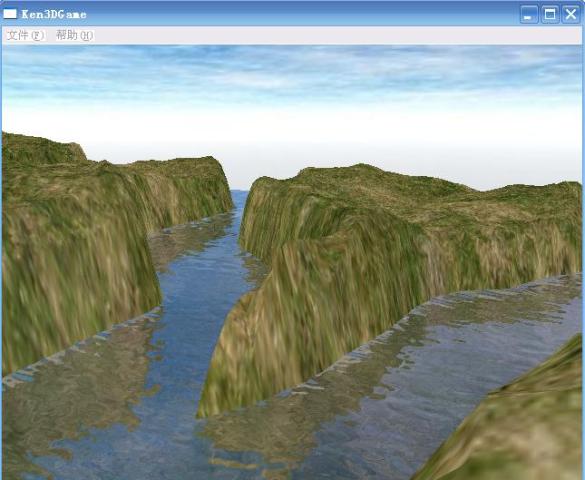
水面反射出的倒影

水面折射出水底的景象

阳光下波光粼粼的效果

一个冲积形成的小水潭 ^ ^
总结:本节涉及内容较之前几篇出现了较大的跳跃。较难的几点,诸如Shader编写、法线贴图运用等等大家可以先往后放;后台纹理创建、缓冲表面获取等方法应力求掌握——此为后期场景特效处理及PostEffect特效框架构建的基础。
另:本节中的水面虽然华丽,但损失了部分性能——场景被绘制3次。实际运用过程中,我们应以性能为优先,兼顾效果。常见的简化手法诸如舍弃折射效果等等,留待后续做进一步讨论~