前言
先祝大家:

前几天复习的时候,又遇见了几条极坐标下的曲线,当时在大一第一次接触编程的时候也在想,如何将这些复杂的曲线以代码的形式表现出来,它们的坐标如何确定。
后来,在不断地学习中,也渐渐认识到,任意满足狄利克雷条件的函数,其傅里叶级数都是收敛的,可以用三角函数作为通项来表示,当然,也可以用幂级数表示。如果把需要绘制的二维图像表示在复平面上,将其轨迹表示成有关时间 t t t的复函数,那么坐标的移动也都可以表示为时间 t t t的函数,然后通过傅里叶变换求出坐标,即通过傅里叶变换可以拟合任意曲线。没想到《信号与线性系统》这门课里的知识可以用到这里来,学到了学到了。
我在b站找到了两种方法来拟合这种图像中的曲线,一种就是上述的傅里叶变换,另外一种是通过贝塞尔曲线。
额(⊙o⊙)…,本篇不谈《信号与线性系统》,也不介绍傅里叶变换,有关傅里叶变换来拟合曲线的操作我准备另写一篇再谈。本篇主要介绍一下如何使用贝塞尔曲线来辅助turtle库绘制麻衣学姐,并通过图像聚类来给画笔添加色彩。
1. 贝塞尔同学
贝塞尔曲线 ( B e ˊ z i e r (Bézier (Beˊzier c u r v e ) curve) curve),是应用于二维图形应用程序的数学曲线。它由起始点、终止点(也称锚点)和控制点定义。通过调整控制点,贝塞尔曲线的形状会发生变化。
1.1 一阶(线性)贝塞尔曲线
给定起始点 P 0 、 P_0、 P0、终止点 P 1 P_1 P1,一阶贝塞尔曲线只是一条两点之间的直线。这条线由下式给出:
B ( t ) = P 0 + ( P 1 − P 0 ) t = ( 1 − t ) P 0 + t P 1 , t ∈ [ 0 , 1 ] B(t)=P_0+(P_1-P_0)t=(1-t)P_0+tP_1,t\in[0,1] B(t)=P0+(P1−P0)t=(1−t)P0+tP1,t∈[0,1]
1.2 二阶贝塞尔曲线
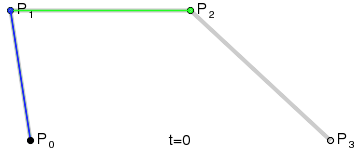
二阶贝塞尔曲线的路径由给定点起始点 P 0 、 P_0、 P0、控制点 P 1 、 P_1、 P1、终止点 P 2 P_2 P2所确定:
B ( t ) = ( 1 − t ) 2 P 0 + 2 t ( 1 − t ) P 1 + t 2 P 2 , t ∈ [ 0 , 1 ] B(t)=(1-t)^2P_0+2t(1-t)P_1+t^2P_2,t\in[0,1] B(t)=(1−t)2P0+2t(1−t)P1+t2P2,t∈[0,1]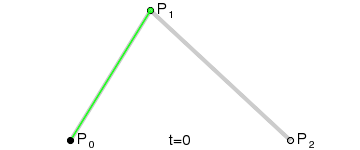
在建构二阶贝塞尔曲线时可分为三部分:

(1)由 P 0 P_0 P0至 P 1 P_1 P1的连续点 Q 0 Q_0 Q0,描述一条一阶贝塞尔曲线;
(2)由 P 1 P_1 P1至 P 2 P_2 P2的连续点 Q 1 Q_1 Q1,描述一条一阶贝塞尔曲线;
(3)由 Q 0 Q_0 Q0至 Q 1 Q_1 Q1的连续点 B ( t ) B(t) B(t),描述一条二阶贝塞尔曲线。
1.3 高阶贝塞尔曲线
对于三阶曲线的路径由给定点起始点 P 0 、 P_0、 P0、控制点 P 1 、 P 2 、 P_1、P_2、 P1、P2、终止点 P 3 P_3 P3所确定,即由一阶贝塞尔曲线描述的中介点 Q 0 、 Q 1 、 Q 2 Q_0、Q_1、Q_2 Q0、Q1、Q2,和由二阶曲线描述的点 R 0 、 R 1 R_0、R_1 R0、R1所建构:
B ( t ) = ( 1 − t ) 3 P 0 + 3 t ( 1 − t ) P 1 2 + 3 t ( 1 − t ) P 2 2 + t 3 P 3 , t ∈ [ 0 , 1 ] B(t)=(1-t)^3P_0+3t(1-t)P_1^2+3t(1-t)P_2^2+t^3P_3,t\in[0,1] B(t)=(1−t)3P0+3t(1−t)P12+3t(1−t)P22+t3P3,t∈[0,1]

对于四阶曲线由给定点起始点 P 0 、 P_0、 P0、控制点 P 1 、 P 2 、 P 3 、 P_1、P_2、P_3、 P1、P2、P3、终止点 P 4 P_4 P4所确定,即由一阶贝塞尔曲线描述的中介点 Q 0 、 Q 1 、 Q 2 、 Q 3 Q_0、Q_1、Q_2、Q_3 Q0、Q1、Q2、Q3,由二阶贝塞尔曲线描述的点 R 0 、 R 1 、 R 2 R_0、R_1、R_2 R0、R1、R2,和由三阶贝塞尔曲线描述的点 S 0 、 S 1 S_0、S_1 S0、S1所建构:


五阶贝塞尔曲线的构成:

上述资料来自维基百科贝塞尔曲线。
2. 麻衣学姐
樱岛麻衣是青春猪头少年不会梦到兔女郎学姐系列番剧里的女主,就是她


3. SVG
S V G SVG SVG,即 S c a l a b l e Scalable Scalable V e c t o r Vector Vector G r a p h i c s Graphics Graphics,意思为可缩放的矢量图形。它是基于 X M L ( E x t e n s i b l e XML(Extensible XML(Extensible M a r k u p Markup Markup L a n g u a g e ) Language) Language),由 W o r l d World World W i d e Wide Wide W e b Web Web C o n s o r t i u m ( W 3 C ) Consortium(W3C) Consortium(W3C)联盟进行开发的。
严格来说应该是一种开放标准的矢量图形语言,可让你设计激动人心的、高分辨率的 W e b Web Web图形页面。用户可以直接用代码来描绘图像,可以用任何文字处理工具打开 S V G SVG SVG图像,通过改变部分代码来使图像具有交互功能,并可以随时插入到 H T M L HTML HTML中通过浏览器来观看。
这里主要介绍一下 S V G SVG SVG中的path元素:
path元素是SVG基本形状中最重要的一个,它用于绘制基本形状,包括矩形、圆形、椭圆、折线形、多边形,以及一些其他的形状,例如贝塞尔曲线、二次曲线等。
path元素的形状是通过属性d来定义的,属性d的值是一个命令+参数的序列:
| 命令 | 功能 |
|---|---|
| M M M | M o v e Move Move t o to to ( x , y ) (x, y) (x,y), 移动到 ( x , y ) (x, y) (x,y) |
| L L L | L i n e Line Line t o to to ( x , y ) (x, y) (x,y), 在当前位置 ( x , y ) (x, y) (x,y)与上一个位置点画线段 |
| H H H | H o r i z o n t a l Horizontal Horizontal l i n e t o lineto lineto, 绘制平行线 |
| V V V | V e r t i c a l Vertical Vertical l i n e t o lineto lineto, 绘制垂直线 |
| C C C | C u r v e t o Curveto Curveto, 三次贝塞尔曲线 ( x 1 , y 1 , x 2 , y 2 , x , y ) (x1, y1, x2, y2, x, y) (x1,y1,x2,y2,x,y) |
| S S S | S m o o t h Smooth Smooth c u r v e t o curveto curveto 光滑三次贝塞尔曲线, 用来创建与之前曲线一样的贝塞尔曲线 ( x 2 , y 2 , x , y ) (x2, y2, x, y) (x2,y2,x,y) |
| Q Q Q | Q u a d r a t i c Quadratic Quadratic B e z i e r Bezier Bezier c u r v e curve curve, 二次贝塞尔曲线 ( x 1 , y 1 , x , y ) (x1, y1, x, y) (x1,y1,x,y) |
| T T T | S m o o t h Smooth Smooth q u a d r a t i c quadratic quadratic B e z i e r Bezier Bezier c u r v e t o curveto curveto, 光滑二次贝塞尔曲线(x, y) |
| A A A | E l l i p t i c a l Elliptical Elliptical A r c Arc Arc, 弧形 |
| Z Z Z | C l o s e p a t h Closepath Closepath, 从当前点画一条直线到起点 |
在了解了 S V G SVG SVG之后,接下来要做的就是如何得到 S V G SVG SVG图片,当然,方法很多,最方便的应该就是使用 A d o b e Adobe Adobe I l l u s t r a t o r Illustrator Illustrator进行操作了,由于本地没有安装,我用的PS转的,但PS转换的SVG图片不含path元素,代替它的是image元素,不是想要的那种SVG格式。然后就用了GitHub上一个开源的Potrace算法,它提供了一个带GUI的命令行工具,通过它能将.bmp格式的图片转为.svg,但失去了色彩。这里结合着前面博客介绍的聚类算法,可以给画笔上一下色。
4. 具体实现
这里封装了两个类,LineMethod类提供了各种SVG中的绘制图形的命令方法,DrawImg类提供的是绘图操作,使用的是turtle库。
import turtle
import cv2
import numpy as np
from bs4 import BeautifulSoup
import os
import re


class LineMethod(object):
    def __init__(self, width, height):
        # 贝塞尔函数的取样次数
        self.samples = 15
        self.width = width
        self.height = height

    def Bezier(self, p1, p2, t):
        # 一阶贝塞尔函数
        return p1 * (1 - t) + p2 * t

    def Bezier2(self, x1, y1, x2, y2, x3, y3):
        # 二阶贝塞尔函数
        turtle.goto(x1, y1)
        turtle.pendown()
        for t in range(0, self.samples + 1):
            x = self.Bezier(self.Bezier(x1, x2, t / self.samples),
                            self.Bezier(x2, x3, t / self.samples), t / self.samples)
            y = self.Bezier(self.Bezier(y1, y2, t / self.samples),
                            self.Bezier(y2, y3, t / self.samples), t / self.samples)
            turtle.goto(x, y)
        turtle.penup()

    def Bezier3(self, x1, y1, x2, y2, x3, y3, x4, y4):
        # 三阶贝塞尔函数
        x1 = - self.width / 2 + x1
        y1 = self.height / 2 - y1
        x2 = - self.width / 2 + x2
        y2 = self.height / 2 - y2
        x3 = - self.width / 2 + x3
        y3 = self.height / 2 - y3
        x4 = - self.width / 2 + x4
        y4 = self.height / 2 - y4  # 坐标变换
        turtle.goto(x1, y1)
        turtle.pendown()
        for t in range(0, self.samples + 1):
            x = self.Bezier(
                self.Bezier(self.Bezier(x1, x2, t / self.samples), self.Bezier(x2, x3, t / self.samples),
                            t / self.samples),
                self.Bezier(self.Bezier(x2, x3, t / self.samples), self.Bezier(x3, x4, t / self.samples),
                            t / self.samples),
                t / self.samples)
            y = self.Bezier(
                self.Bezier(self.Bezier(y1, y2, t / self.samples), self.Bezier(y2, y3, t / self.samples),
                            t / self.samples),
                self.Bezier(self.Bezier(y2, y3, t / self.samples), self.Bezier(y3, y4, t / self.samples),
                            t / self.samples),
                t / self.samples)
            turtle.goto(x, y)
        turtle.penup()

    def Moveto(self, x, y):
        # 绝对移动
        turtle.penup()
        turtle.goto(- self.width / 2 + x, self.height / 2 - y)
        turtle.pendown()

    def MovetoRelative(self, dx, dy):
        # 相对移动
        turtle.penup()
        turtle.goto(turtle.xcor() + dx, turtle.ycor() - dy)
        turtle.pendown()

    def Line(self, x1, y1, x2, y2):
        # 连接svg坐标下两点
        turtle.penup()
        turtle.goto(- self.width / 2 + x1, self.height / 2 - y1)
        turtle.pendown()
        turtle.goto(- self.width / 2 + x2, self.height / 2 - y2)
        turtle.penup()

    def Lineto(self, x, y):
        # 连接当前点和svg坐标下(x, y)
        turtle.pendown()
        turtle.goto(- self.width / 2 + x, self.height / 2 - y)
        turtle.penup()

    def LinetoRelative(self, dx, dy):
        # 连接当前点和相对坐标(dx, dy)的点
        turtle.pendown()
        turtle.goto(turtle.xcor() + dx, turtle.ycor() - dy)
        turtle.penup()

    def Curveto(self, x1, y1, x2, y2, x, y):
        # 三阶贝塞尔曲线到(x, y)
        turtle.penup()
        X_now = turtle.xcor() + self.width / 2
        Y_now = self.height / 2 - turtle.ycor()
        self.Bezier3(X_now, Y_now, x1, y1, x2, y2, x, y)

    def CurvetoRelative(self, x1, y1, x2, y2, x, y):
        # 三阶贝塞尔曲线到相对坐标(x, y)
        turtle.penup()
        X_now = turtle.xcor() + self.width / 2
        Y_now = self.height / 2 - turtle.ycor()
        self.Bezier3(X_now, Y_now, X_now + x1, Y_now + y1, X_now + x2, Y_now + y2, X_now + x, Y_now + y)


class DrawImg(object):
    def __init__(self, filename, rgb):
        self.initWH(filename)
        self.rgb = rgb

    def initWH(self, filename):
        with open(filename) as f:
            self.svg_html = BeautifulSoup(f.read(), 'lxml')
        self.width = float(self.svg_html.svg.attrs['width'][0: -2])
        self.height = float(self.svg_html.svg.attrs['height'][0: -2])
        self.transform = self.svg_html.g.attrs['transform']

        self.line_obj = LineMethod(width=self.width, height=self.height)

        pattern = re.compile('[\w()., ]*\(([\d.]*),-([\d.]*)\)')
        self.scale_value = re.match(pattern, self.transform)
        self.scale = (float(self.scale_value.group(1)), float(self.scale_value.group(2)))

    def readPathAttrD(self, path_d):
        """
        返回一个迭代器,随时获取数据
        :param path_d:
        :return:
        """
        path_dlist = path_d.split(' ')
        for i in path_dlist:
            if i.isdigit():
                yield float(i)
            elif i[0].isalpha():
                yield i[0]
                yield float(i[1:])
            elif i[-1].isalpha():
                yield float(i[: -1])
            elif i[0] == '-':
                yield float(i)

    def drawImg(self, path_diter):
        """
        大写字母绝对定位, 小写字母相对定位
        M Move to (x, y), 移动到(x, y)
        L Line to (x, y), 在当前位置(x, y)与上一个位置点画线段
        H Horizontal lineto, 绘制平行线
        V Vertical lineto, 绘制垂直线
        C Curveto, 三次贝塞尔曲线(x1, y1, x2, y2, x, y)
        S Smooth curveto 光滑三次贝塞尔曲线, 用来创建与之前曲线一样的贝塞尔曲线(x2, y2, x, y)
        Q Quadratic Bezier curve, 二次贝塞尔曲线(x1, y1, x, y)
        T Smooth quadratic Bezier curveto, 光滑二次贝塞尔曲线(x, y)
        A Elliptical Arc, 弧形()
        Z Closepath, 从当前点画一条直线到起点
        :param path_diter:
        :return:
        """
        lastI = ''
        for i in path_diter:
            if i == 'M':
                turtle.end_fill()
                self.line_obj.Moveto(next(path_diter) * self.scale[0], next(path_diter) * self.scale[1])
                turtle.begin_fill()
            elif i == 'm':
                turtle.end_fill()
                self.line_obj.MovetoRelative(next(path_diter) * self.scale[0], next(path_diter) * self.scale[1])
                turtle.begin_fill()
            elif i == 'C':
                self.line_obj.Curveto(next(path_diter) * self.scale[0], next(path_diter) * self.scale[1],
                                      next(path_diter) * self.scale[0], next(path_diter) * self.scale[1],
                                      next(path_diter) * self.scale[0], next(path_diter) * self.scale[1])
                lastI = i
            elif i == 'c':
                self.line_obj.CurvetoRelative(next(path_diter) * self.scale[0], next(path_diter) * self.scale[1],
                                              next(path_diter) * self.scale[0], next(path_diter) * self.scale[1],
                                              next(path_diter) * self.scale[0], next(path_diter) * self.scale[1])
                lastI = i
            elif i == 'L':
                self.line_obj.Lineto(next(path_diter) * self.scale[0], next(path_diter) * self.scale[1])
            elif i == 'l':
                self.line_obj.LinetoRelative(next(path_diter) * self.scale[0], next(path_diter) * self.scale[1])
                lastI = i
            elif lastI == 'C':
                self.line_obj.Curveto(i * self.scale[0], next(path_diter) * self.scale[1],
                                      next(path_diter) * self.scale[0], next(path_diter) * self.scale[1],
                                      next(path_diter) * self.scale[0], next(path_diter) * self.scale[1])
            elif lastI == 'c':
                self.line_obj.CurvetoRelative(i * self.scale[0], next(path_diter) * self.scale[1],
                                              next(path_diter) * self.scale[0], next(path_diter) * self.scale[1],
                                              next(path_diter) * self.scale[0], next(path_diter) * self.scale[1])
            elif lastI == 'L':
                self.line_obj.Lineto(i * self.scale[0], next(path_diter) * self.scale[1])
            elif lastI == 'l':
                self.line_obj.LinetoRelative(i * self.scale[0], next(path_diter) * self.scale[1])

    def start(self):
        # turtle.screensize(640, 480)
        turtle.setup(width=self.width, height=self.height)
        # 坐标轴对调, 否则画出来是反的
        turtle.setworldcoordinates(- self.width / 2, self.height / 2,
                                   self.width / 2, - self.height / 2)

        # # 每隔n次, 更新一下屏幕, 可以用来加速绘画速度
        turtle.tracer(10)
        # turtle.pensize(1)
        # turtle.speed(10)
        turtle.penup()
        turtle.color(self.rgb)

        for i in self.svg_html.find_all('path'):
            path_d = i.attrs['d'].replace('\n', ' ')
            path_diter = self.readPathAttrD(path_d)
            self.drawImg(path_diter)

        turtle.penup()
代码测试:
if __name__ == '__main__':
    # (B, G, R)
    # img1 = cv2.imread('mayi_50.png')
    img1 = cv2.imread('mayi_75.png')
    img2 = np.float32(img1.reshape((-1, 3)))
    # data:np.float32类型的数据,每个特征应该放在一列
    # K:聚类的最终数目
    # bestLabels:预设的分类标签,没有的话就设置为None
    # criteria:终止迭代的条件,当条件满足时算法的迭代就终止,它应该是一个含有三个成员的元组(type,max_iter,epsilon)
    # attempts:重复试验kmeans算法次数,将会返回最好的一次结果
    # flags:初始类中心选择,有两个选择:cv2.KMEANS_PP_CENTERS 和 cv2.KMEANS_RANDOM_CENTERS
    # compactness:紧密度,返回每个点到相应聚类中心距离的平方和, 一个值float
    # labels:标志数组
    # centers:有聚类中心组成的数组

    compactness, labels, centers = cv2.kmeans(data=img2, K=32, bestLabels=None, criteria=(cv2.TERM_CRITERIA_EPS, 10, 1.0),
                                              attempts=16, flags=cv2.KMEANS_RANDOM_CENTERS)

    centers = centers.astype(np.uint8)
    res = centers[labels.flatten()]
    res = res.reshape(img1.shape)
    count = 0
    for i in centers:
        # src: 原图
        # lowerb: 低于这个值变为0
        # upperb: 高于这个值变为0
        res2 = cv2.inRange(src=res, lowerb=i, upperb=i)
        # 将图片里像素值按位反向
        res2 = cv2.bitwise_not(res2)
        cv2.imwrite('test_{}.bmp'.format(count), res2)

        # 位图转为矢量图bmp-->svg
        os.system('Potrace.exe test_{}.bmp -s --flat'.format(count))

        # print('drawing %d' % count)
        # print(i)

        draw_obj = DrawImg('test_{}.svg'.format(count), rgb='#%02x%02x%02x' % (i[2], i[1], i[0]))
        draw_obj.start()

        # count += 1

    print('OK!')
    turtle.mainloop()
测试结果:

enmmmm,效果不是特别好,这个问题是我觉得应该是聚类的结果中部分像素点比较离散,导致.bmp转为.svg的过程中,部分图像的边缘丢失,所以在绘制过程中就出现了这种边缘空白的结果,应该是可以优化的。
结束语
这篇博客写得很仓促哈,部分细节知识点到为止,没有展开,等有时间了再细细道来٩(๑❛ᴗ❛๑)۶。
开源代码仓库