组件进阶与插槽
组件进阶
命名注意: MyTest/my-test
小写-小写或者大写加大写
局部注册和全局注册
以这两个组件为例


局部注册
在需要用的页面import引入
在components注册
<template>
  <div>
      <test-com></test-com>
  </div>
</template>
<script>
import TestCom from "../components/testCom";
export default {


  name: "Test1125",
  components: {

     TestCom},
};
</script>
全局注册
方式一

在main.js中
import buttonMy from './components/button-my'

Vue.component("button-my", buttonMy);
方式二
自己写个js文件
import ButtonMy from "./button-my";

ButtonMy.install = function(Vue) {
  Vue.component(ButtonMy.name, ButtonMy);
};

export default ButtonMy
方式二好处
可以批量注册组件 比如EleentUi的注册


Props
静态传值
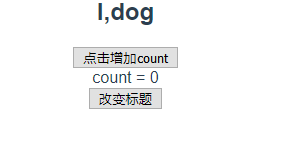
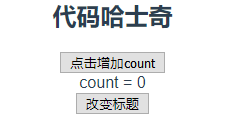
上篇我们已经讲过,这里再次演示
我们已经全局注册ButtonMy组件
ButtonMy组件
<div>
<h2>{
{ title }}</h2>
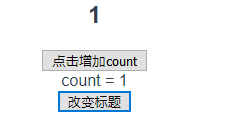
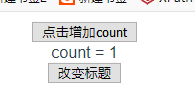
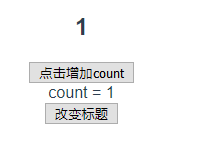
<button @click="count++">点击增加count</button>
<div>count = {
{ count }}</div>
<button @click="changeText">改变标题</button>
</div>
使用
<button-my title="我是代码哈士奇" ></button-my>

动态传值
注意 :title 其中 : 是 v-bind: 简写
<button-my :title="text" @changeTexts="text = '我是狗'"></button-my>

传值类型
数字,字符,布尔值,数组,对象
当带有v-bind:时 会被认为js表达式
如果不加就是单纯的字符串或者数字
数字
<button-my title=1 ></button-my>
字符
<button-my title="我是狗" ></button-my>

布尔值
注意 :
<button-my :title=false></button-my>
改造组件
<h2 v-if="title">{

   { title }}</h2>
数组
传值
<button-my :title="[1,2,3]"></button-my>
组件中
<h2>{

   { title[0] }}</h2>
对象
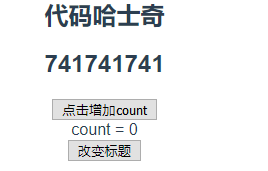
传一个完整的对象
<button-my :title="{ name: '代码哈士奇', id: 741741741 }"></button-my>
组件中
<h2>{

   { title.name }}</h2>
<h2>{

   { title.id }}</h2>
传一个的对象某个属性
 <button-my :title="post.name"></button-my>
 <script>
export default {


  name: "Tests",
  data() {


    return {


      text: "I,dog",
      post:{

      name: '代码哈士奇', id: 741741741 }
    };
  }
};
</script>
组件中
<h2>{

   { title}}</h2>
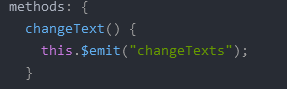
自定义事件
this.$emit('myEvent')
我们上一篇已经使用过
插槽
模板的内容肯定不一样
但是同样模板只定义一个
就需要插槽
插入代码,插入数据等
信息插槽
定义
<template>
  <div>
    <p>
      <slot name="title"></slot>
    </p>
  </div>
</template>

<script>
export default {


  name: "EasyModel"
};
</script>
使用
<easy-model>
          <template slot="title">
            我是狗
          </template>
        </easy-model>
效果

代码插槽
<div>
      <slot name="message"></slot>
</div>
使用
<easy-model>
          <template slot="title">
            我是狗
          </template>
          <template slot="message">
            <h1>哈喽,点击下面链接去百度玩耍</h1>
            <a href="http://www.baidu.com">www.baidu.com</a>
          </template>
</easy-model>

使用例子
model代码
<template>
  <div>
    <section
      id="total"
      class="total-noShow"
      v-if="!mdshowd"
      @click="closeModal"
    ></section>
    <section
      id="comeIn"
      class="comeIn-noShow"
      v-bind:class="{ modalshow: mdshowd }"
    >
      <span
        style="position: relative;left:240px"
        v-if="!mdshowd"
        @click="closeModal"
        >X</span
      >
      <p style="width: 500px;align-content: center">
        <slot name="title"></slot>
      </p>
      <div class="main-Show">
        <slot name="message"></slot>
      </div>
      <div class="opTn">
        <slot name="btnGroup"></slot>
      </div>
    </section>
  </div>
</template>

<script>
export default {


  name: "model",
  props: ["mdshowd"],
  methods: {


    closeModal() {


      this.$emit("close");
    }
  }
};
</script>

<style scoped>
.total-noShow {


  width: 100%;
  height: 100%;
  position: fixed;
  top: 0;
  left: 0;
  background-color: #8f949a;
  opacity: 0.4;
}
.comeIn-noShow {


  width: 500px;
  height: 500px;
  background-color: white;
  position: absolute;
  left: 750px;
  top: 250px;
}
.opTn {


  width: 500px;
  height: 40px;
  position: relative;
  top: 80px;
}
.main-Show {


  width: 400px;
  height: 330px;
  position: relative;
  left: 50px;
  top: 30px;
}
.modalshow {


  display: none;
}
</style>
父组件js代码
<script>
import Model from "../components/model";
export default {


  name: "Tests",
  components: {

      Model },
  data() {


    return {


      text: "I,dog",
      show: true,
      post: {

      name: "代码哈士奇", id: 741741741 },
      datas:[{

      name: "代码哈士奇", id: 1 },{

      name: "哈哈", id: 2 }],
      lookData: ""
    };
  },
  methods:{


    look(item){


      this.show = false;
      this.lookData = item;
    },
    closeLook(){


      this.show = true;
      this.lookData = "";
    }
  }
};
</script>
例一—简单弹窗
现在我们结合之前学习的东西 来一个实践
实现一个如下弹窗
 实现代码
实现代码
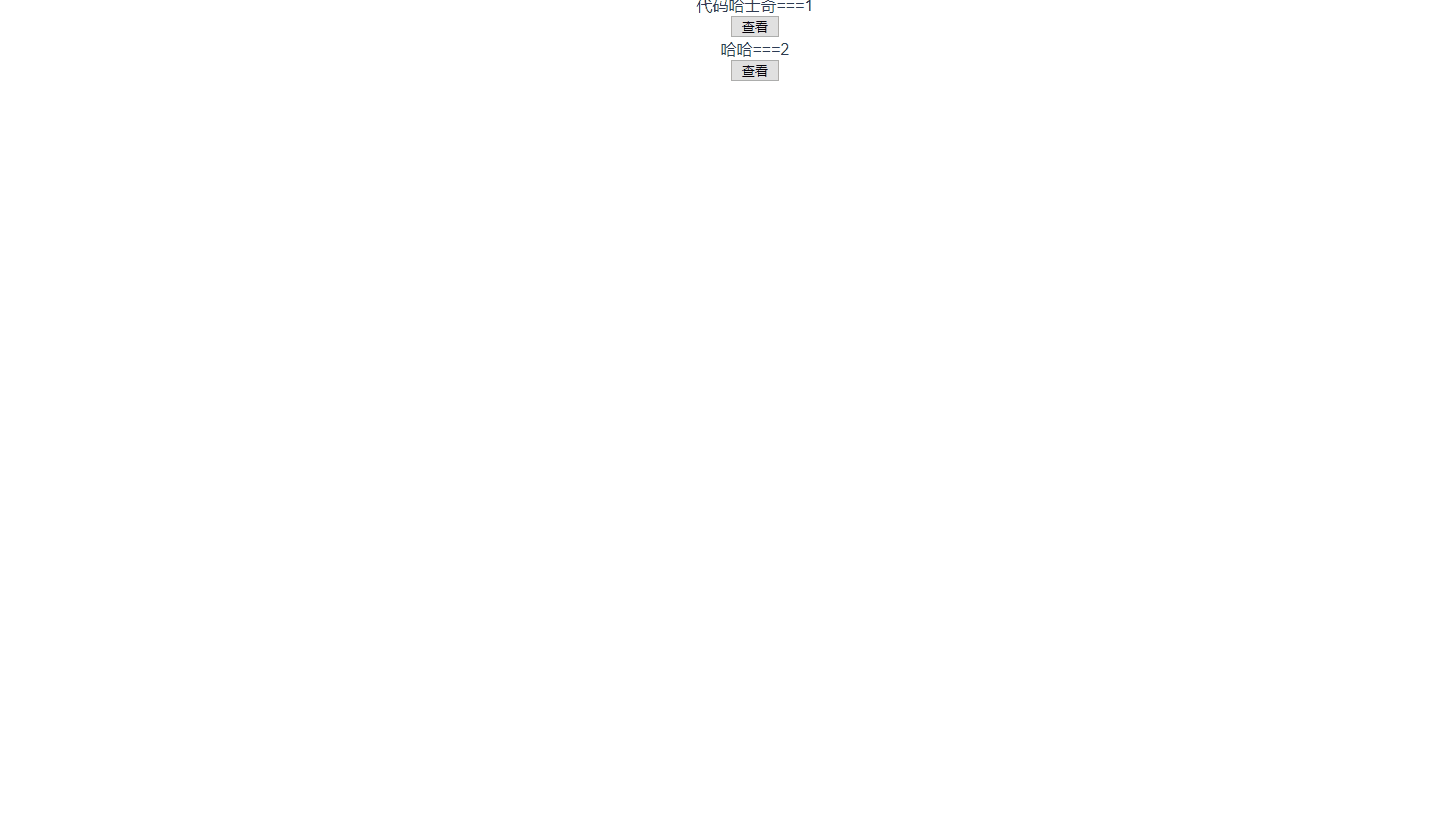
<template>
  <div>
    <div v-for="item in datas" :key="item.id">
      <div>{

   {item.name}}==={

   {item.id}}</div>
      <button @click="look(item)">查看</button>
    </div>
    <model :mdshowd="show" @close="show = true">
    </model>
  </div>
</template>
例二—数据弹窗
进阶
实现代码
<template>
  <div>
    <div v-for="item in datas" :key="item.id">
      <div>{

   {item.name}}==={

   {item.id}}</div>
      <button @click="look(item)">查看</button>
    </div>
    <model :mdshowd="show" @close="show = true">
      <template slot="title">{

   {lookData.name}}</template>
      <template slot="message">
        我叫{

   {lookData.name}},我的代号是{

   {lookData.id}}
      </template>
      <template slot="btnGroup">
        <button @click="closeLook">关闭</button>
      </template>
    </model>
  </div>
</template>
记得练习哦
大家好,我是代码哈士奇,是一名软件学院网络工程的学生,因为我是“狗”,狗走千里吃肉。想把大学期间学的东西和大家分享,和大家一起进步。但由于水平有限,博客中难免会有一些错误出现,有纰漏之处恳请各位大佬不吝赐教!暂时只在csdn这一个平台进行更新,博客主页:https://blog.csdn.net/qq_42027681。
未经本人允许,禁止转载

后续会推出
前端:vue入门 vue开发小程序 等
后端: java入门 springboot入门等
服务器:mysql入门 服务器简单指令 云服务器运行项目
python:推荐不温卜火 一定要看哦
一些插件的使用等
大学之道亦在自身,努力学习,热血青春
如果对编程感兴趣可以加入我们的qq群一起交流:974178910

有问题可以下方留言,看到了会回复哦