转载声明 : 该文章出处为 扛麻袋的少年
本文目录:
写在开头
接上一篇文章:Spring Cloud Gateway 微服务新一代网关。了解完 Gateway 网关的使用后,本文来介绍 Spring Cloud Config 分布式配置中心 相关内容。首先来谈谈为什么要引入 Spring Cloud Config 分布式配置中心这么个玩意。
Spring Cloud Config 和 Spring Cloud Bus 这两哥们,倒是谈不上 停更进维,在开发中还在使用。但是在接下来将会慢慢的被 后起之秀 Alibaba Nacos 所替代。Nacos 会在接下来介绍,Nacos 尽请期待。
Nacos 可以替代 Eureka、Spring Cloud Config、Spring Cloud Bus 。一代三减少更多组件的使用,这样我们就可以在工作中将更多的经历放在业务逻辑上。Spring Cloud Cofig 和Spring Cloud Bus 这两个组件还是比较重要,很多公司都有在使用。
微服务在 服务配置 + 服务总线 这块进行选型,共有三套方案:1.Spring Cloud Config + Spring Cloud Bus、2.Spring Cloud Alibaba Nacos (Nacos 官网)、3.携程 Apollo(Github 地址:Apollo)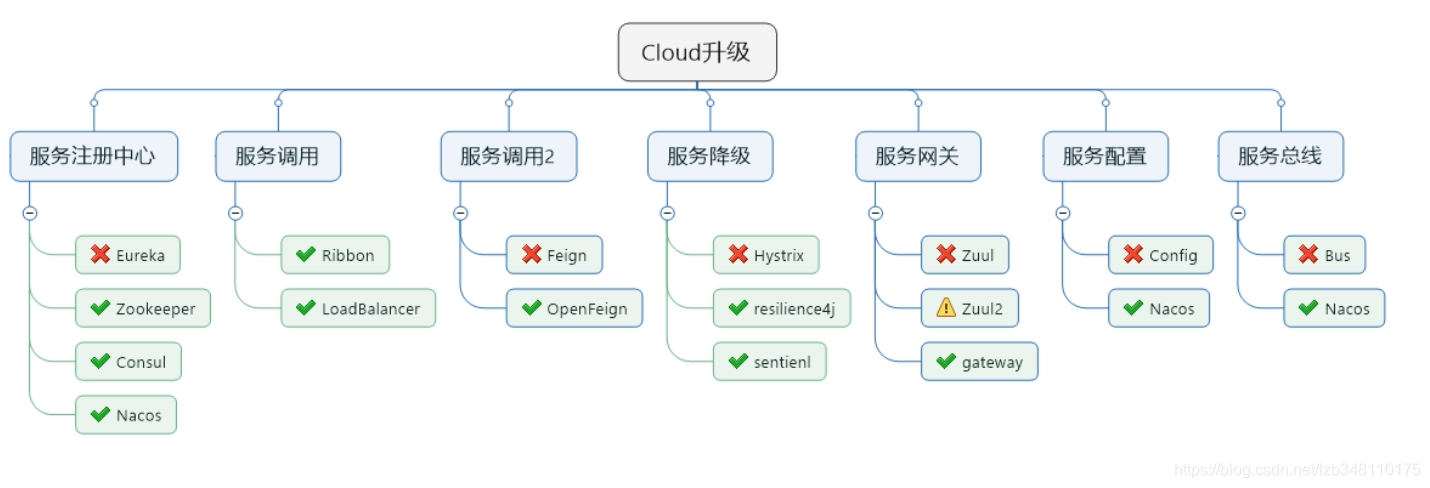
1.微服务面临的问题
到目前为止,我们对 Eureka、Robbin、Feign、Hystrix、Gateway 等有了相应的了解,每个微服务都是单独一个模块,微服务彼此还支持集群环境。但是在微服务项目的开发中,还面临着一个严重的配置问题。每一个微服务都需要一个配置文件,如果有几个微服务需要连接数据库,name就需要进行 4 次数据库的配置。当数据库发生改变,那么就需要同时修改 4 个微服务的配置文件才可以。那么如果有40台呢?如果是集群模式呢??
如果能够做到:一处修改、处处生效,这样就可以减轻修改配置压力,从而增强配置管理方面的功能,此时就需要 Spring Cloud Config 和 Spring Cloud Bus 上场了。
使用 Config + Bus,可以实现 1.一处修改、处处生效,同时也可以 2.灵活的对版本(dev/test/prod)进行切换,这样就足够方便了。本文先来介绍 Spring Cloud Config
2.了解 Spring Cloud Config
Spring Cloud Config 为[wèi]微服务架构中的微服务 提供集中化的外部配置支持,配置服务器为[wèi]各个不同微服务应用的所有环境 提供了一个中心化的外部配置。公共配置都去配置中心读取,私有配置,各个服务独自配置,简直不要太爽
2.1 Config 何方神圣 (Config 是什么)
Spring Cloud Config 分为 服务端 和 客户端。
- 服务端:也称为
分布式配置中心,它是一个独立的微服务应用,用来连接配置服务器并为客户端提供获取配置信息,加密/解密信息等访问接口。就是图中的Config Server; - 客户端:通过指定的
配置中心(Config Server)来管理应用资源,以及与业务相关的配置内容,并在启动的时候从配置中心获取和加载配置信息。
服务器默认采用 Git 来存储配置信息,这样就有助于对环境配置进行版本管理,并且可以通过 Git 客户端工具来方便的管理和访问配置内容。(服务器也支持其他方式:支持SVN 和 本地文件,最推荐 Git,而且使用的是 http/https 访问的形式)
2.2 Config 结构图
 #### 2.3 Config 能帮我们干吗 (Config 功能)

3. Git 远程服务器配置
以下操作,需要在 Github 下进行操作。如果你需要了解 Git 相关内容:点击查看 Git 模块内容
Ⅰ.创建存储 Config 的新 Repository
登陆 Github 账号,进行新 Repository 的创建。此处新创建的 Repository 名称为:springcloud-config 。详细创建过程,可参考:如何将本地项目提交至GitHub远程仓库(第4、5步,前3步看情况是否需要)
Repository 创建成功,即可获取自己的仓库地址。我创建的仓库地址为:https://github.com/Liuzebiao/springcloud-config.git
Ⅱ.将新建的GitHub远程仓库克隆到本地
参考:克隆GitHub远程仓库项目到本地,将项目克隆到本地,方便对数据的修改。GitHub 也支持直接修改,你也可以不克隆,此处克隆只是为了更方便处理数据。
进入克隆目录,新建三个配置文件,分别是 config-dev.yml、config-test.yml、config-prod.yml。然后通过命令将其推送到远程GitHub仓库
git add *.yml (将提交的文件加入暂存区,为git commit做准备)
git commit -m “first commit” (完成对文件内容提交至Git版本库)
git push -u origin master (将本地仓库内容,推送至GitHub远程仓库)
到此为止,远程GitHub仓库推送成功

对配置修改后,通过以上三个命令,便可以再次将修改后的内容推送至 GitHub。你也可以使用 IDEA 等工具进行,步骤如下图所示

Ⅲ.Github 远程仓库内容

4.服务端配置测试 (Config 结构图中的 ConfigServer)
服务端:也称为 分布式配置中心,它是一个独立的微服务应用。我们现在就来对服务端 ConfigServer 进行配置。
4.1 创建ConfigServer模块
它是一个独立的微服务应用,此处模块名称命名为:cloud-config-center-3344。
4.2 引入 pom.xml 依赖
<!--引入spring-cloud-config-server依赖-->
<dependency>
    <groupId>org.springframework.cloud</groupId>
    <artifactId>spring-cloud-config-server</artifactId>
</dependency>
4.3 配置文件 application.yml 修改
server:
  port: 3344   #端口号
spring:
  application:
    name: cloud-config-center  #注册进Eureka 服务器的微服务名
  cloud:
    config:
      server:
        git:
          uri: https://github.com/Liuzebiao/springcloud-config.git  #GitHub远程仓库地址
          # 搜索目录
          search-paths:
            - springcloud-config
      #读取分支
      label: master
#服务注册到eureka
eureka:
  client:
    service-url:
      defaultZone:  http://localhost:7001/eureka
4.4 主启动类 配置@EnableConfigServer注解
@SpringBootApplication
@EnableConfigServer
public class ConfigCenterMain3344 {


    public static void main(String[] args) {


        SpringApplication.run(ConfigCenterMain3344 .class,args);
	}
}
4.5 启动服务端模块,测试
Config 模块需要注册到 Eureka Server,先启动 Eureka 服务。
启动 Config 模块后,测试通过 Config 微服务是否可以从 Github上获取配置内容。我们通过地址:http://localhost:3344/master/config-dev.yml 进行配置内容的访问。

→ 到此为止,成功实现了用 SpringCloud Config 通过 GitHub 获取配置信息
5.GitHub配置文件读取规则
远程 GitHub 仓库,配置文件的命名也是有具体规则的。Spring Cloud Config 官方共支持 5 种方式的配置。5种配置规则见:Config 官网配置规则
/{

    application}/{

    profile}/{

    label}
/{

    application}-{

    profile}.yml (这种不带label方式,默认使用 application.yml 配置)
/{

    label}/{

    application}-{

    profile}.yml (推荐使用第三种)
/{

    application}-{

    profile}.properties
/{

    label}/{

    application}-{

    profile}.properties
5.1 规则说明:
/{application}/{profile}/{label}这种方式,返回的是 Json 对象,需要自己解析所要的内容;

2. /{application}-{profile}.yml 这种不带 label 方式,因为 applicaiton.yml 文件已经有配置过 label,不带label 方式,默认走的就是 yml 配置的 label,返回的是配置内容;

3. /{label}/{application}-{profile}.yml 推荐使用第3种,这种方式简明扼要,条理清晰,返回的是配置内容;

5. {application}-{profile}.properties 同第2种;
6. {label}/{application}-{profile}.properties 同第3种。
5.2 参数说明:
label:GitHub 分支(branch)名称application:服务名profile:环境(dev/test/prod)
6.客户端配置测试 (Config 结构图中的 Client A、Client B、Client C)
客服端:在启动的时候从 配置中心(Config Server) 获取和加载配置信息。
6.1 客户端模块
创建客户端模块,用来读取ConfigServer配置。此处模块名称为:cloud-config-center-3355
6.2 引入 pom.xml 依赖
<!--引入spring-cloud-starter-config依赖-->
<dependency>
    <groupId>org.springframework.cloud</groupId>
    <artifactId>spring-cloud-starter-config</artifactId>
</dependency>
6.3 配置文件 bootstrap.yml 修改
注意:此处需要增加的是一个 bootstap.yml 文件。
Ⅰ.bootstrap.yml 是什么
application.yml 是(用户级)的资源配置项。bootstrap.yml 是(系统级)的资源配置项,优先级更高。
Spring Cloud 会创建一个 “Bootstrap Context”,作为 Spring 应用的 “Application Context” 的 父上下文。初始化的时候,“Bootstrap Context” 负责从 外部源 加载配置属性并解析配置。这两个上下文共享一个从外部获取的 “Environment”。
"Bootstrap" 属性有高优先级。默认情况下,它们不会被本地配置覆盖。 “Bootstrap Context” 和 “Application Context” 有这不同的约定,所以新增了一个 "bootstrap.yml" 文件,保证"Bootstrap Context" 和 "Application Context" 配置的分离。
所以,将客户端模块下的 application.yml 文件改为bootstrap.yml,这是很关键的。 因为 bootstrap.yml 是比 application.yml 优先加载的。bootstrap.yml 优先级高于 applicaiton.yml。
Ⅱ.bootstrap.yml 配置内容
server:
  port: 3355 #端口
spring:
  application: #名称
    name: config-client
  cloud:
    #config客户端配置
    config:
      label: master  #分支名称
      name: config  #配置文件名称
      profile: dev   # 读取后缀名称   上述3个综合:master分支上config-dev.yml 的配置文件被读取(http://config-3344.com:3344/master/fongig-dev.yml)
      uri: http://localhost:3344   #配置中心地址
#服务注册到eureka地址
eureka:
  client:
    service-url:
      defaultZone: http://eureka7001.com:7001/eureka
配置图解:

6.4 主启动类 配置@EnableConfigServer注解
import org.springframework.boot.SpringApplication;
import org.springframework.boot.autoconfigure.SpringBootApplication;
@EnableEurekaClient
@SpringBootApplication
public class ConfigClientMain3355 {


    public static void main(String[] args) {


            SpringApplication.run( ConfigClientMain3355.class,args);
        }
}
6.5 controller业务类
@RestController
public class ConfigClientController {


    @Value("${config.info}") //通过这种方式,可以直接读取ConfigServer中的配置信息
    private String configInfo;
    @GetMapping("/configInfo")
    public String getConfigInfo(){


        return configInfo;
    }
}
6.6 启动客户端模块,测试
Config 模块需要注册到 Eureka Server,先启动 Eureka 服务。然后启动 Config Server 3344 模块,最后启动 Client 3355 模块。我们通过地址:http://localhost:3355/configInfo 发现可以成功读取到 ConfigServer 中的 config-dev.yml 配置。
需要获取 test、prod 等环境配置信息,只需要修改 Ⅱ.bootstrap.yml 配置内容 中的相关属性,即可获取响应环境的配置信息。

7.分布式配置的动态刷新问题
当 GitHub 上的配置文件内容有调整,Github中配置变更后,ConfigServer 配置中心会立刻响应,然鹅客户端却没有任何响应,除非客户端重启或者重新加载,才能够获取最新的配置。 难道每次修改配置文件,客户端都需要重启吗??
那简直就是个噩梦,还是没有解决根本问题。为了避免每次修改 GitHub 配置文件后,客户端都需要重启的问题,此处就引出了客户端 动态刷新 的问题。
接下来对客户端进行 动态刷新 配置。
7.1 pom.xml 引入actuator监控依赖
<!--引入actuator监控-->
<dependency>
    <groupId>org.springframework.boot</groupId>
    <artifactId>spring-boot-starter-actuator</artifactId>
</dependency>
7.2 修改YML,新增暴露监控端口配置
#暴露监控端点
management:
  endpoints:
    web:
      exposure:
        include: "*"  #此处有很多选项可以配置,为了省事 ,直接配置 *
7.3 Controller层添加 @RefreshScope 注解
@RefreshScope
@RestController
public class ConfigClientController {


    @Value("${config.info}")
    private String configInfo;
    @GetMapping("/configInfo")
    public String getConfigInfo(){


        return configInfo;
    }
}
7.4 修改远程 GitHub 配置后,手动发送Post请求刷新客户端(3355端口)
发送命令,刷新客户端。该请求必须是 Post 方式。经过上述一番配置,便可避免服务的重启,成功实现客户端刷新到最新配置内容。

手动版动态刷新实现OK
7.5 手动版动态刷新,存在的问题
实现了动态刷新,解决了 ConfigClient 重启才能获取最新配置信息问题。假如有 N 多个台,就需要 N 多次的 curl -X POST "http://微服务地址:端口号/actuator/refresh"。这仍然是一个噩梦,还是没有解决根本问题。
大规模 微服务/集群模式,我们可以采用广播的方式,一次通知,处处生效。类似于 消息队列的 Topic ,微信公众号 的概念,一次订阅,所有订阅者都能接收到新消息。
他来了,他来了,Spring Cloud Bus 总线 带着 消息队列/广播 机制 向我们走来了。Spring Cloud Bus 总线 可以帮我们实现以下功能:
真正实现:一处通知、处处生效;实现精确通知,只通知集群中的某些服务(精确通知,比如有100台机器,只通知前98台)
Spring Cloud Config + Spring Cloud Bus 两个组件配合使用,绝代双骄,这两个组件用就要一起用。
本文代码同 Spring Cloud Bus 整合打包,代码下载地址:Spring Cloud Config + Spring Cloud Bus 实现统一服务配置、一处通知处处生效、精确通知功能 (提取码:yevm)
下一篇:Spring Cloud Bus 服务总线,实现全局广播/定点通知