占位符配置URL
{application},{profile},{label}这些占位符除了用于标识配置文件的规则外,还可以用于Config Server中对Git仓库地址的URI配置。
{application}代表了应用名,Config Server会根据客户端的spring.application.name信息来填充{application}占位符以定位配置资源的存储位置,从而实现根据微服务应用的属性动态获取不同位置的配置。如果Git的分支和标签名包含“/”,那么{label}参数在HTTP的URL中应该使用“(_)”来替代,以避免改变了URI含义,指向到其他的URI资源。
不过并不推荐使用{application}/{profile}来进行配置。
本地仓库
在使用Git或SVN仓库后,文件都会在Config Server的本地文件系统中存储一份。这些文件默认会被存储在config-repo为前缀的临时目录中,比如:/tmp/config-repo-<随机数>的目录。因为其随机性可能会带来不可预知的后果,所以最好就是指定一个固定的位置来存储这些信息。只需要使用:spring.cloud.config.server.git.basedir或spring.cloud.config.server.svn.basedir来配置一个目录即可。
本地文件系统
Spring Cloud Config也提供了一种不使用Git仓库或SVN仓库的存储方式,而是使用本地文件系统的存储方式来保存配置信息。只需要设置属性spring.profiles.active=native,Config Server会默认从应用的src/main/resource目录下搜索配置文件。如果需要指定搜索配置文件的路径,可以通过spring.cloud.server.native.serchLocations属性来指定具体的配置文件位置。
健康监测
根据默认配置规则,可以在Git仓库中创建一个名为app-config的配置库,让健康检测器能够访问它。也可以配置一个实际存在的仓库来进行连通监测,如:
spring.cloud.config.server.health.repositories.check.name=didispace
spring.cloud.config.server.health.repositories.check.label=master
spring.cloud.config.server.health.repositories.check.profiles=dev
健康监测的repositories是个Map对象,所以实际使用可恶意配置多个。每个配置中包含了与定位仓库地址类似的三个元素。
name:应用名
label:分支名
profiles:环境名
健康检测器可以通过spring.cloud.config.server.health.enabled=false参数来关闭。

属性覆盖
通过spring.cloud.config.server.overrides属性来设置键值对的参数,这些参数会以Map的方式加载到客户端的配置中。如:
spring.cloud.config.server.overrides.name=zzzzzz
spring.cloud.config.server.overrides.from=zhejiang
通过该属性配置的参数不会被Spring Cloud的客户端修改,并且Spring Cloud客户端从Config Server中获取配置信息时,都会取得这些配置信息。利用该特性可以方便地为Spring Cloud应用配置一些共同属性或是默认属性。
安全保护
首先在pom.xml文件中加入spring-boot-starter-security依赖。
        <dependency>
            <groupId>org.springframework.boot</groupId>
            <artifactId>spring-boot-starter-security</artifactId>
        </dependency>
也可以在配置文件中指定用户名和密码,如:
spring.security.user.name=zzf
spring.security.user.password=123456

spring.cloud.config.username=zzf
spring.cloud.config.password=123456


高可用配置
Spring Cloud Config实现服务端高可用有两种方式。
传统模式
不需要给这些服务端做额外配置,只需要遵守一个配置规则,将所有的Config Server都指向同一个Git仓库,这样所有的配置内容就通过统一的共享文件系统来维护。而客户端在指定Config Server位置时,只需要配置Config Server上层的负载均衡设备地址即可。
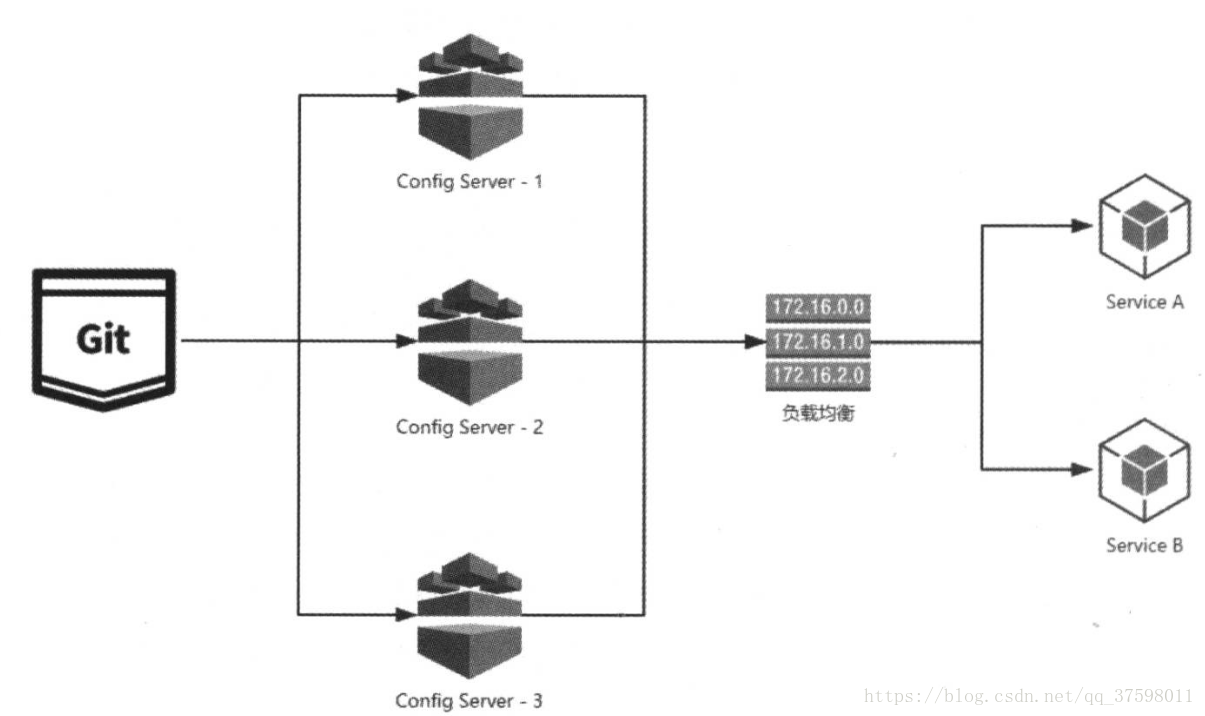
服务模式
除了传统模式,也可以将Config Server作为普通的微服务纳入Eureka的服务治理体系中。这样就能通过配置中心的服务名来获取配置信息,这种方式比传统的实现模式来说更容易维护,因为服务端的负载均衡配置和客户端的配置中心指定都通过服务治理解决了,既实现了高可用,也实现了自维护。
客户端详解
URI指定配置中心
Spring Cloud Config的客户端在启动时,默认会从工程的classpath中加载配置信息并启动应用。只有当我们配置spring.cloud.donfig.uri的时候客户端应用才会尝试连接Spring Cloud Config的服务端来获取远程配置信息并初始化Spring环境配置。同时必须把参数配置在bootstrap.properties中,环境变量或是其他优先级高于应用Jar包内的配置信息中,才能正确加载到远程配置。否则Spring Cloud Config的客户端会默认尝试连接http://localhost:8888。
如:
spring.application.name=didispace
spring.cloud.config.profile=dev
spring.cloud.config.uri=http://localhost:7001/
服务化配置中心
1.首先在服务端与客户端的pom.xml文件中添加依赖jar:
<dependency>
<groupId>org.springframework.cloud</groupId>
<artifactId>spring-cloud-starter-netflix-eureka-client</artifactId>
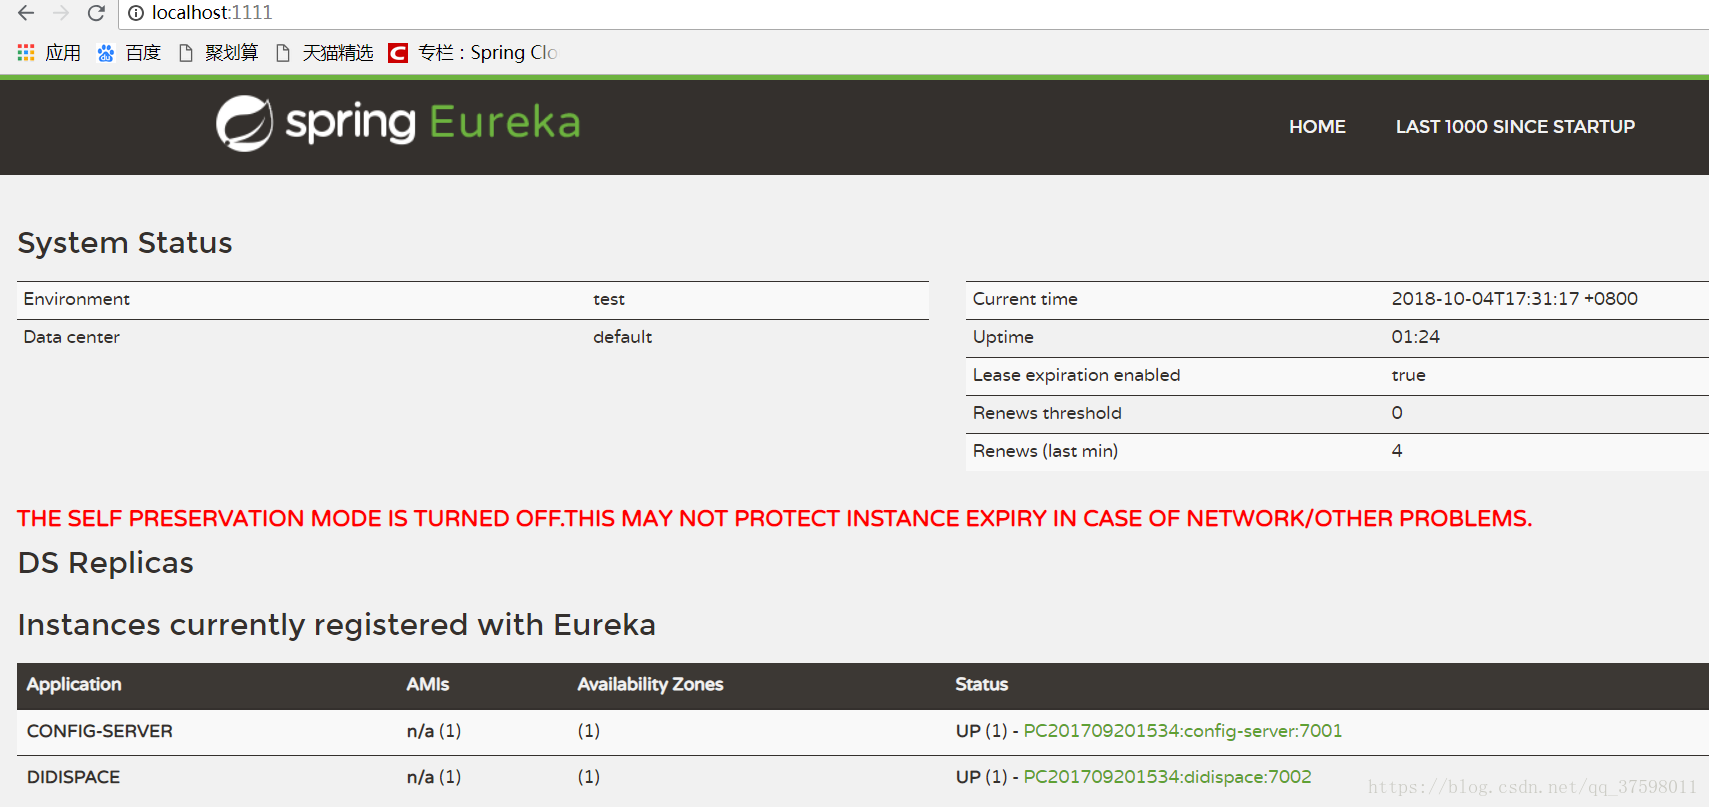
</dependency>2.在application.properties中配置eureka.client.serviceUrl.defaultZone指定服务注册中心的位置。
spring.application.name=config-server
server.port=7001

spring.cloud.config.server.git.uri=###############
spring.cloud.config.server.git.search-paths=config-repo
spring.cloud.config.server.git.username=###############
spring.cloud.config.server.git.password=###############

eureka.client.serviceUrl.defaultZone=http://localhost:1111/eureka/
3.在应用主类中新增@EnableDiscoveryClient注解,用来将config-server注册到上面配置的服务注册中心。
@EnableDiscoveryClient
@EnableConfigServer
@SpringBootApplication
public class ConfigServerApplication {

    public static void main(String[] args) {
        SpringApplication.run(ConfigServerApplication.class, args);
    }
}
客户端配置
1.在bootstrap.properties中按如下配置:
server.port=7002

spring.application.name=didispace

eureka.client.serviceUrl.defaultZone=http://localhost:1111/eureka/

spring.cloud.config.discovery.enabled=true
spring.cloud.config.discovery.service-id=config-server
spring.cloud.config.profile=dev
首先通过eureka.client.serviceUrl.defaultZone参数指定服务注册中心,用于服务的注册与发现,将spring.cloud.config.discovery.enable参数设为true,开启通过服务来访问Config Server的功能。最后利用spring.cloud.config.discovery.serviceId参数来指定Config Server注册的服务名。这里的spring.application.name和spring.cloud.config.profile如之前通过URI的方式访问的时候一样,用来定位Git中的资源。
2.在应用主类增加@EnableDiscoveryClient注解用来发现config-server服务。
@EnableDiscoveryClient
@SpringBootApplication
public class ConfigClientApplication {

    public static void main(String[] args) {
        SpringApplication.run(ConfigClientApplication.class, args);
    }
}
3.控制器使用之前的来访问:
@RefreshScope
@RestController
public class TestController {
@Value("${from}")
private String from;
@Autowired
private Environment environment;
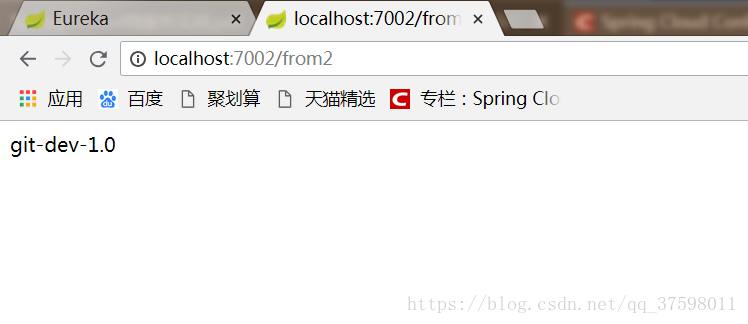
@RequestMapping("/from2")
public String from2(){
return environment.getProperty("from","undefined");
}
@RequestMapping("/from")
public String from(){
return this.from;
}
}然后启动这些服务。
失败快速响应与重试
如果需要实现客户端优先判断Config Server获取是否正常,并快速获得响应失败内容,只需要在bootstrap.properties中配置参数spring.cloud.config.failFast=true即可。
如果想要开启重试机制则需要引入以下jar包:
         <dependency>
            <groupId>org.springframework.retry</groupId>
            <artifactId>spring-retry</artifactId>
        </dependency>
        <dependency>
            <groupId>org.springframework.boot</groupId>
            <artifactId>spring-boot-starter-aop</artifactId>
        </dependency>
如果不做其他配置,它会尝试6次然后停止返回错误信息。
可以通过下面的参数设置最大重试机制和间隔:
spring.cloud.config.retry.multiplier:初始重试家那个时间,默认为1000ms。
spring.cloud.config.retry.initial-intervel:下一间隔的乘数,默认为为1.1所以当最初间隔是1000ms时,下一次就是1100ms。
spring.cloud.config.retry.max-interval:最大间隔时间,默认为2000ms。
spring.cloud.config.retry.max-attempts:最大重试次数,默认为6次。
动态刷新配置
1.首先在config-client的pom.xml中新增spring-boot-starter-actuator监控模块。
        <dependency>
            <groupId>org.springframework.boot</groupId>
            <artifactId>spring-boot-starter-actuator</artifactId>
        </dependency>
然后在配置文件中加入:
management.endpoints.web.exposure.include=bus-refresh然后访问http://localhost:7002/actuator/bus-refresh
参考《Spring Cloud 微服务实战》