1.介绍
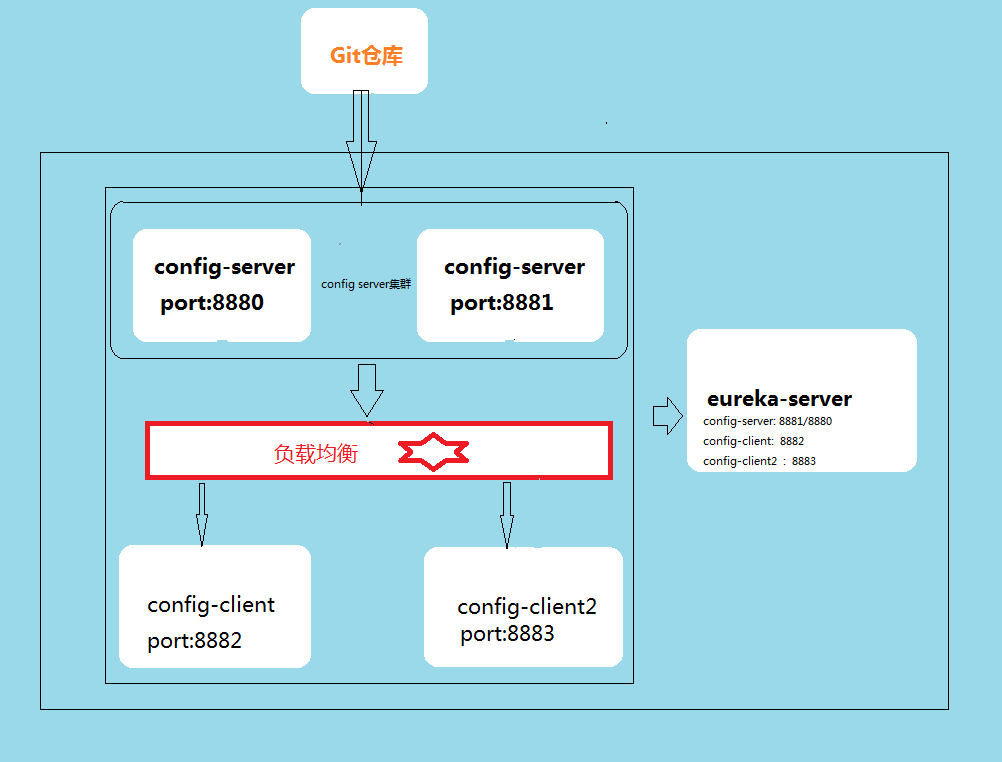
上篇文章讲了 Spring Cloud 配置中心 : 配置中心从远程git仓库获取配置文件信息; 服务从配置中心读取配置信息,将结合 Eureka服务注册中心 组成高可用服务配置中心,当服务实例很多时,配置中心达到高可用。
2.使用
继续使用上一篇文章的工程
1)创建服务注册中心
①先创建一个Spring Boot 工程 eureka-server,pom文件
<?xml version="1.0" encoding="UTF-8"?>
<project xmlns="http://maven.apache.org/POM/4.0.0" xmlns:xsi="http://www.w3.org/2001/XMLSchema-instance"
	xsi:schemaLocation="http://maven.apache.org/POM/4.0.0 http://maven.apache.org/xsd/maven-4.0.0.xsd">
	<modelVersion>4.0.0</modelVersion>

	<groupId>com.xeepoo</groupId>
	<artifactId>eureka-server</artifactId>
	<version>0.0.1-SNAPSHOT</version>
	<packaging>jar</packaging>

	<name>eureka-server</name>
	<description>Demo project for Spring Boot</description>

	<parent>
		<groupId>org.springframework.boot</groupId>
		<artifactId>spring-boot-starter-parent</artifactId>
		<version>2.0.1.RELEASE</version>
		<relativePath/> <!-- lookup parent from repository -->
	</parent>

	<properties>
		<project.build.sourceEncoding>UTF-8</project.build.sourceEncoding>
		<project.reporting.outputEncoding>UTF-8</project.reporting.outputEncoding>
		<java.version>1.8</java.version>
		<spring-cloud.version>Finchley.RC1</spring-cloud.version>
	</properties>

	<dependencies>
		<!-- eureka server-->
		<dependency>
			<groupId>org.springframework.cloud</groupId>
			<artifactId>spring-cloud-starter-netflix-eureka-server</artifactId>
		</dependency>

		<dependency>
			<groupId>org.springframework.boot</groupId>
			<artifactId>spring-boot-starter-test</artifactId>
			<scope>test</scope>
		</dependency>
	</dependencies>

	<dependencyManagement>
		<dependencies>
			<dependency>
				<groupId>org.springframework.cloud</groupId>
				<artifactId>spring-cloud-dependencies</artifactId>
				<version>${spring-cloud.version}</version>
				<type>pom</type>
				<scope>import</scope>
			</dependency>
		</dependencies>
	</dependencyManagement>

	<build>
		<plugins>
			<plugin>
				<groupId>org.springframework.boot</groupId>
				<artifactId>spring-boot-maven-plugin</artifactId>
			</plugin>
		</plugins>
	</build>

	<repositories>
		<repository>
			<id>spring-milestones</id>
			<name>Spring Milestones</name>
			<url>https://repo.spring.io/milestone</url>
			<snapshots>
				<enabled>false</enabled>
			</snapshots>
		</repository>
	</repositories>


</project>
②在 启动类EurekaServerApplication 添加注解 @EnableEurekaServer
@SpringBootApplication
@EnableEurekaServer
public class EurekaServerApplication {
	public static void main(String[] args) {
		SpringApplication.run(EurekaServerApplication.class, args);
	}
}
③配置文件 application.yml
####注册中心端口号
server:
port: 8900
#### 通过 eureka.client.register-with-eureka false
#### 和 etch-registry:false来表明这是个eureka server.
eureka:
####主机名
instance:
hostname: localhost
client:
service-url:
defaultZone: http://${eureka.instance.hostname}:${server.port}/eureka/
register-with-eureka: false
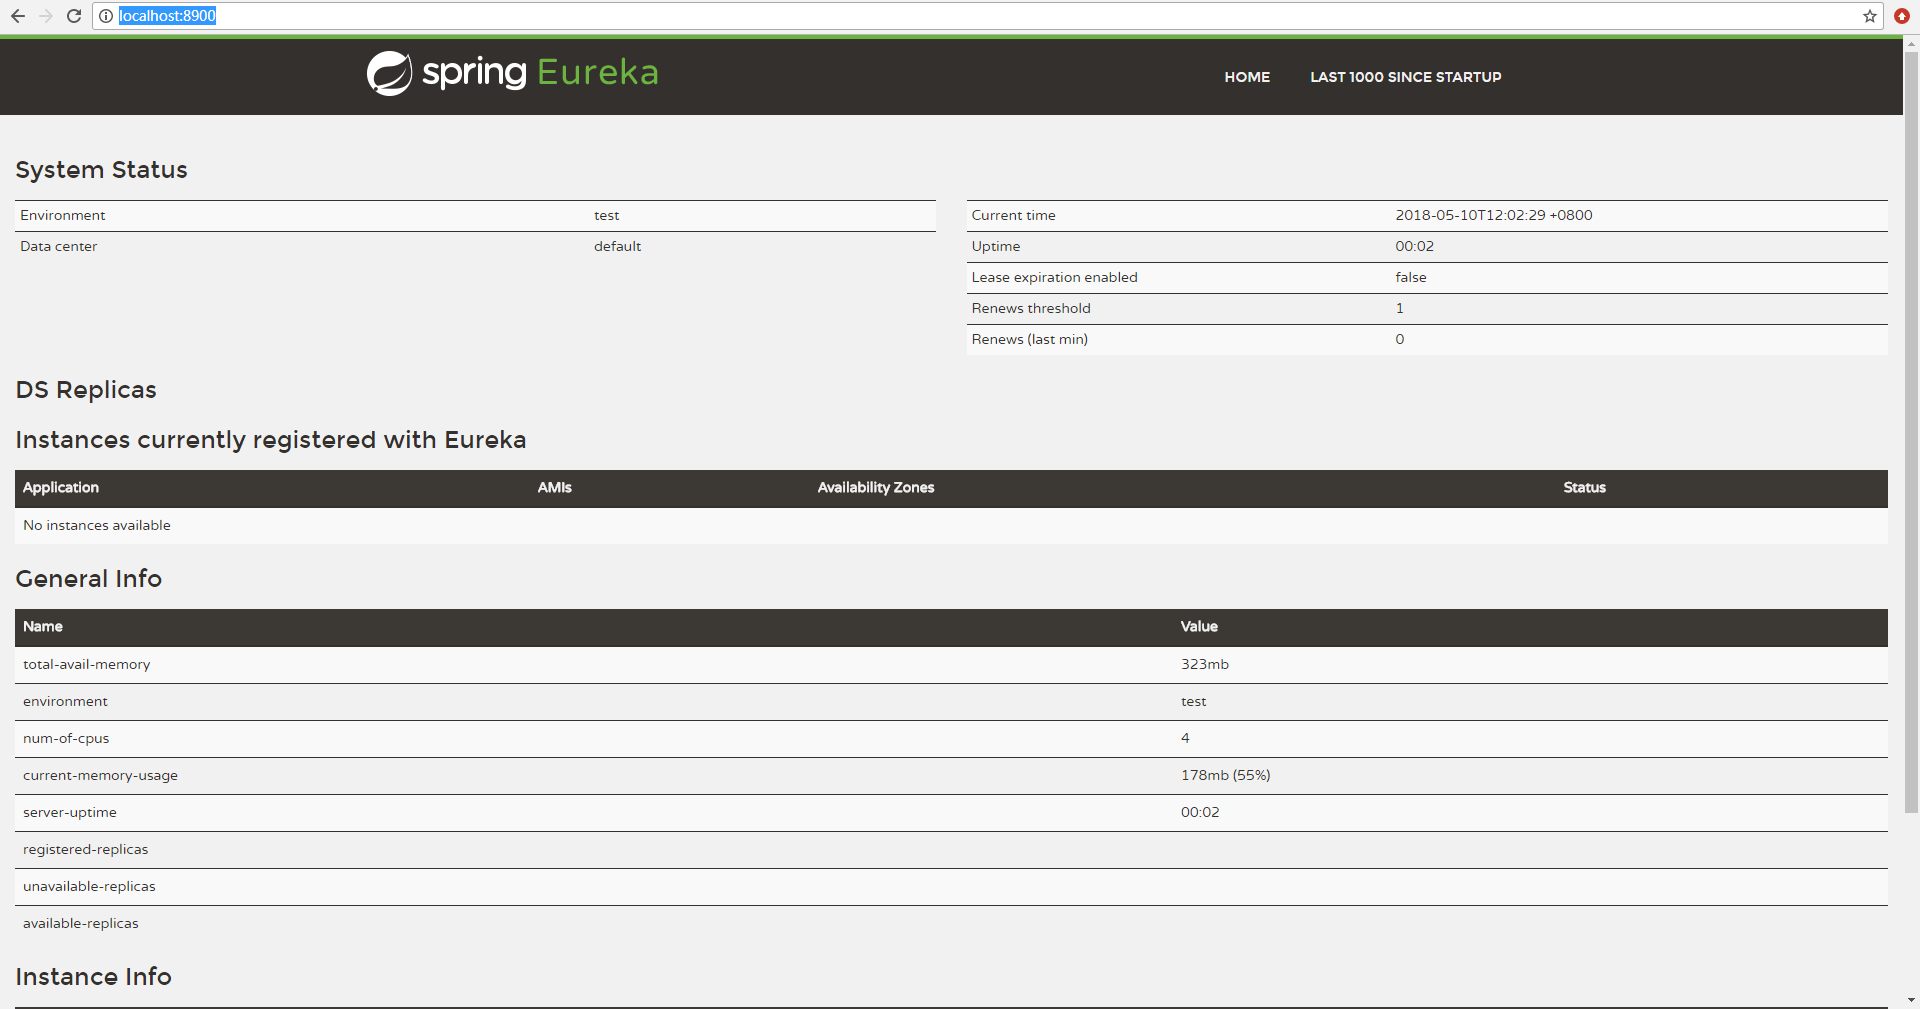
fetch-registry: false④启动程序,访问 http://localhost:8900/ 看到下面界面表示成功
2)改造config-server
①在pom.xml中添加依赖
		<dependency>
			<groupId>org.springframework.cloud</groupId>
			<artifactId>spring-cloud-starter-netflix-eureka-client</artifactId>
		</dependency>
② 配置文件 application.yml
#端口号
server:
  port: 8880
spring:
  application:
    #服务名称
    name: config-server
  cloud:
    config:
      server:
        #git地址
        git:
          uri: https://gitee.com/XeePoo/config-server.git
          search-paths: respo
          username: *****
          password: *****
#eureka注册中心地址
eureka:
  client:
    service-url:
defaultZone: http://localhost:8900/eureka/(注: 在配置中指定了eureka注册中心地址,就不需要在启动类添加注解@EnableEurekaClient ,(添加了也可以,更易读) )
③启动 config-server,继续访问注册中心 http://localhost:8900/
可以看到 config-server已经成功的注册到了服务注册中心
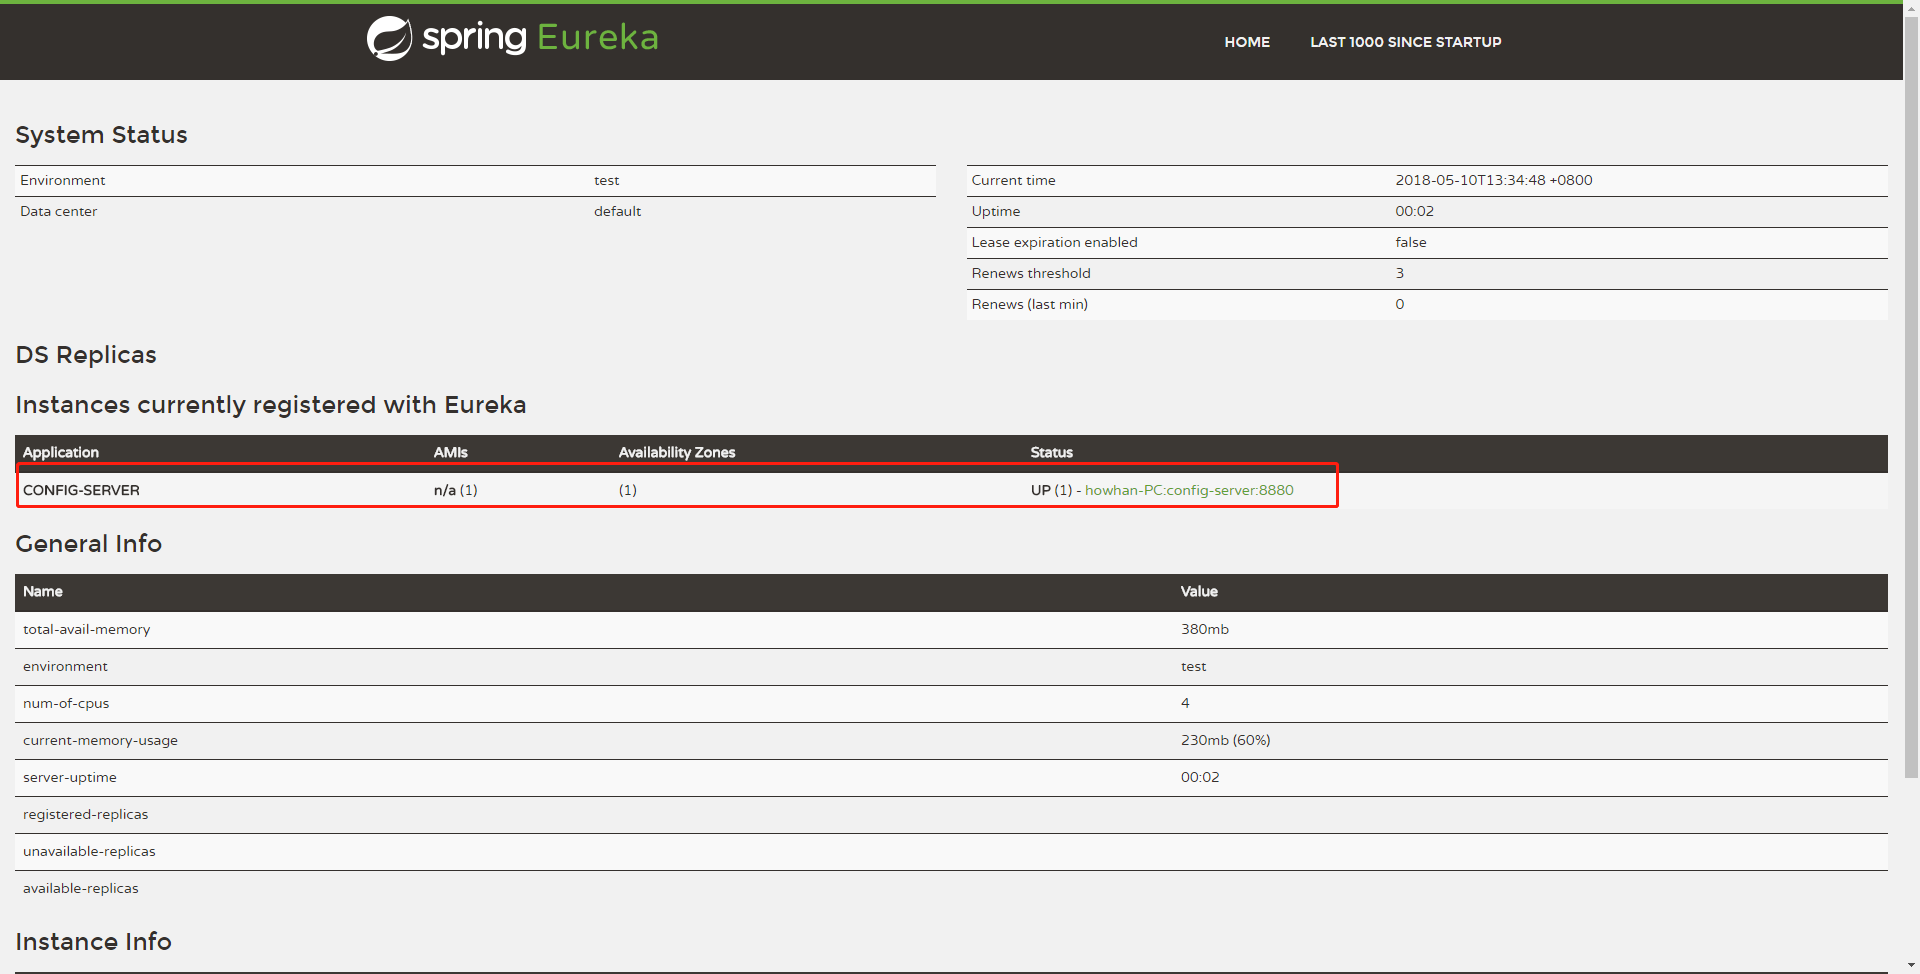
④先 关闭 config-server 服务
3)改造config-client
①在pom.xml文件中 添加依赖
<!-- 服务注册 eureka client -->
		<dependency>
			<groupId>org.springframework.cloud</groupId>
			<artifactId>spring-cloud-starter-netflix-eureka-client</artifactId>
		</dependency>
②配置文件 bootstrap.yml
server:
  port: 8882
spring:
  application:
    name: config-client
  cloud:
    config:
      profile: dev
      label: master
      fail-fast: true #没有启动configserver 会快速报错停止
      discovery:
        service-id: config-server
        enabled: true
#eureka注册中心地址
eureka:
  client:
    service-url:
      defaultZone: http://localhost:8900/eureka/
同时指明注册中心地址
4) 新建一个Spring Boot项目命名为 config-client2
在配置中心配置的git仓库中添加配置文件 config-client2-dev.properties 内有属性 test2=Config-Client2
test2=Config-Client2①config-client2的pom.xml
<?xml version="1.0" encoding="UTF-8"?>
<project xmlns="http://maven.apache.org/POM/4.0.0" xmlns:xsi="http://www.w3.org/2001/XMLSchema-instance"
	xsi:schemaLocation="http://maven.apache.org/POM/4.0.0 http://maven.apache.org/xsd/maven-4.0.0.xsd">
	<modelVersion>4.0.0</modelVersion>

	<groupId>com.xeepoo</groupId>
	<artifactId>config-client2</artifactId>
	<version>0.0.1-SNAPSHOT</version>
	<packaging>jar</packaging>

	<name>config-client2</name>
	<description>Demo project for Spring Boot</description>

	<parent>
		<groupId>org.springframework.boot</groupId>
		<artifactId>spring-boot-starter-parent</artifactId>
		<version>2.0.2.RELEASE</version>
		<relativePath/> <!-- lookup parent from repository -->
	</parent>

	<properties>
		<project.build.sourceEncoding>UTF-8</project.build.sourceEncoding>
		<project.reporting.outputEncoding>UTF-8</project.reporting.outputEncoding>
		<java.version>1.8</java.version>
		<spring-cloud.version>Finchley.RC1</spring-cloud.version>
	</properties>

	<dependencies>
		<dependency>
			<groupId>org.springframework.cloud</groupId>
			<artifactId>spring-cloud-starter-config</artifactId>
		</dependency>
		<dependency>
			<groupId>org.springframework.cloud</groupId>
			<artifactId>spring-cloud-starter-netflix-eureka-client</artifactId>
		</dependency>
		<dependency>
			<groupId>org.springframework.boot</groupId>
			<artifactId>spring-boot-starter-web</artifactId>
		</dependency>
		<dependency>
			<groupId>org.springframework.boot</groupId>
			<artifactId>spring-boot-starter-test</artifactId>
			<scope>test</scope>
		</dependency>
	</dependencies>

	<dependencyManagement>
		<dependencies>
			<dependency>
				<groupId>org.springframework.cloud</groupId>
				<artifactId>spring-cloud-dependencies</artifactId>
				<version>${spring-cloud.version}</version>
				<type>pom</type>
				<scope>import</scope>
			</dependency>
		</dependencies>
	</dependencyManagement>

	<build>
		<plugins>
			<plugin>
				<groupId>org.springframework.boot</groupId>
				<artifactId>spring-boot-maven-plugin</artifactId>
			</plugin>
		</plugins>
	</build>

	<repositories>
		<repository>
			<id>spring-milestones</id>
			<name>Spring Milestones</name>
			<url>https://repo.spring.io/milestone</url>
			<snapshots>
				<enabled>false</enabled>
			</snapshots>
		</repository>
	</repositories>


</project>
②创建一个Controller 命名为 TestController
@RestController
public class TestController {

    @Value("${test}")
    String test;

    @RequestMapping("hello3")
    public String test2(){
        return "test2 "+test;
    }
}
③配置文件 bootstrap.yml
server:
port: 8883
spring:
application:
name: config-client2
cloud:
config:
profile: dev
label: master
fail-fast: true #没有发现 Config Server 服务 会快速报错停止
discovery:
service-id: config-server
enabled: true
#eureka注册中心地址
eureka:
client:
service-url:
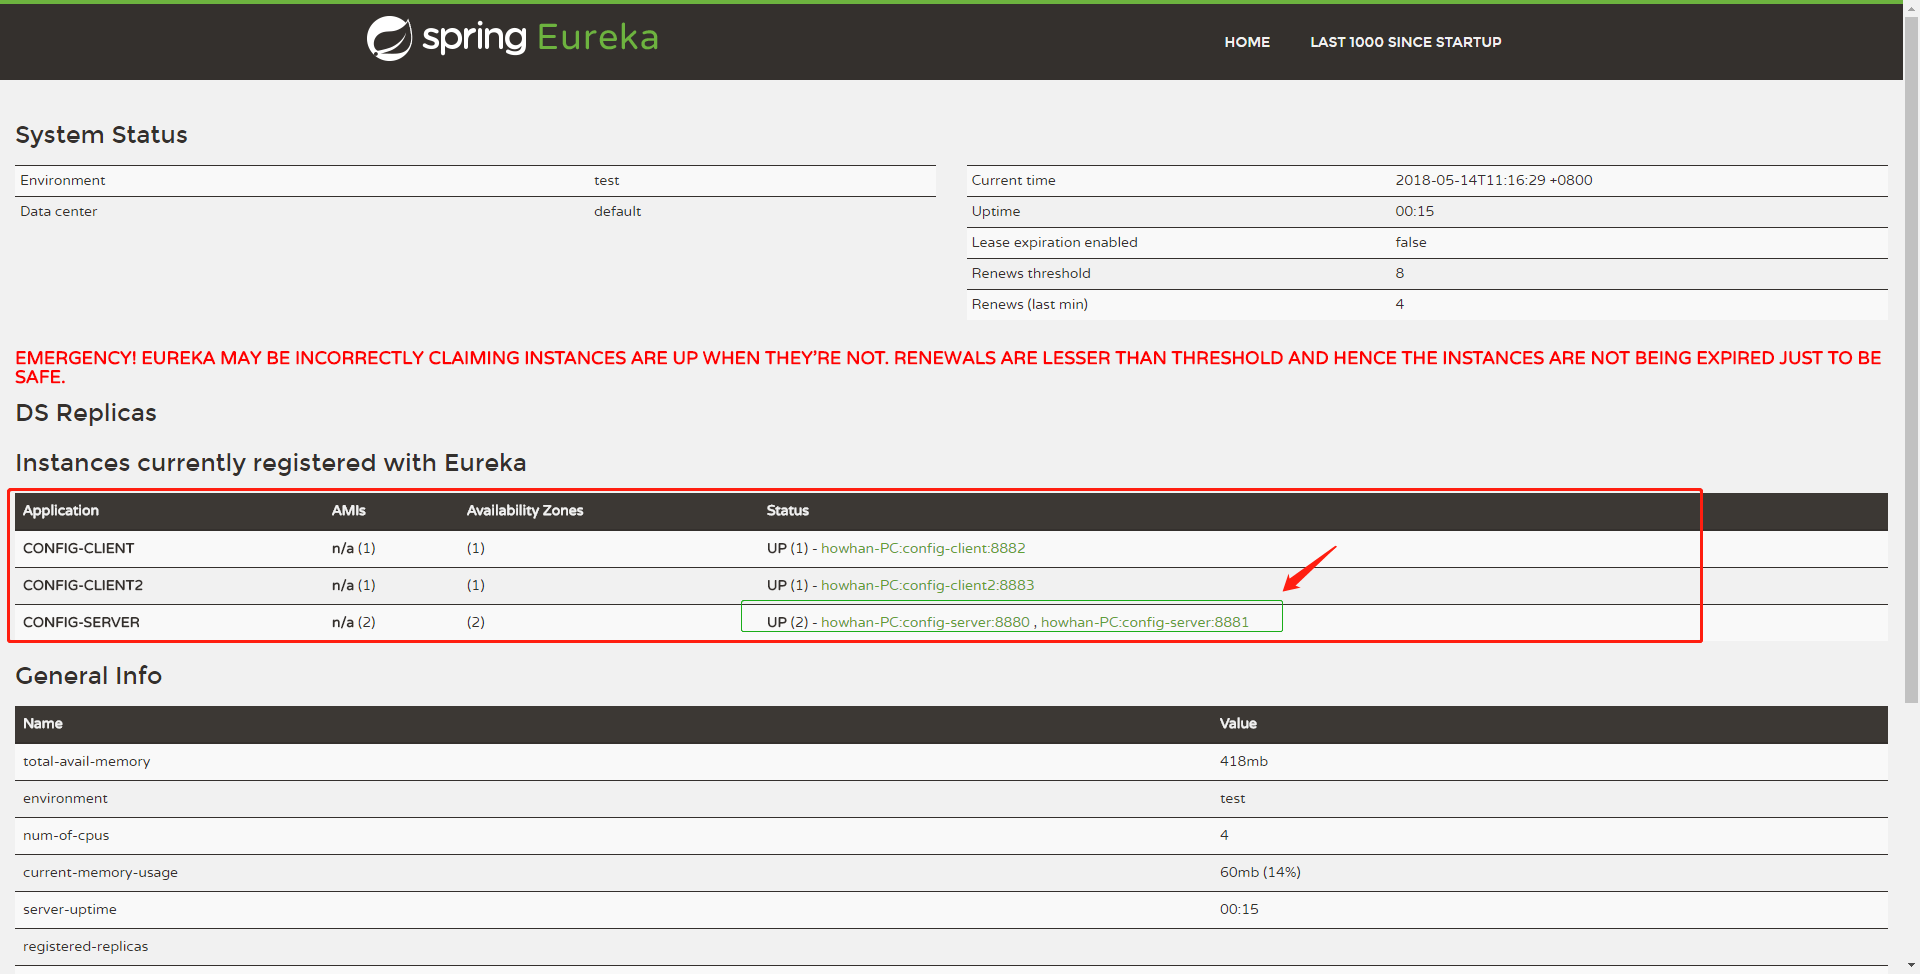
defaultZone: http://localhost:8900/eureka/ 5)使用服务
①停止所有服务,启动eureka-server
②config-server启动,然后修改config-server的application.yml端口 8881再次启动
共启动两次,端口号为8880和8881
③config-client、config-client2分别启动
④访问 http://localhost:8900/ 可以看到
⑤访问地址
http://localhost:8881/hello1
hello1 Spring Cloud Config test2 Config-Client2