一、文章大纲
二、安装环境
本文基于如下的环境进行试验的:
- Windows 10中文64位专业版。
- v12.18.3版本的Node.js。
- @vue/cli 4.5.4的Vue.js和cli。
三、安装vue-cli
使用npm全局安装vue-cli:
npm install -g @vue/cli可以使用如下的创建项目的命令,查看vue cli的安装情况:
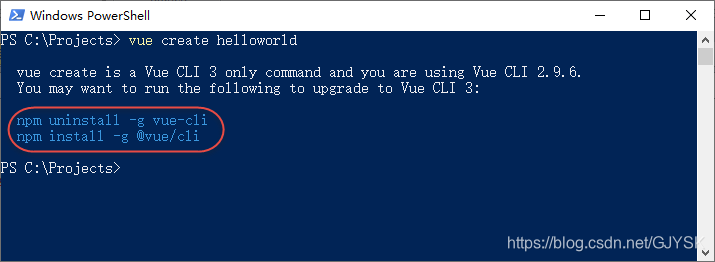
按照上面的提示,先卸载之前的版本,然后安装新的版本。

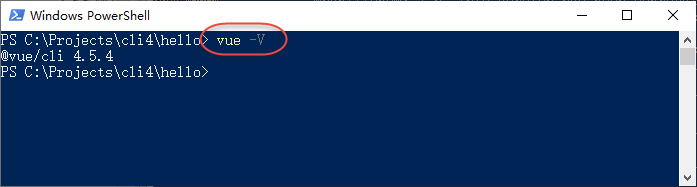
安装成功后,如果要查看安装的cli的版本,可以执行命令:
node -V温馨提醒:-V是大写的V,而不是小写的v。
四、创建项目
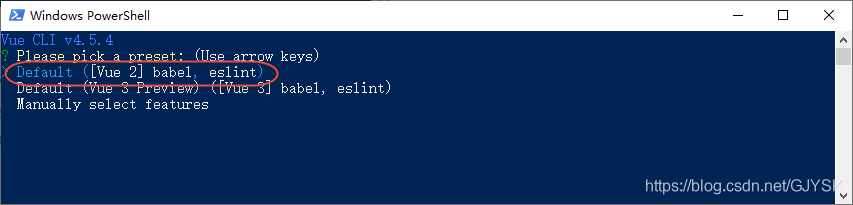
在命令行执行如下命令:
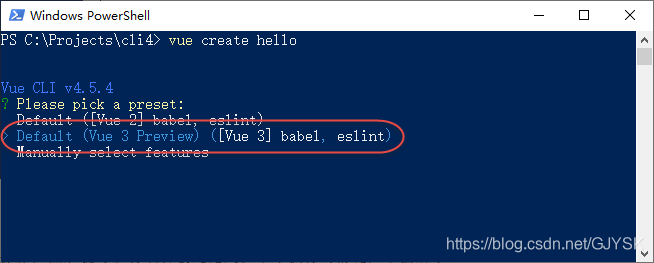
vue create hello控制台会输出如下的内容:

此处有三个选择:
- Default ([Vue 2] babel, eslint):使用Vue2创建项目,默认配置,提供了babel和eslint的支持。
- Default (Vue 3 Preview) ([Vue 3] babel, eslint):使用Vue3预览版创建项目,默认配置,提供了babel和eslint的支持。
- Manually select features:手动选择需要的功能,提供更多的特性选择,可以根据实际项目的需要进行选择所需的特性配置。
可以使用上下方向键来切换选项。咱们快速过一下前2个选项的效果,然后再详细介绍第3个选项的操作。
1、Default ([Vue 2] babel, eslint)
如上图所示,咱们选择第1个选项,然后按下回车键,我们不需要再做其他任何操作,然后就可以将项目创建完成。命令执行的情况如下图所示:

这样,使用第1个选项创建项目就算完成了,我们再试试第2个选项。
2、Default (Vue 3 Preview) ([Vue 3] babel, eslint)
如上图所示,这次选择的是第2个选项,然后按下回车键,我们仍然不需要再做其他任何操作,然后就可以将项目创建完成。命令执行的情况如下图所示:
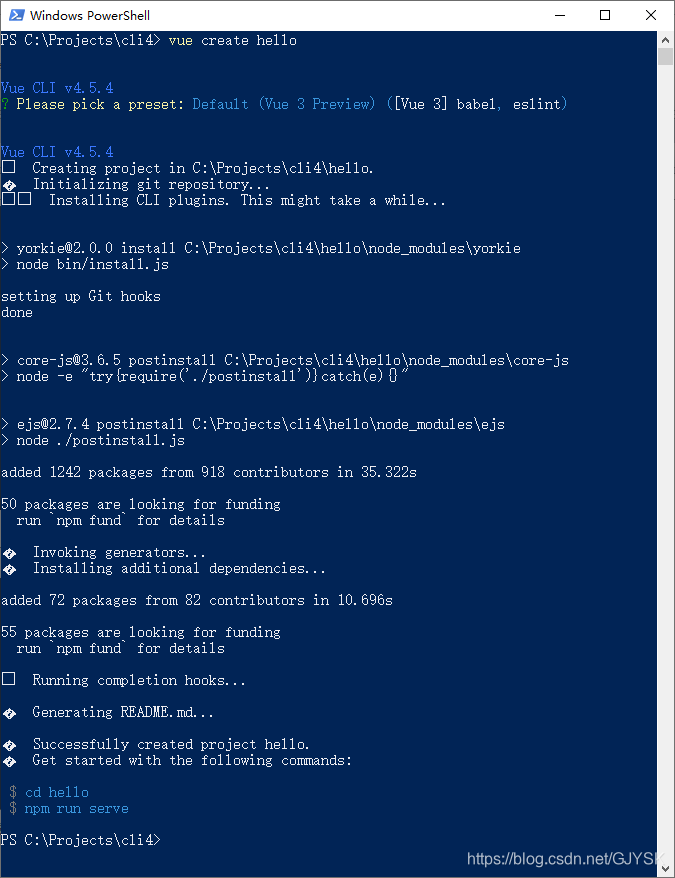
这样,使用第2个选项创建项目就算完成了。
可以看到,使用前2个选项创建项目是比较简单的,不需要我们去做过多的配置,基本上就按照默认的配置来创建项目了。如果我们希望自己定义项目的各项配置信息,那么就需要使用第3个选项来创建项目了。
3、Manually select features
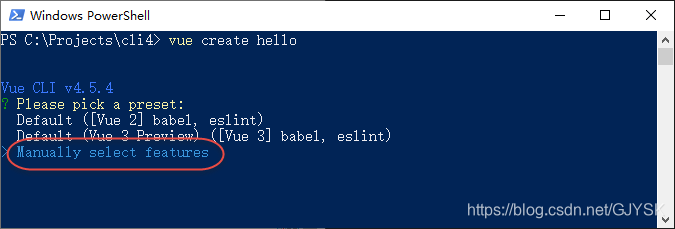
如上图所示,这次选择的是第3个选项,然后按下回车键,命令行会显示如下的内容:
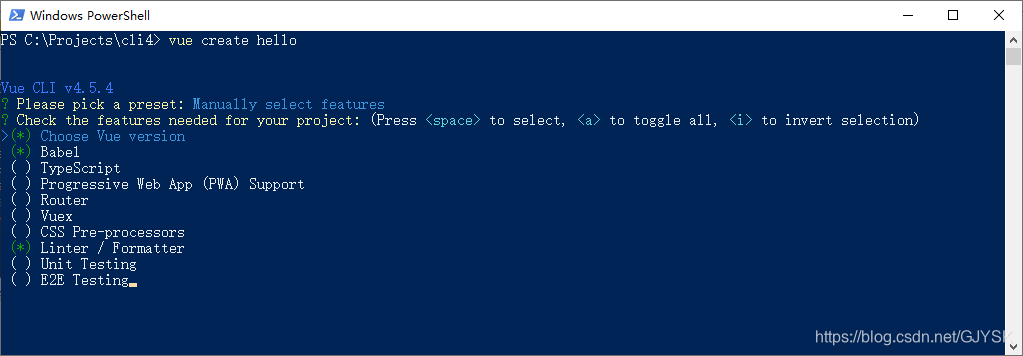
vue-cli内置支持了10个功能特性,对于每一项的功能,此处做个简单描述:
- Choose Vue version:选择Vue的版本。
- Babel:是否使用babel。
- TypeScript:支持使用TypeScript编写源码。
- Progressive Web App(PWA):是否支持渐进式网页应用(PWA)。
- Router:是否支持vue-router。
- Vuex:是否支持vuex。
- CSS Pre-processors:是否支持CSS预处理器。
- Linter/Formatter:是否支持代码风格检查和格式化。
- Unit Testing:是否支持单元测试。
- E2E Testing:是否支持E2E测试。
上述10个选项可以多选,具体操作:使用方向键在特性选项之间切换,使用空格键选中当前特性,使用a键切换选择所有,使用i键反选(说明:会将选中的选项取消选中,将没有选中的选项选中)。
可以根据项目的需要选择上述这些选项,首先需要选择需要的配置项,为了演示目的,我们将所有的选项都选中,如下图所示:
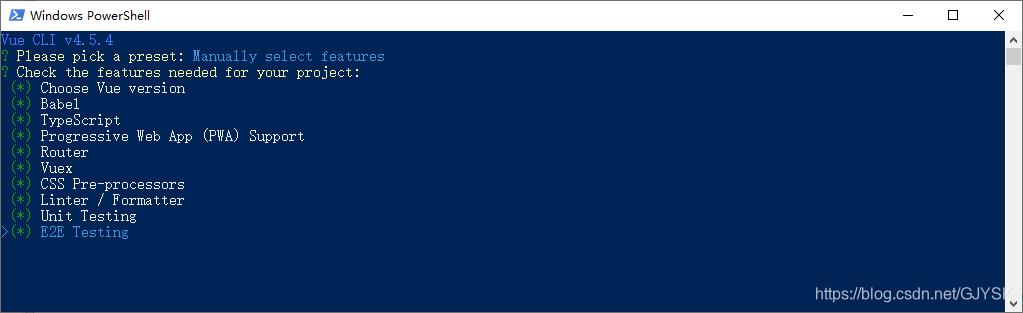
如上图所示,10个配置项都选中了,然后按下键盘上的回车键,开始对每个选中配置项进行具体的配置。命令行中会按着顺序让你对每个配置项进行配置,没有选中的配置项不会出现具体的配置界面。按照我们上述的选择,回车后,首先看到的第1个页面如下图所示:
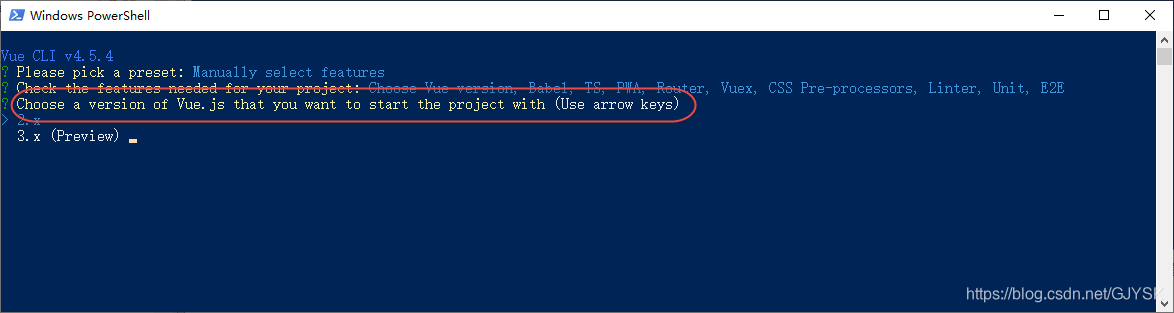
Choose a version of Vue.js that you want to start the project with (Use arrow keys)
翻译:选择我们想在项目中使用的Vue.js的版本,使用键盘的上下键进行选择。
这里咱们就选择2.x吧,然后按下回车键,如下图所示:
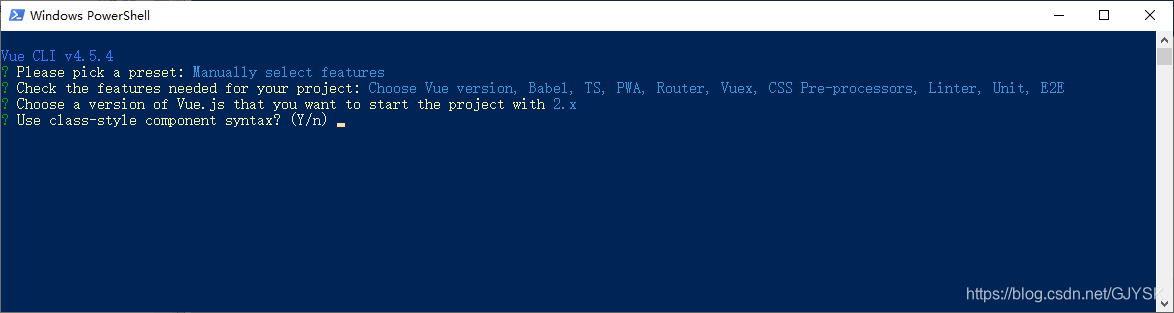
Use class-style component syntax? (Y/n)
翻译:是否使用class风格的组件语法?
这里是让选择在开发Vue组件时,要不要使用class风格的写法。如果需要则在命令行输入大写Y,不需要则输入小写n。为了更方便地使用TypeScript,此处选择Y,然后按下回车键。
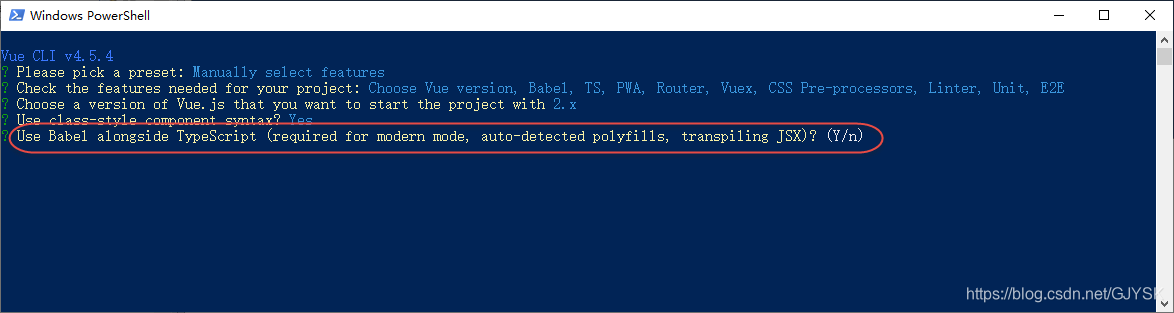
Use Babel alongside TypeScript (required for modern mode, auto-detected polyfills, transpiling JSX)? (Y/n)
翻译:在TypeScript中使用babel,如果使用现代模式、代码注入polyfills、替换JSX,则为必须项
如果实在搞不清楚具体是什么意思,可以先不用管,直接选择Y,进入下一步:
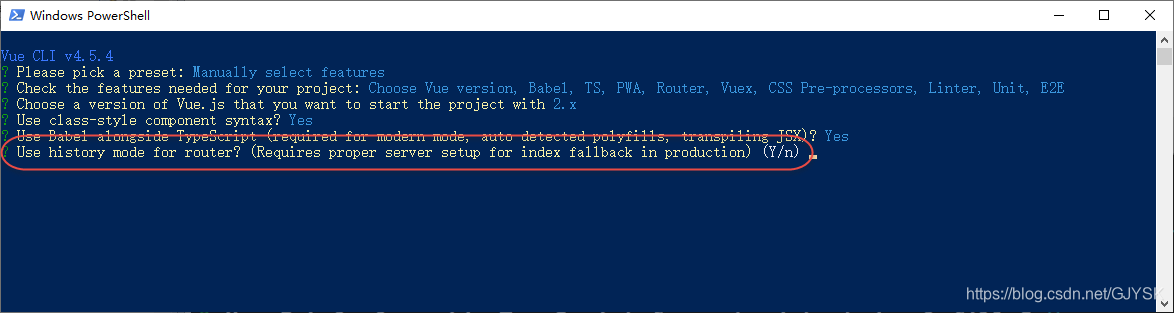
Use history mode for router? (Requires proper server setup for index fallback in production) (Y/n)
翻译:路由器使用历史记录模式?(需要适当的服务器设置,以便在生产环境中进行索引回退)
根据项目情况,如果需要则在命令行输入大写Y,不需要则输入小写n。此处我们选择Y,按下回车键。
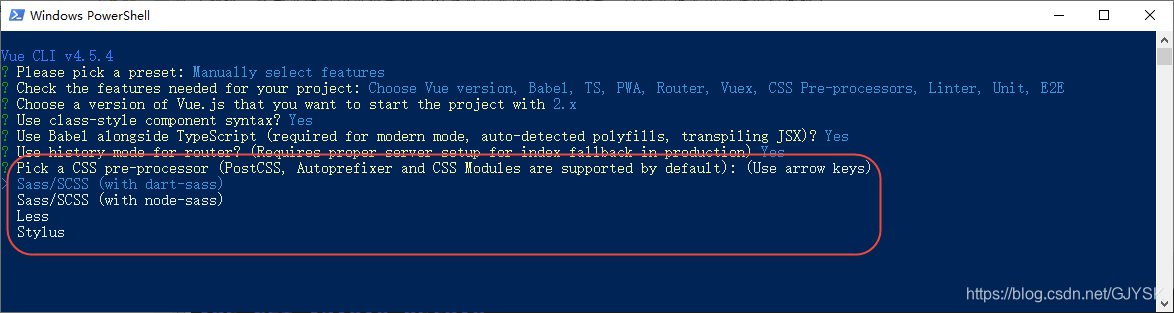
Pick a CSS pre-processor (PostCSS, Autoprefixer and CSS Modules are supported by default)
翻译:选择一种CSS预处理器,默认支持PostCSS、Autoprefixer和CSS模块。
这里提供了4个选项,通过键盘上下键进行选择。
- Sass/SCSS (with dart-sass)
- Sass/SCSS (with node-sass)
- Less
- Stylus
这几个选项的具体情况稍后我们用专门的文章进行说明,此处我们就先选择《Less》选项,然后按下回车键。

Pick a linter / formatter config: (Use arrow keys)
翻译:选择代码检查和格式化配置。
- ESLint with error prevention only
- ESLint + Airbnb config
- ESLint + Standard config
- ESLint + Prettier
- TSLint (deprecated)
这几个选项的具体情况稍后我们用专门的文章进行说明,此处我们就先选择《ESLint + Standard config》选项,然后按下回车键。
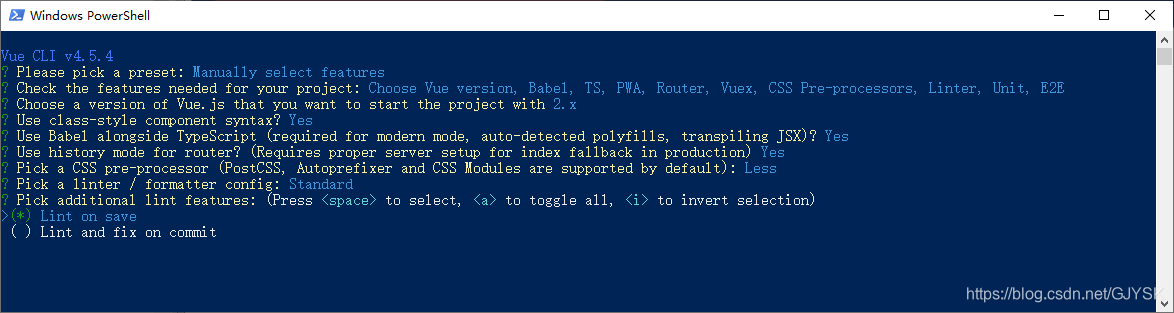
Pick additional lint features: (Press <space> to select, <a> to toggle all, <i> to invert selection)
翻译:选择附加的语法检查配置,可以按下空格键选中选项,按下a键选择所有,按下i键进行反选,即选中的取消选中,没有选中的选中。
- Lint on save:保存时检查。
- Lint and fix on commit:提交时检查和修复。
根据项目情况进行选择,此处我们将其全部选中,如下图所示:
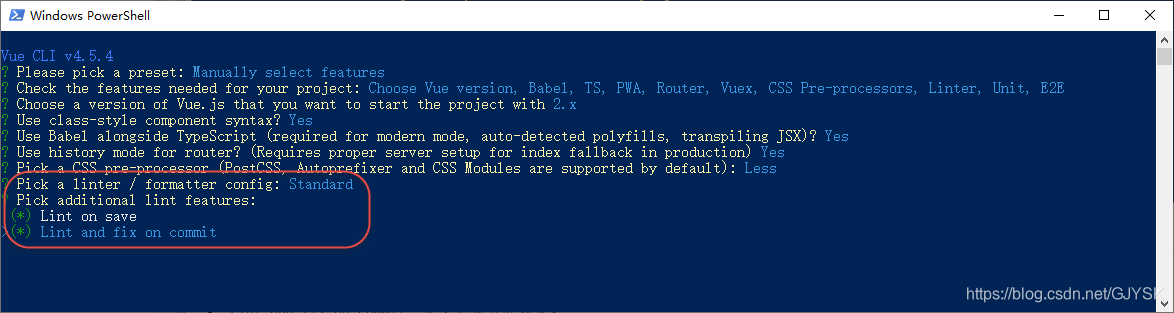
按下回车键,然后命令行内容如下图所示:
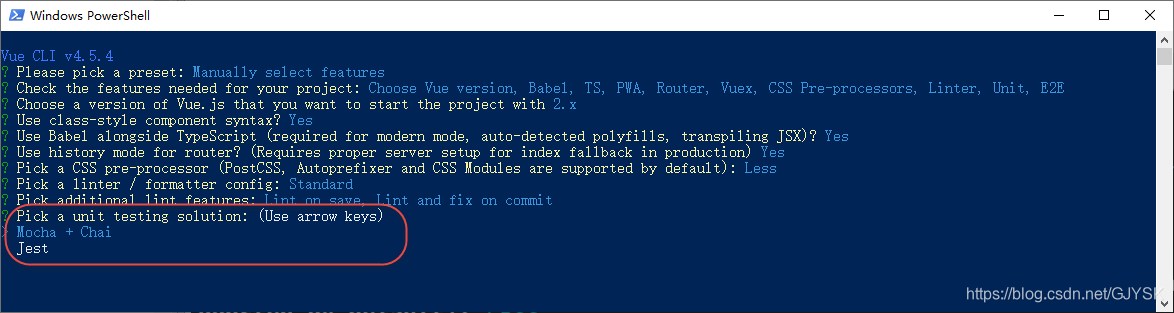
Pick a unit testing solution: (Use arrow keys)
翻译:选择单元测试工具
- Mocha + Chai
- Jest
这两种测试工具我们也在稍后的文章中进行详细介绍,此处可以选择《Jest》,然后按下回车键。
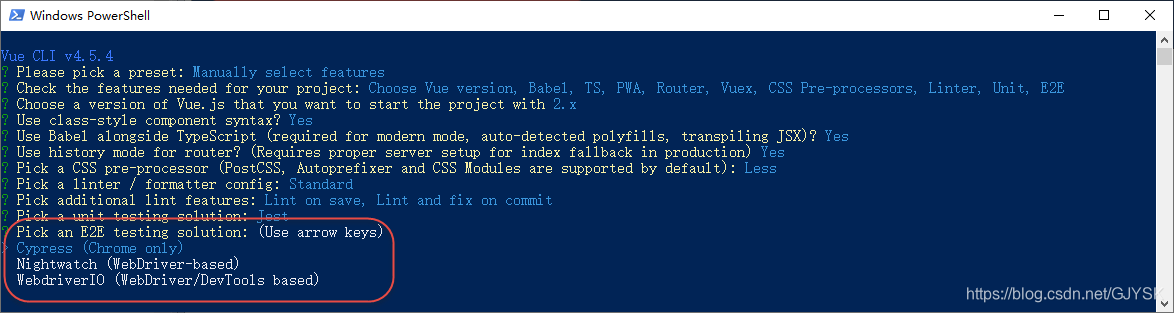
Pick an E2E testing solution
翻译:选择点对点测试方案。
- Cypress (Chrome only)
- Nightwatch (WebDriver-based)
- WebdriverIO (WebDriver/DevTools based)
这两种测试工具我们也在稍后的文章中进行详细介绍,此处可以选择《WebdriverIO (WebDriver/DevTools based)》,然后按下回车键。
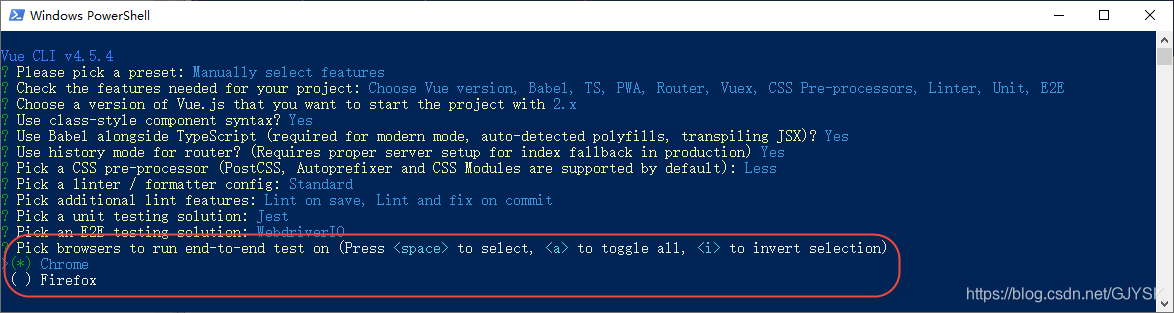
Pick browsers to run end-to-end test on (Press <space> to select, <a> to toggle all, <i> to invert selection)
翻译:选择进行点对点测试的浏览器,可以按下空格键选中选项,按下a键选择所有,按下i键进行反选,即选中的取消选中,没有选中的选中。
根据项目情况进行选择,此处我们将其全部选中,如下图所示:
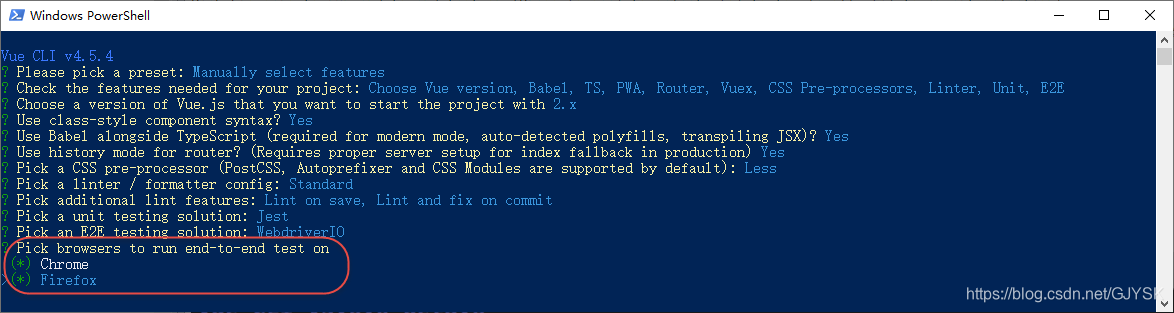
按下回车键,然后命令行内容如下图所示:
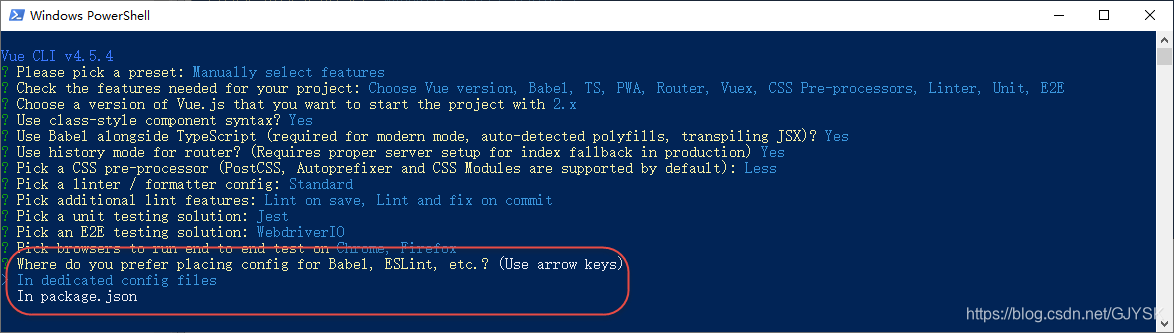
Where do you prefer placing config for Babel, ESLint, etc.?
翻译:你更喜欢把Babel、ESLint等的配置放到哪里?
- In dedicated config files:在独立的配置文件中。
- In package.json:统一放在package.json文件中。
根据项目情况进行选择,此处我们选择《In package.json》选项,如下图所示:
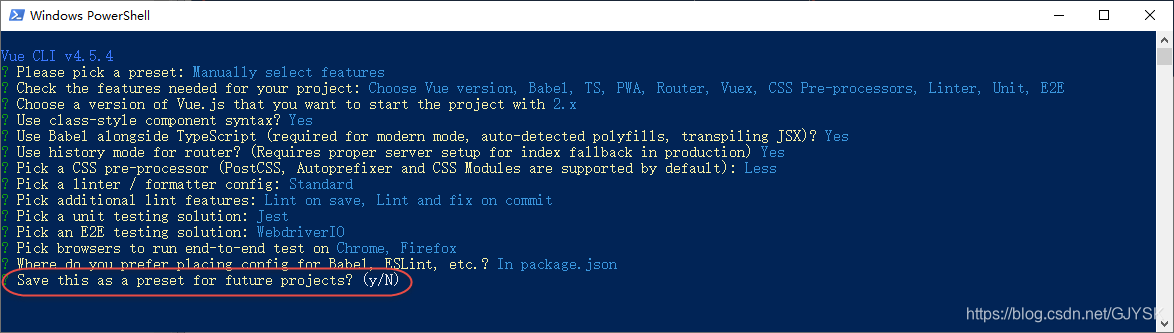
Save this as a preset for future projects? (y/N)
翻译:是否将此保存为将来项目的预置?
如果保存的话,将来在创建项目的时候,就可以按照该配置进行创建了。这个大家可以自行尝试。
如果需要保存,在输入小写y,不需要的话输入大写N(一路下来都是大写Y小写n,这里画风突变成了小写y大写N,-_-)。此处我们选择不保存,输入大写N,按下回车键,如下图所示:
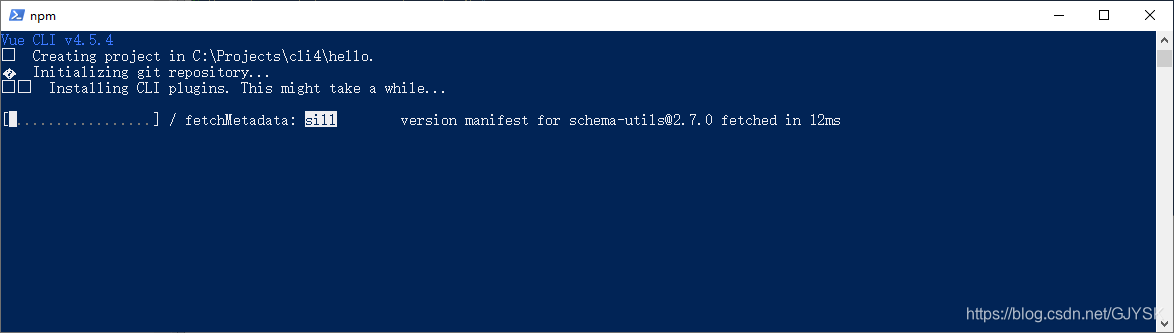
如上图示,这就开始按照咱们的配置进行项目的创建了,坐等结果了。
最后,输出了一大堆的东西,如果中间没有出现错误的话,那咱们的项目就创建成功了,可以进行后续的操作了。

贴上控制台输出的内容:
PS C:\Projects\cli4> vue create hello


Vue CLI v4.5.4
? Please pick a preset: Manually select features
? Check the features needed for your project: Choose Vue version, Babel, TS, PWA, Router, Vuex, CSS Pre-processors, Linter, Unit, E2E
? Choose a version of Vue.js that you want to start the project with 2.x
? Use class-style component syntax? Yes
? Use Babel alongside TypeScript (required for modern mode, auto-detected polyfills, transpiling JSX)? Yes
? Use history mode for router? (Requires proper server setup for index fallback in production) Yes
? Pick a CSS pre-processor (PostCSS, Autoprefixer and CSS Modules are supported by default): Less
? Pick a linter / formatter config: Standard
? Pick additional lint features: Lint on save, Lint and fix on commit
? Pick a unit testing solution: Jest
? Pick an E2E testing solution: WebdriverIO
? Pick browsers to run end-to-end test on Chrome, Firefox
? Where do you prefer placing config for Babel, ESLint, etc.? In package.json
? Save this as a preset for future projects? No


Vue CLI v4.5.4
✨  Creating project in C:\Projects\cli4\hello.
�  Initializing git repository...
⚙️  Installing CLI plugins. This might take a while...


> [email protected] install C:\Projects\cli4\hello\node_modules\fibers
> node build.js || nodejs build.js

`win32-x64-72` exists; testing
Binary is fine; exiting

> [email protected] install C:\Projects\cli4\hello\node_modules\deasync
> node ./build.js

`win32-x64-node-12` exists; testing
Binary is fine; exiting

> [email protected] install C:\Projects\cli4\hello\node_modules\yorkie
> node bin/install.js

setting up Git hooks
done


> [email protected] postinstall C:\Projects\cli4\hello\node_modules\babel-runtime\node_modules\core-js
> node -e "try{require('./postinstall')}catch(e){}"


> [email protected] postinstall C:\Projects\cli4\hello\node_modules\core-js
> node -e "try{require('./postinstall')}catch(e){}"


> [email protected] postinstall C:\Projects\cli4\hello\node_modules\webpack-bundle-analyzer\node_modules\ejs
> node ./postinstall.js

added 2117 packages from 1326 contributors in 71.254s

75 packages are looking for funding
  run `npm fund` for details

�  Invoking generators...
�  Installing additional dependencies...


> [email protected] install C:\Projects\cli4\hello\node_modules\chromedriver
> node install.js

Current existing ChromeDriver binary is unavailable, proceeding with download and extraction.
Downloading from file:  https://chromedriver.storage.googleapis.com/84.0.4147.30/chromedriver_win32.zip
Saving to file: C:\Users\Cuiyo\AppData\Local\Temp\84.0.4147.30\chromedriver\chromedriver_win32.zip
Received 1040K...
Received 2080K...
Received 3120K...
Received 4160K...
Received 4737K total.
Extracting zip contents to C:\Users\Cuiyo\AppData\Local\Temp\84.0.4147.30\chromedriver.
Copying to target path C:\Projects\cli4\hello\node_modules\chromedriver\lib\chromedriver
Done. ChromeDriver binary available at C:\Projects\cli4\hello\node_modules\chromedriver\lib\chromedriver\chromedriver.exe

> [email protected] postinstall C:\Projects\cli4\hello\node_modules\geckodriver
> node index.js

Downloading geckodriver... Extracting... Complete.
added 249 packages from 184 contributors in 44.28s

87 packages are looking for funding
  run `npm fund` for details

⚓  Running completion hooks...

�  Generating README.md...

�  Successfully created project hello.
�  Get started with the following commands:

 $ cd hello
 $ npm run serve

PS C:\Projects\cli4>
五、启动项目
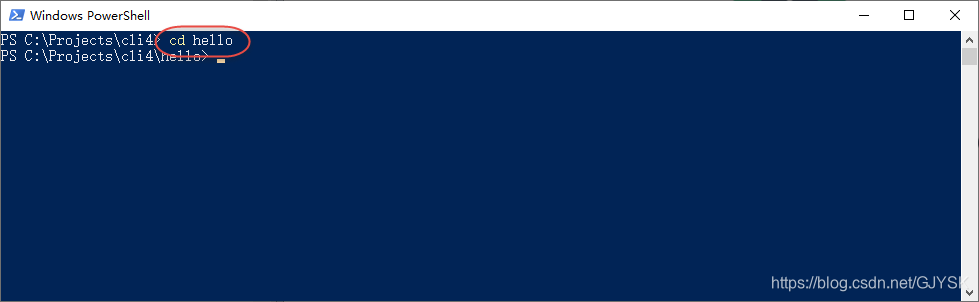
初始完之后,进入到项目根目录:
cd hello如下图所示:
在命令行输入如下命令,启动项目:
npm run serve稍等片刻,可以看到命令行输出了如下的内容:
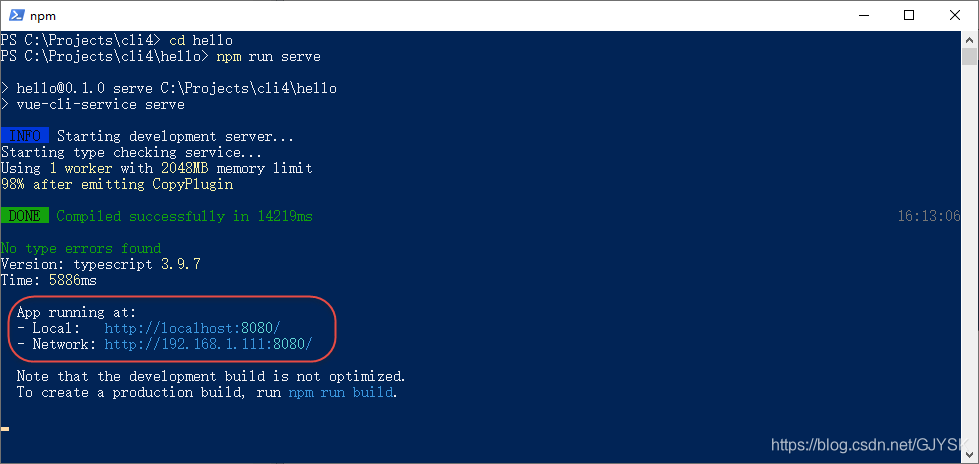
在命令行上看到类似于上面你的消息,就说明我们的项目启动成功了。然后复制2个地址中的任何一个,粘贴到浏览器的地址栏中打开,如下图所示:

至此,项目就算启动成功了。
六、打包上线
在开发完项目之后,就应该打包上线了。vue-cli也提供了打包的命令,打开命令行工具cmd,在项目根目录下执行如下命令:
npm run build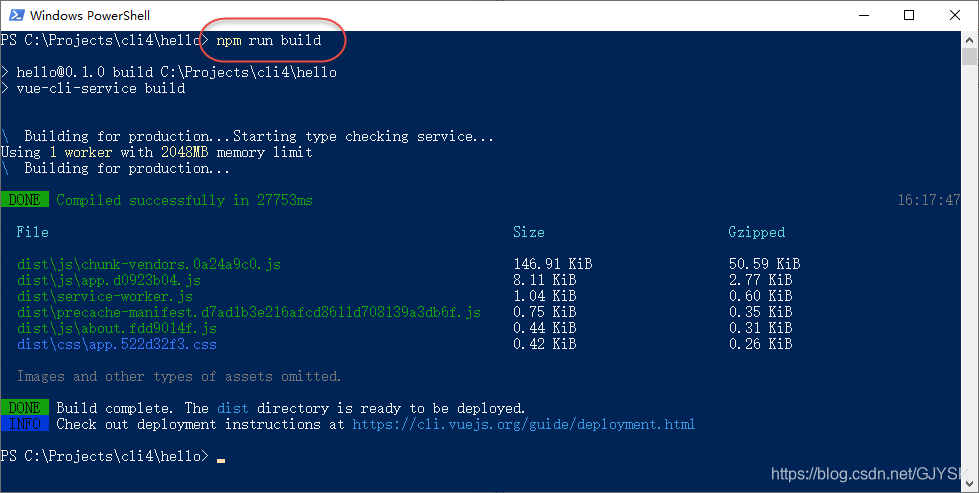
执行完之后,可以看到在项目根目录下多出了一个dist目录,如下图所示:

该目录下就是打包好的所有静态资源,直接部署到静态资源服务器就好了。
七、参考资料
- https://www.jianshu.com/p/5e13bc2eb97c
- https://segmentfault.com/a/1190000014627083
- https://blog.csdn.net/weiwenwen6/article/details/83120115
- https://blog.csdn.net/weixin_41717785/article/details/99567097
- https://blog.csdn.net/qq_33673284/article/details/82918764
- https://copyfuture.com/blogs-details/20200519144521753sqo6c6n1o1lx3jb
- https://www.jianshu.com/p/fbcad30031c2
- https://www.jianshu.com/p/c028e4cfc8c8