文章目录
3 Bean的作用域
Bean的六种作用域总结
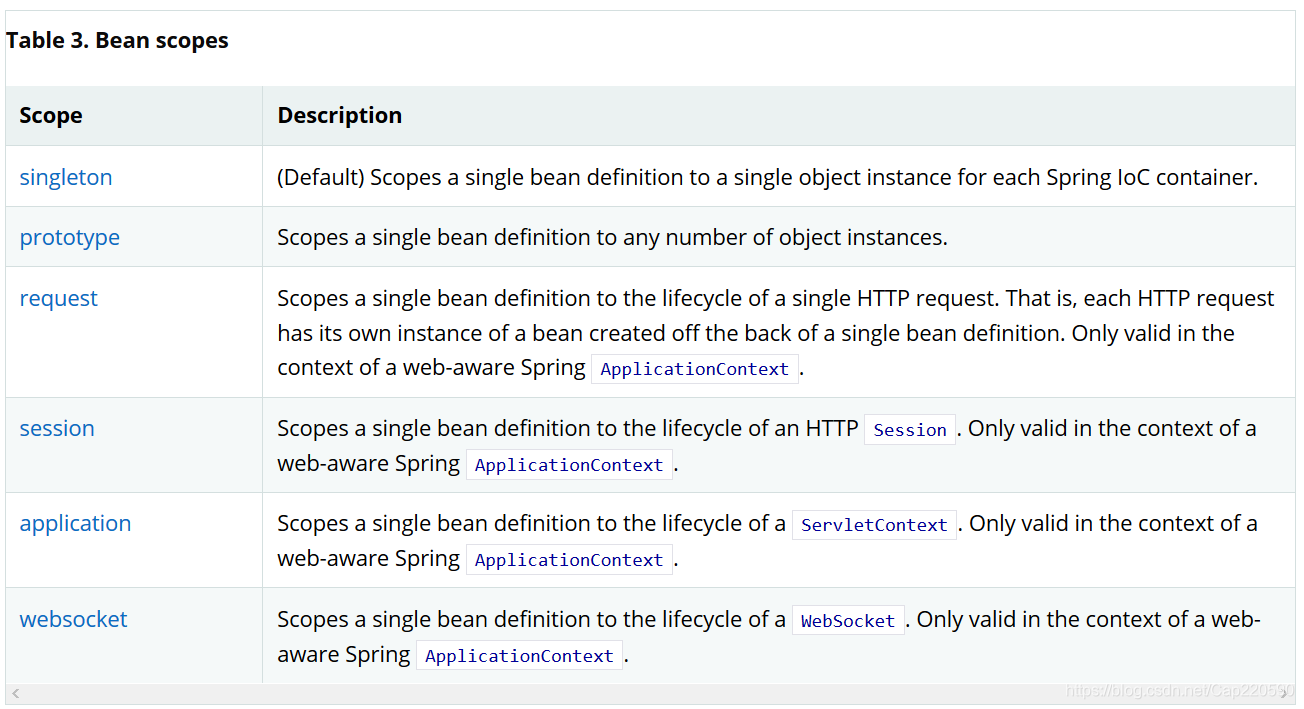
3.1 单例作用域——默认
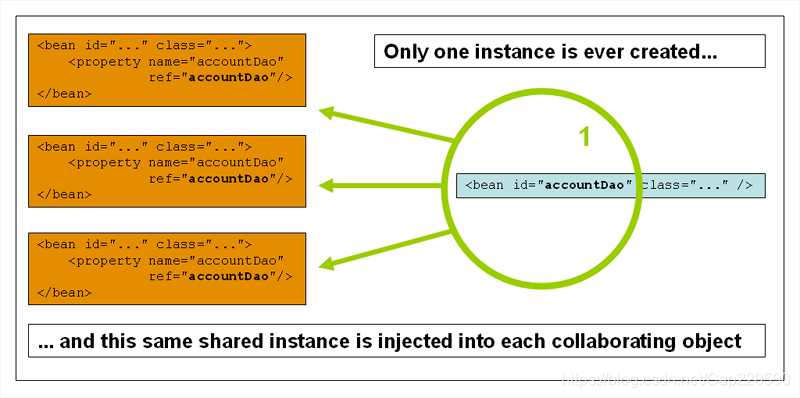
- 单例作用域是Bean定义的默认作用域
- 单例作用域是指一个容器只会创建一次该bean对象
实例
- 创建一个User实体类
public class User {
    private int id;
    private String name;
    /**Getter and Setter */
}
- 在元数据配置文件
beans.xml中给User创建一个bean定义
<bean id="user" class="com.cap.pojo.User" scope="singleton" />
- 测试
        ApplicationContext context = new ClassPathXmlApplicationContext("beans.xml");
        User u1 = context.getBean(User.class);
        User u2 = context.getBean(User.class);
        System.out.println(u1 == u2);
- 结果
true
3.2 原型作用域
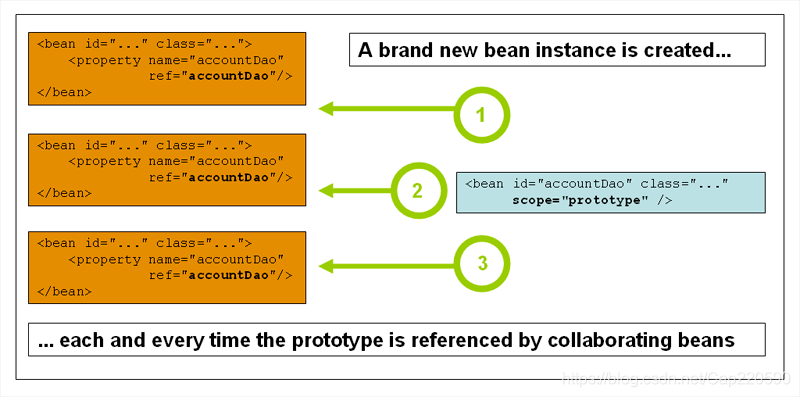
- 原型作用域是指每次需要获取bean对象就会创建一个新的bean对象。
实例
- 在元数据配置文件
beans.xml中的User的Bean定义中指定属性scope的值为prototype
<bean id="user" class="com.cap.pojo.User" scope="prototype" />
- 改动一下测试方法,再打印hash值
    @Test
    public void test2(){
        ApplicationContext context = new ClassPathXmlApplicationContext("beans2.xml");
        User u1 = context.getBean(User.class);
        User u2 = context.getBean(User.class);
        System.out.println(u1.hashCode());
        System.out.println(u2.hashCode());
        System.out.println(u1 == u2);
    }
- 结果可得:
1354003114
825658265
false
3.3 其他作用域
request、session、application、websocket需要在web下使用,这里暂时不展开
4 自动装配
4.1 显式装配
- 创建三个实体类
Person,Cat,Dog,其中Person类引用了Cat和Dog
public class Cat {
    public void shout(){
        System.out.println("喵喵喵~");
    }
}
public class Dog {
    public void shout(){
        System.out.println("旺旺旺~");
    }
}
public class Person {
    private Cat cat;
    private Dog dog;
    private String name;
}
- 在元数据配置
beans.xml文件中给Person的bean显式装配
<?xml version="1.0" encoding="UTF-8"?>
<beans xmlns="http://www.springframework.org/schema/beans"
       xmlns:xsi="http://www.w3.org/2001/XMLSchema-instance"
       xsi:schemaLocation="http://www.springframework.org/schema/beans
        https://www.springframework.org/schema/beans/spring-beans.xsd">

    <bean id="dog" class="com.cap.pojo.Dog" />
    <bean id="cat" class="com.cap.pojo.Cat" />

    <bean id="person" class="com.cap.pojo.Person" >
        <property name="name" value="公孙离" />
        <property name="dog" ref="dog" />
        <property name="cat" ref="cat" />
    </bean>

</beans>
- 编写测试方法
    @Test
    public void test(){
        ApplicationContext context = new ClassPathXmlApplicationContext("beans.xml");
        Person p = context.getBean(Person.class);
        System.out.println(p.getName());
        p.getDog().shout();
        p.getCat().shout();
    }
- 结果可得:
公孙离
旺旺旺~
喵喵喵~
4.2 通过byName进行自动装配
修改beans.xml
 <bean id="person" class="com.cap.pojo.Person" autowire="byName">
     <property name="name" value="公孙离" />
 </bean>
可以看到,使用bean的autowire属性,就可以实现自动装配,byName属性值的自动装配是依据bean的setter的名字
- 我们修改Person类中的
setDog(),改为setDog123()
 public void setDog123(Dog dog) {
     this.dog = dog;
 }
此时测试方法会报错
2. 我们再修改beans.xml
<bean id="dog123" class="com.cap.pojo.Dog" />
此时测试方法通过,说明确实是使用setter后面跟着的名字
4.3 通过byType进行自动装配
byType会去容器中寻找相同类型的bean注入,如果容器中有两个相同的类型会报错。
4.4 通过注解@Autowired进行自动装配
@Autowired首先根据byName,如果有多个类型,那就根据byType
- 创建User实体类,添加@Autowired注解
public class User {
    @Autowired
    private Cat cat;
    @Autowired
    private Dog dog;
    private String name;
    /** Getter和Setter */
}
- 修改beans.xml
注意注解需要配置命名空间
<?xml version="1.0" encoding="UTF-8"?>
<beans xmlns="http://www.springframework.org/schema/beans"
       xmlns:xsi="http://www.w3.org/2001/XMLSchema-instance"
       xmlns:context="http://www.springframework.org/schema/context"
       xsi:schemaLocation="http://www.springframework.org/schema/beans
        https://www.springframework.org/schema/beans/spring-beans.xsd
        http://www.springframework.org/schema/context
        https://www.springframework.org/schema/context/spring-context.xsd">
	<!-- 开启注解 -->
    <context:annotation-config/>

    <bean id="user" class="com.cap.pojo.User">
        <property name="name" value="公孙离" />
    </bean>

    <bean id="cat" class="com.cap.pojo.Cat" />
    <bean id="dog" class="com.cap.pojo.Dog" />

</beans>
- 测试方法
public class MyTest {
    @Test
    public void test(){
        ApplicationContext context = new ClassPathXmlApplicationContext("beans.xml");
        User u = context.getBean(User.class);
        System.out.println(u.getName());
        u.getCat().shout();
        u.getDog().shout();

    }
}
- 结果可得:
公孙离
喵~
旺~
4.5 @Autowired配合@Qualifier
当@Autowired通过byName和byType不能确定一个bean的时候,可以使用@Qualifier来指定bean的id
    <bean id="cat1" class="com.cap.pojo.Cat" />
    <bean id="cat2" class="com.cap.pojo.Cat" />
    <bean id="dog1" class="com.cap.pojo.Dog" />
    <bean id="dog2" class="com.cap.pojo.Dog" />
    @Autowired
    @Qualifier("cat1")
    private Cat cat;
    @Autowired
    @Qualifier("dog1")
    private Dog dog;
@Resource在JDK11中被移除了