Bean的作用域
| Scope | Description |
|---|---|
| singleton | (Default) Scopes a single bean definition to a single object instance for each Spring IoC container.单例 |
| prototype | Scopes a single bean definition to any number of object instances.作用于任意数量的对象实例。 |
| request | Scopes a single bean definition to the lifecycle of a single HTTP request. That is, each HTTP request has its own instance of a bean created off the back of a single bean definition. Only valid in the context of a web-aware Spring ApplicationContext.作用于一个请求 |
| session | Scopes a single bean definition to the lifecycle of an HTTP Session. Only valid in the context of a web-aware Spring ApplicationContext.作用于一次会话 |
| application | Scopes a single bean definition to the lifecycle of a ServletContext. Only valid in the context of a web-aware Spring ApplicationContext. |
| websocket | Scopes a single bean definition to the lifecycle of a WebSocket. Only valid in the context of a web-aware Spring ApplicationContext. |
几种作用域中,request、session作用域仅在基于web的应用中使用(不必关心你所采用的是什么web应用框架),只能用在基于web的Spring ApplicationContext环境。
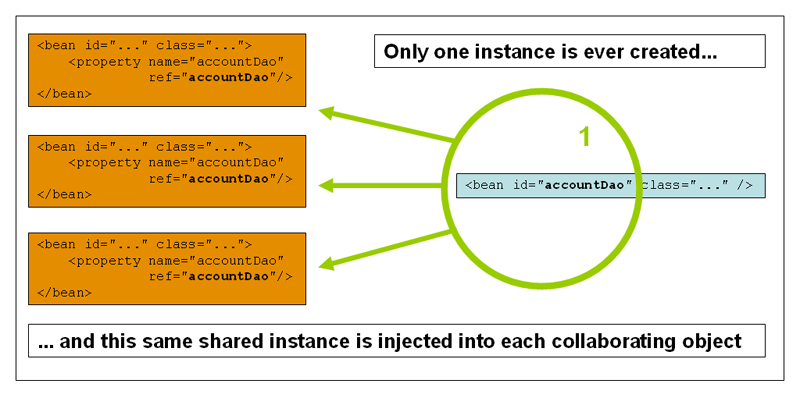
Singleton
当一个bean的作用域为Singleton,那么Spring IoC容器中只会存在一个共享的bean实例,并且所有对bean的请求,只要id与该bean定义相匹配,则只会返回bean的同一实例。Singleton是单例类型,就是在创建起容器时就同时自动创建了一个bean的对象,不管你是否使用,他都存在了,每次获取到的对象都是同一个对象。注意,Singleton作用域是Spring中的缺省作用域。要在XML中将bean定义成singleton,可以这样配置:
<bean id="ServiceImpl" class="cn.csdn.service.ServiceImpl" scope="singleton">
测试:
 @Test
 public void test03(){
     ApplicationContext context = newClassPathXmlApplicationContext("applicationContext.xml");
     User user = (User) context.getBean("user");
     User user2 = (User) context.getBean("user");
     System.out.println(user==user2);
 }
Prototype
当一个bean的作用域为Prototype,表示一个bean定义对应多个对象实例。Prototype作用域的bean会导致在每次对该bean请求(将其注入到另一个bean中,或者以程序的方式调用容器的getBean()方法)时都会创建一个新的bean实例。Prototype是原型类型,它在我们创建容器的时候并没有实例化,而是当我们获取bean的时候才会去创建一个对象,而且我们每次获取到的对象都不是同一个对象。根据经验,对有状态的bean应该使用prototype作用域,而对无状态的bean则应该使用singleton作用域。在XML中将bean定义成prototype,可以这样配置:
 <bean id="account" class="com.foo.DefaultAccount" scope="prototype"/>
  或者
 <bean id="account" class="com.foo.DefaultAccount" singleton="false"/>

Request
当一个bean的作用域为Request,表示在一次HTTP请求中,一个bean定义对应一个实例;即每个HTTP请求都会有各自的bean实例,它们依据某个bean定义创建而成。该作用域仅在基于web的Spring ApplicationContext情形下有效。考虑下面bean定义:
<bean id="loginAction" class=cn.csdn.LoginAction" scope="request"/>
针对每次HTTP请求,Spring容器会根据loginAction bean的定义创建一个全新的LoginAction bean实例,且该loginAction bean实例仅在当前HTTP request内有效,因此可以根据需要放心的更改所建实例的内部状态,而其他请求中根据loginAction bean定义创建的实例,将不会看到这些特定于某个请求的状态变化。当处理请求结束,request作用域的bean实例将被销毁。
Session
当一个bean的作用域为Session,表示在一个HTTP Session中,一个bean定义对应一个实例。该作用域仅在基于web的Spring ApplicationContext情形下有效。考虑下面bean定义:
<bean id="userPreferences" class="com.foo.UserPreferences" scope="session"/>
针对某个HTTP Session,Spring容器会根据userPreferences bean定义创建一个全新的userPreferences bean实例,且该userPreferences bean仅在当前HTTP Session内有效。与request作用域一样,可以根据需要放心的更改所创建实例的内部状态,而别的HTTP Session中根据userPreferences创建的实例,将不会看到这些特定于某个HTTP Session的状态变化。当HTTP Session最终被废弃的时候,在该HTTP Session作用域内的bean也会被废弃掉。
Bean的自动装配
- 自动装配是使用spring满足bean依赖的一种方法
- spring会在应用上下文中为某个bean寻找其依赖的bean。
Spring中bean有三种装配机制,分别是:
- 在xml中显式配置;
- 在java中显式配置;
- 隐式的bean发现机制和自动装配。
这里主要讲第三种:自动化的装配bean。
Spring的自动装配需要从两个角度来实现,或者说是两个操作:
- 组件扫描(component scanning):spring会自动发现应用上下文中所创建的bean;
- 自动装配(autowiring):spring自动满足bean之间的依赖,也就是我们说的IOC/DI;
组件扫描和自动装配组合发挥巨大威力,使得显示的配置降低到最少。
推荐不使用自动装配xml配置 , 而使用注解 .
测试环境搭建
1、新建一个项目
2、新建两个实体类,Cat Dog 都有一个叫的方法
public class Cat {
   public void shout() {
       System.out.println("miao~");
  }
}
public class Dog {
   public void shout() {
       System.out.println("wang~");
  }
}
3、新建一个用户类 User
public class User {
   private Cat cat;
   private Dog dog;
   private String str;
}
4、编写Spring配置文件
<?xml version="1.0" encoding="UTF-8"?>
<beans xmlns="http://www.springframework.org/schema/beans"
      xmlns:xsi="http://www.w3.org/2001/XMLSchema-instance"
      xsi:schemaLocation="http://www.springframework.org/schema/beans
       http://www.springframework.org/schema/beans/spring-beans.xsd">

   <bean id="dog" class="com.maple.pojo.Dog"/>
   <bean id="cat" class="com.maple.pojo.Cat"/>

   <bean id="user" class="com.maple.pojo.User">
       <property name="cat" ref="cat"/>
       <property name="dog" ref="dog"/>
       <property name="str" value="Hello Spring"/>
   </bean>
</beans>
5、测试
public class MyTest {
   @Test
   public void testMethodAutowire() {
       ApplicationContext context = newClassPathXmlApplicationContext("beans.xml");
       User user = (User) context.getBean("user");
       user.getCat().shout();
       user.getDog().shout();
  }
}
结果正常输出,环境OK
byName
autowire byName (按名称自动装配)
由于在手动配置xml过程中,常常发生字母缺漏和大小写等错误,而无法对其进行检查,使得开发效率降低。
采用自动装配将避免这些错误,并且使配置简单化。
测试:
1、修改bean配置,增加一个属性 autowire="byName"
 <!--
    autowire="byName"会自己在容器上下文中查找和自己对象的set方法后面的值对应的bean-id
 -->
<bean id="user" class="com.maple.pojo.User" autowire="byName">
   <property name="str" value="Hello Spring"/>
</bean>
2、再次测试,结果依旧成功输出!
3、将 cat 的bean id修改为 catXXX
4、再次测试, 执行时报空指针java.lang.NullPointerException。因为按byName规则找不对应set方法,真正的setCat就没执行,对象就没有初始化,所以调用时就会报空指针错误。
小结:
当一个bean节点带有 autowire byName的属性时。
- 将查找其类中所有的set方法名,例如setCat,获得将set去掉并且首字母小写的字符串,即cat。
- 去spring容器中寻找是否有此字符串名称id的对象。
- 如果有,就取出注入;如果没有,就报空指针异常。
byType
autowire byType (按类型自动装配)
使用autowire byType首先需要保证:同一类型的对象,在spring容器中唯一。如果不唯一,会报不唯一的异常。
NoUniqueBeanDefinitionException
测试:
1、将user的bean配置修改一下 : autowire="byType"
2、测试,正常输出
3、在注册一个cat 的bean对象!
<bean id="dog" class="com.maple.pojo.Dog"/>
<bean id="cat" class="com.maple.pojo.Cat"/>
<bean id="cat2" class="com.maple.pojo.Cat"/>
<!--
	autowire="byType"会自己在容器上下文中查找和自己对象属性类型相同的bean
-->
<bean id="user" class="com.maple.pojo.User" autowire="byType">
   <property name="str" value="Hello Spring"/>
</bean>
4、测试,报错:NoUniqueBeanDefinitionException
5、删掉cat2,将cat的bean名称改掉!测试!因为是按类型装配,所以并不会报异常,也不影响最后的结果。甚至将id属性去掉,也不影响结果。
这就是按照类型自动装配!