介绍
Spring 是一个开源框架.
Spring 为简化企业级应用开发而生. 使用 Spring 可以使简单的 JavaBean 实现以前只有 EJB 才能实现的功能.
Spring 是一个 IOC(DI) 和 AOP 容器框架.
具体描述 Spring:
轻量级:Spring 是非侵入性的 - 基于 Spring 开发的应用中的对象可以不依赖于 Spring 的 API
依赖注入(DI — dependency injection、IOC)
面向切面编程(AOP — aspect oriented programming)
容器: Spring 是一个容器, 因为它包含并且管理应用对象的生命周期
框架: Spring 实现了使用简单的组件配置组合成一个复杂的应用. 在 Spring 中可以使用 XML 和 Java 注解组合这些对象
一站式:在 IOC 和 AOP 的基础上可以整合各种企业应用的开源框架和优秀的第三方类库 (实际上 Spring 自身也提供了展现层的 SpringMVC 和 持久层的 Spring JDBC)
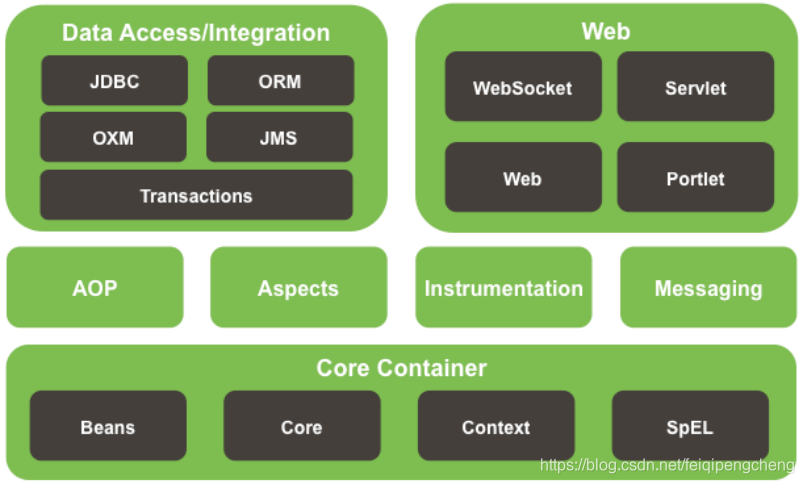
spring模块
helloworld
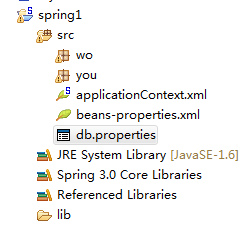
所需架包
建立一个java工程
例子:
///spring1/src/you/HelloWorld.java  bean
package you;

public class HelloWorld {
private String s;

public void setS(String s) {
	this.s = s;
}
public void sayHello(){
	System.out.println("hello,"+s);
}
}
///////////////////////////////////////////////////////////////////
///spring1/src/you/Main.java
package you;
import org.springframework.context.support.ClassPathXmlApplicationContext;
public class Main {
	public static void main(String[] args) {
//1. 创建 Spring 的 IOC 容器
ClassPathXmlApplicationContext ctx = new ClassPathXmlApplicationContext("applicationContext.xml");

//2. 从 IOC 容器中获取 bean 的实例
//利用id获取到IOC中bean的实例
HelloWorld helloworld = (HelloWorld) ctx.getBean("helloworld");

//根据类型来获取 bean 的实例: 要求在  IOC 容器中只有一个与之类型匹配的 bean, 若有多个则会抛出异常.
//一般情况下, 该方法可用, 因为一般情况下, 在一个 IOC 容器中一个类型对应的 bean 也只有一个.
HelloWorld helloWorld1 = ctx.getBean(HelloWorld.class);

//3. 使用 bean
helloworld.sayHello();
	}
}
////////////////////////////////////////////////////////////////////
//全局配置文件 /spring1/src/applicationContext.xml
<?xml version="1.0" encoding="UTF-8"?>
<beans xmlns="http://www.springframework.org/schema/beans"
	xmlns:xsi="http://www.w3.org/2001/XMLSchema-instance"
	xmlns:util="http://www.springframework.org/schema/util"
	xmlns:p="http://www.springframework.org/schema/p"
	xsi:schemaLocation="http://www.springframework.org/schema/beans http://www.springframework.org/schema/beans/spring-beans.xsd
		http://www.springframework.org/schema/util http://www.springframework.org/schema/util/spring-util-4.0.xsd">
		<!--配置bean-->
<!--class: bean的全类名,通过反射的方式在IOC容器中创建Bean.所以要求Bean中必须有无参数的构造器-->
<!--id:标识容器中的bean. id唯一.若 id 没有指定,Spring 自动将权限定性类名作为 Bean 的名字,id 可以指定多个名字,名字之间可用逗号、分号、或空格分隔-->

<bean id="helloworld" class="you.HelloWorld">
<property name="s" value="dwqdkw"></property>
</bean>
</beans>
IOC DI描述
IOC(Inversion of Control):其思想是反转资源获取的方向. 传统的资源查找方式要求组件向容器发起请求查找资源. 作为回应, 容器适时的返回资源. 而应用了 IOC 之后, 则是容器主动地将资源推送给它所管理的组件, 组件所要做的仅是选择一种合适的方式来接受资源. 这种行为也被称为查找的被动形式
DI(Dependency Injection) — IOC 的另一种表述方式:即组件以一些预先定义好的方式(例如: setter 方法)接受来自如容器的资源注入. 相对于 IOC 而言,这种表述更直接

Spring 容器
在 Spring IOC 容器读取 Bean 配置创建 Bean 实例之前, 必须对它进行实例化. 只有在容器实例化后, 才可以从 IOC 容器里获取 Bean 实例并使用.
Spring 提供了两种类型的 IOC 容器实现.
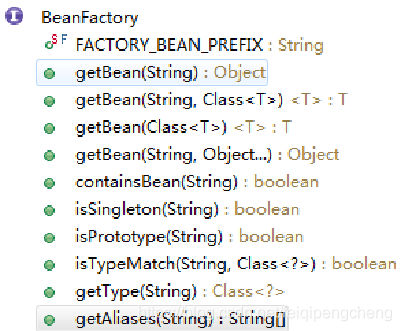
BeanFactory: IOC 容器的基本实现.BeanFactory 是 Spring 框架的基础设施,面向 Spring 本身
ApplicationContext: 提供了更多的高级特性. 是 BeanFactory 的子接口.;ApplicationContext 面向使用 Spring 框架的开发者,几乎所有的应用场合都直接使用 ApplicationContext 而非底层的 BeanFactory。
无论使用何种方式, 配置文件时相同的.
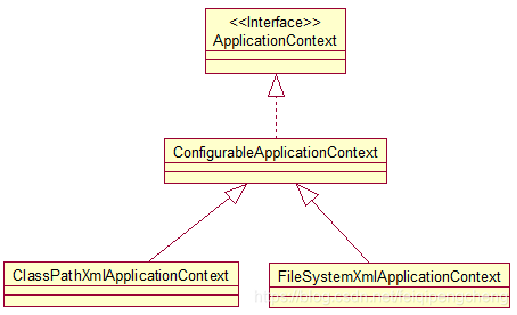
ApplicationContext
ApplicationContext 的主要实现类:
ClassPathXmlApplicationContext:从 类路径下加载配置文件
FileSystemXmlApplicationContext: 从文件系统中加载配置文件
ConfigurableApplicationContext 扩展于 ApplicationContext,新增加两个主要方法:refresh() 和 close(), 让 ApplicationContext 具有启动、刷新和关闭上下文的能力
ApplicationContext 在初始化上下文时就实例化所有单例的 Bean。
WebApplicationContext 是专门为 WEB 应用而准备的,它允许从相对于 WEB 根目录的路径中完成初始化工作
从 IOC 容器中获取 Bean
调用 ApplicationContext 的 getBean() 方法
前面的例子有
依赖注入的方式
Spring 支持 3 种依赖注入的方式
属性注入
构造器注入
工厂方法注入(很少使用,不推荐)
属性注入
属性注入即通过 setter 方法注入Bean 的属性值或依赖的对象。属性注入使用 元素, 使用 name 属性指定 Bean 的属性名称,value 属性或 子节点指定属性值
属性注入是实际应用中最常用的注入方式
前面例子有
构造方法注入
通过构造方法注入Bean 的属性值或依赖的对象,它保证了 Bean 实例在实例化后就可以使用。
构造器注入在 元素里声明属性, 中没有 name 属性
例子(在之前的例子上):
//bean /spring1/src/you/Car.java
package you;


public class Car {

	private String company;
	private String brand;

	private int maxSpeed;
	private float price;

	public Car(String company, String brand, float price) {
		super();
		this.company = company;
		this.brand = brand;
		this.price = price;
	}

	public Car(String company, String brand, int maxSpeed) {
		super();
		this.company = company;
		this.brand = brand;
		this.maxSpeed = maxSpeed;
	}

	public Car(String company, String brand, int maxSpeed, float price) {
		super();
		this.company = company;
		this.brand = brand;
		this.maxSpeed = maxSpeed;
		this.price = price;
	}

	@Override
	public String toString() {
		return "Car [company=" + company + ", brand=" + brand + ", maxSpeed="
				+ maxSpeed + ", price=" + price + "]";
	}
}
//////////////////////////////////////////////////////////////////////
//全局配置文件 /spring1/src/applicationContext.xml
<!--使用构造器注入属性值可以指定参数的位置和参数的类型!以区分重载的构造器!| -->
<bean id="car" class="you.Car">
<constructor-arg value="dazhong" index="0"></constructor-arg>
<constructor-arg value="shanghai" index="1"></constructor-arg>
<constructor-arg value="3600" index="2"></constructor-arg>
</bean>

<bean id="car1" class="you.Car">
<constructor-arg value="dazhong" type="java.lang.String"></constructor-arg>
<constructor-arg value="shanghai" type="java.lang.String"></constructor-arg>
<constructor-arg value="3600" type="int"></constructor-arg>
</bean>
//////////////////////////////////////////////////////////////////////
//测试
Car car=(Car) ctx.getBean("car");
System.out.println(car);
Car car1=(Car) ctx.getBean("car1");
System.out.println(car1);
细节
构造器注入也可如此
例子,在前面基础上
全局配置文件 /spring1/src/applicationContext.xml
<bean id="car1" class="you.Car">
<constructor-arg value="dazhong" type="java.lang.String"></constructor-arg>
<constructor-arg value="shanghai" type="java.lang.String"></constructor-arg>
<constructor-arg  type="int">
<value>260</value>
</constructor-arg>
</bean>
字面值
字面值:可用字符串表示的值,可以通过 元素标签或 value 属性进行注入。
基本数据类型及其封装类、String 等类型都可以采取字面值注入的方式
若字面值中包含特殊字符,可以使用 <![CDATA[]]> 把字面值包裹起来。
例子,在前面基础上
全局配置文件 /spring1/src/applicationContext.xml
<bean id="car1" class="you.Car">
<constructor-arg value="dazhong" type="java.lang.String"></constructor-arg>
<constructor-arg  type="java.lang.String">
<value><![CDATA[<shanghai^>]]></value>
</constructor-arg>
<constructor-arg  type="int">
<value>260</value>
</constructor-arg>
</bean>
引用其它 Bean
组成应用程序的 Bean 经常需要相互协作以完成应用程序的功能. 要使 Bean 能够相互访问, 就必须在 Bean 配置文件中指定对 Bean 的引用
在 Bean 的配置文件中, 可以通过 元素或 ref 属性为 Bean 的属性或构造器参数指定对 Bean 的引用.
也可以在属性或构造器里包含 Bean 的声明, 这样的 Bean 称为内部 Bean
内部bean
当 Bean 实例仅仅给一个特定的属性使用时, 可以将其声明为内部 Bean. 内部 Bean 声明直接包含在 或 元素里, 不需要设置任何 id 或 name 属性,内部 Bean 不能使用在任何其他地方
例子,在前面基础上
//bean Person
package you;

public class Person {
private String name;
private Car car;
@Override
public String toString() {
	return "Person [car=" + car + ", name=" + name + "]";
}
public String getName() {
	return name;
}
public void setName(String name) {
	this.name = name;
}
public Car getCar() {
	return car;
}
public void setCar(Car car) {
	this.car = car;
}

}
////////////////////////////////////////////////////////////////////
//全局配置文件 /spring1/src/applicationContext.xml
//ref 属性
<bean id="person" class="you.Person">
<property name="name" value="tom"></property>
<property name="car" ref="car"></property>
</bean>
//<ref>元素
<bean id="person" class="you.Person">
<property name="name" value="tom"></property>
<property name="car" >
<ref bean="car"/>
</property>
</bean>
//内部 Bean
<bean id="person" class="you.Person">
<property name="name" value="tom"></property>
<property name="car" >
<!--只能在内部使用-->
<bean class="you.Car">
<constructor-arg value="dazhong" index="0"></constructor-arg>
<constructor-arg value="shanghai" index="1"></constructor-arg>
<constructor-arg value="3600" index="2"></constructor-arg>
</bean>
</property>
</bean>
//////////////////////////////////////////////////////////////////////
//测试
System.out.println(ctx.getBean("person"));
注入参数详解:null 值和级联属性
可以使用专用的 元素标签为 Bean 的字符串或其它对象类型的属性注入 null 值
和 Struts、Hiberante 等框架一样,Spring 支持级联属性的配置。
例子,在前面基础上
Bean Car 属性加上setget方法
//全局配置文件 /spring1/src/applicationContext.xml  级联属性  属性县初始化才可对级联属性赋值 和struts2不一样
<bean id="person" class="you.Person">
<property name="name" value="tom"></property>
<property name="car" >
<ref bean="car"/>
</property>
<property name="car.maxSpeed" value="260"></property>
</bean>
集合属性
在 Spring中可以通过一组内置的 xml 标签(例如: < list>, < set> 或 < map>) 来配置集合属性.
配置 java.util.List 类型的属性, 需要指定 < list> 标签, 在标签里包含一些元素.这些标签可以通过 < value> 指定简单的常量值, 通过 < ref> 指定对其他 Bean 的引用. 通过 < bean > 指定内置 Bean 定义. 通过 指定空元素. 甚至可以内嵌其他集合.
数组的定义和 List 一样, 都使用
配置 java.util.Set 需要使用 标签, 定义元素的方法与 List 一样.
例子,在前面基础上
//bean Person 中的car变成List<Car> cars
//全局配置文件 /spring1/src/applicationContext.xml
<bean id="person1" class="you.Person">
<property name="name" value="jarry"></property>
<property name="cars">
<list>
<ref bean="car"/>
<ref bean="car1"/>
</list>
</property>
</bean>
//////////////////////////////////////////////////////////////////////
////测试
System.out.println(ctx.getBean("person1"));
Java.util.Map 通过 < map > 标签定义, < map> 标签里可以使用多个 < entry > 作为子标签. 每个条目包含一个键和一个值.
必须在 < key> 标签里定义键
因为键和值的类型没有限制, 所以可以自由地为它们指定 < value>, < ref>, < bean> 或 < null> 元素.
可以将 Map 的键和值作为 < entry> 的属性定义: 简单常量使用 key 和 value 来定义; Bean 引用通过 key-ref 和 value-ref 属性定义
例子,在前面基础上
//bean
package you;

import java.util.List;
import java.util.Map;

public class Person2 {
private String name;
private Map<String,Car>cars;
@Override
public String toString() {
	return "Person [car=" + cars + ", name=" + name + "]";
}
public String getName() {
	return name;
}
public void setName(String name) {
	this.name = name;
}
public Map<String, Car> getCars() {
	return cars;
}
public void setCars(Map<String, Car> car) {
	this.cars = car;
}
}
////////////////////////////////////////////////////////////////////
////全局配置文件 /spring1/src/applicationContext.xml
<bean id="person3" class="you.Person2">
<property name="name" value="kangkang"></property>
<property name="cars">
<map>
<entry key="AA" value-ref="car"></entry>
<entry key="AB" value-ref="car1"></entry>
</map>
</property>
</bean>
/////////////////////////////////////////////////////////////////////
//测试
System.out.println(ctx.getBean("person3"));
使用 < props> 定义 java.util.Properties, 该标签使用多个 < prop> 作为子标签. 每个 < prop> 标签必须定义 key 属性.
例子,在前面基础上
//bean
package you;

import java.util.Properties;

public class DataSource {
private Properties p;

public Properties getP() {
	return p;
}

public void setP(Properties p) {
	this.p = p;
}

@Override
public String toString() {
	return "DataSource [p=" + p + "]";
}

}
////////////////////////////////////////////////////////////////////
////全局配置文件 /spring1/src/applicationContext.xml
<bean id="datasource" class="you.DataSource">
<property name="p">
<!--使用props 和prop子节点来为Properties 属性赋值-->
<props>
<prop key="data">1479008950</prop>
<prop key="name">dunqipeng</prop>
</props>
</property>
</bean>
/////////////////////////////////////////////////////////////////////
//测试
System.out.println(ctx.getBean("datasource"));
使用 utility scheme 定义集合
使用基本的集合标签定义集合时, 不能将集合作为独立的 Bean 定义, 导致其他 Bean 无法引用该集合, 所以无法在不同 Bean 之间共享集合.
可以使用 util schema 里的集合标签定义独立的集合 Bean. 需要注意的是, 必须在 < beans> 根元素里添加 util schema 定义
例子,在前面基础上
////////////////////////////////////////////////////////////////////
////全局配置文件 /spring1/src/applicationContext.xml
<util:list id="cars">
<ref bean="car"/>
<ref bean="car1"/>
</util:list>
<bean id="person5" class="you.Person">
<property name="name" value="kangkang"></property>
<property name="cars" ref="cars"></property>
</bean>
/////////////////////////////////////////////////////////////////////
//测试
System.out.println(ctx.getBean("person5"));
使用 p 命名空间
为了简化 XML 文件的配置,越来越多的 XML 文件采用属性而非子元素配置信息。
Spring 从 2.5 版本开始引入了一个新的 p 命名空间,可以通过 元素属性的方式配置 Bean 的属性。
使用 p 命名空间后,基于 XML 的配置方式将进一步简化
例子,在前面基础上
////////////////////////////////////////////////////////////////////
////全局配置文件 /spring1/src/applicationContext.xml
<util:list id="cars">
<ref bean="car"/>
<ref bean="car1"/>
</util:list>
<bean id="person5" class="you.Person" p:name="kangkang" p:cars-ref="cars">
</bean>
XML 配置里的 Bean 自动装配
Spring IOC 容器可以自动装配 Bean. 需要做的仅仅是在 < bean> 的 autowire 属性里指定自动装配的模式
byType(根据类型自动装配): 若 IOC 容器中有多个与目标 Bean 类型一致的 Bean. 在这种情况下, Spring 将无法判定哪个 Bean 最合适该属性, 所以不能执行自动装配.
byName(根据名称自动装配): 必须将目标 Bean 的名称和属性名设置的完全相同.
constructor(通过构造器自动装配): 当 Bean 中存在多个构造器时, 此种自动装配方式将会很复杂. 不推荐使用
例子:
//bean Car
package wo;
public class Car {

	private String company;
	private String brand;

	private int maxSpeed;
	private float price;

	public String getCompany() {
		return company;
	}

	public void setCompany(String company) {
		this.company = company;
	}

	public String getBrand() {
		return brand;
	}

	public void setBrand(String brand) {
		this.brand = brand;
	}

	public int getMaxSpeed() {
		return maxSpeed;
	}

	public void setMaxSpeed(int maxSpeed) {
		this.maxSpeed = maxSpeed;
	}


	public float getPrice() {
		return price;
	}

	public void setPrice(float price) {
		this.price = price;
	}

	public Car(String company, String brand, float price) {
		super();
		this.company = company;
		this.brand = brand;
		this.price = price;
	}

	public Car(String company, String brand, int maxSpeed) {
		super();
		this.company = company;
		this.brand = brand;
		this.maxSpeed = maxSpeed;
	}

	public Car(String company, String brand, int maxSpeed, float price) {
		super();
		this.company = company;
		this.brand = brand;
		this.maxSpeed = maxSpeed;
		this.price = price;
	}

	public Car() {
		super();
		// TODO Auto-generated constructor stub
	}

	@Override
	public String toString() {
		return "Car [company=" + company + ", brand=" + brand + ", maxSpeed="
				+ maxSpeed + ", price=" + price + "]";
	}
}
//Person
package wo;

import java.util.List;

public class Person {
private String name;
private Car car;
@Override
public String toString() {
	return "Person [car=" + car + ", name=" + name + "]";
}
public String getName() {
	return name;
}
public void setName(String name) {
	this.name = name;
}
public Car getCar() {
	return car;
}
public void setCar(Car car) {
	this.car = car;
}

}
//////////////////////////////////////////////////////////////////////
//全局配置文件/spring1/src/beans-autowire.xml
<?xml version="1.0" encoding="UTF-8"?>
<beans xmlns="http://www.springframework.org/schema/beans"
	xmlns:xsi="http://www.w3.org/2001/XMLSchema-instance"
	xmlns:util="http://www.springframework.org/schema/util"
	xmlns:p="http://www.springframework.org/schema/p"
	xsi:schemaLocation="http://www.springframework.org/schema/beans http://www.springframework.org/schema/beans/spring-beans.xsd
		http://www.springframework.org/schema/util http://www.springframework.org/schema/util/spring-util-4.0.xsd">
<!--可以使用autowire 属性指定自动装配的方式,byName根据bean的名字和当前bean的setter 风格的属性名进行自动装配,有装配,无不装配
byType根据bean的类型和当前bean的属性的类型进行自动装配。若IOC容器中有1个以上的类型匹配的bean,则抛异常。-->
<bean id="car" class="wo.Car" p:brand="dazhong" p:company="feier" p:maxSpeed="260" p:price="3600"></bean>
<bean id="person" class="wo.Person" p:name="li" autowire="byName"></bean>
</beans>
//////////////////////////////////////////////////////////////////////
//测试
package wo;
import org.springframework.context.support.ClassPathXmlApplicationContext;

public class Main {

	public static void main(String[] args) {
ClassPathXmlApplicationContext ctx = new ClassPathXmlApplicationContext("beans-autowire.xml");
System.out.println(ctx.getBean("person"));
	}

}
自动装配的缺点
1.在 Bean 配置文件里设置 autowire 属性进行自动装配将会装配 Bean 的所有属性. 然而, 若只希望装配个别属性时, autowire 属性就不够灵活了.
2.autowire 属性要么根据类型自动装配, 要么根据名称自动装配, 不能两者兼而有之.
3.一般情况下,在实际的项目中很少使用自动装配功能,因为和自动装配功能所带来的好处比起来,明确清晰的配置文档更有说服力一些
继承 Bean 配置
Spring 允许继承 bean 的配置, 被继承的 bean 称为父 bean. 继承这个父 Bean 的 Bean 称为子 Bean
子 Bean 从父 Bean 中继承配置, 包括 Bean 的属性配置
子 Bean 也可以覆盖从父 Bean 继承过来的配置
父 Bean 可以作为配置模板, 也可以作为 Bean 实例. 若只想把父 Bean 作为模板, 可以设置 < bean> 的abstract 属性为 true, 这样 Spring 将不会实例化这个 Bean
并不是 元素里的所有属性都会被继承. 比如: autowire, abstract 等.
也可以忽略父 Bean 的 class 属性, 让子 Bean 指定自己的类, 而共享相同的属性配置. 但此时 abstract 必须设为 true
例子(在前面例子之上):
///spring1/src/beans-autowire.xml
<!-- bean配置的继承:使用bean的parent属性指定继承哪个bean的配置-->
<!--抽象bean: bean的abstract 属性为true的bean. 这样的bean不能被IOC容器实例化,只用来被继承配置,若某一个bean的class属性没有指定,则该bean必须是一个抽象bean -->
<bean id="car1" class="wo.Car" p:brand="dazhong" p:company="feier" p:maxSpeed="260" p:price="3600" abstract="true"></bean>
<bean id="car" parent="car1"></bean>
依赖 Bean 配置
Spring 允许用户通过 depends-on 属性设定 Bean 前置依赖的Bean,前置依赖的 Bean 会在本 Bean 实例化之前创建好
如果前置依赖于多个 Bean,则可以通过逗号,空格或的方式配置 Bean 的名称
例子(在前面例子之上):
///spring1/src/beans-autowire.xml
<bean id="car1" class="wo.Car" p:brand="dazhong" p:company="feier" p:maxSpeed="260" p:price="3600" abstract="true"></bean>
<bean id="car"   parent="car1"></bean>
<bean id="person" class="wo.Person" p:name="li" depends-on="car"></bean>
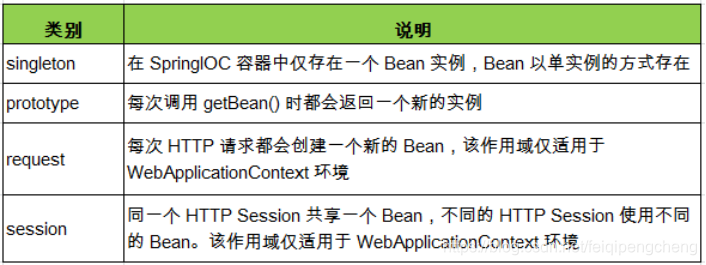
Bean 的作用域
在 Spring 中, 可以在 < bean> 元素的 scope 属性里设置 Bean 的作用域. 默认情况下, Spring 只为每个在 IOC 容器里声明的 Bean 创建唯一一个实例, 整个 IOC 容器范围内都能共享该实例:所有后续的 getBean() 调用和 Bean 引用都将返回这个唯一的 Bean 实例.该作用域被称为 singleton, 它是所有 Bean 的默认作用域.
使用外部属性文件
在配置文件里配置 Bean 时, 有时需要在 Bean 的配置里混入系统部署的细节信息(例如: 文件路径, 数据源配置信息等). 而这些部署细节实际上需要和 Bean 配置相分离
Spring 提供了一个 PropertyPlaceholderConfigurer 的 BeanFactory 后置处理器, 这个处理器允许用户将 Bean 配置的部分内容外移到属性文件中. 可以在 Bean 配置文件里使用形式为 ${var} 的变量, PropertyPlaceholderConfigurer 从属性文件里加载属性, 并使用这些属性来替换变量.
Spring 还允许在属性文件中使用 ** $ {propName}**,以实现属性之间的相互引用。
context:property-placeholder的坑
例子(在前面例子之上):
////spring1/src/beans-properties.xml 全局配置文件
<?xml version="1.0" encoding="UTF-8"?>
<beans xmlns="http://www.springframework.org/schema/beans"
	xmlns:xsi="http://www.w3.org/2001/XMLSchema-instance"
	xmlns:context="http://www.springframework.org/schema/context"
	xsi:schemaLocation="http://www.springframework.org/schema/beans http://www.springframework.org/schema/beans/spring-beans.xsd
		http://www.springframework.org/schema/context http://www.springframework.org/schema/context/spring-context-4.0.xsd">
<!-- 导入外部的资源文件 -->
<context:property-placeholder location="classpath:db.properties" system-properties-mode="FALLBACK"/>
<bean id="person" class="wo.Person" >
<property name="name" value="${jdbc.user}"></property>
</bean>
</beans>
//////////////////////////////////////////////////
///spring1/src/db.properties
jdbc.user=root
jdbc.password=1230
jdbc.driverClass=com.mysql.jdbc.Driver
jdbc.jdbcUrl=jdbc:mysql:///test
jdbc.initPoolSize=5
jdbc.maxPoolSize=10
/////////////////////////////////////////////////////////
//测试
ClassPathXmlApplicationContext ctx = new ClassPathXmlApplicationContext("beans-properties.xml");
System.out.println(ctx.getBean("person"));