本文宗旨,致力于学习研究与分享!如有侵权!即使告知,作者会在第一时间内删除!!!!
前言:
验证码种类繁多,继英文字母,数字 组合 后出现了 文字点击,图标点击! 前面介绍了文字点选,本次将探讨图标点选如何进行识别!
类似YI盾图标,JI验图标点选这种怎么解决?

第一步:
- 肯定是标注数据集,labelimage应该都听过,网上下载个,然后画框框就行,类别标注为同一个类别就行比如(target),如果不嫌麻烦可以一步到位,自己直接把类别都区分好就行!后面的内容就不用看了,yolo 一步解决这个验证码!
-
https://www.cnblogs.com/Terrypython/p/9577657.html
- 可以看这个老哥的使用方式!整就完事
第二步:
- 得到第一步的位置预测数据集,就扔给网络训练就完事了,什么yolov3,ssd,啥的都行,用你喜欢的姿势解决。别说什么windows不友好,pytorch的环境搭建很简单了,windows一样玩儿,毕竟这个验证码又不需要用到ctc
- 训练过程你们搞一下,毕竟这篇文章的主体不是为了讲这些东西
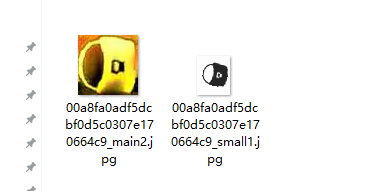
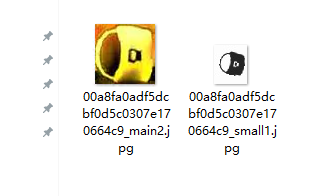
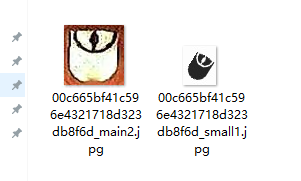
- 如果顺利进行,你就来到这一步了,关于下图这两个图标,大的不用说,就是前面的结晶,小的那个,如果不嫌麻烦,也可以用前面的结晶,嫌麻烦就上图像检测算法,直接切割就行。
- 小图切割算法
import numpy as np
def FindImageBBox(img):
    v_sum = np.sum(img, axis=0)
    start_i = None
    end_i = None
    minimun_range = 10
    maximun_range = 20
    min_val = 10
    peek_ranges = []
    ser_val = 0
    # 从左往右扫描,遇到非零像素点就以此为字体的左边界
    for i, val in enumerate(v_sum):
        #定位第一个字体的起始位置
        if val > min_val and start_i is None:
            start_i = i
            ser_val = 0
        #继续扫描到字体,继续往右扫描
        elif val > min_val and start_i is not None:
            ser_val = 0
        #扫描到背景,判断空白长度
        elif val <= min_val  and start_i is not None:
            ser_val  = ser_val + 1
            if (i - start_i >= minimun_range and ser_val > 2) or (i - start_i >= maximun_range):
                # print(i)
                end_i = i
                #print(end_i - start_i)
                if start_i> 5:
                    start_i = start_i-5
                peek_ranges.append((start_i, end_i+2))
                start_i = None
                end_i = None
        #扫描到背景,继续扫描下一个字体
        elif val <= min_val and start_i is None:
            ser_val = ser_val+1
        else:
            raise ValueError("cannot parse this case...")
    return peek_ranges
调用方式:
image = cv2.imread(now_images, cv2.IMREAD_GRAYSCALE)
 cropped1 = image[345:384, 0:115]
 ret, image1 = cv2.threshold(cropped1, 127, 255, cv2.THRESH_BINARY_INV)
 box = FindImageBBox(image1)
 for l,i in enumerate(box):
     cropped2 = cropped1[0:39, i[0]:i[1]]  # 裁剪坐标为[y0:y1, x0:x1]
     cv2.imwrite(os.path.join(path1,f"{name_1}_small{l}.jpg"), cropped2)
第三步:
- 上面两部讲完了,到最重点的环节了,怎么解决同一类型图片的分类问题?
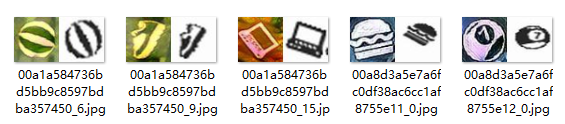
- 就比如说这张图片有两个锁,怎么把另一张图片的两个锁归为一个类呢?
下面这张图假装是锁,难得找哇 - 其实孪生网络就完全没必要那么麻烦,我们只看结果,孪生网络要完成的任务就是区分他俩是不是同一种,或者说计算他俩的相似度。为了避免那么多分类要去找到相同的然后放里面这种操作,笔者是这么解决的,可以参考一下:
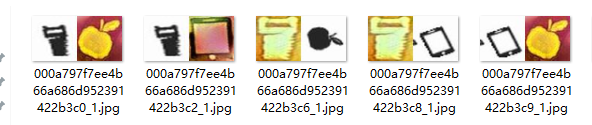
看到这样的款式应该快明白我的意思了 - 无论是相同的图片还是不同的图片,都揉在一起,训练的时候,进入孪生网络的时候,拆开一分为2,label标签,1为不同,0为相同,网络不就认识了么?也不会出现那种网络结构里的误杀,避免了损失,类别再多无所谓,也不需要知道他属于哪一类,一万张图片分类起来很难,从一张图片里分出几类肯定不难吧。有了这种条件,网络还不能识别,那就是网络的锅了。
- 方便理解,下面为代码演示
class SiameseNetworkDataset(Dataset): def __init__(self ,imageFolderDataset ,transform=None ,should_invert=True): self.imageFolderDataset = [os.path.join(imageFolderDataset,i) for i in os.listdir(imageFolderDataset)] self.transform = transform self.should_invert = should_invert def __getitem__(self ,index): imgpath = random.choice(self.imageFolderDataset) # 37个类别中任选一个 img = Image.open(imgpath) img = img.resize((120,60)) img0 = img.crop((0,0,60,60)) img1 = img.crop((60,0,120,60)) img00 = img0.convert("L") img11 = img1.convert("L") label = int(imgpath.split('_')[-1].replace('.jpg','')) if self.should_invert: img00 = PIL.ImageOps.invert(img00) img11 = PIL.ImageOps.invert(img11) if self.transform is not None: img00 = self.transform(img00) img11 = self.transform(img11) return img00, img11, torch.from_numpy(np.array([label] ,dtype=np.float32)) def __len__(self): return len(self.imageFolderDataset) - 加载数据,我是这样写的,你们也可以随便搞搞,反正就是需要三个向量,两个是图片的输入,一个是标签(就是你标注的答案)
- 再就是数据增强,这一步其实还是很重要的,看你们操作,随便搞搞,我就写了这么几个
transform = transforms.Compose( [ # transforms.RandomCrop((40,40)), # transforms.ColorJitter, transforms.RandomVerticalFlip(), # transforms.RandomCrop(), transforms.RandomHorizontalFlip(), transforms.Resize((100 ,100)), transforms.ToTensor()]) - 有了数据肯定是需要输入网络进行训练的了,上网络,数据锅里倒
# 搭建模型
class SiameseNetwork(nn.Module):
    def __init__(self):
        super().__init__()
        self.cnn1 = nn.Sequential(
            nn.ReflectionPad2d(1),
            nn.Conv2d(1, 4, kernel_size=3),
            nn.ReLU(inplace=True),
            nn.BatchNorm2d(4),

            nn.ReflectionPad2d(1),
            nn.Conv2d(4, 8, kernel_size=3),
            nn.ReLU(inplace=True),
            nn.BatchNorm2d(8),

            nn.ReflectionPad2d(1),
            nn.Conv2d(8, 8, kernel_size=3),
            nn.ReLU(inplace=True),
            nn.BatchNorm2d(8),
        )

        self.fc1 = nn.Sequential(
            nn.Linear(8 * 100 * 100, 500),
            nn.ReLU(inplace=True),

            nn.Linear(500, 500),
            nn.ReLU(inplace=True),

            nn.Linear(500, 5))

    def forward_once(self, x):
        output = self.cnn1(x)
        output = output.view(output.size()[0], -1)
        output = self.fc1(output)
        return output

    def forward(self, input1, input2):
        output1 = self.forward_once(input1)
        output2 = self.forward_once(input2)
        return output1, output2
网络搞好了肯定就需要结果了,说白了就是计算相似度
class ContrastiveLoss(torch.nn.Module):
    """
    Contrastive loss function.
    Based on: http://yann.lecun.com/exdb/publis/pdf/hadsell-chopra-lecun-06.pdf
    """
    def __init__(self, margin=2.0):
        super(ContrastiveLoss, self).__init__()
        self.margin = margin

    def forward(self, output1, output2, label):
        euclidean_distance = F.pairwise_distance(output1, output2, keepdim=True)
        loss_contrastive = torch.mean((1 - label) * torch.pow(euclidean_distance, 2) +
                                      (label) * torch.pow(torch.clamp(self.margin - euclidean_distance, min=0.0), 2))

        return loss_contrastive
最后一步就是组装训练,等待结果
def train():
    global iteration_number
    for epoch in range(0, train_number_epochs):
        for i,data in enumerate(train_dataloader,0):
            img0, img1, label = data
            # img0维度为torch.Size([32, 1, 100, 100]),32是batch,label为torch.Size([32, 1])
            img0, img1, label = img0.cuda(), img1.cuda(), label.cuda()  # 数据移至GPU
            optimizer.zero_grad()
            output1, output2 = net(img0, img1)
            loss_contrastive = criterion(output1, output2, label)
            loss_contrastive.backward()
            optimizer.step()
            if i % 10 == 0:
                iteration_number += 10
                counter.append(iteration_number)
                loss_history.append(loss_contrastive.item())
        if epoch%20 ==0 and epoch!=0:
            torch.save(net.state_dict(), f'siamese.pth')
        print("Epoch number: {} , Current loss: {:.4f}".format(epoch, loss_contrastive.item()))

    show_plot(counter, loss_history)
到此为止是不是很简单呢?你学会了么?
总结
- 别人的代码真好用,抄抄改改的不就完成了么
- 自己写的代码根本不能用,不重要,会用别人的就行了
- 解决问题就行了,比如群里老哥的暴力破解某验,哈哈哈
写在最后
-
有问题可以加群来一起探讨下
-
QQ群:112631040
-
本次代码由: 有风有阳 大哥提供!
-
黄瓜帅:QQ908383407
-
恰个饭:
-
有需要学习验证码识别的小伙伴,可以来lengyue.video,一流教学,百万数据集提供为您学习提供辅助!,找黄瓜帅可领优惠卷!!数量有限!!!
-
-
本文章禁止转载!!!!!
-
本文章禁止转载!!!!!
-
本文章禁止转载!!!!!