终于抓住11月的尾部,赶在12月到来之前进行更新了,2018准备要跟我们说拜拜了,小伙伴们你们今年的目标实现了吗?,好了扯远了,今天趁着有时间更新一下博客,记录一下使用keras + tensorflow + cpu 如何进行图像识别
以下的教程是基于Linux系统来实现的,有windows的同学可能需要改改,但是不建议使用windows来跑
还有由于识别的图像比较多内存小于等于4G的同学要跑的话建议减少一些图像,否则会卡死跑不动
项目依赖情况 requirements.txt
由于这里没法上传文件只好cp 了上来
absl-py==0.3.0
asn1crypto==0.24.0
astor==0.7.1
astroid==2.0.4
attrs==18.2.0
Automat==0.7.0
backcall==0.1.0
certifi==2018.8.24
cffi==1.11.5
chardet==3.0.4
constantly==15.1.0
cryptography==2.3.1
cssselect==1.0.3
cycler==0.10.0
decorator==4.3.0
gast==0.2.0
Ghost.py==0.2.3
graphviz==0.10.1
grpcio==1.14.0
h5py==2.8.0
hyperlink==18.0.0
idna==2.7
imutils==0.5.1
incremental==17.5.0
ipython==6.5.0
ipython-genutils==0.2.0
isort==4.3.4
jedi==0.12.1
Keras==2.2.2
Keras-Applications==1.0.4
Keras-Preprocessing==1.0.2
kiwisolver==1.0.1
lazy-object-proxy==1.3.1
lxml==4.2.5
Markdown==2.6.11
matplotlib==2.2.3
mccabe==0.6.1
numpy==1.14.5
opencv-python==3.4.2.17
parsel==1.5.0
parso==0.3.1
pexpect==4.6.0
pickleshare==0.7.4
Pillow==5.3.0
prompt-toolkit==1.0.15
protobuf==3.6.0
ptyprocess==0.6.0
pyasn1==0.4.4
pyasn1-modules==0.2.2
pycparser==2.19
PyDispatcher==2.0.5
pydot==1.2.4
PyDvi==0.1.0
Pygments==2.2.0
PyHamcrest==1.9.0
pylint==2.1.1
pyOpenSSL==18.0.0
pyparsing==2.2.0
PySide==1.2.4
python-dateutil==2.7.3
pytz==2018.5
PyYAML==3.13
queuelib==1.5.0
requests==2.19.1
scipy==1.1.0
Scrapy==1.5.1
service-identity==17.0.0
simplegeneric==0.8.1
six==1.11.0
tensorboard==1.9.0
tensorflow==1.9.0
termcolor==1.1.0
traitlets==4.3.2
Twisted==18.7.0
typed-ast==1.1.0
typing==3.6.4
urllib3==1.23
w3lib==1.19.0
wcwidth==0.1.7
Werkzeug==0.14.1
wrapt==1.10.11
zope.interface==4.5.0
项目结构
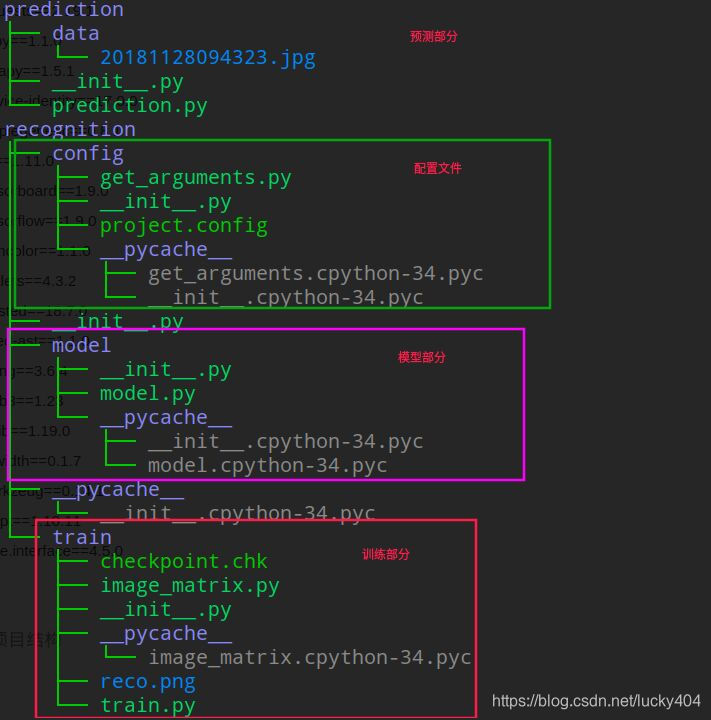
数据说明
这里是使用keras 来识别三种类型的图像 1 猫 2 狗 3 马 数据来源是通过爬虫去抓取的数据总量大概是 5800 张图像
准备好了环境和数据 接下来就是如何使用keras 来做图像识别
第一步 构建自己的模型
以下是我的模型代码
from keras import regularizers
from keras import backend as bk
from keras.models import Sequential
from keras.layers.core import Dense
from keras.layers.core import Flatten
from keras.layers.core import Dropout
from keras.layers.core import Activation
from keras.layers.convolutional import Conv2D
from keras.layers.convolutional import MaxPooling2D
from keras.layers.normalization import BatchNormalization


class ImageModel:
    @staticmethod
    def build(width, heigth, classes, depth=3):
        """

        """

        model = Sequential()
        if bk.image_data_format() == "channels_first":
            shape = (depth, width, heigth)

        else:
            shape = (width, heigth, depth)

        model.add(Conv2D(20, (3, 3), padding="same", input_shape=shape))
        model.add(Activation("relu"))
        model.add(MaxPooling2D(strides=(2, 2)))
        # ---------------------------------------------------------------
        model.add(Conv2D(30, (3, 3), padding="same"))
        model.add(Activation("relu"))
        model.add(MaxPooling2D(strides=(2, 2)))
        # ---------------------------------------------------------------
        model.add(Conv2D(50, (5, 5), padding="same"))
        model.add(Activation("relu"))
        model.add(MaxPooling2D(strides=(2, 2)))
        model.add(Dropout(0.5))
        # ---------------------------------------------------------------
        model.add(Flatten())
        # model.add(Dense(250, kernel_regularizer=regularizers.l2(0.01), activity_regularizer=regularizers.l1(0.01)))
        model.add(Dense(250))
        model.add(Dropout(0.5))
        model.add(Activation("relu"))
        # ---------------------------------------------------------------
        model.add(Dense(classes))
        model.add(Activation("softmax"))

        return model
大概的过程就是卷积-----> 池化------>压平------> 全连接----->softmax 分类
这里有一篇很好的文章告诉你cnn 是如何工作的: https://www.zhihu.com/question/22553761
还有一篇很好的视频教程:https://www.bilibili.com/video/av15889450/?spm_id_from=333.788.videocard.2
第二步 收集数据
有了模型之后我们就需要收集大量的数据来训练我们的模型,这里推荐大家使用这个脚本去下载数据
https://blog.csdn.net/hust_bochu_xuchao/article/details/79431145
由于是百度下载的图像可能会重复,需要去重
我自己的做法是检查MD5重复的图片直接删除, 除了删除重复的数据,还需要删除一些无关的数据
比如你百度图片搜索 猫 可能会出现一些跟猫没有关的图像,如果这些图像也被下载了需要我们自己去删除掉
import os
from imutils import paths

# 图片过滤

def get_md5(filename):
    """
    获取文件的MD5
    """
    md5 = os.popen('md5sum %s' % filename).read().split(' ')[0]
    return md5

def filterAll(path):
    """
    """
    if not os.path.exists(path):
        print('过滤失败,路径不存在')
        return
    hash = dict()
    images = paths.list_images(path)
    for im in images:
        md5 = get_md5(im)
        filename = os.path.basename(im)
        if md5 not in hash:
            hash[md5] = filename
        else:
            name = hash.get(md5)
            print('图片重复 %s 和 %s' % (im, name))
            os.system('rm -rf %s' % im)

filterAll('/home/fantasy/MachineLearning/project/spiders/downloads')
第三步给数据打标签
下载完了数据之后我们还需要给数据打标记,就相当于你在教一个小孩这个是什么,那个是什么,因此我们需要告诉机器,这个图片是什么?
这里我就新建了3个文件夹分别是 0, 1, 2 ,0 代表里面全是猫的图片 1 代表里面全是狗的图片 2 代表里面全是马的图片
第四步划分训练集和测试集
给数据打好标记之后就要给数据划分训练数据和测试数据了,一般划分的标准就是 训练数据 7 测试数据 3
最后大概就是这样的
训练集

测试集

第五步 开始训练
训练之前需要将所有的图像数据转为tensor 也就是张量
import os
import sys
import cv2
import numpy as np
from imutils import paths
from keras.utils import to_categorical
from config.get_arguments import get_option
from keras.preprocessing.image import img_to_array


def image2matrix(path):
    """
    图像裁剪然后转为矩阵
    """
    heigth = int(get_option("image", "height"))
    width = int(get_option("image", "width"))
    matrix = list()
    labels = []
    if os.path.exists(path) is False:
        print("路径不存在 %s" % path)
        return
    images = paths.list_images(path)
    for img in images:
        image = cv2.imread(img)
        # 有时候读取文件会返回None 不知道为什么读取不到因此这里先这样处理
        if image is None:
            os.system('rm -rf %s' % img)
            continue
        cv2.cvtColor(image, cv2.COLOR_BGR2RGB)
        try:
            image = cv2.resize(image, (heigth, width), interpolation = cv2.INTER_AREA)
            image = img_to_array(image)
        except Exception as ex:
            print(ex)
            print(img)
            sys.exit(1)
        matrix.append(image)
        label = int(img.split(os.path.sep)[-2])
        labels.append(label)

    return matrix, labels

def image_matrix(path):
    """
    训练集矩阵
    """
    matrix, _ = image2matrix(path)
    matrix = np.array(matrix, dtype="float") / 255.0
    return matrix

def image_label(path):
    """
    训练集标签
    """
    classes = int(get_option("image", 'classes'))
    _, labels = image2matrix(path)
    labels = np.array(labels)
    labels = to_categorical(labels, num_classes=classes)

    return labels
由于训练过程往往非常的漫长,因此我这里做了断点和邮件接收
断点:就是说每个epochs 之后让keras 保存一下权重等信息,如果不小心断掉了训练,下次它可以从保存的信息里面继续
关于邮件接收,我这里使用的是QQ 邮箱,QQ邮箱需要设置一下smtp 不懂设置的可以看我以前的博客:
https://blog.csdn.net/lucky404/article/details/79430379
训练部分的代码如下:
import sys
import smtplib
sys.path.append("../")
import numpy as np
from keras.utils import plot_model
import matplotlib.pyplot as plt
from keras.optimizers import Adam
from model.model import ImageModel
from email.mime.text import MIMEText
from keras.callbacks import EarlyStopping
from config.get_arguments import get_option
from keras.callbacks import ModelCheckpoint
from image_matrix import image_matrix, image_label
from keras.preprocessing.image import ImageDataGenerator


def run(train_path, test_path):
    """
    训练模型
    """
    height = int(get_option("image", "height"))
    width = int(get_option("image", "width"))
    classes = int(get_option("image", "classes"))
    epochs = int(get_option("train", "epochs"))
    batch_size = int(get_option("train", "batch_size"))
    save_path = get_option("model", "save_path")

    model = ImageModel.build(width=width, heigth=height, classes=classes)
    # init_lr = 0.001
    init_lr = 1e-3
    decay=0.0
    opt = Adam(lr=init_lr, decay=decay)
    # adam = Adam(lr=0.001, beta_1=0.99,beta_2=0.9, epsilon=1e-8)
    # 编译模型需要三个参数, 优化器,损失函数,指标列表
    model.compile(optimizer=opt, loss="categorical_crossentropy", metrics=['accuracy'])
    train_matrix = image_matrix(train_path)
    train_label = image_label(train_path)
    test_matrix = image_matrix(test_path)
    test_label = image_label(test_path)
    # 图像预处理, rotation range的作用是用户指定旋转角度范围
    # width_shift_range & height_shift_range 分别是水平位置平移和上下位置平移
    # horizontal_flip的作用是随机对图片执行水平翻转操作
    datagen = ImageDataGenerator(
    rotation_range=20,
    width_shift_range=0.2,
    height_shift_range=0.2,
    horizontal_flip=True)
    model.load_weights("checkpoint.chk")
    result = model.fit_generator(
        datagen.flow(train_matrix, train_label, batch_size=batch_size),
        validation_data=(test_matrix, test_label),
        # steps_per_epoch = len(train_matrix) // epochs,
        epochs=epochs,
        verbose=1,
        # callbacks=[EarlyStopping(monitor='val_loss', min_delta=0, patience=5, verbose=0, mode='auto')]
        callbacks = [ModelCheckpoint('checkpoint.chk', monitor='val_loss',
        verbose=0, save_best_only=True, save_weights_only=False, mode='auto', period=1)]
        )
    score = model.evaluate(test_matrix, test_label, batch_size=32)
    print("训练完毕 模型评分 %s" % score)
    model.save(save_path)
    # plot_model(model, to_file='model.png')
    plt.style.use("ggplot")
    plt.figure()
    n = epochs
    aranges = np.arange(0, n)
    plt.plot(result.history["loss"], label="train_loss")
    plt.plot(result.history["acc"], label="train_acc")
    plt.plot(result.history["val_loss"], label="val_loss")
    plt.plot(result.history["val_acc"], label="val_acc")

    plt.title("Image recognition")
    plt.xlabel("Epochs")
    plt.ylabel("loss/acc")
    plt.legend(loc="lower left")
    plt.savefig("reco")
    tellMeResult(score)

def tellMeResult(result):
    """
    训练完毕,发送邮件告诉我结果
    """
    host = get_option('email', 'host')
    account = get_option('email', 'account')
    key = get_option('email', 'key')
    target = get_option('email', 'recv_account')
    title = get_option('email', 'title')
    result = '模型的准确率: ' + str(int(result[1] * 100))
    msg = MIMEText(result)
    msg['Subject'] = title
    msg['From'] = account
    msg['To'] = target
    try:
        smtp = smtplib.SMTP_SSL()
        smtp.connect(host=host)
        smtp.login(account, key)
        smtp.sendmail(account, target, msg.as_string())
    except Exception as ex:
        print('邮件发送失败: %s' % ex)


if __name__ == "__main__":
    train = get_option("data_set", "train_data")
    test = get_option("data_set", "test_data")
    run(train, test)
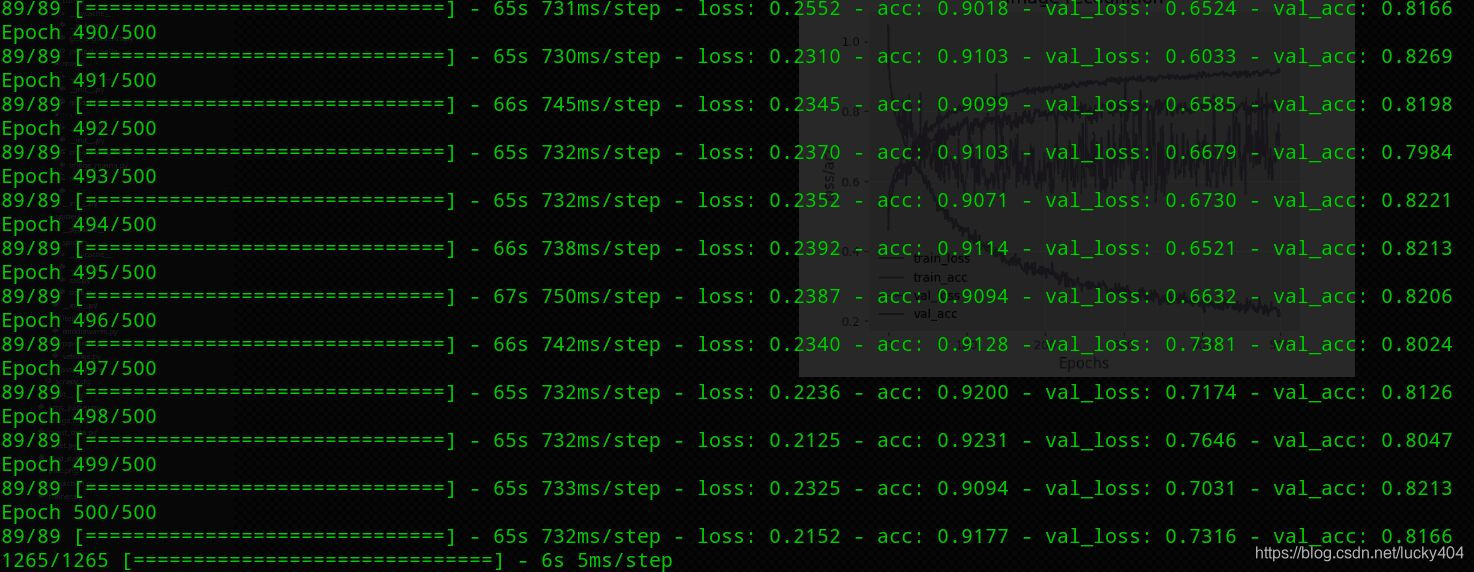
我的个人笔记本 完整的跑完训练大于需要 12 小时左右,以下是今天早上6点多的时候刚跑完的 准确率 大概 81%
第六步 将模型用于预测
训练完毕之后我们会保存一个模型文件 我们将使用这个模型文件来识别新的图片到底是什么
识别部分的代码
import os
import cv2
import sys
import imutils
import argparse
import numpy as np
sys.path.append('../')
from recognition.config.get_arguments import get_option
from keras.models import load_model
from keras.preprocessing.image import img_to_array

# 根据已有的模型预测单张图片是属于哪个类型

def getArgs():
    """
    获取输入参数
    """
    ag = argparse.ArgumentParser()
    ag.add_argument("-i", "--image", required=True, help="input image" )
    ag.add_argument("-m", "--model", required=True, help="input model")
    ag.add_argument("-s", "--show", action="store_true", default=False, help="show predict result")

    args = vars(ag.parse_args())
    return args

def image_array(input_image):
    """
    讲图片数据转换为array
    """
    height = int(get_option("image", "height"))
    width = int(get_option("image", "width"))
    image = cv2.imread(input_image)
    image = cv2.resize(image, (height, width))
    image = image.astype("float") / 255.0
    image = img_to_array(image)
    image = np.expand_dims(image, axis=0)
    return image


def predict():
    """
    预测图片属于那种类型
    """

    arg = getArgs()
    model = arg["model"]
    input_image = arg["image"]

    if not os.path.exists(input_image):
        print('预测失败,图片不存在 %s' % input_image)
        return
    if not os.path.exists(model):
        print("预测失败, model不存在 %s" % model)

    image = image_array(input_image)
    orgin = {0:"猫",1:"狗", 2:"马"}
    model = load_model(model)
    result = model.predict(image)[0]
    proba = np.max(result)
    label = str(np.where(result==proba)[0])
    label = "{}".format(label)
    closed = "{:.2f}%".format(proba * 100)
    label = eval(label)
    print("该图片有 %s 的可能性是属于 %s 类别" % (closed, orgin.get(label[0])))


if __name__ == "__main__":
    predict()
例如我需要识别的图像如下

识别结果

完整的项目已经上传到github:
喜欢的可以start
https://github.com/pythondever/keras-image-recognition/tree/master