3 OAuth 2.0
OAuth 2.0是安全授权的工业标准协议,我们了解它需要理解下面的专用术语:

-
交互参与方:
- Client:需要访问
Resource Sever受保护资源的应用; - Resource Owner :终端用户,
Client通过终端用户进行不同类型的授权(Grant Type); - Authorization Server:提供访问授权的应用,
Client使用某种Grant Type向Authorization Server获取Access Token; - Resource Sever:包含受保护资源的应用,
Client使用Access Token访问Resource Server的受保护资源;
- Client:需要访问
-
授权类型 - Grant Type
- Authorization Code:让用户访问Client页面时,页面打向Authorization Server的登录页面,登录后显示授权访问页面,授权成功后Client即可获得Access Token访问Resource Server
- Password:通过提供提供用户名和密码获得Access Token,一般是给应用服务的客户端使用(IOS、Android、Web App)。
- Client Credentials:Client通过Client Id和Client Secret直接向Authorization Server请求Access Token;它主要用于非用户参与的应用,如后台服务。
-
Token
- Access Token:用来访问受保护资源的唯一令牌;
- Refresh Token:当Access Token失效时,我们可以使用Refresh Token来获取一个新的Access Token,它的时效性要远远大于Access Token
- JWT:JSON Web Token,它代表双方之间安全传输的信息;它使用数字签名,传输的信息可以被验证和信任。
3.1 OAuth 2.0 Authorization Server
新建应用,信息如下:
Group:top.wisely
Artifact:auth-server
Dependencies:Spring Security、Spring Web Starter、Spring Data JPA、MySQL Driver、Lombok
build.gradle文件中的依赖如下:
dependencies {
   implementation 'org.springframework.boot:spring-boot-starter-data-jpa'
   implementation 'org.springframework.boot:spring-boot-starter-security'
   implementation 'org.springframework.boot:spring-boot-starter-web'
   compileOnly 'org.projectlombok:lombok'
   compileOnly 'org.projectlombok:lombok'
   runtimeOnly 'mysql:mysql-connector-java'
   annotationProcessor 'org.projectlombok:lombok'
  //...
}
Spring Security不提供OAuth 2.0 Authorization Server的功能,我们使用spring-security-oauth2-autoconfigure来实现OAuth 2.0 Authorization Server的功能和配置。Spring Boot不提供spring-security-oauth2-autoconfigure版本的维护,需指定它的版本。
implementation 'org.springframework.security.oauth.boot:spring-security-oauth2-autoconfigure:2.2.X.RELEASE'
3.1.1 spring-security-oauth2-autoconfigure提供的自动配置
spring-security-oauth2-autoconfigure使用OAuth2AutoConfiguration导入了关于Authorization Server配置OAuth2AuthorizationServerConfiguration,他们通过AuthorizationServerProperties用security.oauth2.authorization.*来进行定制配置。OAuth2AuthorizationServerConfiguration做了下面的配置:
AuthorizationServerConfigurerAdapter:继承此类通过重载其方法对进行配置。configure(ClientDetailsServiceConfigurer clients):配置client的信息,可通过security.oauth2.client.*来配置,只支持配置一个。configure(AuthorizationServerEndpointsConfigurer endpoints):配置Authorization Server端点的非安全特性。配置了TokenStore、AccessTokenConverter,若Grant Type为password则需设置AuthenticationManager。configure(AuthorizationServerSecurityConfigurer security):配置Authorization Server的安全性。tokenKeyAccess:配置端点/oauth/token_key的访问安全,提供JWT编码的Token;通过security.oauth2.authorization.tokenKeyAccess来配置。checkTokenAccess:配置端点/oauth/check_token的访问安全,解码Access Token用来检查和确认生成的token;通过security.oauth2.authorization.checkTokenAccess来配置。
- 导入
AuthorizationServerTokenServicesConfiguration:配置JWT。TokenStore:用来生成和获取token;自动配置了JwtTokenStore的Bean;AccessTokenConverter:将access token转换成不同的格式;自动配置了JwtAccessTokenConverter转换成JWT格式。
3.1.2 获取用户配置
Authorization Server要获取终端用户,来获取用户相关信息。我们沿用上节的SysAuthority、SysRole、SysUser、SysAuthorityRepository、
SysRoleRepository、SysUserRepository、CusotmUserDetailsService。我们的配置如下:
@Configuration
public class WebSecurityConfig extends WebSecurityConfigurerAdapter {
    @Autowired
    SysUserRepository sysUserRepository;
    @Bean
    protected UserDetailsService userDetailsService() {
        return new CusotmUserDetailsService(sysUserRepository);
    }

    @Bean
    PasswordEncoder passwordEncoder(){
        return new BCryptPasswordEncoder();
    }

    @Bean
    @Override //暴露authenticationManager Bean。
    protected AuthenticationManager authenticationManager() throws Exception {
        return super.authenticationManager();
    }

    @Override
    protected void configure(HttpSecurity http) throws Exception {
        http.authorizeRequests()
                .anyRequest().authenticated();
    }
}
3.1.3 JWT配置
配置JWT需要添加spring-security-jwt的依赖:
implementation 'org.springframework.security:spring-security-jwt'
因AuthorizationServerTokenServicesConfiguration为我们做了自动配置,我们只需在application.yml即可配置JWT。我们签名生成JWT token的时候,需使用自签名的证书,当前证书使用的是“Spring Web MVC”这一章我们生成的证书。
security:
  oauth2:
    authorization:
      jwt:
        key-store: classpath:keystore.jks
        key-store-password: pass1234
        key-alias: wisely
        key-password: pass1234
3.1.4 Authorization Server配置
OAuth2AuthorizationServerConfiguration自动配置的client只有一个不符合我们的要求,我们需要使用@EnableAuthorizationServer和继承AuthorizationServerConfigurerAdapter完全定制自己的Authorization Server配置。
@EnableAuthorizationServer
@Configuration
public class AuthServerConfig extends AuthorizationServerConfigurerAdapter {

    private final PasswordEncoder passwordEncoder;
    private final DataSource dataSource;
    private final AuthenticationManager authenticationManager;
    private final UserDetailsService userDetailsService;
    private final TokenStore tokenStore;
    private final AccessTokenConverter accessTokenConverter;
    private final AuthorizationServerProperties properties;

    public AuthServerConfig(PasswordEncoder passwordEncoder,
                            DataSource dataSource,
                            AuthenticationManager authenticationManager,
                            UserDetailsService userDetailsService,
                            TokenStore tokenStore,
                            AccessTokenConverter accessTokenConverter,
                            AuthorizationServerProperties properties) {
        this.passwordEncoder = passwordEncoder;
        this.dataSource = dataSource;
        this.authenticationManager = authenticationManager;
        this.userDetailsService = userDetailsService;
        this.tokenStore = tokenStore;
        this.accessTokenConverter = accessTokenConverter;
        this.properties = properties;
    }
}
上面注入的Bean都是下面配置需要的。
3.1.4.1 配置Client
@Override
public void configure(ClientDetailsServiceConfigurer clients) throws Exception {
    clients
        .jdbc(this.dataSource)
        .passwordEncoder(passwordEncoder);
}
指定Client的来源于数据库,数据源为dataSource;它默认了存储Client的表以及结构。
新建schema.sql:
create table if not exists oauth_client_details (
  client_id VARCHAR(255) PRIMARY KEY,
  resource_ids VARCHAR(255),
  client_secret VARCHAR(255),
  scope VARCHAR(255),
  authorized_grant_types VARCHAR(255),
  web_server_redirect_uri VARCHAR(255),
  authorities VARCHAR(255),
  access_token_validity INTEGER,
  refresh_token_validity INTEGER,
  additional_information VARCHAR(4096),
  autoapprove varchar(255)
);
新增两个Client,data.sql
INSERT INTO oauth_client_details (client_id, client_secret, scope, authorized_grant_types, autoapprove)
values ('postman', # 1
        '$2a$10$KCroi.THbmXdKXOgBud1zOzdmHrfpNxSytd/o5ZQLhCTzFXib1p66', #2
        'any'
        'password,client_credentials,refresh_token', # 3
        true);
INSERT INTO oauth_client_details (client_id, client_secret, authorized_grant_types, autoapprove)
values ('app',
        '$2a$10$1vUvCP9fzPeXIRzoOaPROuIRvq2nrh7iauWLIa371qZSmaP0p6ave',
        'any'
        'password,client_credentials,refresh_token',
        true);
- Client Id;
- Client Secret;
postman的密码是postman,app的密码是app;可使用passwordEncoder.encode("postman")获得; - 该Client支持的Grant Type。
我们需要任何指定Client来源都可通过ClientDetailsService接口来定制,和UserDetailsService类似,我们可以通过重载其loadClientByClientId来定制。然后我们可以通过下面来配置:
    @Override
    public void configure(ClientDetailsServiceConfigurer clients) throws Exception {
        clients.withClientDetails(new SomeCustomClientDetailsService());
    }
我们上面的:
@Override
public void configure(ClientDetailsServiceConfigurer clients) throws Exception {
    clients
        .jdbc(this.dataSource)
        .passwordEncoder(passwordEncoder);
}
等同于:
@Override
public void configure(ClientDetailsServiceConfigurer clients) throws Exception {
    JdbcClientDetailsService detailsService = new JdbcClientDetailsService(this.dataSource);
    detailsService.setPasswordEncoder(passwordEncoder);
    clients.withClientDetails(detailsService);
}
我们经常也会使用内存来注册Client:
public void configure(ClientDetailsServiceConfigurer clients) throws Exception {
    clients
        .inMemory()
            .withClient("postman")
            .secret(passwordEncoder.encode("postman"))
            .scopes("any")
            .authorizedGrantTypes("password", "authorization_code", "refresh_token")
        .and()
            .withClient("app")
            .secret(passwordEncoder.encode("app"))
            .scopes("any")
            .authorizedGrantTypes("password", "authorization_code", "refresh_token");
}
3.1.4.2 配置端点非安全特性
@Override
public void configure(AuthorizationServerEndpointsConfigurer endpoints) throws Exception {
        endpoints.accessTokenConverter(this.accessTokenConverter); //1
        endpoints.tokenStore(this.tokenStore); //2
        endpoints.authenticationManager(this.authenticationManager); //3
        endpoints.userDetailsService(userDetailsService); //4
}
- 设置自动配置的
accessTokenConverter,实际设置为JwtAccessTokenConverter的Bean; - 设置自动配置的
tokenStore,实际设置为JwtTokenStore的Bean; - 为让Grant Type支持
password需设置authenticationManager。 - 当Grant Type为
refresh_token时,需设置userDetailsService
3.1.4.3 配置Authorization Server安全
@Override
public void configure(AuthorizationServerSecurityConfigurer security) throws Exception {
        security.checkTokenAccess(this.properties.getCheckTokenAccess());
        security.tokenKeyAccess(this.properties.getTokenKeyAccess());
        security.realm(this.properties.getRealm());
}
上面的配置通过application.yml来配置:
security:
  oauth2:
    authorization:
      jwt:
        key-store: classpath:keystore.jks
        key-store-password: pass1234
        key-alias: wisely
        key-password: pass1234
      tokenKeyAccess: permitAll()
      checkTokenAccess: isAuthenticated()
      realm: wisely
3.1.5 Authorization Server的端点
TokenEndpoint:路径/oauth/token,按照OAuth 2.0规范请求Token;TokenKeyEndpoint:路径/oauth/token_key,提供JWT编码的Token;CheckTokenEndpoint:路径/oauth/check_token,解码Client的Access Token用来检查和确认生成的Token;AuthorizationEndpoint:路径/oauth/authorize,按照OAuth 2.0规范的授权实现。
3.1.6 获取Token
同样我们的客户端也是独立的,我们采用用获取Token的方式来访问服务。
3.1.6.1 获取Access Token
Postman即为一个Client,使用POST访问http://localhost:8080/oauth/token,Client Id和Client Secret填入Basic Auth中。
请求参数:
grant_type:passwordusername:wyfpassword:111111

JWT是一种编码的形式,它由Header.PayLoad.Signature三部分组成,通过我们keystore的公钥(public key)即可验证JWT Token。

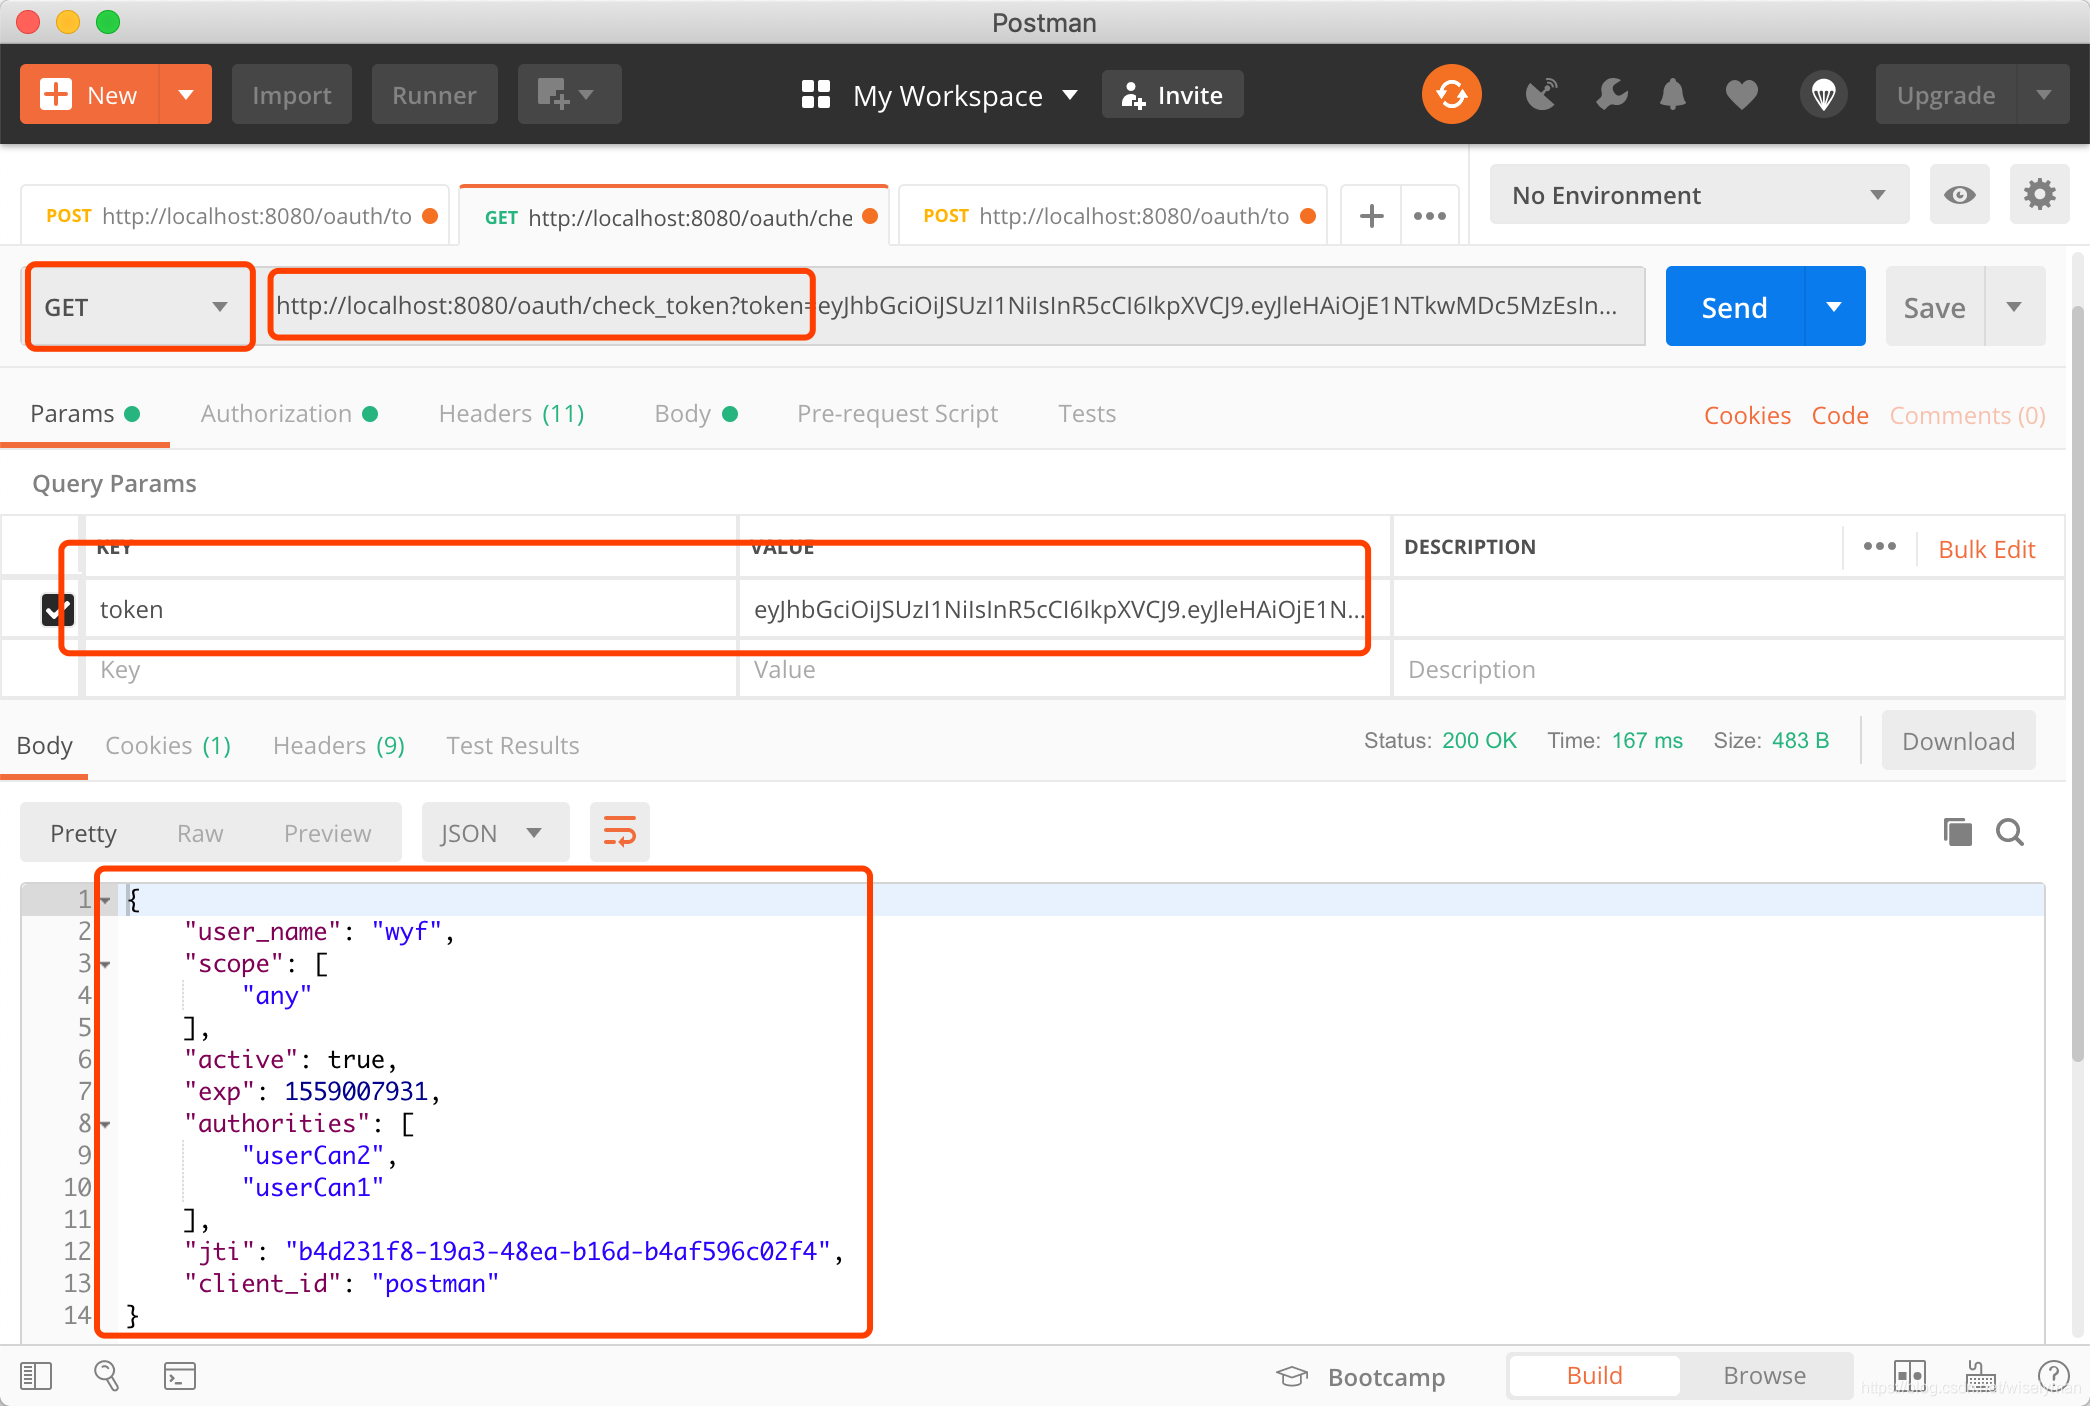
3.1.6.2 检查Token
用GET访问http://localhost:8080/oauth/check_token,Client Id和Client Secret填入Basic Auth中。
3.1.6.2 刷新Token
使用POST访问http://localhost:8080/oauth/token,请求参数:
grant_type:refresh_tokenusername:wyfpassword:111111refresh_token:从请求返回中复制


新书推荐:
我的新书《从企业级开发到云原生微服务:Spring Boot 实战》已出版,内容涵盖了丰富Spring Boot开发的相关知识
购买地址:https://item.jd.com/12760084.html
主要包含目录有:
第一章 初识Spring Boot(快速领略Spring Boot的美丽)
第二章 开发必备工具(对常用开发工具进行介绍:包含IntelliJ IDEA、Gradle、Lombok、Docker等)
第三章 函数式编程
第四章 Spring 5.x基础(以Spring 5.2.x为基础)
第五章 深入Spring Boot(以Spring Boot 2.2.x为基础)
第六章 Spring Web MVC
第七章 数据访问(包含Spring Data JPA、Spring Data Elasticsearch和数据缓存)
第八章 安全控制(包含Spring Security和OAuth2)
第九章 响应式编程(包含Project Reactor、Spring WebFlux、Reactive NoSQL、R2DBC、Reactive Spring Security)
第十章 事件驱动(包含JMS、RabbitMQ、Kafka、Websocket、RSocket)
第11章 系统集成和批处理(包含Spring Integration和Spring Batch)
第12章 Spring Cloud与微服务
第13章 Kubernetes与微服务(包含Kubernetes、Helm、Jenkins、Istio)
多谢大家支持。