Spring Boot + Spring Security OAuth2示例
简介
在这篇文章中,我们将讨论使用Spring Boot + Spring Security OAuth2保护REST API的示例。我们将实现AuthorizationServer,ResourceServer和一些REST API用于不同的CRUD基本操作并使用Postman测试通过这些API。我们将使用MySQL数据库来读取用户凭据而不是内存中的身份验证。另外,为了简化我们的ORM解决方案,我们将使用spring-data-jpa和BCryptPasswordEncoder进行密码编码,以最快的速度上手。
了解OAuth
OAuth只是一种安全授权协议,用于处理第三方应用程序的授权,使第三方应用程序能够获得对Web服务的有限访问权限,以便在不泄露密码的情况下访问用户数据。(例如在许多网站上使用fackbook,twitter登录)所有工作都在此协议下。对OAuth有相关的知识了解,掌握及上手更容易。基本上涉及三方:OAuth提供商,OAuth客户和所有者。在此,OAuth提供商提供诸如Facebook,Twitter等身份验证令牌。同样,OAuth Client是希望代表所有者访问凭证的应用程序,所有者是在OAuth提供程序(如facebook和twitter)上拥有帐户的用户。
了解OAuth2
OAuth2是一种授权框架,,使应用程序能够获得对HTTP服务(如Facebook,GitHub)上的用户帐户的访问权限。它的工作原理是将用户身份验证委派给托管用户帐户的服务,并授权第三方应用程序访问用户帐户。OAuth 2为Web和桌面应用程序以及移动设备提供授权流程。
OAuth2角色
OAuth2提供4种不同的角色:
资源所有者(Resource Owner)
资源服务器(Resource Server)
授权服务器(Authorization Server)
客户端(Client)
Maven依赖(Maven Dependencies)
    <parent>
        <groupId>org.springframework.boot</groupId>
        <artifactId>spring-boot-starter-parent</artifactId>
        <version>1.5.8.RELEASE</version>
    </parent>
    <dependencies>
	    <dependency>
                   <groupId>org.springframework.boot</groupId>
                   <artifactId>spring-boot-starter-web</artifactId>
            </dependency>
	    <dependency>
                   <groupId>org.springframework.boot</groupId>
                   <artifactId>spring-boot-starter-data-jpa</artifactId>
             </dependency>
	     <dependency>
                    <groupId>org.springframework.boot</groupId>
                    <artifactId>spring-boot-starter-security</artifactId>
	      </dependency>
		  <dependency>
                   <groupId>org.springframework.boot</groupId>
                   <artifactId>spring-security-oauth2</artifactId>
             </dependency>
	     <dependency>
                    <groupId>mysql</groupId>
                    <artifactId>mysql-connector-java</artifactId>
	      </dependency>
	      <dependency>
                     <groupId>commons-dbcp</groupId>
                     <artifactId>commons-dbcp</artifactId>
		</dependency>
		<dependency>
				     <groupId>org.projectlombok</groupId>
			         <artifactId>lombok</artifactId>
		</dependency>
    </dependencies>
OAuth2授权服务器配置
这个类扩展AuthorizationServerConfigurerAdapter并负责生成特定于客户端的令牌。在这里,我们使用内存凭证,其中client_id为test-client,CLIENT_SECRET为test-secret。但您也可以自由使用JDBC实现。
@EnableAuthorizationServer:启用授权服务器.AuthorizationServerEndpointsConfigurer定义授权和令牌端点以及令牌服务。
- AuthorizationConfig.java
package com.battle.oauth;

import org.springframework.beans.factory.annotation.Autowired;
import org.springframework.context.annotation.Configuration;
import org.springframework.security.authentication.AuthenticationManager;
import org.springframework.security.oauth2.config.annotation.configurers.ClientDetailsServiceConfigurer;
import org.springframework.security.oauth2.config.annotation.web.configuration.AuthorizationServerConfigurerAdapter;
import org.springframework.security.oauth2.config.annotation.web.configuration.EnableAuthorizationServer;
import org.springframework.security.oauth2.config.annotation.web.configurers.AuthorizationServerEndpointsConfigurer;
import org.springframework.security.oauth2.config.annotation.web.configurers.AuthorizationServerSecurityConfigurer;
import org.springframework.security.oauth2.provider.token.TokenStore;

/**
 * Description: OAuth2授权服务器配置,
 *
 * @EnableAuthorizationServer; 启用授权服务器.AuthorizationServerEndpointsConfigurer定义授权和令牌端点以及令牌服务
 */

@Configuration
@EnableAuthorizationServer
public class AuthorizationConfig extends AuthorizationServerConfigurerAdapter {


    public static final String CLIEN_ID = "test-client";
    public static final String CLIENT_SECRET = "test-secret";

    public static final String GRANT_TYPE_PASSWORD = "password";
    public static final String AUTHORIZATION_CODE = "authorization_code";
    public static final String REFRESH_TOKEN = "refresh_token";
    public static final String IMPLICIT = "implicit";

    public static final String SCOPE_READ = "read";
    public static final String SCOPE_WRITE = "write";
    public static final String TRUST = "trust";

    public static final int ACCESS_TOKEN_VALIDITY_SECONDS = 1 * 60 * 60;
    public static final int FREFRESH_TOKEN_VALIDITY_SECONDS = 6 * 60 * 60;


    @Autowired
    private TokenStore tokenStore;

    @Autowired
    private AuthenticationManager authenticationManager;

    @Override
    public void configure(AuthorizationServerSecurityConfigurer security) throws Exception {
        super.configure(security);
    }

    @Override
    public void configure(ClientDetailsServiceConfigurer clients) throws Exception {
        clients.inMemory()
               .withClient(CLIEN_ID)//客户端ID
               .secret(CLIENT_SECRET)
               .authorizedGrantTypes(GRANT_TYPE_PASSWORD, AUTHORIZATION_CODE, REFRESH_TOKEN, IMPLICIT )
               .scopes(SCOPE_READ, SCOPE_WRITE, TRUST)
               .accessTokenValiditySeconds(ACCESS_TOKEN_VALIDITY_SECONDS)
               .refreshTokenValiditySeconds(FREFRESH_TOKEN_VALIDITY_SECONDS);
    }

    @Override
    public void configure(AuthorizationServerEndpointsConfigurer endpoints) throws Exception {
        endpoints.tokenStore(tokenStore)
                 .authenticationManager(authenticationManager);
    }
}
OAuth2资源服务器配置
我们上下文中的资源是我们为CRUD操作公开的REST API。要访问这些资源,必须对客户端进行身份验证。在实时方案中,每当用户尝试访问这些资源时,将要求用户提供他的真实性,一旦用户被授权,他将被允许访问这些受保护的资源。
- ResourceServerConfig.java
package com.battle.oauth;

import org.springframework.context.annotation.Configuration;
import org.springframework.security.config.annotation.web.builders.HttpSecurity;
import org.springframework.security.oauth2.config.annotation.web.configuration.EnableResourceServer;
import org.springframework.security.oauth2.config.annotation.web.configuration.ResourceServerConfigurerAdapter;
import org.springframework.security.oauth2.config.annotation.web.configurers.ResourceServerSecurityConfigurer;
import org.springframework.security.oauth2.provider.error.OAuth2AccessDeniedHandler;

/**
 * Description: Oauth2资源服务器,
 * @EnableResourceServer: Enables a resource server
 */
@Configuration
@EnableResourceServer
public class ResourceServerConfig extends ResourceServerConfigurerAdapter {

    private static final String RESOURCE_ID = "resource_id";

    @Override
    public void configure(ResourceServerSecurityConfigurer resources) throws Exception {
        resources.resourceId(RESOURCE_ID)
                 .stateless(false);
    }

    @Override
    public void configure(HttpSecurity http) throws Exception {
        http.anonymous().disable()
            .authorizeRequests().antMatchers("/users/**").access("hasRole('ADMIN')")
            .and().exceptionHandling().accessDeniedHandler(new OAuth2AccessDeniedHandler());
    }
}
安全配置
这个类扩展了WebSecurityConfigurerAdapter并提供了常用的spring安全配置。这里,我们使用bcrypt编码器来编码我们的密码。您可以尝试使用此在线Bcrypt工具来编码和匹配bcrypt密码。以下配置基本上是引导授权服务器和资源服务器。
- @EnableWebSecurity:启用Spring安全Web安全支持。
在这里,我们使用in-memory-tokenstore但你可以自由使用JdbcTokenStore或JwtTokenStore.Here
- SecurityConfig.java
package com.battle.oauth;

import org.springframework.beans.factory.annotation.Autowired;
import org.springframework.boot.web.servlet.FilterRegistrationBean;
import org.springframework.context.annotation.Bean;
import org.springframework.context.annotation.Configuration;
import org.springframework.core.annotation.Order;
import org.springframework.security.authentication.AuthenticationManager;
import org.springframework.security.config.annotation.authentication.builders.AuthenticationManagerBuilder;
import org.springframework.security.config.annotation.method.configuration.EnableGlobalMethodSecurity;
import org.springframework.security.config.annotation.web.builders.HttpSecurity;
import org.springframework.security.config.annotation.web.builders.WebSecurity;
import org.springframework.security.config.annotation.web.configuration.EnableWebSecurity;
import org.springframework.security.config.annotation.web.configuration.WebSecurityConfigurerAdapter;
import org.springframework.security.core.userdetails.UserDetailsService;
import org.springframework.security.crypto.bcrypt.BCryptPasswordEncoder;
import org.springframework.security.oauth2.provider.token.TokenStore;
import org.springframework.security.oauth2.provider.token.store.InMemoryTokenStore;
import org.springframework.web.cors.CorsConfiguration;
import org.springframework.web.cors.UrlBasedCorsConfigurationSource;
import org.springframework.web.filter.CorsFilter;

/**
 * Description:
 * @EnableWebSecurity: 启用Spring安全Web安全支持。
 * @EnableGlobalMethodSecurity: 支持具有方法级访问控制,例如@PreAuthorize @PostAuthorize
 */
@Configuration
@EnableWebSecurity
@EnableGlobalMethodSecurity(prePostEnabled = true)
public class SecurityConfig extends WebSecurityConfigurerAdapter {

    @Autowired
    public UserDetailsService userDetailsService;

    @Override
    public void configure(WebSecurity web) throws Exception {
        super.configure(web);
    }

    @Override
    protected AuthenticationManager authenticationManager() throws Exception {
        return super.authenticationManager();
    }

    @Override
    protected void configure(AuthenticationManagerBuilder auth) throws Exception {
        auth.userDetailsService(userDetailsService)
            .passwordEncoder(encoder());
    }

    @Bean
    public BCryptPasswordEncoder encoder(){
        return new BCryptPasswordEncoder();
    }

    @Bean
    public TokenStore tokenStore(){
        return new InMemoryTokenStore();
    }

    @Override
    protected void configure(HttpSecurity http) throws Exception {
        http.anonymous().disable();
    }

    @Bean
    @Order(0)
    public FilterRegistrationBean filterRegistrationBean(){
        UrlBasedCorsConfigurationSource source = new UrlBasedCorsConfigurationSource();
        CorsConfiguration config = new CorsConfiguration();
        config.setAllowCredentials(true);
        config.addAllowedOrigin("*");
        config.addAllowedHeader("*");
        config.addAllowedMethod("*");
        source.registerCorsConfiguration("/**", config);
        return new FilterRegistrationBean(new CorsFilter(source));
    }
}
Rest APIs
下面是为我们测试而公开的REST APIs
- UserController.java
package com.battle.controller;

import com.battle.domain.User;
import com.battle.service.UserService;
import org.springframework.beans.factory.annotation.Autowired;
import org.springframework.web.bind.annotation.*;

import java.util.List;

/**
 - Description:Rest APIs
 */
@RestController
@RequestMapping("/users")
public class UserController {

    @Autowired
    private UserService userService;

    @RequestMapping(value = "/user", method = RequestMethod.GET)
    public List<User> listUser() {
        return userService.findAll();
    }

    @RequestMapping(value = "/user", method = RequestMethod.POST)
    public User create(@RequestBody User user) {
        return userService.save(user);
    }

    @RequestMapping(value = "/user/{id}", method = RequestMethod.DELETE)
    public String delete(@PathVariable(value = "id") Long id) {
        userService.delete(id);
        return "success";
    }
}
扩展实现UserDetailService接口
让我们定义负责从数据库中获取用户详细信息的Userservice。以下是spring将用于验证用户的实现。
- UserServiceImpl.java
package com.battle.service.impl;

import com.battle.dao.UserDao;
import com.battle.domain.User;
import com.battle.service.UserService;
import org.springframework.beans.factory.annotation.Autowired;
import org.springframework.security.core.authority.SimpleGrantedAuthority;
import org.springframework.security.core.userdetails.UserDetails;
import org.springframework.security.core.userdetails.UserDetailsService;
import org.springframework.security.core.userdetails.UsernameNotFoundException;
import org.springframework.stereotype.Service;

import java.util.ArrayList;
import java.util.Arrays;
import java.util.List;

/**
 * Description: custom user service implement class
 * Created by William.Cheung on 2018/10/22.
 */
@Service
public class UserServiceImpl implements UserDetailsService,UserService {

    @Autowired
    private UserDao userDao;

	@Override
    public UserDetails loadUserByUsername(String username) throws UsernameNotFoundException {
        User user = userDao.findByUsername(username);
        if (user == null) {
            throw new UsernameNotFoundException("Invalid username or password.");
        }
        return new org.springframework.security.core.userdetails.User(user.getUsername(), user.getPassword(), getAuthority());
    }
    private List<SimpleGrantedAuthority> getAuthority() {
        return Arrays.asList(new SimpleGrantedAuthority("ROLE_ADMIN"));
    }
    public List<User> findAll() {
        List<User> list = new ArrayList<>();
        userDao.findAll().iterator().forEachRemaining(list::add);
        return list;
    }

    @Override
    public void delete(long id) {
        userDao.delete(id);
    }

    @Override
    public User save(User user) {
        return userDao.save(user);
    }
}
SQL脚本执行
启动程序操作之前先建库,插入如下数据
INSERT INTO用户(id,用户名,密码,工资,年龄)VALUES(1,'Adam','$ 2a $ 04 $ I9Q2sDc4QGGg5WNTLmsz0.fvGv3OjoZyj81PrSFyGOqMphqfS2qKu',4234,45);
测试应用程序
我们将使用postman来测试OAuth2的实现。
生成AuthToken:在标题中,我们将用户名和密码分别作为admin和密码作为授权标头。根据Oauth2规范,访问令牌请求应该使用application/x-www-form-urlencoded.以下是设置。
- TokenEndpoint:用来作为请求者获得令牌(Token)的服务,默认的URL是/oauth/token.
- AuthorizationEndpoint:用来作为请求者获得授权的服务,默认的URL是/oauth/authorize.
如下图操作流程:
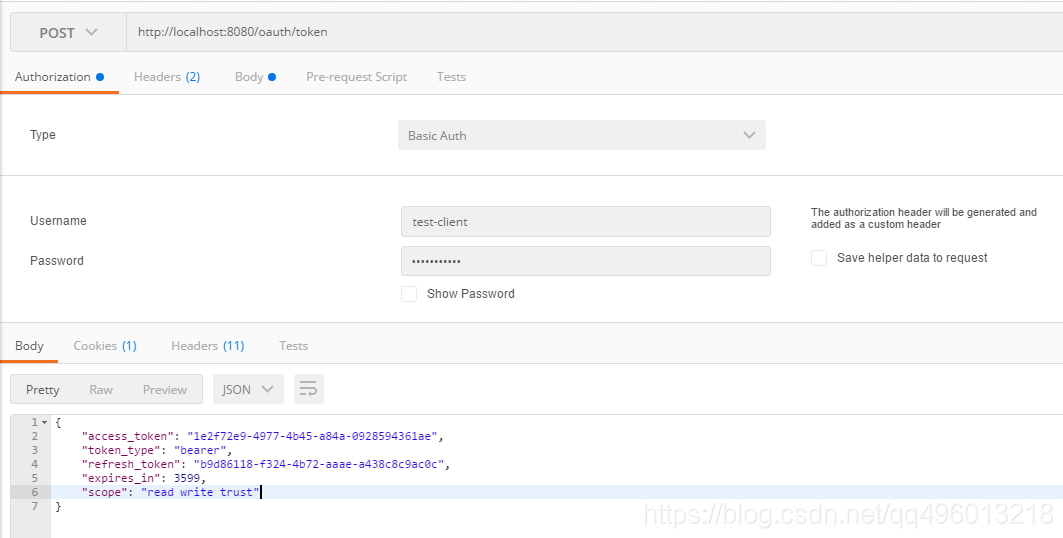
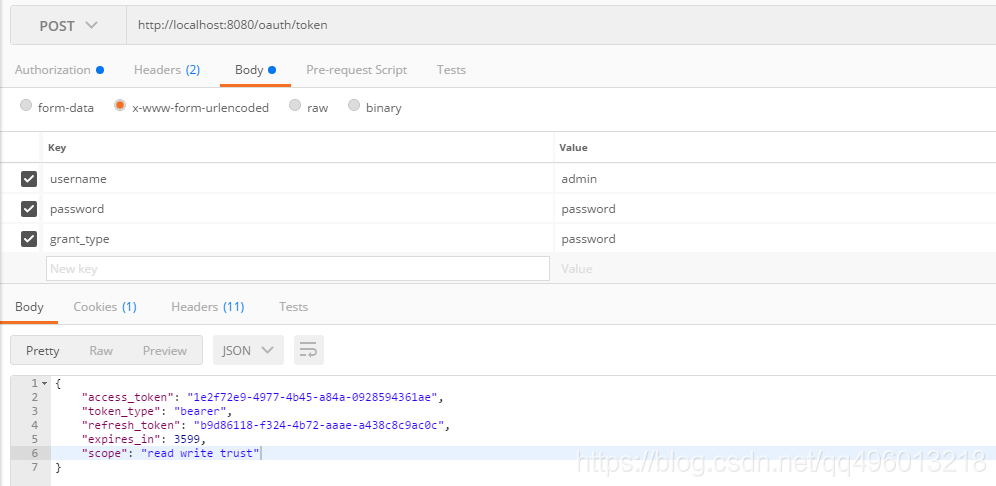
- 如上图是成功获取到访问的token,如下图我们去访问开放的REST APIs看给我们返回什么信息。

- 以上访问user接口返回信息是:未授权,未在上下文找到授权对象信息。
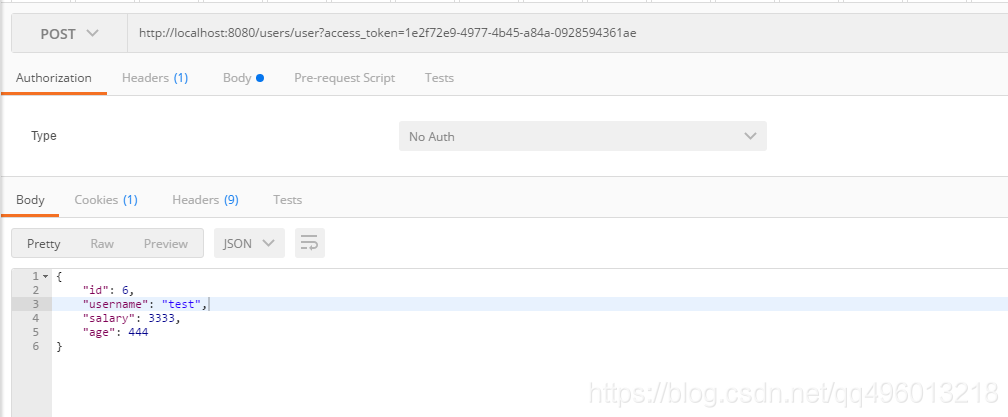
- 以下是成功访问REST API返回的接口集
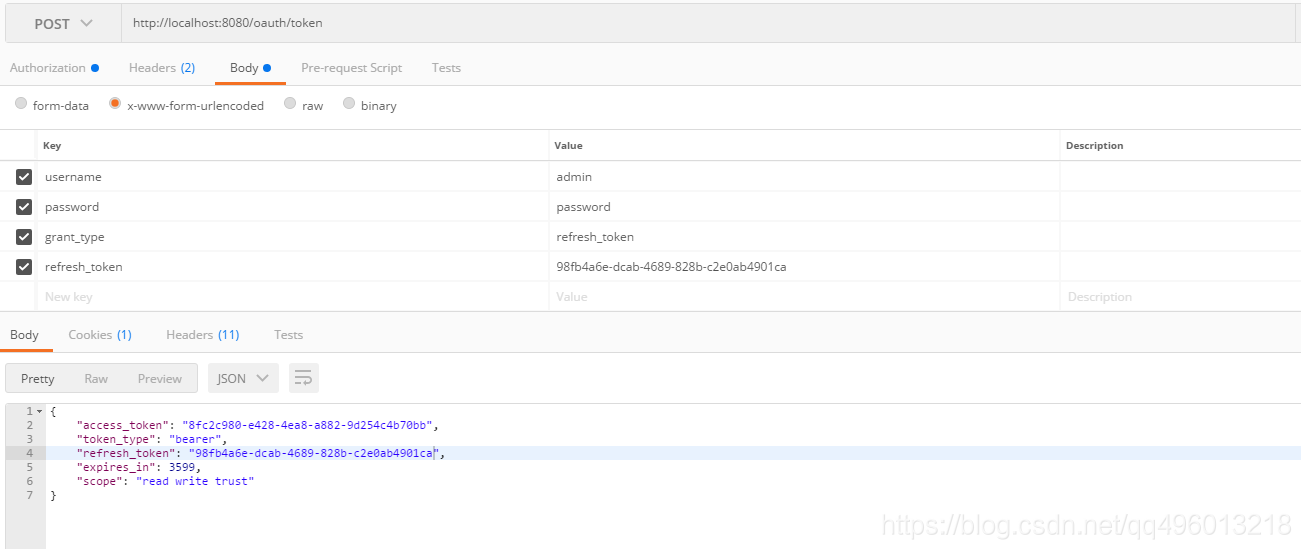
- 由于每一个token的有效期比较短,我们需要通过Refresh_token重新获取新的token。如下图:
Spring boot 2.0x
更多信息请查阅:https://oauth.net/2/