OAuth 2.0是安全授权的工业标准协议,我们了解它需要理解下面的专用术语:
-
交互参与方:
- Client:需要访问
Resource Sever受保护资源的应用; - Resource Owner :终端用户,Client通过终端用户进行不同类型的授权(
Grant Type); - Authorization Server:提供访问授权的应用,
Client使用某种Grant Type向Authorization Server获取Access Token; - Resource Sever:包含受保护资源的应用,
Client使用Access Token访问Resource Server的受保护资源;
- Client:需要访问
-
授权类型 - Grant Type
- Authorization Code:让用户访问Client页面时,页面打向Authorization Server的登录页面,登录后显示授权访问页面,授权成功后Client即可获得Access Token访问Resource Server
- Password:通过提供提供用户名和密码获得Access Token,一般是给应用服务的客户端使用(IOS、Android、Web App)。
- Client Credentials:Client通过Client Id和Client Secret直接向Authorization Server请求Access Token;它主要用于非用户参与的应用,如后台服务。
-
Token
- Access Token:用来访问受保护资源的唯一令牌;
- Refresh Token:当Access Token失效时,我们可以使用Refresh Token来获取一个新的Access Token,它的时效性要远远大于Access Token
- JWT:JSON Web Token,它代表双方之间安全传输的信息;它使用数字签名,传输的信息可以被验证和信任。
3.2 OAuth 2.0 Resource Server
新建应用,信息如下:
Group:top.wisely
Artifact:resource-server
Dependencies:Spring Security、OAuth2 Resource Server、Spring Web Starter、Lombok
build.gradle文件中的依赖如下:
dependencies {
	implementation 'org.springframework.boot:spring-boot-starter-oauth2-resource-server'
	implementation 'org.springframework.boot:spring-boot-starter-security'
	implementation 'org.springframework.boot:spring-boot-starter-web'
	compileOnly 'org.projectlombok:lombok'
	annotationProcessor 'org.projectlombok:lombok'
  //...
}
3.2.1 Spring Boot的自动配置
Spring Boot使用OAuth2ResourceServerJwtConfigurationResource Server做了自动配置,它使用OAuth2ResourceServerProperties通过spring.security.oauth2.resourceserver.*进行配置。OAuth2ResourceServerJwtConfiguration导入了两个配置:
-
OAuth2ResourceServerJwtConfiguration:配置JWT Token解码的JwtDecoder。- 使用Authorization Server的 JWK Set URI端点进行解码,使用
spring.security.oauth2.resourceserver.jwt.jwk-set-uri配置; - 使用Authorization Server的keyStore的公钥进行解码,使用
spring.security.oauth2.resourceserver.jwt.public-key-location配置;
- 使用Authorization Server的 JWK Set URI端点进行解码,使用
-
OAuth2ResourceServerWebSecurityConfiguration:常规的Spring Security配置,使用HttpSecurity配置Resource Server和JWT:@Configuration(proxyBeanMethods = false) @ConditionalOnBean(JwtDecoder.class) static class OAuth2WebSecurityConfigurerAdapter extends WebSecurityConfigurerAdapter { @Override protected void configure(HttpSecurity http) throws Exception { http.authorizeRequests().anyRequest().authenticated().and() .oauth2ResourceServer().jwt(); } }
3.2.1 方式1:JWK Set路径配置
我们可以通过在Resource Server中设置JWK Set路径解码JWT Token。
3.2.1.1 Authorization Server的修改
我们对JWT的操作依赖于nimbus包,需添加依赖:
implementation 'com.nimbusds:nimbus-jose-jwt:7.0.1'
Resource Server端已通过spring-boot-starter-oauth2-resource-server自动依赖。
使用JWK Set URI需Authorization Server提供支持,我们需要在Authorization Server上添加端点:
@FrameworkEndpoint //1
public class JwkSetEndpoint {

    KeyPair keyPair; //2

    public JwkSetEndpoint(KeyPair keyPair) {
        this.keyPair = keyPair;
    }

    @GetMapping("/.well-known/jwks.json") //3
    @ResponseBody
    public Map<String, Object> getKey(Principal principal) {
        RSAPublicKey publicKey = (RSAPublicKey) this.keyPair.getPublic(); //4
        RSAKey key = new RSAKey.Builder(publicKey).build();
        return new JWKSet(key).toJSONObject(); //5
    }
}
-
@FrameworkEndpoint和@Controller相同功能,只用于框架提供的端点; -
注入密钥对
KeyPair;@Bean //通过读取key store的配置构造 public KeyPair keyPair(AuthorizationServerProperties properties, ApplicationContext context){ Resource keyStore = context .getResource(properties.getJwt().getKeyStore()); char[] keyStorePassword = properties.getJwt().getKeyStorePassword() .toCharArray(); KeyStoreKeyFactory keyStoreKeyFactory = new KeyStoreKeyFactory(keyStore, keyStorePassword); String keyAlias = properties.getJwt().getKeyAlias(); char[] keyPassword = Optional .ofNullable(properties.getJwt().getKeyPassword()) .map(String::toCharArray).orElse(keyStorePassword); return keyStoreKeyFactory.getKeyPair(keyAlias, keyPassword); } -
构造端点地址为:
/.well-known/jwks.json -
返回JWK set的JSON对象。
我们还需要将/.well-known/jwks.json配置为允许任意访问:
@Configuration
public class WebSecurityConfig extends WebSecurityConfigurerAdapter {
		//...
    @Override
    protected void configure(HttpSecurity http) throws Exception {
        http.authorizeRequests()
                .mvcMatchers("/.well-known/jwks.json").permitAll()
                .anyRequest().authenticated();
    }
   //...
}
3.2.1.2 Resource Server配置
Resource Server的配置很简单,只需:
spring:
  security:
    oauth2:
      resourceserver:
        jwt:
          jwk-set-uri: http://localhost:8080/.well-known/jwks.json
server:
  port: 8082
3.2.2 方式2:公钥配置
我们还可以在Resource Server中配置keyStore的公钥来解码JWT Token。
我们可以借助keytool和openssl输出公钥,命令如下:
$ keytool -list -rfc --keystore keystore.jks | openssl x509 -inform pem -pubkey -noout
-----BEGIN PUBLIC KEY-----
MIIBIjANBgkqhkiG9w0BAQEFAAOCAQ8AMIIBCgKCAQEAk2EdRm6/9VA/nMDt9XCh
96dTOv3wmZyh4LgG5pccsLgd5ZCSm5oENz+X6/m3yN7e+QMuP+2zSG/kdEH9vqGK
xKRd0/DV54s77OzRG+KHxxfmB10i36GNprfHN50pcyXoAbeIbztVIFWPIBedZrpZ
S8aufnK9PLOgH6C8cEoPf6Y/t2+Vxn/kjjMRU4oj0gl7j6tFTT79/g8qp0R5eBiJ
2KT/sdqMhRC0u5+i0ijcQycX52L+mfv4iyCyu7Z0g9bpQQDv069iPC9URyPuKyY0
HSlXUT/lXJ4o7wEYu7wrcmnkNk+4ot9uDvBUl2cdZ8BFlVyuNxJwYmRFyx2zgnAT
VwIDAQAB
-----END PUBLIC KEY-----
我们还可以通过KeyPair来获取,上例中的Authorization Server中,我们可以通过:
@Bean
CommandLineRunner publicKey(KeyPair keyPair){
   return args -> {
      System.out.println(Base64.encodeBase64String(keyPair.getPublic().getEncoded()));
   };
}

我们将内容复制到src/main/resources/public.txt中。
我们可以通过application.yml指定公钥:
spring:
  security:
    oauth2:
      resourceserver:
        jwt:
          public-key-location: classpath:public.txt
server:
  port: 8082
3.2.3 Resource Server获取权限
Spring Boot已经为我们做好了所有的配置,到此为止Resource Server的配置已完成。默认情况下权限是从Client的Scope中获取的,而我们的权限存在于authorities中,我们需要替代OAuth2ResourceServerWebSecurityConfiguration的配置。
@EnableGlobalMethodSecurity(prePostEnabled = true) //1
@EnableWebSecurity
public class WebSecurityConfig extends WebSecurityConfigurerAdapter {
    @Override
    protected void configure(HttpSecurity http) throws Exception {
        http.authorizeRequests()
                .anyRequest().authenticated()
                .and()
                .oauth2ResourceServer().jwt().jwtAuthenticationConverter(jwt -> { //2
                    Collection<SimpleGrantedAuthority> authorities =
                            ((Collection<String>) jwt.getClaims()
                                    .get("authorities")).stream() //3
                                                        .map(SimpleGrantedAuthority::new)
                                                        .collect(Collectors.toSet());
            return new JwtAuthenticationToken(jwt, authorities);
        });
    }

}
- 弃用方法安全;
- 通过自定义
Converter来指定权限,Converter是函数接口,当前上下问参数为JWT对象; - 获取JWT中的
authorities;
3.2.3 测试控制器
我们借用上一届定义的控制器的权限声明:
@RestController
public class SecurityController {

    @GetMapping("/userCan1")
    @PreAuthorize("hasAuthority('userCan1')")
    public Jwt userCan1(@AuthenticationPrincipal Jwt jwt){ //获得用户信息
        return jwt;
    }

    @GetMapping("/userCan2")
    @PreAuthorize("hasAuthority('userCan2')")
    public Jwt userCan2(@AuthenticationPrincipal Jwt jwt){
        return jwt;
    }

    @GetMapping("/adminCan1")
    @PreAuthorize("hasAuthority('adminCan1')")
    public Jwt adminCan1(@AuthenticationPrincipal Jwt jwt){
        return jwt;
    }

    @GetMapping("/adminCan2")
    @PreAuthorize("hasAuthority('adminCan2')")
    public Jwt adminCan2(@AuthenticationPrincipal Jwt jwt){
        return jwt;
    }

}
3.2.4 验证
分别用wyf与admin用户请求Token:
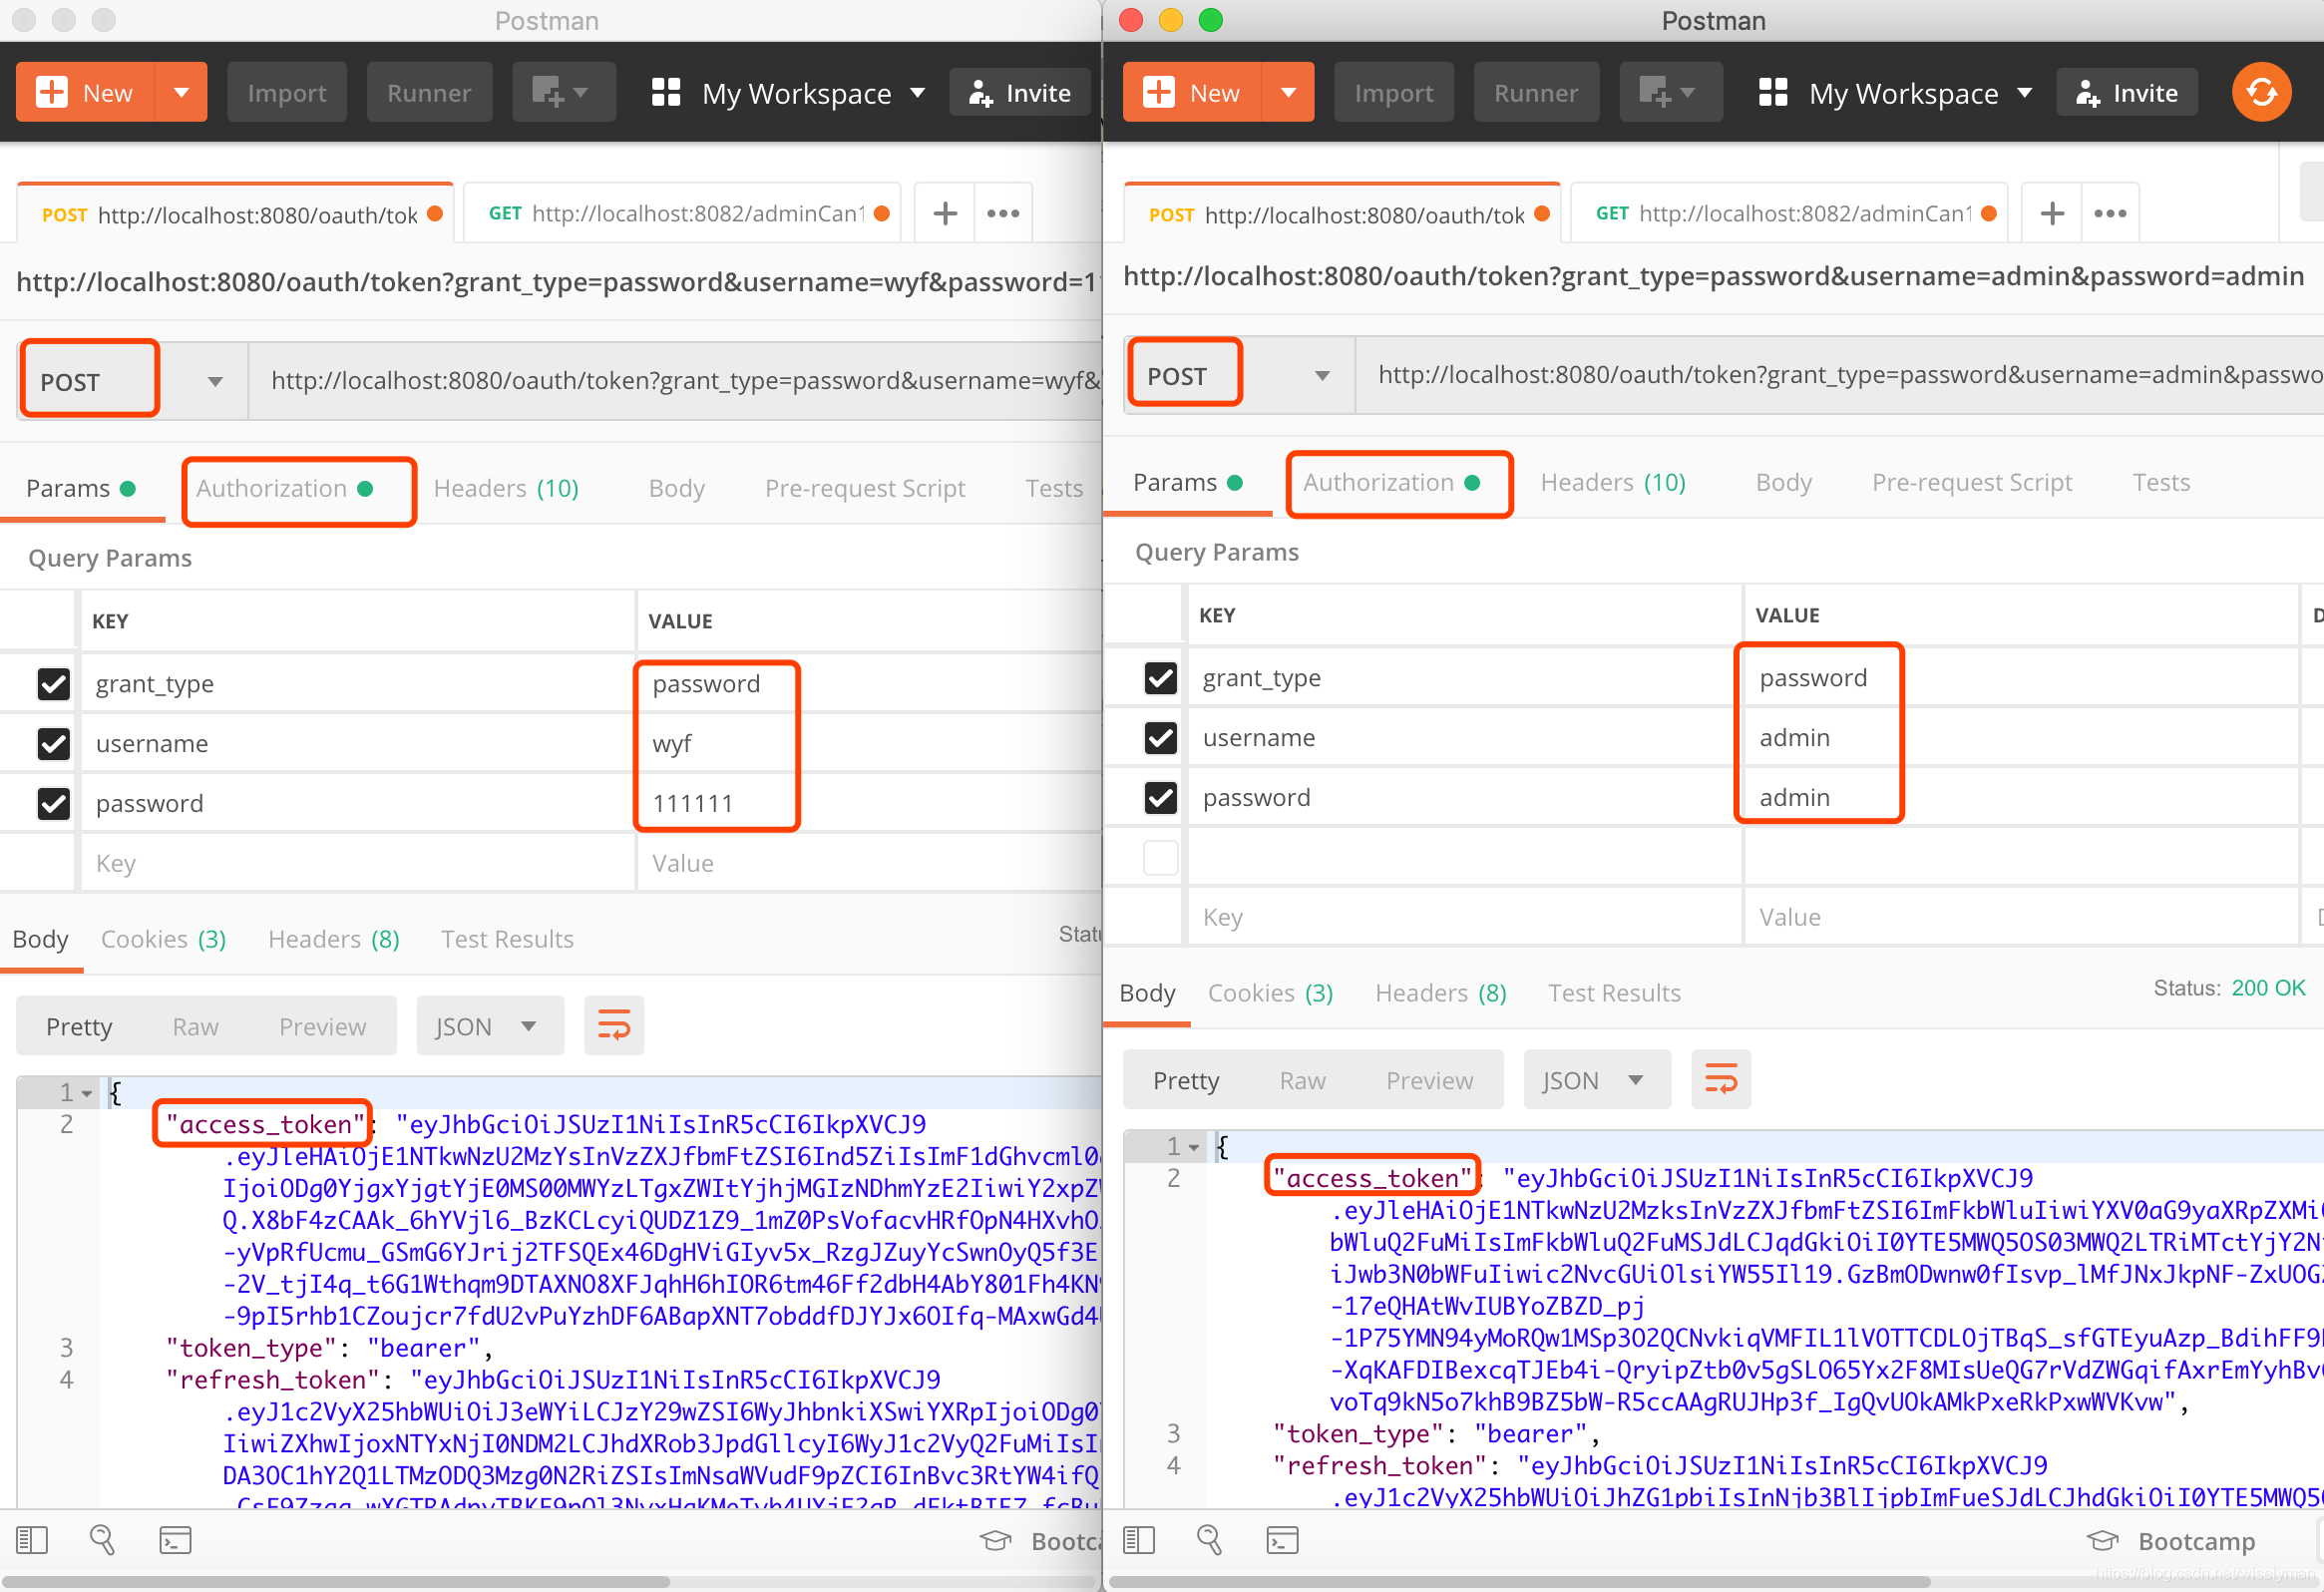
Resource Server的认证请求是通过BearerTokenAuthenticationFilter来传递的;我们需要使用Bearer Token构造头部数据来传递Token,格式为:Authorization:Bearer Token,Postman支持直接使用Bearer Token。
分别复制wyf和admin的access_token请求http://localhost:8082/adminCan1,这个地址只有admin用户才可以访问。我们wyf用户使用Postman的Bearer Token,admin用户手动构造头部信息。

新书推荐:
我的新书《从企业级开发到云原生微服务:Spring Boot 实战》已出版,内容涵盖了丰富Spring Boot开发的相关知识
购买地址:https://item.jd.com/12760084.html
主要包含目录有:
第一章 初识Spring Boot(快速领略Spring Boot的美丽)
第二章 开发必备工具(对常用开发工具进行介绍:包含IntelliJ IDEA、Gradle、Lombok、Docker等)
第三章 函数式编程
第四章 Spring 5.x基础(以Spring 5.2.x为基础)
第五章 深入Spring Boot(以Spring Boot 2.2.x为基础)
第六章 Spring Web MVC
第七章 数据访问(包含Spring Data JPA、Spring Data Elasticsearch和数据缓存)
第八章 安全控制(包含Spring Security和OAuth2)
第九章 响应式编程(包含Project Reactor、Spring WebFlux、Reactive NoSQL、R2DBC、Reactive Spring Security)
第十章 事件驱动(包含JMS、RabbitMQ、Kafka、Websocket、RSocket)
第11章 系统集成和批处理(包含Spring Integration和Spring Batch)
第12章 Spring Cloud与微服务
第13章 Kubernetes与微服务(包含Kubernetes、Helm、Jenkins、Istio)
多谢大家支持。