Cobbler自动安装linux
一、cobbler简介
cobbler官网
网络安装服务器套件 Cobbler(补鞋匠),可以看作是一个更多功能的pxe,它实现系统安装和pxe也差不多,需要的文件和过程大致都一样。
cobbler能自动管理dns/tftp/dhcp/rsync这四个服务。基本的系统安装,cobbler只需生成一个distro和一个profile即可。
distro相当于一个镜像,它提供安装系统过程中所需的一切文件,如vmlinuz,initrd以及rpm包等。
profile的作用是为了自动修改pxelinux.cfg/default文件,每生成或修改一次profile,都会在default文件中修改或追加对应的label。
除了distro/profile之外,cobbler还管理system/images/repositories等,但是用的很少。
二、 cobbler安装
2.1 cobbler配置目录
/ec/cobbler
/etc/cobbler/settings : cobbler 主配置文件
/etc/cobbler/iso/: iso模板配置文件
/etc/cobbler/pxe: pxe模板文件
/etc/cobbler/power: 电源配置文件
/etc/cobbler/user.conf: web服务授权配置文件
/etc/cobbler/users.digest: web访问的用户名密码配置文件
/etc/cobbler/dhcp.template : dhcp服务器的的配置末班
/etc/cobbler/dnsmasq.template : dns服务器的配置模板
/etc/cobbler/tftpd.template : tftp服务的配置模板
/etc/cobbler/modules.conf : 模块的配置文件
数据目录:
/var/lib/cobbler/config/: 用于存放distros,system,profiles 等信 息配置文件
/var/lib/cobbler/triggers/: 用于存放用户定义的cobbler命令
/var/lib/cobbler/kickstart/: 默认存放kickstart文件
/var/lib/cobbler/loaders/: 存放各种引导程序 镜像目录
/var/www/cobbler/ks_mirror/: 导入的发行版系统的所有数据
/var/www/cobbler/images/ : 导入发行版的kernel和initrd镜像用于 远程网络启动
/var/www/cobbler/repo_mirror/: yum 仓库存储目录
日志目录:
/var/log/cobbler/installing: 客户端安装日志
/var/log/cobbler/cobbler.log : cobbler日志
2.2 配置yum源
 wget -O /etc/yum.repos.d/epel.repo http://mirrors.aliyun.com/repo/epel-6.repo #使用阿里云
yum clean all
yum makecache
2.3 安装cobbler
2.3.1准备环境软件
准备环境软件httpd、dhcp、xinetd、rsync、pykickstart、cobbler和cobbler-web
yum install -y httpd tftp dhcp cobbler cobbler-web pykickstart xinetd
这里出现一个报错

缺少依赖包:Djange,Djange依赖包是python-simplejson,所以
yum install -y python-simplejson #下载依赖包
wget https://kojipkgs.fedoraproject.org//packages/Django14/1.4.14/1.el6/noarch/Django14-1.4.14-1.el6.noarch.rpm #下载Djange源到当前目录
 rpm -ivh Django14-1.4.14-1.el6.noarch.rpm #安装Django包
以上操作之后再次
yum install -y httpd tftp dhcp cobbler cobbler-web pykickstart xinetd
出现“complete”提示,成功安装以上软件。
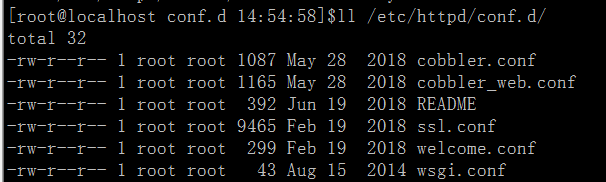
安装成功后在 /etc/httpd/conf.d目录下出现cobbler的配置文件,如下图中cobbler.conf、cobbler_web.conf
2.3.2启动相关服务
启动apache
/etc/init.d/httpd start
出现错误:
httpd: Could not reliably determine the server's fully qualified domain name, using 127.0.0.1 for ServerName
 解决办法:
vim /etc/httpd/conf/httpd.conf
在#ServerName www.example.com:80加上
 ServerName localhost:80
查看开启服务
lsof -i:80
启动cobbler

/etc/init.d/cobblerd start
检查cobbler启动状
/etc/init.d/cobblerd status
检查cobbler配置
cobbler check
出现错误提示:xmlrpclib.Fault: <Fault 1: “<class ‘cobbler.cexceptions.CX’>:‘login failed’”> ,解决办法需要重启cobbler,并执行cobbler get-loaders.
     service cobblerd restart
     cobbler get-loaders
然后执行cobbler check出现如下提示
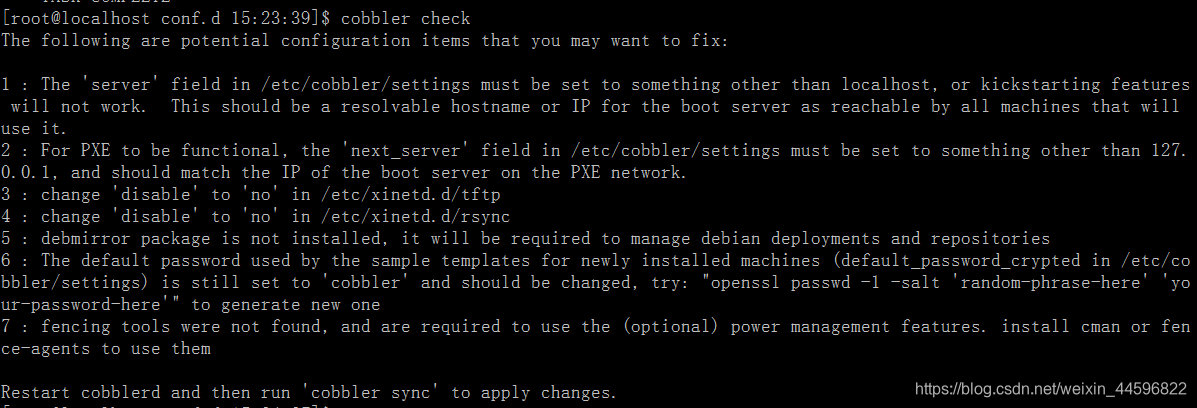
根据上图完成cobbler安装剩下步骤
-
关闭防火墙和selinux
/etc/init.d/iptables stop chkconfig iptables off #关闭防火墙 sestatus #查看seLinux状态 vim /etc/selinux/config #更改配置文件将SELINUX=enforcing 改为SELINUX=disabled reboot 重启 -
修改 /etc/cobbler/settings
sed -i "s/next_server: 127.0.0.1/next_server: 192.168.31.170/g" /etc/cobbler/settings #next_server参数的值为提供PXE服务的主机相应的IP地址 sed -i "s/server: 127.0.0.1/server: 192.168.31.170/g" /etc/cobbler/settings #server参数的值为提供cobbler服务的主机相应的IP地址或主机名 -
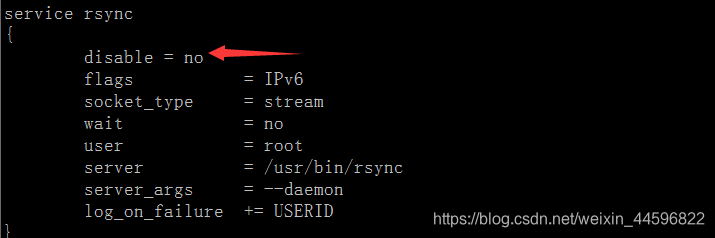
修改/etc/xinetd.d/rsync和/etc/xinetd.d/tftp配置文件
vim /etc/xinetd.d/rsync
vim etc/xinetd.d/tftp
-
生成新装机器登录密码
openssl passwd -1 -salt 'cobbler' '123123'

将生成的密码替换/etc/cobbler/settings下原来的 default_password_crypted:
-
下载 cman 和fence-agents(和电源管理有关虚拟机不用下载)
yum -y install cman fence-agents -
重启和检查cobbler配置
/etc/init.d/cobblerd restart
cobbler check
2.3.3 配置dhcp和tftp
如果在/etc/cobbler/settings中设置了manage_dhcp:1,表示由cobbler管理dhcp(默认为0即人为手动管理),则cobbler管理的dhcp的配置模板/etc/cobbler/dhcp.template会覆盖/etc/dhcp/dhcpd.conf中配置,所以应该修改模板文件dhcp.template。
	  vim /etc/cobbler/settings # 将manage_dhcp:0改为manage_dhcp:1

	  vim /etc/cobbler/dhcp.template# 修改dhcp的配置模板文件,自动生成DHCP配置文件

 option pxe-system-type code 93 = unsigned integer 16;

subnet 192.168.31.0 netmask 255.255.255.0 #修改子网
 {
 option routers             192.168.31.1;# 修改网关
 option domain-name-servers 192.168.31.1;#修改dns
 option subnet-mask         255.255.255.0;
 range dynamic-bootp        192.168.31.100 192.168.31.254;#子网范围
 default-lease-time         21600;
 max-lease-time             43200;
 next-server                $next_server;  #在/etc/cobbler/settings中设置的next_server
 class "pxeclients" {
      match if substring (option vendor-class-identifier, 0, 9) = "PXEClient";
      if option pxe-system-type = 00:02 {
              filename "ia64/elilo.efi";
      } else if option pxe-system-type = 00:06 {
              filename "grub/grub-x86.efi";
      } else if option pxe-system-type = 00:07 {
              filename "grub/grub-x86_64.efi";
重启cobbler配置生效
  		 /etc/init.d/cobblerd restart
  		 cobbler sync #自动生成DHCP配置文件,并重启DHCP
   cleaning link caches
running post-sync triggers
running python triggers from /var/lib/cobbler/triggers/sync/post/*
running python trigger cobbler.modules.sync_post_restart_services
running: dhcpd -t -q
received on stdout:
received on stderr:
running: service dhcpd restart #重启DHCP服务
received on stdout: Starting dhcpd: [  OK  ]
观察DHCP配置文件变化
cat /etc/dhcp/dhcpd.conf
#Cobbler managed dhcpd.conf file (cobbler管理的)
#generated from cobbler dhcp.conf template (Mon May 27 15:53:56 2019)
#Do NOT make changes to /etc/dhcpd.conf. Instead, make your changes
#in /etc/cobbler/dhcp.template, as /etc/dhcpd.conf will be
#overwritten.
关于tftp,在/etc/cobbler/settings中默认启用了由cobbler管理tftp,所以此处无需配置它。只要知道它的根目录为/var/lib/tftpboot即可。但是如果后面装系统的时候如果找不到tftp(应该是cobbler管理tftp的bug),则手动启动tftp即可。
三、cobbler从本地光盘安装系统
3.1生成distro
生成distro的方法有多种,可以从本地镜像导入生成,也可以根据网络上的资源生成。显然,从本地生成的效率是最好的。
从本地导入的过程实际上是将系统镜像中的文件复制到/var/www/cobbler/目录(默认)下。
mount /dev/cdrom /mnt/
cobbler import --name=CentOS6.6  --path=/mnt/ --arch=x86_64
cobbler import --name=CentOS7  --path=/mnt/ --arch=x86_64#虚拟机下挂载centos7的ISO文件
导入完成后,就会把镜像复制到/var/www/cobbler/ks_mirror目录下,自动做好yum源
与PXE不同,Cobbler可以自动帮助我们生成系统安装的yum 源,而不需要我们自己去制作,我们只要指定光盘路径就好了。
#执行下面的命令可以看到,这里已经成功的制作了两个系统yum源。
cobbler distro list
结果:
CentOS6.6-x86_64
CentOS7-x86_64
3.2修改启动菜单
生成的启动菜单位置/var/lib/tftpboot/pxelinux.cfg/default
#cat /var/lib/tftpboot/pxelinux.cfg/default
DEFAULT menu
PROMPT 0
MENU TITLE Cobbler | http://cobbler.github.io  #可以修改为自己的标签。
TIMEOUT 200
TOTALTIMEOUT 6000
ONTIMEOUT local

LABEL local
        MENU LABEL (local)
        MENU DEFAULT
        LOCALBOOT -1

LABEL CentOS6.6-x86_64
        kernel /images/CentOS6.6-x86_64/vmlinuz
        MENU LABEL CentOS6.6-x86_64
        append initrd=/images/CentOS6.6-x86_64/initrd.img ksdevice=bootif lang=  kssendmac text  ks=http://192.168.31.176/cblr/svc/op/ks/profile/CentOS6.6-x86_64
        ipappend 2

LABEL CentOS7-x86_64
        kernel /images/CentOS7-x86_64/vmlinuz
        MENU LABEL CentOS7-x86_64
        append initrd=/images/CentOS7-x86_64/initrd.img ksdevice=bootif lang=  kssendmac text  ks=http://192.168.31.176/cblr/svc/op/ks/profile/CentOS7-x86_64
        ipappend 2
四、提供kickstart文件
以下是CentOS6的Kickstart内容:
# kickstart template for Fedora 8 and later.
# (includes %end blocks)
# do not use with earlier distros
#platform=x86, AMD64, or Intel EM64T
# System authorization information
auth  --useshadow  --enablemd5
# System bootloader configuration
bootloader --location=mbr
# Partition clearing information
clearpart --all --initlabel
#Partition information
part /boot --fstype ext4 --size 5600 --ondisk sda
part swap --size=3000
part / --fstype ext4 --size 1 --grow --ondisk sda
part /var --fstype=ext4  --size=6000  --ondisk sda

# Use text mode install
text
# Firewall configuration
firewall --disable
# Run the Setup Agent on first boot
firstboot --disable
# System keyboard
keyboard us
# System language
lang en_US
# Use network installation
url --url=$tree
# If any cobbler repo definitions were referenced in the kickstart profile, include them here.
$yum_repo_stanza
# Network information
$SNIPPET('network_config')
#network --bootproto=dhcp   --device=em1
# Reboot after installation
reboot

#Root password
rootpw --iscrypted $default_password_crypted
# SELinux configuration
selinux --disabled
# Do not configure the X Window System
skipx
# System timezone
timezone   Asia/Shanghai
# Install OS instead of upgrade
install
# Clear the Master Boot Record
zerombr

%packages
@base
@compat-libraries
@debugging
@development
tree
nmap
sysstat
lrzsz
dos2unix
telnet

%pre
$SNIPPET('log_ks_pre')
$SNIPPET('kickstart_start')
$SNIPPET('pre_install_network_config')
# Enable installation monitoring
$SNIPPET('pre_anamon')

%post

%end
以下是cenos7的kickstart配置文件:
#version=DEVEL
# System authorization information
auth --enableshadow --passalgo=sha512
# Install OS instead of upgrade
install
# Use network installation
url --url=$tree
# Use text mode install
text
# Firewall configuration
firewall --disabled
firstboot --disable
# ignoredisk --only-use=sda   # 此项是CentOS7默认的项,但cobbler编译ks文件时不支持此语法,所以必须将此项注释掉
# Keyboard layouts
# old format: keyboard us
# new format:
keyboard --vckeymap=us --xlayouts='us'
# System language
lang en_US.UTF-8

# Network information
#network  --onboot=yes --bootproto=dhcp --device=eth0 --noipv6
$SNIPPET('network_config')
# Reboot after installation
reboot
# Root password
rootpw --iscrypted $default_password_crypted
# SELinux configuration
selinux --disabled
# Do not configure the X Window System
skipx
# System timezone
timezone Asia/Shanghai
# System bootloader configuration
bootloader --append="quiet crashkernel=auto" --location=mbr --boot-drive=sda
# Clear the Master Boot Record
zerombr
# Partition clearing information
clearpart --all --initlabel
# Disk partitioning information
part /boot --asprimary --fstype="xfs" --size=1024
part swap --fstype="swap" --size=2000
part / --asprimary --fstype="xfs" --grow --size=6000
part /var  --fstype="xfs"  --size=5000

# 如果是要LVM分区,则考虑以下分区
# part /boot --fstype ext4 --size=100
# part swap --fstype=swap --size=2048
# part pv26 --size=100 --grow
# volgroup VG00 --pesize=32768 pv26
# logvol / --fstype ext4 --name=LVroot --vgname=VG00 --size=29984
# logvol /data --fstype ext4 --name=LVdata --vgname=VG00 --size=100 --grow

%post
rm -f /etc/yum.repos.d/*
 cat >>/etc/yum.repos.d/my.repo <<eof
[base]
name=sohu
baseurl=http://mirrors.sohu.com/centos/7/os/x86_64/
gpgcheck=0
enable=1
[epel]
name=epel
baseurl=http://mirrors.aliyun.com/epel/7Server/x86_64/
enable=1
gpgcheck=0
eof
sed -i "s/rhgb //" /boot/grub2/grub.cfg
sed -i "/UUID/d" /etc/sysconfig/network-scripts/ifcfg-eth0
echo "DNS1=114.114.114.114" >> /etc/sysconfig/network-scripts/ifcfg-eth0
echo "UseDNS no" >> /etc/ssh/sshd_config
sed -i "s/GSSAPIAuthentication yes/GSSAPIAuthentication no/" /etc/ssh/ssh_config
sed -i "s/^SELINUX=.*$/SELINUX=disabled/" /etc/sysconfig/selinux
systemctl disable firewalld
%end

%packages
@base
@core
@development
@platform-devel
kexec-tools
lftp
tree
lrzsz
ntpdate

%end

%addon com_RedHat_kdump --enable --reserve-mb='auto'

%end
  touch /var/lib/cobbler/kickstarts/CentOS6.6-x86_64.cfg
 touch /var/lib/cobbler/kickstarts/CentOS7-x86_64.cfg
 #将配置文件写到对应文件里
五、修改profile配置
在导入镜像生成distro的过程中,会自动生成一个profile。
profile : 类似于一个 配置文件,类似于你的 bash_profile, 里面包含你可以添加 kernel 参数,对应的kickstart 文件 以及 此profile 对应的 distro 等等.
该profile默认使用的kickstart是/var/lib/cobbler/kickstarts/sample_end.ks,所以需要修改此项。
#cobbler profile report
Name                           : CentOS7-x86_64
TFTP Boot Files                : {}
Comment                        :
DHCP Tag                       : default
Distribution                   : CentOS7-x86_64
Enable gPXE?                   : 0
Enable PXE Menu?               : 1
Fetchable Files                : {}
Kernel Options                 : {}
Kernel Options (Post Install)  : {}
Kickstart                      : /var/lib/cobbler/kickstarts/sample_end.ks
Kickstart Metadata             : {}
Management Classes             : []
Management Parameters          : <>
Name Servers                   : []
Name Servers Search Path       : []
Owners                         : ['admin']
Parent Profile                 :
Internal proxy                 :
Red Hat Management Key         : <>
Red Hat Management Server      : <>
Repos                          : []
Server Override                : <>
Template Files                 : {}
Virt Auto Boot                 : 1
Virt Bridge                    : xenbr0
Virt CPUs                      : 1
Virt Disk Driver Type          : raw
Virt File Size(GB)             : 5
Virt Path                      :
Virt RAM (MB)                  : 512
Virt Type                      : kvm

Name                           : CentOS6.6-x86_64
TFTP Boot Files                : {}
Comment                        :
DHCP Tag                       : default
Distribution                   : CentOS6.6-x86_64
Enable gPXE?                   : 0
Enable PXE Menu?               : 1
Fetchable Files                : {}
Kernel Options                 : {}
Kernel Options (Post Install)  : {}
Kickstart                      : /var/lib/cobbler/kickstarts/sample_end.ks
Kickstart Metadata             : {}
Management Classes             : []
Management Parameters          : <>
Name Servers                   : []
Name Servers Search Path       : []
Owners                         : ['admin']
Parent Profile                 :
Internal proxy                 :
Red Hat Management Key         : <>
Red Hat Management Server      : <>
Repos                          : []
Server Override                : <>
Template Files                 : {}
Virt Auto Boot                 : 1
Virt Bridge                    : xenbr0
Virt CPUs                      : 1
Virt Disk Driver Type          : raw
Virt File Size(GB)             : 5
Virt Path                      :
Virt RAM (MB)                  : 512
Virt Type                      : kvm
更改kickstart位置
cobbler profile edit --name=CentOS7-x86_64 --kickstart=/var/lib/cobbler/kickstarts/CentOS7-x86_64.cfg
cobbler profile edit --name=CentOS6.6-x86_64 --kickstart=/var/lib/cobbler/kickstarts/CentOS6.6-x86_64.cfg
将网卡名称变成eth0形式。加内核参数
cobbler profile edit --name=CentOS7-x86_64 --kopts=="net.ifnames=0 biosdevname=0"#因为centos7默认网卡不是eth*命名的

当然,不使用自生成的profile,自己添加一个profile也可以,同时还可以设置profile选项,如"--kickstart"项。如下:其中"--distro"指定该profile是添加到哪个distro下的。
#cobbler profile add --name=CentOS7-x86_64 --distro=CentOS7-x86_64 --kickstart=/var/lib/cobbler/kickstarts/CentOS7-x86_64.ks
实际上,每添加一个profile都是在向/var/lib/tftpboot/pxelinux.cfg/default中添加一个label
#cat /var/lib/tftpboot/pxelinux.cfg/default
DEFAULT menu
PROMPT 0
MENU TITLE Cobbler | http://cobbler.github.io
TIMEOUT 200
TOTALTIMEOUT 6000
ONTIMEOUT local

LABEL local
        MENU LABEL (local)
        MENU DEFAULT
        LOCALBOOT -1

LABEL CentOS6.6-x86_64
        kernel /images/CentOS6.6-x86_64/vmlinuz
        MENU LABEL CentOS6.6-x86_64
        append initrd=/images/CentOS6.6-x86_64/initrd.img ksdevice=bootif lang=  kssendmac text  ks=http://192.168.31.176/cblr/svc/op/ks/profile/CentOS6.6-x86_64
        ipappend 2

LABEL CentOS7-x86_64
        kernel /images/CentOS7-x86_64/vmlinuz
        MENU LABEL CentOS7-x86_64
        append initrd=/images/CentOS7-x86_64/initrd.img ksdevice=bootif lang=  text net.ifnames=0 biosdevname=0 kssendmac  ks=http://192.168.31.176/cblr/svc/op/ks/profile/CentOS7-x86_64
        ipappend 2

MENU end
可以自己手动编辑label,生成不同的启动项。

启动项原来背景图片是menu.c32,可以改为vesamenu.c32,安装界面默认菜单等待时间是200s,可以修改为20秒。菜单默认从本地启动系统,需要修改默认启动项。
也可以修改vim /etc/cobbler/pxe/pxedefault.template的配置,cobbler sync 生效
以下是修改后配置

DEFAULT vesamenu
PROMPT 0
MENU TITLE Cobbler | http://cobbler.github.io
TIMEOUT 20
TOTALTIMEOUT 6000
ONTIMEOUT CentOS7-x86_64

LABEL local
        MENU LABEL (local)
         LOCALBOOT -1

LABEL CentOS6.6-x86_64
        kernel /images/CentOS6.6-x86_64/vmlinuz
        MENU LABEL CentOS6.6-x86_64
        append initrd=/images/CentOS6.6-x86_64/initrd.img ksdevice=bootif lang=  kssendmac text  ks=http://192.168.31.176/cblr/svc/op/ks/profile/CentOS6.6-x86_64
        ipappend 2

LABEL CentOS7-x86_64
        kernel /images/CentOS7-x86_64/vmlinuz
         MENU DEFAULT #修改为默认项
        MENU LABEL CentOS7-x86_64
        append initrd=/images/CentOS7-x86_64/initrd.img ksdevice=bootif lang=  text net.ifnames=0 biosdevname=0 kssendmac  ks=http://192.168.31.176/cblr/svc/op/ks/profile/CentOS7-x86_64
        ipappend 2

MENU end
六、开始安装
新建一个虚拟机,然后开机。选择centos7启动
开始安装前把服务dhcpd/rsyncd/tftp/cobbler等重启一遍,以防服务没起出错。
七、使用koan自动重装系统
	yum install -y koan #下载koan软件
   koan --server=192.168.31.128 --list=profiles#查找可用系统
   koan --replace-self  --server=192.168.31.128 --profile=CentOS7-x86_64#重装系统
八、使用cobbler自定义yum源
  cobbler repo add --name=openstack-mitaka   --mirror=........      --arch=x86_64  --breed=yum
 cobbler reposync
九、根据mac地址实现自动化安装
下图是cobbler工作流程:

由图可知,分区对应kickstarts文件,操作对应的是一个profile
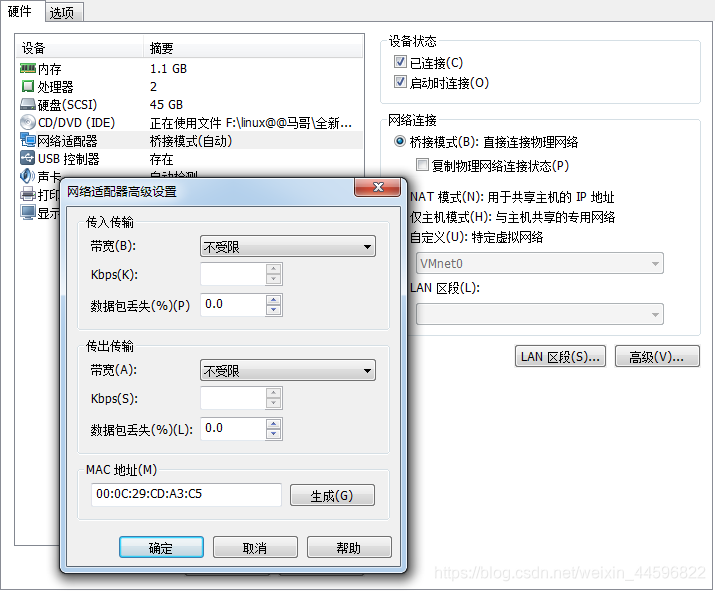
在虚拟机上查看生成的Mac地址:
现在规划这个mac地址为 00:0C:29:CD:A3:C5的机器的IP,主机名,子网,网关等。
ip:192.168.31.168
主机名:linuxceshi
子网掩码:255.255.255.0
网关:192.168.31
DNS:192.168.31.1
添加系统:
 cobbler system add --name=linuxceshi \
  --mac=00:0C:29:CD:A3:C5 --profile=CentOS7-x86_64 \
  --ip-address=192.168.31.168  --subnet=255.255.255.0\
  --gateway=192.168.31.1  --interface=eth0\
  --static=1 --hostname=linuxceshi  \
  --name-servers=192.168.31.1 \
  --kickstart=/var/lib/cobbler/kickstarts/CentOS7-x86_64.cfg
cobbler sync