2.1.集群主机规划
| 机器名称 | ip/mac地址 | 硬件资源 | 安装服务 | |
|---|---|---|---|---|
| 1 | cdh1 root/server123 | 192.168.80.100,00:50:56:2B:5B:EF | cpu:2核 , 内存:2.5g ,硬盘20g ,网卡:千兆网卡 | jdk、zookeeper、kafka |
| 2 | cdh2 root/server123 | 192.168.80.101,00:50:56:39:23:67 | cpu:2核 , 内存:2.5g ,硬盘20g ,网卡:千兆网卡 | jdk、zookeeper、kafka |
| 3 | cdh3 root/server123 | 192.168.80.102,00:50:56:3E:3A:0B | cpu:2核 , 内存:2.5g ,硬盘20g ,网卡:千兆网卡 |
说明:集群主机之间需要配置ssh免密码登录
免密登录参考:https://www.cnblogs.com/luzhanshi/p/13369797.html
#zookeeper官网地址:
    http://zookeeper.apache.org/
    一个分布式协调服务,管理我们的集群
官网提供配置说明:https://zookeeper.apache.org/doc/current/zookeeperStarted.html
/usr/local/zookeeper/:

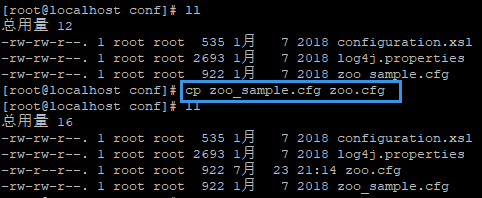
菜单进入conf目录下面,将zoo_sample.cfg复制一份到本目录并改名为zoo.cfg
vim编辑该配置文件:
#编辑文件:
    vim zoo.cfg

----------------------------------------------------------------------------
# The number of milliseconds of each tick
#时间单元,zk中的所有时间都是以该时间单元为基础,进行整数倍配置(单位是毫秒,下面配置的是2秒)
tickTime=2000
# The number of ticks that the initial
# synchronization phase can take
#follower在启动过程中,会从leader同步最新数据需要的最大时间。如果集群规模比较大,可以调大该参数
initLimit=10
# The number of ticks that can pass between
# sending a request and getting an acknowledgement
#leader与集群中所有机器进行心跳检查的最大时间。如果超出该时间,某follower没有回应,则说明该follower下线
syncLimit=5
# the directory where the snapshot is stored.
# do not use /tmp for storage, /tmp here is just
# example sakes.
#事务日志输出目录
dataDir=/usr/local/zookeeper/zookeeper-3.4.5-cdh5.14.0/zkdatas
# the port at which the clients will connect
#客户端连接端口
clientPort=2181
# the maximum number of client connections.
# increase this if you need to handle more clients
#maxClientCnxns=60
#
# Be sure to read the maintenance section of the
# administrator guide before turning on autopurge.
#
# http://zookeeper.apache.org/doc/current/zookeeperAdmin.html#sc_maintenance
#
# The number of snapshots to retain in dataDir
#需要保留文件数目,默认就是3个
autopurge.snapRetainCount=3
# Purge task interval in hours
# Set to "0" to disable auto purge feature
#自动清理事务日志和快照文件的频率,这里是1个小时
autopurge.purgeInterval=1

#集群服务器配置,数字1/2/3需要与myid文件一致。右边两个端口,2888表示数据同步和通信端口;3888表示选举端口
server.1=域名1:2888:3888
server.2=域名2:2888:3888
server.3=域名3:2888:3888
上面我的域名设置是my.server1;my.server2;my.server3
#创建数据存储目录:
    mkdir -p /usr/local/zookeeper/zookeeper-3.4.5-cdh5.14.0/zkdatas
#创建myid:
  cd/usr/local/zookeeper/zookeeper-3.4.5-cdh5.14.0/zkdatas
  touch myid
  并编辑myid内容为1
server02和server03为基础
#分发到node02节点,并修改myid内容为2:
     scp -r zookeeper-3.4.5-cdh5.14.0/ server02:$PWD

#分发到node03节点,并修改myid内容为3:
     scp -r zookeeper-3.4.5-cdh5.14.0/ server03:$PWD
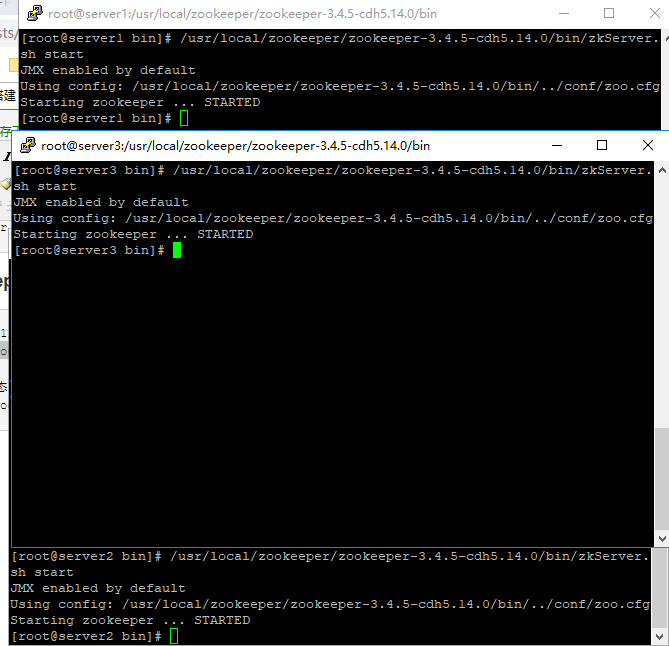
分别在node01/node02/node03节点启动/停止:
    /usr/local/zookeeper/zookeeper-3.4.5-cdh5.14.0/bin/zkServer.sh start/stop


#查看集群状态:
    /usr/local/zookeeper/zookeeper-3.4.5-cdh5.14.0/bin/zkServer.sh status
如果在查看状态的时候出现如下错误:

出现这个问题有一下几种可能性:
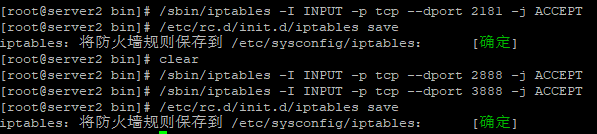
1.防火墙没有关闭,就是对应的集群端口没有开放,所以各个节点之间没办法通信(zoo.cfg中最后自己配置的内容(包括2888端口和3888端口)以及zookeeper自己的2181端口);
2.zookeeper中conf目录下的zoo.cfg配置文件有问题,查看日志dataLog文件的目录,以及data数据文件的目录是否正确;
3.myid文件中的内容是否和zoo.cfg中配
开放上述端口:
再次测试:


下载kafka
#kafka官网:
http://kafka.apache.org/
http://kafka.apache.org/downloads
#分发到node02节点,并修改myid内容为2: