由于手头上的i.MX283开发板没有独立按键,所以只能用一个IO口手动拉高拉低来模拟按键,但是这样会造成一个小问题,这个后面会提到。按键驱动与LED驱动最大的区别就是前者是GPIO输入,后者是GPIO输出,我们只需要读取IO口电平即可,同样的这也是一个字符设备,按照字符设备驱动框架编写驱动即可。
-
按键驱动编写:
1.首先引用头文件、定义驱动名称和按键IO口
/*
   BUTTON Driver driver for EasyARM-iMX283
*/
#include <linux/module.h>//模块加载卸载函数
#include <linux/kernel.h>//内核头文件
#include <linux/types.h>//数据类型定义
#include <linux/sched.h>
#include <linux/init.h>
#include <linux/fs.h>//file_operations结构体
#include <linux/device.h>//class_create等函数
#include <linux/ioctl.h>
#include <linux/delay.h>
#include <linux/bcd.h>
#include <linux/capability.h>
#include <linux/rtc.h>
#include <linux/cdev.h>
#include <linux/gpio.h>//gpio_request  gpio_free函数

#include <../arch/arm/mach-mx28/mx28_pins.h>
#define DEVICE_NAME	"imx283_key"//驱动名称
#define BUTTON	MXS_PIN_TO_GPIO(PINID_SSP0_DATA7)  //P2.7脚
2.编写open、write、read、relese函数
static int button_open(struct inode *inode ,struct file *flip)
{

   int ret = -1;
   gpio_free(BUTTON); //释放GPIO
   ret = gpio_request(BUTTON, "KEY1");//申请GPIO
   printk("gpio_request = %d\r\n",ret);
   return 0;
}


static int button_release(struct inode *inode ,struct file *flip)
{
  gpio_free(BUTTON);
  return 0;
}


static int button_write(struct file *filp, const char __user *buf, size_t count,
                loff_t *f_pos)
{

   return 0;//按键不需要输出,直接返回0即可
}


static  ssize_t button_read(struct file *filp,  char __user *buf, size_t count,
                loff_t *f_pos)
{
    int ret = -1;
	unsigned char databuf[1];
	gpio_direction_input(BUTTON);//配置为输入
	databuf[0]=gpio_get_value(BUTTON);//获取GPIO电平
	databuf[0]=databuf[0]?1:0;
	ret=copy_to_user(buf, databuf, 1);
	if(ret < 0)
	{
      printk("kernel read error \n");
	}
    return 0;
}
这里需要注意一个地方,gpio_get_value(类似的还有gpio_set_value )实际上是一个宏定义,它跟cpu类型(平台)有关,我是i.mx28系列平台,该宏定义路径为:linux-2.6.35.3\arch\arm\plat-mxs\include\mach\gpio.h,定义如下:
#define gpio_get_value          __gpio_get_value
//#define gpio_set_value          __gpio_set_value

int __gpio_get_value(unsigned gpio)
{
	struct gpio_chip	*chip;

	chip = gpio_to_chip(gpio);
	WARN_ON(extra_checks && chip->can_sleep);
	return chip->get ? chip->get(chip, gpio - chip->base) : 0;
}此函数返回的结果只有0或非0值,若当前GPIO为高电平,其返回值是该引脚对应的那一位被置位的值,比如,我接的是P2.7脚,当该脚被拉高时,此函数返回值为(1<<7)128。因此,如果应用层只希望返回值是0或1,驱动read函数最好做下处理:
	databuf[0]=gpio_get_value(BUTTON);//获取GPIO电平
	databuf[0]=databuf[0]?1:0;
接着,定义一个file_operations结构体并填充
static struct file_operations button_fops={
	.owner		= THIS_MODULE,
	.open 		= button_open,
	.write		= button_write,
	.read       = button_read,
	.release	= button_release,
};
3.编写设备注册与注销函数
同样的,我们还是采用前面提到的新字符设备驱动的注册和注销方法,同时,让设备自动创建设备节点。
static struct cdev button_cdev;//定义一个cdev结构体
static struct class *button_class;//创建一个button类
static struct device *button_device;//创建一个设备
static int major;//主设备号
static dev_t  devid;//设备号

static int __init button_init(void)
{
    /*1.申请设备号 此处由内核动态分配设备号*/
    alloc_chrdev_region(&devid, 0, 1, DEVICE_NAME);
	major = MAJOR(devid);
	/*2.初始化 button_cdev结构体*/
   	cdev_init(&button_cdev, &button_fops);
	/*3.向button_cdev添加设备*/
   	cdev_add(&button_cdev,devid, 1);
   //4.创建一个button_class类
   button_class = class_create(THIS_MODULE,"button_class");
   //5.在button类下面创建一个button设备 然后mdev通过这个自动创建/dev/"DEVICE_NAME"
   button_device = device_create(button_class,NULL,devid,NULL,DEVICE_NAME);
   printk("module init ok\n");
   return 0;
}


static void __exit button_exit(void)
{
  /*1.删除button_cdev结构体*/
  cdev_del(&button_cdev);
  /*2.注销设备*/
   unregister_chrdev_region(devid,1);
  /*3.删除button设备*/
  device_destroy(button_class, devid);
  /*4.删除button类*/
  class_destroy(button_class);
  printk("module exit ok\n");
}

module_init(button_init);
module_exit(button_exit);4.添加作者和LICENSE信息
MODULE_LICENSE("GPL");
MODULE_AUTHOR("xzx2020");
5.测试程序
每隔500ms读取一次GPIO电平并打印,会阻塞控制台。
注意:这里仅仅是作为测试驱动,实际上这样读取IO口是不可取的。
#include <stdio.h>
#include <stdlib.h>
#include <unistd.h>
#include <sys/types.h>
#include <sys/stat.h>
#include <fcntl.h>
#include <termios.h>
#include <limits.h>
#include <asm/ioctls.h>
#include <time.h>
#include <pthread.h>

int main(void)
{
	int fd;
	char buf[1] = {0};

	fd = open("/dev/imx283_key", O_RDWR);
	if (fd < 0)
	{
		printf("open /dev/imx283_key error \n");
	}

    while(1)
    {
     read(fd, buf, 1);
     printf("key value = %d \r\n",buf[0]);
	 usleep(500000);
	}
}
在开发板上运行测试:
IO口接地时:
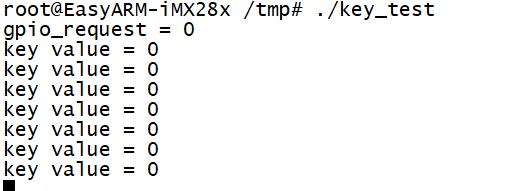
IO口接高电平时:

由于我是直接将IO用杜邦线拉低或者拉高,但是这个IO口实际上是浮空的,这会造成一个问题:当IO从接地状态或者从接高电平状态切换到浮空时,IO的电平会保持上一次的状态,也就是说,当IO一开始是接高电平,接着让它保持浮空,读取IO口的值仍然是高电平。
所以,实际按键电路设计时需要外接上拉或者下拉电阻,不要让IO口浮空,IO浮空时的电平值是不确定的。
GPIO中断
将某一个具有 GPIO 功能的引脚,配置成 GPIO 功能模式并设置为输入工作状态时,该引脚就可以检测外部输入的中断信号。
这里演示一个简单的GPIO中断。
1.引用头文件、定义引脚和相关变量
/*
GPIO IRQ driver for EasyARM-iMX283
*/
#include<linux/init.h>
#include<linux/module.h>
#include<mach/gpio.h>
#include<asm/io.h>
#include"mach/../../mx28_pins.h"
#include <mach/pinctrl.h>
#include "mach/mx28.h"
#include <linux/fs.h>
#include <linux/io.h>
#include <asm/uaccess.h>
#include <linux/miscdevice.h>
#include <linux/irq.h>
#include <linux/sched.h>
#include <linux/interrupt.h>
#include <linux/timer.h>
#include <linux/kernel.h>
#include <linux/delay.h>
#include <asm/uaccess.h>
#include <asm/io.h>


#define INT_PIN  MXS_PIN_TO_GPIO(PINID_SSP0_DATA4)//P2_4
static int irq = 0;//中断号
2.中断服务函数
中断服务函数的入口参数和返回值都是有规定的,后面会介绍。
这里为了测试,就让它打印一句"irq test。
//中断服务程序
static irqreturn_t gpio_irq(int irq, void *dev_id)
{
	printk("irq test \n");
	return IRQ_RETVAL(IRQ_HANDLED);
}
3.注册函数和注销函数
GPIO中断注册与注销主要需要以下几个函数,第一个是gpio_to_irq,这是一个宏定义,作用是申请中断号,只有申请了中断号,才可以进行后面的操作。
#define gpio_to_irq		__gpio_to_irq

int __gpio_to_irq(unsigned gpio)
{
	struct gpio_chip	*chip;

	chip = gpio_to_chip(gpio);
	return chip->to_irq ? chip->to_irq(chip, gpio - chip->base) : -ENXIO;
}第二个是set_irq_type,设置中断触发方式:
int set_irq_type(unsigned int irq, unsigned int type)
{
	struct irq_desc *desc = irq_to_desc(irq);
	unsigned long flags;
	int ret = -ENXIO;

	if (!desc) {
		printk(KERN_ERR "Trying to set irq type for IRQ%d\n", irq);
		return -ENODEV;
	}

	type &= IRQ_TYPE_SENSE_MASK;
	if (type == IRQ_TYPE_NONE)
		return 0;

	raw_spin_lock_irqsave(&desc->lock, flags);
	ret = __irq_set_trigger(desc, irq, type);
	raw_spin_unlock_irqrestore(&desc->lock, flags);
	return ret;
}
/*
irq:中断号
type:中断类型
*/
可配置的中断类型有以下几种:
#define IRQ_TYPE_NONE		0x00000000	/* Default, unspecified type */
#define IRQ_TYPE_EDGE_RISING	0x00000001	/* Edge rising type */
#define IRQ_TYPE_EDGE_FALLING	0x00000002	/* Edge falling type */
#define IRQ_TYPE_EDGE_BOTH (IRQ_TYPE_EDGE_FALLING | IRQ_TYPE_EDGE_RISING)
#define IRQ_TYPE_LEVEL_HIGH	0x00000004	/* Level high type */
#define IRQ_TYPE_LEVEL_LOW 0x00000008 /* Level low type */第三个函数就是request_irq,申请中断以及向内核注册中断服务程序
static inline int __must_check
request_irq(unsigned int irq, irq_handler_t handler, unsigned long flags,
	    const char *name, void *dev)
{
	return request_threaded_irq(irq, handler, NULL, flags, name, dev);
}

/*
irq:中断号
handler:中断服务程序
flags:中断类型
name:中断名称
dev: 如果将 flags 设置为 IRQF_SHARED 的话,dev 用来区分不同的中断,一般情况下将
dev 设置为设备结构体,dev 会传递给中断处理函数 irq_handler_t 的第二个参数。
*/
irq_handler_t是一个函数指针,其返回值是irqreturn_t型,入口参数有两个,一个是int类型,一个是void*(可以强制转化为任何其他类型)。
typedef irqreturn_t (*irq_handler_t)(int, void *);

enum irqreturn {
	IRQ_NONE,
	IRQ_HANDLED,
	IRQ_WAKE_THREAD,
};

typedef enum irqreturn irqreturn_t;第四个是gpio_free,用于释放申请的中断号。
void free_irq(unsigned int irq, void *dev_id)
{
	struct irq_desc *desc = irq_to_desc(irq);

	if (!desc)
		return;

	chip_bus_lock(irq, desc);
	kfree(__free_irq(irq, dev_id));
	chip_bus_sync_unlock(irq, desc);
}
/*
irq:中断号
dev_id:如果中断设置为共享(IRQF_SHARED)的话,此参数用来区分具体的中断。共享中断
只有在释放最后中断处理函数的时候才会被禁止掉。
其他中断,此字段为NULL
*/
static int __init gpio_drv_init(void)
{
int ret;
/*1.先申请 GPIO 口,同时把该 GPIO 口设置为输入模式*/
gpio_free(INT_PIN);
ret = gpio_request(INT_PIN, "irq_pin");
if (ret < 0)
{
printk("request gpio failed \n");
return ret;
}
gpio_direction_input(INT_PIN);
/*2.根据该 GPIO 申请其对应 IRQ 中断号*/
irq = gpio_to_irq(INT_PIN);
/*3.设置中断触发方式为下降沿触发*/
set_irq_type(irq, IRQF_TRIGGER_RISING);
/*4.申请中断并向内核注册中断处理函数*/
ret = request_irq(irq, gpio_irq, IRQF_DISABLED, "gpio_int", NULL);
if (ret != 0)
{
printk("request irq failed!! ret: %d irq:%d gpio:%d \n", ret, irq, INT_PIN);
return -EBUSY;
}
printk("module init ok\n");
return 0;
}
static void __exit gpio_drv_exit(void)
{
/*1.释放申请的中断号*/
free_irq(irq, NULL);
/*2.释放申请的GPIO*/
gpio_free(INT_PIN);
printk("module exit ok\n");
}
module_init(gpio_drv_init);
module_exit(gpio_drv_exit);
MODULE_LICENSE("GPL");
MODULE_AUTHOR("xzx2020");此驱动测试不需要测试程序,在板子上加载驱动程序即可。用insmod指令加载完驱动,再用cat /proc/interrupt 查看:
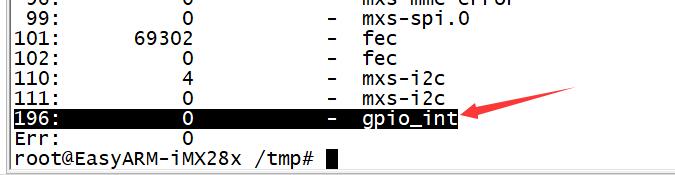
gpio中断已经生成,中断号196,现在用杜邦线连接P2.4口产生一个下降沿。
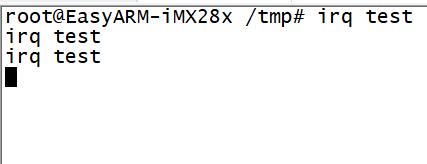
可以看到中断服务程序执行了。