在Java中一旦提及哈希表第一时间想到的就是HashMap这一常用的类,所以此类也是面试必问的知识。也许大家都知道在JDK1.8之前HashMap是由"数组+链表"组成,由于各种各样的原因(即缺陷)在JDK1.8中进行了改进,改为"数组+链表/红黑树"实现。本文将从JDK1.7的源码开始讲起,让大家了解JDK1.8的改进原因,加深印象。
JDK7
类前注释
首先我们稍微读一下HashMap的注释(第一段),对其有个大致的了解。
Hash table based implementation of the Map interface.  This implementation provides
all of the optional map operations, and permits null values and the null key.  (The
HashMap class is roughly equivalent to Hashtable, except that it is unsynchronized
and permits nulls.)  This class makes no guarantees as to the order of the map;
in particular, it does not guarantee that the order will remain constant over time.
译文:HashMap是基于Map接口的哈希表实现。它提供了所有可选的Map操作,并且他允许key和value为null(HashMap和HashTable大致相同,除了它是线程不安全的和允许null值)。HashMap不保证映射的顺序。特别是,它不能保证顺序会随着时间的推移保持恒定。
通过此段注释我们可以知道HashMap是允许null的,而HashTable不允许(HashTable在put操作时会检查value不为空,但是在计算hash值时如果key为null则会抛NPE)。HashMap是线程不安全的,HashTable线程安全。HashMap无法保证映射的顺序。
成员变量
/**
 * 默认的初始化容量为16,并且容量必须为2的幂
 */
static final int DEFAULT_INITIAL_CAPACITY = 1 << 4; // aka 16

/**
 * HashMap允许的最大容量,如果通过构造方法指定了容量并且大于此最大容量值则使用此最大容量
 */
static final int MAXIMUM_CAPACITY = 1 << 30;

/**
 * 默认的负载因子
 */
static final float DEFAULT_LOAD_FACTOR = 0.75f;

/**
 * 当HashMap为膨胀时共享的空表。
 */
static final Entry<?,?>[] EMPTY_TABLE = {};

/**
 * 这个table就是存储数据的table了,初始化时它指向的是上面的空表。这是因为默认容量是16,如果新建一
 * 个HashMap而不去使用就白白浪费空间了,所以初始化时HashMap其实是还没有任何空间的,当第一次put操
 * 作时才会占据空间。
 */
transient Entry<K,V>[] table = (Entry<K,V>[]) EMPTY_TABLE;

/**
 * 记录HashMap中的KV对个数
 */
transient int size;

/**
 * 下次扩容的阈值,即如果HashMap的容量为16,当前已经使用了12(16*0.75)那么就会进行扩容操作
 */
// 如果当前table为EMPTY_TABLE(即空)那么在第一次put元素时将为其创建初始容量
int threshold;

/**
 * HashMap的负载因子
 */
final float loadFactor;

/**
 * 记录当前HashMap进行结构修改的次数,结构修改是指那些更改了HashMap或以其他方式修改其内部结构
 *(例如,重新哈希)。此字段用于fail-fast机制。
 */
transient int modCount;

/**
 * 表示在对字符串键(即key为String类型)的HashMap应用替代哈希函数时HashMap的条目数量的默认阈值。
 * 替代哈希函数的使用可以减少由于对字符串键进行弱哈希码计算时的碰撞概率
 */
static final int ALTERNATIVE_HASHING_THRESHOLD_DEFAULT = Integer.MAX_VALUE;

/**
 * A randomizing value associated with this instance that is applied to
 * hash code of keys to make hash collisions harder to find. If 0 then
 * alternative hashing is disabled.
 */
transient int hashSeed = 0;
构造方法
/**
 * 通过指定的初始容量和负载因子创建空的HashMap
 *
 * @param  initialCapacity 初始容量
 * @param  loadFactor      负载因子
 * @throws IllegalArgumentException 如果初始容量或负载因子不为正数,将抛出此异常
 */
public HashMap(int initialCapacity, float loadFactor) {
	if (initialCapacity < 0)
		throw new IllegalArgumentException("Illegal initial capacity: " + initialCapacity);
	if (initialCapacity > MAXIMUM_CAPACITY)
		initialCapacity = MAXIMUM_CAPACITY;
	if (loadFactor <= 0 || Float.isNaN(loadFactor))
		throw new IllegalArgumentException("Illegal load factor: " + loadFactor);

	this.loadFactor = loadFactor;
	threshold = initialCapacity;
        //JDK8开始HashMap里的那个hook就不叫init(),而是改名为reinitialize()了,作用还是差不多。
	init();
}

/**
 * 通过指定的初始容量和默认的负载因子(0.75)创建一个空的HashMap
 *
 * @param  initialCapacity 初始容量
 * @throws IllegalArgumentException 如果初始容量为负数将抛出此异常
 */
public HashMap(int initialCapacity) {
	this(initialCapacity, DEFAULT_LOAD_FACTOR);
}

/**
 * 通过默认的初始容量(16)和负载因子(0.75)创建空的HashMap
 */
public HashMap() {
	this(DEFAULT_INITIAL_CAPACITY, DEFAULT_LOAD_FACTOR);
}

/**
 * 子类的初始化钩子。
 * 在HashMap初始化之后但在没有任何条目已插入的时候,在所有构造函数和伪构造函数中(克隆,
 * readObject)将调用此方法。(在没有此方法的情况下,readObject将需要明确了解子类。)
 */
void init() {
}
在成员变量中我们已经知道了HashMap的容量必须为2的幂,可是我们在构造方法知道initialCapacity时是可以随意指定一个正数的,比如我设置initialCapacity=17那么最终HashMap的容量是怎么样的呢?报错还是??这时我们看一下put方法。
public V put(K key, V value) {
    //第一次添加元素时发现table为空,进行膨胀(inflate)操作
    if (table == EMPTY_TABLE) {
        inflateTable(threshold);
    }
    ......
}

private void inflateTable(int toSize) {
	// 设置capacity大于toSize的最小2的幂
	int capacity = roundUpToPowerOf2(toSize);

	threshold = (int) Math.min(capacity * loadFactor, MAXIMUM_CAPACITY + 1);
	table = new Entry[capacity];
	initHashSeedAsNeeded(capacity);
}
可以发现如果我们设置非2的幂的容量,HashMap会将其设置为大于指定值的最小2的幂(如指定为30,最终设置为32)。那么现在又有一个问题了,为什么一定要是2的幂呢?这个问题在下方indexFor中解答。
查看HashMap最后一行调用init()方法,同时我们可以发现在readObject方法中也调用了此方法。在这里此方法是空的,因为此方法是交由HashMap的子类实现的,它用于在HashMap创建完但是还没有插入元素时做一些事情。知乎:HashMap构造函数最后一行调用的init方法是什么意思?
hash
HashMap的插入过程中首先就需要计算key的hash值,所以这是重点啦!JDK7中hash的实现云里雾里,在JDK8中此部分代码已经修改。
final int hash(Object k) {
	int h = hashSeed;
	if (0 != h && k instanceof String) {
		return sun.misc.Hashing.stringHash32((String) k);
	}
	h ^= k.hashCode();
	// This function ensures that hashCodes that differ only by
	// constant multiples at each bit position have a bounded
	// number of collisions (approximately 8 at default load factor).
	h ^= (h >>> 20) ^ (h >>> 12);
	return h ^ (h >>> 7) ^ (h >>> 4);
}
为什么在方法中需要对String的hash值进行单独计算呢?这是由于我们可以创造一些hash值相同的字符串(如Aa和C#),如果大量这些hash值一样的字符串插入HashMap中,那么在一个桶(bucket)中的链表将十分长,严重拖慢速度。可参看《Hash Collision DoS 问题》
最后两行迷一样的位操作是为了让每一位都参与运算,让相近的数最后通过hash能分散开并减少碰撞。StackOverFlow: Understanding strange Java hash function
indexFor
计算出了key的hash值接下来就需要通过hash值在有限的数组中找个位置添加元素。需要注意的是hash值是很大的,并且可以为负数,如何在长度为length的数组中找到待放置的索引位置呢?大部分人会马上说取模嘛?注意,hash值是可以为负数的,取模后的值也为负数,我们还需要进行转正操作,这样不好。看看HashMap的经典操作吧!太棒啦!
put方法:int i = indexFor(hash, table.length);

static int indexFor(int h, int length) {
    // assert Integer.bitCount(length) == 1 : "length must be a non-zero power of 2";
    return h & (length-1);
}
此操作不可谓不精妙。下面举一个例子来说明。
如果table.length为32,对应二进制为0000 0000 0000 0000 0000 0000 0010 0000
table.length-1,为 31,对应二进制为0000 0000 0000 0000 0000 0000 0001 1111
将hash值与31进行位与运算,可以肯定的是得到的值只会在0~31之间。除了低5位,其他的位都为0呀!
如果hash值为23523584,对应二进制为0000 0001 0110 0110 1111 0001 0000 0000
操作后得到index为0。
其实HashMap的容量必须为2的幂也与此运算息息相关。
如果HashMap的容量不为2的幂
假设table.length为36,对应二进制为0000 0000 0000 0000 0000 0000 0010 0100
table.length-1,为 35,对应二进制为0000 0000 0000 0000 0000 0000 0010 0011
将hash值与35进行位与运算,可以发现低6位中总是有3位一直为0,导致数组中会有位置一直不会有元素被放置。
put
在使用HashMap中打交道最多的就是get和put操作了,通过下方put方法的实现我们可以很清晰的看到拉链法在HashMap中的实现。
public V put(K key, V value) {
	if (table == EMPTY_TABLE) {
		inflateTable(threshold);
	}
	if (key == null)
		return putForNullKey(value);
	int hash = hash(key);
	int i = indexFor(hash, table.length);
	for (Entry<K,V> e = table[i]; e != null; e = e.next) {
        //待添加位置不为null则需要在链表中进行查找
		Object k;
		if (e.hash == hash && ((k = e.key) == key || key.equals(k))) {
            //找到相同的key则直接覆盖,返回旧值
			V oldValue = e.value;
			e.value = value;
			e.recordAccess(this);
			return oldValue;
		}
	}

	modCount++;
	addEntry(hash, key, value, i);
	return null;
}

void addEntry(int hash, K key, V value, int bucketIndex) {
	if ((size >= threshold) && (null != table[bucketIndex])) {
        //达到扩容阈值,进行2倍的扩容操作
		resize(2 * table.length);
		hash = (null != key) ? hash(key) : 0;
        //重新计算待添加元素的对应的index
		bucketIndex = indexFor(hash, table.length);
	}
    //未达到扩容要求或index位置处为null,新建bucket
	createEntry(hash, key, value, bucketIndex);
}

void createEntry(int hash, K key, V value, int bucketIndex) {
    //不难看出在链表中添加节点的操作为头插法(JDK8是尾插法)
	Entry<K,V> e = table[bucketIndex];
	table[bucketIndex] = new Entry<>(hash, key, value, e);
	size++;
}
扩容成环
当HashMap发现需要扩容时调用resize方法将数组大小扩容为原来的2倍,通过transfer方法转移数据。但是在多线程操作HashMap(虽然多线程环境下不应该使用HashMap,但是这个问题很有意思)中的扩容过程中链表容易成环从而可能导致get时的死循环。可参看《疫苗:JAVA HASHMAP的死循环》
JDK8
在上文JDK7的HashMap介绍中我们已经了解了HashMap的重要成员变量和关键方法,接下来将介绍JDK8中HashMap不同于之前的变量和方法。
成员变量
/**
 * 将链表转化为红黑树的阈值,默认设置为8。删除节点小于此阈值后又会转化为链表
 */
static final int TREEIFY_THRESHOLD = 8;

/**
 * 在哈希表扩容时,如果发现链表长度小于 6,则会由树重新退化为链表
 */
static final int UNTREEIFY_THRESHOLD = 6;

/**
 * 最小树形化容量阈值:即 当哈希表中的容量 > 该值时,才允许树形化链表(即 将链表 转换成红黑树)
 * 否则,若桶内元素太多时,则直接扩容,而不是树形化
 * 为了避免进行扩容、树形化选择的冲突,这个值不能小于 4 * TREEIFY_THRESHOLD
 */
static final int MIN_TREEIFY_CAPACITY = 64;
很多人对为什么将链表转化为红黑树的阈值设置为8存在疑惑,同时这也是一个面试题。其实答案在HashMap的Implementation notes中已经告诉我们了。
Because TreeNodes are about twice the size of regular nodes, we
use them only when bins contain enough nodes to warrant use
(see TREEIFY_THRESHOLD). And when they become too small (due to
removal or resizing) they are converted back to plain bins.  In
usages with well-distributed user hashCodes, tree bins are
rarely used.  Ideally, under random hashCodes, the frequency of
nodes in bins follows a Poisson distribution
(http://en.wikipedia.org/wiki/Poisson_distribution) with a
parameter of about 0.5 on average for the default resizing
threshold of 0.75, although with a large variance because of
resizing granularity. Ignoring variance, the expected
occurrences of list size k are (exp(-0.5)*pow(0.5, k)/factorial(k)).
The first values are:
0:    0.60653066
1:    0.30326533
2:    0.07581633
3:    0.01263606
4:    0.00157952
5:    0.00015795
6:    0.00001316
7:    0.00000094
8:    0.00000006
more: less than 1 in ten million
当hashCode离散性很好的时候,树型bin用到的概率非常小,因为数据均匀分布在每个bin中,几乎不会有bin中链表长度会达到阈值。但是在随机hashCode下,离散性可能会变差,然而JDK又不能阻止用户实现这种不好的hash算法,因此就可能导致不均匀的数据分布。不过理想情况下随机hashCode算法下所有bin中节点的分布频率会遵循泊松分布,我们可以看到,一个bin中链表长度达到8个元素的概率为0.00000006,几乎是不可能事件。所以选择8。
hash
static final int hash(Object key) {
    int h;
    return (key == null) ? 0 : (h = key.hashCode()) ^ (h >>> 16);
}
与JDK7的hash方法相比这个hash方法精简了许多。将hash值的高16位和低16位做异或,就是为了混合原始哈希码的高位和低位,以此来加大低位的随机性。而且混合后的低位掺杂了高位的部分特征,这样高位的信息也被变相保留下来。
resize
先来看一下resize方法的注释吧!
初始化或增加表大小。 如果为空,则根据字段阈值中保持的初始容量目标进行分配。否则,因为我们使用的是2的幂,所以每个bin(bucket)中的元素在新table中要么在相同的索引位置处,要么在新表中以2的幂偏移(oldIndex+oldCap)。
final Node<K,V>[] resize() {
	Node<K,V>[] oldTab = table;
	//获取旧table的容量,如果是第一次put操作那么oldTable为null,得到容量为0
	int oldCap = (oldTab == null) ? 0 : oldTab.length;
	int oldThr = threshold;
	int newCap, newThr = 0;
	if (oldCap > 0) {
		//不是第一次put操作,oldTab不为null
		if (oldCap >= MAXIMUM_CAPACITY) {
			threshold = Integer.MAX_VALUE;
			//超过最大值不再扩充
			return oldTab;
		}
		else if ((newCap = oldCap << 1) < MAXIMUM_CAPACITY && oldCap >= DEFAULT_INITIAL_CAPACITY)
			//容量扩大为原来的两倍,threshold变为原来的两倍
			newThr = oldThr << 1; // double threshold
	}
	else if (oldThr > 0) // initial capacity was placed in threshold
		//旧容量小等于0并且旧阈值大于0,将旧阈值赋给新容量
		newCap = oldThr;
	else {// zero initial threshold signifies using defaults
		//第一次put操作时threshold为0,所以容量使用默认值
		newCap = DEFAULT_INITIAL_CAPACITY;
		newThr = (int)(DEFAULT_LOAD_FACTOR * DEFAULT_INITIAL_CAPACITY);
	}
	if (newThr == 0) {
		float ft = (float)newCap * loadFactor;
		newThr = (newCap < MAXIMUM_CAPACITY && ft < (float)MAXIMUM_CAPACITY ?
				  (int)ft : Integer.MAX_VALUE);
	}
	//更新阈值
	threshold = newThr;
	@SuppressWarnings({"rawtypes","unchecked"})
	Node<K,V>[] newTab = (Node<K,V>[])new Node[newCap];
	table = newTab;
	//转移数据
	if (oldTab != null) {
		for (int j = 0; j < oldCap; ++j) {
			Node<K,V> e;
			//遍历数组每个位置,赋值给e,不为null说明有数据
			if ((e = oldTab[j]) != null) {
				oldTab[j] = null;
				if (e.next == null)
					//位置上只有一个元素,没有形成链表或树,直接往新table赋值即可
					newTab[e.hash & (newCap - 1)] = e;
				else if (e instanceof TreeNode)
					//元素是树节点,通过树形节点去拆分
					((TreeNode<K,V>)e).split(this, newTab, j, oldCap);
				else { // 保持顺序
					//利用哈希值的高低位去区分存储位置,如果高位是0,则存储在原来的位置;如果是1则存储在原来位置+oldCap(下方会讲解原因,一定要看,很棒的 )
					//低位链表的头结点、尾节点
					Node<K,V> loHead = null, loTail = null;
					//高位链表的头节点、尾节点
					Node<K,V> hiHead = null, hiTail = null;
					Node<K,V> next;
					do {
						next = e.next;
						if ((e.hash & oldCap) == 0) {
							if (loTail == null)
								loHead = e;
							else
								loTail.next = e;
							loTail = e;
						}
						else {
							if (hiTail == null)
								hiHead = e;
							else
								hiTail.next = e;
							hiTail = e;
						}
					} while ((e = next) != null);
					if (loTail != null) {
						loTail.next = null;
						newTab[j] = loHead;
					}
					if (hiTail != null) {
						hiTail.next = null;
						newTab[j + oldCap] = hiHead;//特别注意
					}
				}
			}
		}
	}
	return newTab;
}
JDK8中将链表中原来index冲突的节点打散,而打散的方法仅仅是判断(e.hash & oldCap),如果为0则保持在原索引位置,否则newIndex = oldIndex + oldCap。为什么是oldCap呢?看下面。
假设oldCap = 16,则oldCap-1 = 15
二进制为:0000 0000 0000 0000 0000 0000 0000 1111
hash1  : 0000 0000 0000 0000 0000 0000 0000 1010
hash2  : 0000 0000 0000 0000 0000 0000 0001 1010
如上两个hash值,经过indexFor=>hash & (oldCap - 1)操作后得到的index(都是10)是相同的,会形成链表

扩如后newCap = 32,则newCap-1 = 31
二进制为:0000 0000 0000 0000 0000 0000 0001 1111
hash1  : 0000 0000 0000 0000 0000 0000 0000 1010
hash2  : 0000 0000 0000 0000 0000 0000 0001 1010
hash1经过indexFor操作后得到index = oldIndex = 10
hash2经过indexFor操作后得到index = Bin0000 1010 + Bin0001 0000 = Dec10 + Dec16 = oldIndex + OldCap = 26
所以如果(e.hash & oldCap)结果为1则新位置在原位置处加上oldCap
我们也会发现链表中的顺序是保持的,而JDK7中链表的顺序是反转的。
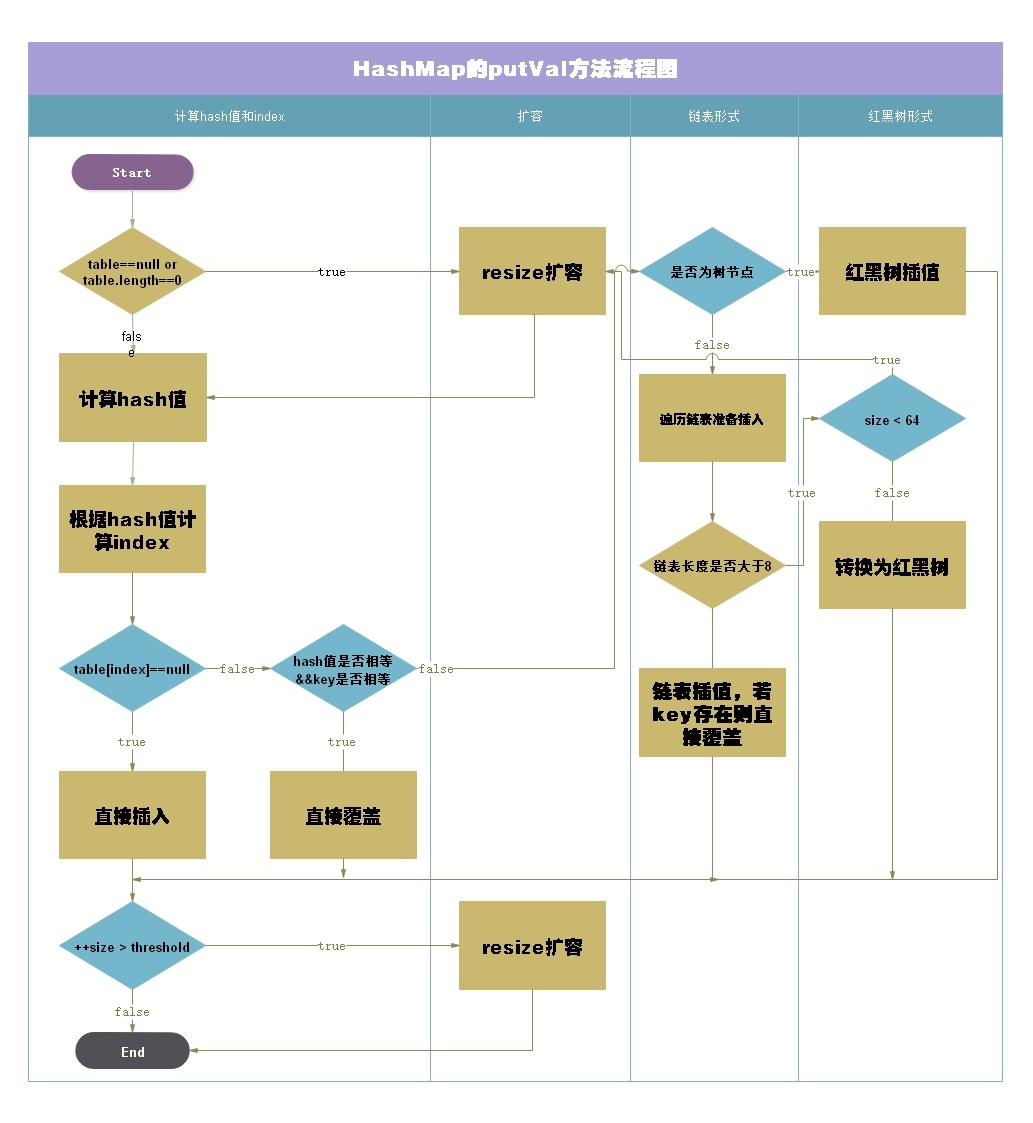
putVal
相比JDK7简短的put方法,JDK8中调用的putVal就比较长了_。
final V putVal(int hash, K key, V value, boolean onlyIfAbsent,boolean evict) {
	Node<K,V>[] tab; Node<K,V> p; int n, i;
	if ((tab = table) == null || (n = tab.length) == 0)
        //第一次添加元素时进行扩容操作,容量变为16
		n = (tab = resize()).length;
	if ((p = tab[i = (n - 1) & hash]) == null)
        //在计算得的index位置上没有数据直接新建节点即可
		tab[i] = newNode(hash, key, value, null);
	else {
		Node<K,V> e; K k;
		if (p.hash == hash &&
			((k = p.key) == key || (key != null && key.equals(k))))
            //在计算得的index位置上有数据并且相等
			e = p;
		else if (p instanceof TreeNode)
            //p表示的是待插入位置table[index]的节点,如果它是一个树节点说明此处是一棵红黑树,使用树的插入方法
			e = ((TreeNode<K,V>)p).putTreeVal(this, tab, hash, key, value);
		else {
            //待插入位置形成了链表,执行链表的插入操作
			for (int binCount = 0; ; ++binCount) {
				if ((e = p.next) == null) {
                    //找到链表的末尾进行插入,这里和JDK7的头插法不同
					p.next = newNode(hash, key, value, null);
					if (binCount >= TREEIFY_THRESHOLD - 1) // -1 for 1st
                        //插入新节点后达到TREEIFY_THRESHOLD表示的链表长度,进行链表转树操作
						treeifyBin(tab, hash);
					break;
				}
				if (e.hash == hash && ((k = e.key) == key || (key != null && key.equals(k))))
                    //找到一个和key相同的节点,后续更新这个节点
					break;
				p = e;
			}
		}
		if (e != null) { // 存在和key相同的节点,更新节点(onlyIfAbsent设置为true则不会更新,默认为false)
			V oldValue = e.value;
			if (!onlyIfAbsent || oldValue == null)
				e.value = value;
			afterNodeAccess(e);
			return oldValue;
		}
	}
	++modCount;
	if (++size > threshold)
        //判断是否大于阈值进行扩容操作
		resize();
	afterNodeInsertion(evict);
	return null;
}
在此我们感兴趣的方法是treeifyBin这一将链表转化为红黑树的方法。
treeifyBin
final void treeifyBin(Node<K,V>[] tab, int hash) {
	int n, index; Node<K,V> e;
    //当table的长度小于MIN_TREEIFY_CAPACITY(64)时,只是进行扩容
	if (tab == null || (n = tab.length) < MIN_TREEIFY_CAPACITY)
		resize();
	else if ((e = tab[index = (n - 1) & hash]) != null) {
        //定义首节点和尾节点
		TreeNode<K,V> hd = null, tl = null;
		do {
            //此处将Node节点转换为了TreeNode
			TreeNode<K,V> p = replacementTreeNode(e, null);
			if (tl == null)
				hd = p;
			else {
				p.prev = tl;
				tl.next = p;
			}
			tl = p;
		} while ((e = e.next) != null);
        //不难发现这个方法还没开始进行树形转化,仅仅将原来的单链表变成了双向链表
		if ((tab[index] = hd) != null)
			hd.treeify(tab);//关键
	}
}
treeifyBin并没有完成树形化操作,转而使用treeify进行树形化操作。
//将链表转换成红黑树
final void treeify(Node<K,V>[] tab) {
	TreeNode<K,V> root = null;
	//遍历链表,当前节点为x
	for (TreeNode<K,V> x = this, next; x != null; x = next) {
		next = (TreeNode<K,V>)x.next;
		x.left = x.right = null;
		if (root == null) {
			//树根节点颜色为黑色
			x.parent = null;
			x.red = false;
			root = x;
		}
		else {
			K k = x.key;
			int h = x.hash;
			Class<?> kc = null;
			//从根结点开始遍历,寻找当前结点x的插入位置
			for (TreeNode<K,V> p = root;;) {
				int dir, ph;
				K pk = p.key;
				if ((ph = p.hash) > h)//如果当前结点的hash值小于根结点的hash值,dir = -1
					dir = -1;
				else if (ph < h) //如果当前结点的hash值大于根结点的hash值,dir = 1
					dir = 1;
				else if ((kc == null &&
						  (kc = comparableClassFor(k)) == null) ||
						 (dir = compareComparables(kc, k, pk)) == 0)
				/*
                 * 如果两个节点的key的hash值相等,那么还要通过其他方式再进行比较
                 * 如果当前链表节点的key实现了comparable接口,并且当前树节点和链表节点是相同Class的实例,
                 * 那么通过comparable的方式再比较两者。
                 * 如果还是相等,最后再通过tieBreakOrder比较一次
                 */
					dir = tieBreakOrder(k, pk);

				TreeNode<K,V> xp = p;
				if ((p = (dir <= 0) ? p.left : p.right) == null) {
					x.parent = xp;
					if (dir <= 0)
						//dir <= 0,作为左孩子
						xp.left = x;
					else
						//dir > 0,作为孩子
						xp.right = x;
					root = balanceInsertion(root, x);//调整树,使之符合红黑树性质(各种旋转操作在这里完成)
					break;
				}
			}
		}
	}
    //保证树的根节点一定也要成为链表的首节点
	moveRootToFront(tab, root);
}
如果两个key未实现Comparable接口,或者比较之后仍然没有比较出大小。那么就要通过一个tieBreakOrder再比较一次。
static int tieBreakOrder(Object a, Object b) {
	int d;
	if (a == null || b == null ||
		(d = a.getClass().getName().
		 compareTo(b.getClass().getName())) == 0)
		d = (System.identityHashCode(a) <= System.identityHashCode(b) ?
			 -1 : 1);
	return d;
}
System.identityHashCode(obj)是一个native方法,它和Object.hashCode()方法不同的是此方法只会去调用Object的hashCode方法,不管对象对应的类是否重写了hashCode方法,而普通的obj.hashCode方法会调用自己实现的hashCode方法(如果自己实现的话)。
class A {
    @Override
    public int hashCode() {
        System.out.println("自己的hashC0de");
        return super.hashCode();
    }
}

public static void main(String[] args) {
	A a = new A();
	System.out.println(System.identityHashCode(a));//根本不会去使用自己的hashCode方法
	System.out.println("============");
	System.out.println(a.hashCode());
}
/**
 * 356573597
 * ============
 * 自己的hashC0de
 * 356573597
 */
附:插入流程图