1. 布局简介
QT Quick中布局一般有如下四种方式,
①. 绝对坐标:x、y、z、width、height、
②. 锚(anchors) 布局
③. 定位器(Row、Column、Grid、Flow)
④. 布局管理器(GridLayout、RowLayout、ColumnLayout)
绝对布局很好理解,给值就显示,但是不灵活;锚布局已经简单学过(QT Quick QML入门笔记(四)锚(anchors)布局),今天来学另外一种布局方法——定位器,他包含Row、Column、Grid、Flow四种布局。
anchors 实际上是 Item 的一个属性集,Row 则是一个单独的 Item ,专门用来管理其它 Item 的,后面介绍的几种布局,也是类似的。
2. Row布局
在一个 Row 内的 item ,可以使用 Positioner 附加属性来获知自己在 Row 中的更多位置信息。 Positioner 有 index 、 isFirstItem 、 isLastItem 三个属性。
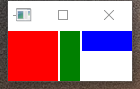
官方提供行布局的实例如下:
import QtQuick 2.0

Row {
    spacing: 2  //相邻间距
    Rectangle {
        color: "red";
        width: 50; height: 50
    }
    Rectangle {
        color: "green";
        width: 20; height: 50
    }
    Rectangle {
        color: "blue";
        width: 50; height: 20
    }
}
运行结果如下:
3. 嵌套布局
Column布局和Row布局没什么区别,就不废话。而Row和Column之间可以嵌套,代码如下:
import QtQuick 2.0
import QtQuick.Window 2.2

Window {
    visible: true;
    width:  480;
    height: 320;

    Text {
        id: txt;
        text:  "Student Info"
        anchors.horizontalCenter:  parent.horizontalCenter;
        color: "black";
        font.bold:  true;
        font.pixelSize: 36;        //像素大小
    }

    Rectangle {
        id:                 cchVehicleStatusView;
        anchors.top:       txt.bottom;
        anchors.topMargin:  12
        anchors.horizontalCenter:    txt.horizontalCenter;
        color:              "yellow"
        radius:             10
        width: 250;
        height: 200;
        opacity :0.7;

        Column {
            id:         buttonColumn
            spacing:    4

            Repeater {                 //重复
                id:     studentPropert;
                model:  5
                property var propertyNames:  [ qsTr("Name: "), qsTr("Age: "), qsTr("Sex: "), qsTr("Class: "), qsTr("Math Scores: ") ]
                property var propertyValues: [ qsTr("ZhangSan"), qsTr("17"), qsTr("Man"), qsTr("216"), qsTr("98")]
                Row{
                    spacing:    4

                    Text {
                        text:       studentPropert.propertyNames[index]
                        font.bold:  true;
                        font.pointSize:              24;
                        color: "black";
                    }
                    Text {
                        text:       studentPropert.propertyValues[index]
                        font.pointSize:              24;
                        color: "red";
                    }
                }
            }
        }
    }
}
运行结果如下:
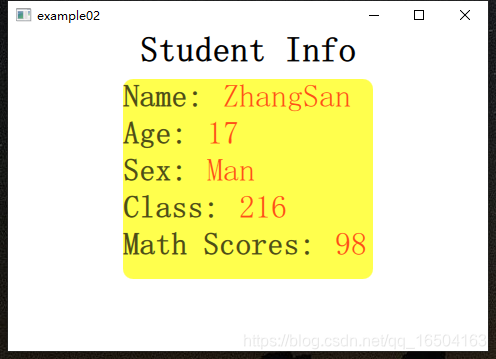
在Column中嵌套Row,共5行2列,是使用了“Repeater ”关键字,来实现5行的,就是“model”赋值为5。
mode还有另外一种用法,如下修改了两处代码
        Column {
            id:         buttonColumn
            spacing:    4

            Repeater {                 //重复
                id:     studentPropert;
//                model:  5 //[修改1]
                model: [ qsTr("ZhangSan"), qsTr("17"), qsTr("Man"), qsTr("216"), qsTr("98")]
                property var propertyNames:  [ qsTr("Name: "), qsTr("Age: "), qsTr("Sex: "), qsTr("Class: "), qsTr("Math Scores: ") ]
//                property var propertyValues: [ qsTr("ZhangSan"), qsTr("17"), qsTr("Man"), qsTr("216"), qsTr("98")]

                Row{
                    spacing:    4

                    Text {
                        text:       studentPropert.propertyNames[index]
                        font.bold:  true;
                        font.pointSize:              24;
                        color: "black";

                    }

                    Text {
//                        text:       studentPropert.propertyValues[index]
                        text:       modelData; //[修改2]
                        font.pointSize:              24;
                        color: "red";
                    }
                }
            }
        }
运行结果一样,“model” 代替了变量“propertyValues”。
● 参考:Qt Quick 布局介绍
● 我的QT QUICK QML学习过程总结:
QT Quick QML入门笔记(一)应用程序结构分析和QML基础
QT Quick QML入门笔记(四)锚(anchors)布局
● 不过还是建议您看安老师的QT Quick专栏:Qt Quick简明教程
