一.总体框架
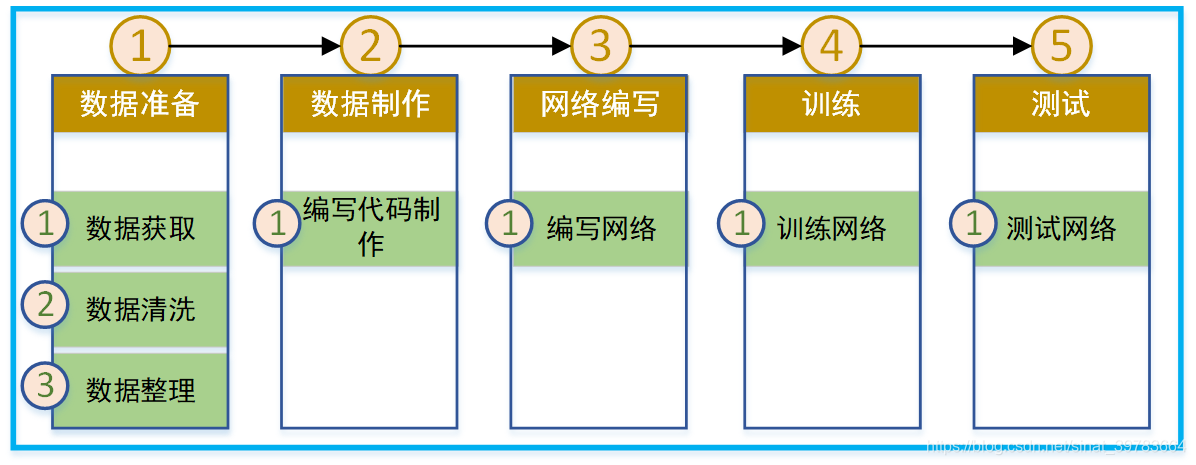
二.数据准备
1.爬虫软件爬取
2.清洗数据
3.整理
三.数据制作
1.基本思想
1.1 指定文件夹
#源代码
self.path = path
#举例
path = "/var/www/html/"
1.2 文件或文件夹名字列表
#源代码
self.datalist = os.listdir(path)
Python os.listdir()
(1)概述
- Python os.listdir() 方法: 用于返回指定的文件夹包含的文件或文件夹的名字的列表。
- 它不包括 . 和 … 即使它在文件夹中。
- 只支持在 Unix, Windows 下使用。
(2)语法
os.listdir(path)
(3)参数
- path – 需要列出的目录路径
(4)返回值
返回指定路径下的文件和文件夹列表。
(5)实例
#实例
#!/usr/bin/python
# -*- coding: UTF-8 -*-

import os, sys

# 打开文件
path = "/var/www/html/"
dirs = os.listdir( path )

# 输出所有文件和文件夹
for file in dirs:
   print file
#打印结果
test.htm
stamp
faq.htm
_vti_txt
robots.txt
itemlisting
resumelisting
writing_effective_resume.htm
advertisebusiness.htm
papers
resume
1.3 索引数据
索引文件夹下的数据。
#源代码
data = self.datalist[index]
1.4 拼接路径和数据
将文件夹和与文件夹下的数据进行路径连接,
#源代码
os.path.join(self.path,data)
1.5 打开数据
连接以后打开数据。
#源代码
img = Image.open(os.path.join(self.path,data))
1.6 影像转numpy数据
将影像数据转为numpy数据。
#源代码
img = np.array(img)
1.7 numpy转Tensor数据
将numpy数据转换为Tensor数据,一变pytorch训练使用。
#源代码
torch.Tensor(img)
1.8 旋转轴与归一化
将旋转后的数据进行轴变换,变成pytorch所使用的数据顺序(NCHW),并归一化数据。
#源代码
data = torch.Tensor(img).permute(2,0,1) / 255.# 归一化
1.9 Normaliz处理
#源代码
data = (data - MyDataset.mean) / MyDataset.std # 标准化
1.10 标签与标签转Tensor
获取标签,并且将标签转为Tensor数据类型。
#源代码
target = int(data.split(".")[0])#标签
target = torch.tensor(target)#标签转Tensor
2.案例
制作数据集。数据集文件名称:MyDataset
#源代码
from torch.utils.data import Dataset
import os
from PIL import Image
import numpy as np
import torch
import torch.utils.data as data
class MyDataset(Dataset):

    mean = torch.tensor([0.4870, 0.4537, 0.4161]).reshape(3,1,1)
    std = torch.tensor([0.2624, 0.2558, 0.2580]).reshape(3,1,1)

    def __init__(self,path):
        """
        初始化数据集
        加载数据
        """
        # 获取指定文件夹下的文件列表
        self.path = path
        self.datalist = os.listdir(path)

    def __len__(self):
        return len(self.datalist)

    def __getitem__(self, index):
        data = self.datalist[index]
        target = int(data.split(".")[0])
        img = Image.open(os.path.join(self.path,data))
        img = np.array(img)
        data = torch.Tensor(img).permute(2,0,1) / 255. # 归一化
        data = (data - MyDataset.mean) / MyDataset.std # Normaliz
        target = torch.tensor(target)
        return data, target

if __name__ == '__main__':

    MyDataset("dataset/")
四.编写网络
编写神经网络。文件名称为:MyNet
#源代码
import torch.nn as nn

class MLPNet(nn.Module):

    def __init__(self):
        super(MLPNet, self).__init__()
        self.layers = nn.Sequential(
            nn.Linear(100*100*3, 128),
            nn.ReLU(),
            nn.Linear(128,256),
            nn.ReLU(),
            nn.Linear(256,256),
            nn.ReLU(),
            nn.Linear(256,128),
            nn.ReLU(),
            nn.Linear(128,64),
            nn.ReLU(),
            nn.Linear(64,2),
            nn.Softmax(dim=1)
        )

    def forward(self, x):
        x = x.reshape(-1, 100*100*3)
        return self.layers(x)
五.编写训练
编写训练模型。文件名称为:MyTrain
#源代码
import torch
import torch.nn as nn
from torch.utils.data import DataLoader
from MyNet import MLPNet
from MyDataset import MyDataset
import j
class Trainer:

    def __init__(self):
        self.net = MLPNet()
        self.loss_func = nn.MSELoss()
        self.opt = torch.optim.Adam(self.net.parameters())
        self.dataset = MyDataset("dataset/")

    def loader_data(self):
        return DataLoader(dataset=self.dataset, batch_size=300, shuffle=True)

    def train(self):
        loader = self.loader_data()
        for i in range(20):
            predict = 0
            print("epochs:{}".format(i))
            for j ,(x , y ) in enumerate(loader):
                out = self.net(x)
                y = torch.nn.functional.one_hot(y).float()
                loss = self.loss_func(out, y)
                if j % 5 == 0:
                    print("{}/{},loss:{}".format(j, len(loader), loss.float()))

                classifition = out.argmax(1)#???
                predict += (classifition == y.argmax(1)).sum()
                self.opt.zero_grad()
                loss.backward()
                self.opt.step()

            accuracy = (predict.item() / len(self.dataset.datalist) ) * 100
            print("精度是:{}".format(str(accuracy) + "%"))
            torch.save(self.net, "models/net.pth")

if __name__ == '__main__':

    train = Trainer()
    train.train()
六.编写测试
编写测试代码。文件名称为:TestNet
#源代码
import torch
import numpy as np
from PIL import Image
from MyDataset import MyDataset

def test():

    img = Image.open("testimg/lion.jpg")
    img = img.resize((100, 100), Image.ANTIALIAS)
    img = np.array(img)
    img = torch.tensor(img,dtype=torch.float32).permute(2,0,1) / 255.
    img = (img - MyDataset.mean ) / MyDataset.std

    net = torch.load("models/net.pth")
    out = net(img)
    result = out.argmax(1)
    print("猫" if result == 0 else "狗")
    print("置信度:{}".format(out.max()))

test()
七.应用
使用制作数据文件:MyNet、神经网络文件:MyNet、训练网络文件:MyTrain、测试网络文件:TestNet,共四个文件可进行猫狗识别。
数据、测试文件:https://pan.baidu.com/s/1-Gerudtshv9dPruWzeSs_g
项目列表如下:
![[外链图片转存中...(img-ysEhoD7x-1573739288979)]](https://img-blog.csdnimg.cn/20191120130250776.JPG#pic_center)
