声明:本博文如存在问题,欢迎各位dalao指正!!!
任务描述
本关任务:使用SpringBoot + MyBatis实现一个最简单的注册功能的小程序。
相关知识
为了完成本关任务,你需要掌握:1.如何搭建SpringBoot项目 2.如何分层实现注册。
项目创建
maven构建项目:

    访问 http://start.spring.io/ ;

    进入网址填好自己需要的包名和工具,比如web,MySQL之类的;

    点击Generate Project下载项目压缩包;

    解压后,用Eclipse打开就行。

Spring Boot的基础结构共三个文件:

    src/main/java:程序开发以及主程序入口;

    src/main/resources:配置文件;

    src/test/java: 测试程序。

Spring Boot的目录结构如下:
    Application.java 建议放到根目录下面,主要用于启动项目;
	entity 目录主要用于实体(Entity);
	mapper 层为数据访问层;
    service 层主要是业务类代码;
	controller 层负责页面访问控制。
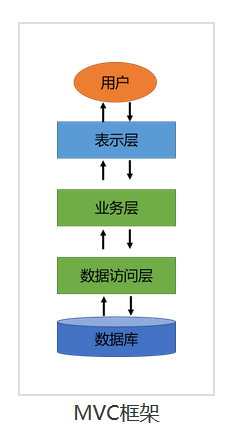
MVC框架
MVC 是一种使用 MVC(Model View Controller 模型-视图-控制器)设计创建 Web 应用程序的模式:
Model(模型)表示应用程序核心(比如数据库记录列表)。
View(视图)显示数据(数据库记录)。
Controller(控制器)处理输入(写入数据库记录)。
优势:耦合性低;重用性高;生命周期成本低;部署块;可维护性高;有利软件工程化管理。
那么我们如何实现MVC框架呢?
其实我们已经做过一部分了,在之前的内容中,我们使用了Controller,Controller就是属于控制器,即C,使用的实体类其实就是模型层。
使用MVC分层实现注册
1.按照第一关的流程,添加依赖及配置application.properties文件:
    <dependency>
        <groupId>org.mybatis.spring.boot</groupId>
        <artifactId>mybatis-spring-boot-starter</artifactId>
        <version>2.1.0</version>
    </dependency>
    spring.datasource.driverClassName = com.mysql.jdbc.Driver
    #mysql地址
    spring.datasource.url = jdbc:mysql://localhost:3306/information_schema?useUnicode=true&cha\fracterEncoding=utf-8
    #mysql用户名
    spring.datasource.username = root
    #mysql密码
    spring.datasource.password = 123123
2.接下来 mapper 层,增加注册的数据访问接口:
    @Mapper
    public interface UserMapper {
        @Insert("insert into users (userName,passWord) values (#{username},#{password})")
        @Options(useGeneratedKeys = true, keyProperty = "userId")
        public int insert(@Param("username")String userName, @Param("password")String password);
    }
3.在service层增加注册业务代码:
在之前我们都是在Controller中直接对数据库进行的操作,学习了MVC我们应该知道业务逻辑的处理应该单独成为一个模块,所以我们现在要将业务逻辑层的代码提取出来成为一个单独的模块。
    @Service
    public class UserService {
        @Autowired
        UserMapper userMapper;
        public Result addUser(String userName, String passWord) {
            Result result = new Result();
            //验证参数
            if (org.springframework.util.StringUtils.isEmpty(userName)
                    || org.springframework.util.StringUtils.isEmpty(passWord)) {
                result.setCode(-1);
                result.setMessage("用户名或者密码为空");
            }//验证成功进行调用数据访问层进行注册
            else {
                int insert = userMapper.insert(userName, passWord);
                result.setCode(0);
                result.setMessage("成功");
                result.setData(insert);
            }
            return result;
        }
Result类为返回值,类结构如下:
    @Data
    public class Result {
        //0为成功,非0为异常
        int code;
        //成功或失败消息
        String message;
        //返回数据
        Object data;
    }
4.最后在controller层创建注册接口并调用这个service即可:
    @Controller
    public class UserController {
        @Autowired
        UserService userService;
        @RequestMapping("/register")
        @ResponseBody
        public Result register(@RequestParam(name = "userName") String userName,
                @RequestParam(name = "passWord") String passWord) {
            Result addUser = userService.addUser(userName, passWord);
            return addUser;
        }
    }
编程要求
1.在 UserMapper 里增加注册用户信息的数据库访问接口
package net.educoder.mapper;

import org.apache.ibatis.annotations.Insert;
import org.apache.ibatis.annotations.Mapper;
import org.apache.ibatis.annotations.Options;
import org.apache.ibatis.annotations.Param;
import net.educoder.entity.TUser;

@Mapper
public interface UserMapper {

	/********* Begin *********/

     @Insert("insert into t_user (userName,passWord) values (#{userName},#{passWord})")
    @Options(useGeneratedKeys = true, keyProperty = "userId")
	public int insert(TUser user);
    /********* End *********/
}
2.在UserService 中验证参数,调用UserMapper接口进行注册
package net.educoder.service.impl;

import org.springframework.beans.factory.annotation.Autowired;
import org.springframework.stereotype.Service;

import net.educoder.entity.Result;
import net.educoder.entity.TUser;
import net.educoder.mapper.UserMapper;

@Service
public class UserService {

	/********* Begin *********/
    @Autowired
    UserMapper userMapper;

	@Autowired
    UserMapper demoMapper;
    public Result addUser(String userName, String passWord) {
        Result result = new Result();
        //验证参数
        if (org.springframework.util.StringUtils.isEmpty(userName)
                || org.springframework.util.StringUtils.isEmpty(passWord)) {
            result.setCode(-1);
            result.setMessage("用户名或者密码为空");
        }//验证成功进行调用数据访问层进行注册
        else {
			TUser tUser = new TUser();
			tUser.setUserName(userName);
			tUser.setPassWord(passWord);
            int insert = userMapper.insert(tUser);
            result.setCode(0);
            result.setMessage("成功");
			// tUser.setUserId(tUser.getUserId());
            result.setData(tUser);
        }
        return result;

  /********* End *********/
}
}
3.在UserController创建前端访问接口,调用UserService的接口进行注册。
package net.educoder.controller;

import org.springframework.beans.factory.annotation.Autowired;
import org.springframework.stereotype.Controller;
import org.springframework.web.bind.annotation.RequestMapping;
import org.springframework.web.bind.annotation.RequestParam;
import org.springframework.web.bind.annotation.ResponseBody;

import net.educoder.entity.Result;
import net.educoder.service.impl.UserService;

@Controller
public class UserController {

	/********* Begin *********/
    @Autowired
    UserService userService;
    @RequestMapping("/register")
    @ResponseBody
    public Result register(@RequestParam(name = "userName") String userName,
        @RequestParam(name = "passWord") String passWord) {
        Result addUser = userService.addUser(userName, passWord);
        return addUser;
    }
  /********* End *********/

}
总结:
在UserMapper时插入数据给一个对象,我们最好是将新建一个TUser对象,然后将插入的值给对象,然后将对象插入进去,不然就会出现自增长的UserId和插入的UserName、passWord等值对应不上一个对象,然后就会出现UserId找不到对象的情况。
