springboot+mybatis+thymeleaf
进行一个简单的数据库数据查询
开发工具: eclipse + jdk8+maven-3.0.4+mysql5.7+druid
springboot和springmvc
springboot这个 框架用起来比springmvc方便多了,光是配置上面省去了我们多少工作量。对得起这个微服务
首先springboot不用我们单独的建立tomcat服务,也不用我们在那庞大的application-context中 去整合 hibernate/mybatis
毕竟从 datasource构建,定义sessinonFactory,然后定义 tarnscationManager,
然后去注入到 拦截器TranSactionInterceptor里面从而定义事物传播.
然后使用定义的拦截器注入到BeanNameAutoProxyCreator定义可以接受事物管理扫描的bean以及bean的代理
这个过程也是毕竟花费时间的。
这个过程中有一些步骤是可以继续封装的。
springboot帮我们省去了这些过程,我们可以很方便的使用
材料需要的网址:
springboot :
http://projects.spring.io/spring-boot/#quick-start
mybatis:
http://www.mybatis.org/spring-boot-starter/mybatis-spring-boot-autoconfigure/

thymeleaf:
https://docs.spring.io/spring-boot/docs/current-SNAPSHOT/reference/htmlsingle/

thymeleaf属性介绍
对于thymeleaf需要一些配置在上面的网站上可以找到

我们将上面的配置属性 copy到我们的 application.properties文件中
但是需要修改几个参数:
spring.thymeleaf.cache=false
spring.thymeleaf.prefix=classpath:/templates/ 这个是返回页面模板时候查找模板的前缀,根据实际情况进行修改
spring.thymeleaf.suffix=.html 这个是模板文件的后缀名
第一步:新建一个maven项目,在pom中整合thymeleaf和mybatis
还有jdbc和数据源
这个步骤很简单,我们建立一个 miaosha的maven项目
(前提是eclipse已经设置好了maven)
maven加入镜像
为了方便,我们把maven的settings.xml 稍微修改下,加入镜像,这样我们可以得到jar包
在 <mirrors>下面增加如下的镜像配置
<mirror>
  <id>alimaven</id>
  <name>aliyun maven</name>
  <url>http://maven.aliyun.com/nexus/content/groups/public/</url>
  <mirrorOf>central</mirrorOf>
</mirror>
还要启用本地源:
<localRepository>D:\maven-data\repo</localRepository>
加入依赖
然后我们在 pom.xml中将 springboot,thymeleaf,mybatis的jar包依赖引进
pom.xml
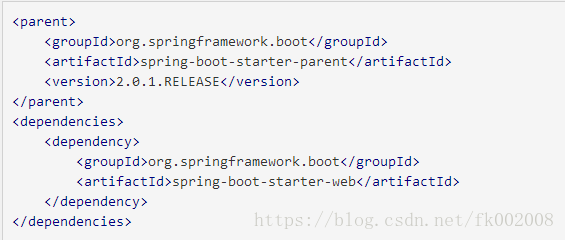
<parent>
		<groupId>org.springframework.boot</groupId>
		<artifactId>spring-boot-starter-parent</artifactId>
		 <!--<version>2.0.1.RELEASE</version> -->
		<version>1.5.8.RELEASE</version>
	</parent>

	<dependencies>

		<dependency>
			<groupId>org.springframework.boot</groupId>
			<artifactId>spring-boot-starter-web</artifactId>
		</dependency>

		<!-- 集成 thymeleaf -->
    <dependency>
      <groupId>org.springframework.boot</groupId>
      <artifactId>spring-boot-starter-thymeleaf</artifactId>
	</dependency>

		<!-- 集成 mybatis -->
	<dependency>
	    <groupId>org.mybatis.spring.boot</groupId>
	    <artifactId>mybatis-spring-boot-starter</artifactId>
	     <version>1.3.1</version>
	</dependency>

	<!-- 集成jdbc -->
		<dependency>
		<groupId>mysql</groupId>
		<artifactId>mysql-connector-java</artifactId>
		<scope>runtime</scope>
	</dependency>

	<!-- 集成数据源 -->
	<dependency>
		<groupId>com.alibaba</groupId>
		<artifactId>druid</artifactId>
		<version>1.0.5</version>
	</dependency>
	</dependencies>
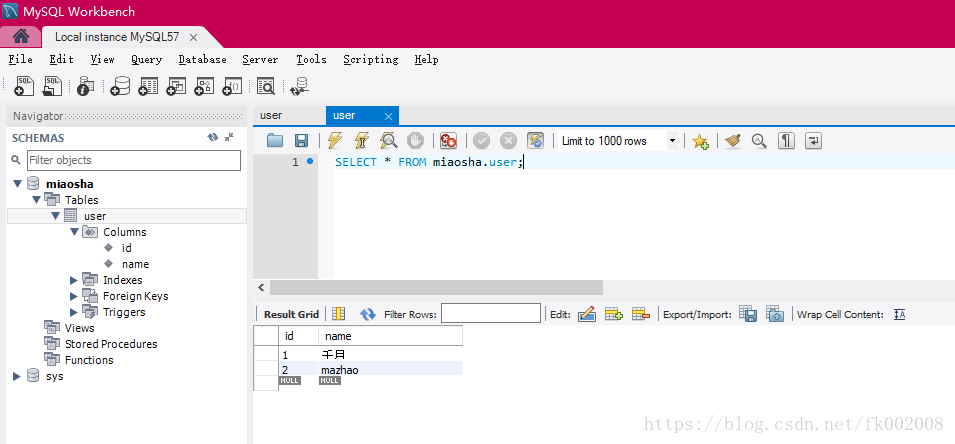
第二步: 建立一个数据库我们获取数据
安装好mysql之后,使用 自带的wokbench视图化环境下建立一个 schema (数据库)
这里我们将建立一个 名为 miaosha的数据库.然后建立一个user的关系模式 user(id,name)

第三步: 新建application.properties
配置thymeleaf和mybatis以及jdbc和druid
这个文件放到我们的 main/resoureces 下面就行
(如果没有 main/resoureces 目录自己建立一个然后加入到classpath中)
application.properties 文件中要配置这个 thymeleaf的属性 ,mybatis的属性和jdbc信息以及数据源信息
当然这些文件我们可以分类管理的,这里我们写在一起,方便
thymeleaf的属性以及templates设定
# THYMELEAF (ThymeleafAutoConfiguration)=====================
 # Whether to enable template caching.
spring.thymeleaf.cache=false
spring.thymeleaf.encoding=UTF-8
spring.thymeleaf.enabled=true
spring.thymeleaf.mode=HTML5

#这个是页面返回时候的前缀路径,用于寻找模板
spring.thymeleaf.prefix=classpath:/templates/
#这个是模板的扩展名
spring.thymeleaf.suffix=.html
spring.thymeleaf.servlet.content-type=text/html
注意到我们的模板的位置: classpath:/templates/
所以我们要在classpath路径中建立一个 templates的文件夹用来存储模板
我们可以在 main/resources目录下 建立这个 templates文件夹
我们这次使用 hello.html作为 展示
Mybatis属性
# aliases :将数据库的关系映射到 bean
mybatis.type-aliases-package=miaosha.dao.domain
mybatis.configuration.map-underscore-to-camel-case=true
mybatis.configuration.default-fetch-size=100
mybatis.configuration.default-statement-timeout=3000
# mybatis中的xml文件
mybatis.mapperLocations = classpath:miaosha/dao/xml/*.xml
jdbc和数据源属性
spring.datasource.url=jdbc:mysql://127.0.0.1:3306/miaosha?useUnicode=true&characterEncoding=utf-8&allowMultiQueries=true&useSSL=false
spring.datasource.username=root
spring.datasource.password=123456
spring.datasource.driver-class-name=com.mysql.jdbc.Driver
spring.datasource.type=com.alibaba.druid.pool.DruidDataSource
#这个是druid的一个配置属性
spring.datasource.filters=stat
spring.datasource.maxActive=2
spring.datasource.initialSize=1
spring.datasource.maxWait=60000
spring.datasource.minIdle=1
spring.datasource.timeBetweenEvictionRunsMillis=60000
spring.datasource.minEvictableIdleTimeMillis=300000
spring.datasource.validationQuery=select 'x'
spring.datasource.testWhileIdle=true
spring.datasource.testOnBorrow=false
spring.datasource.testOnReturn=false
spring.datasource.poolPreparedStatements=true
spring.datasource.maxOpenPreparedStatements=20
第四步:建立工程各个层次包
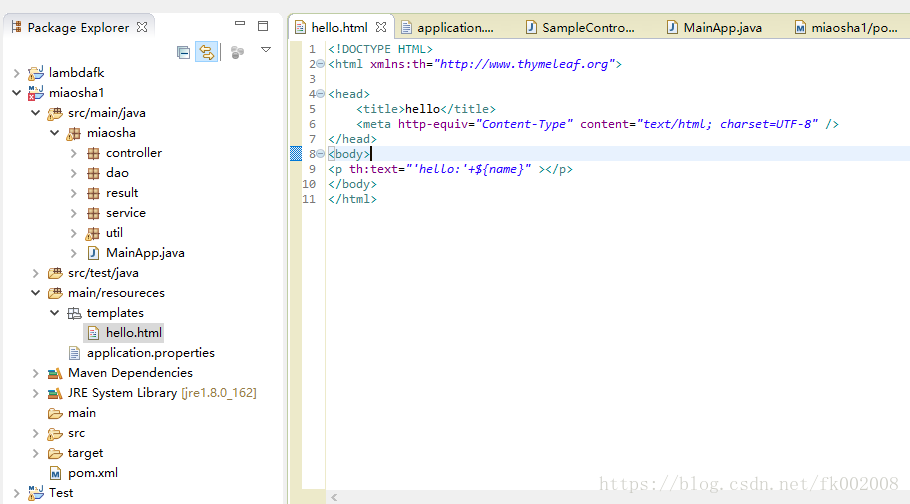
hello.html
<!DOCTYPE HTML>
<html xmlns:th="http://www.thymeleaf.org">

<head>
    <title>hello</title>
    <meta http-equiv="Content-Type" content="text/html; charset=UTF-8" />
</head>
<body>
<p th:text="'hello:'+${name}" ></p>
</body>
</html>
4.1 建立domain和UserDao
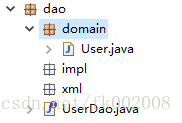
---------------------------------------------
User.java
package miaosha.dao.domain;

public class User {
	private int id ;
	private String name ;
	public int getId() {
		return id;
	}
	public void setId(int id) {
		this.id = id;
	}
	public String getName() {
		return name;
	}
	public void setName(String name) {
		this.name = name;
	}

}
UserDao.java
package miaosha.dao;

import org.apache.ibatis.annotations.Mapper;
import org.apache.ibatis.annotations.Param;
import org.apache.ibatis.annotations.Select;

import miaosha.dao.domain.User;

@Mapper
public interface UserDao {

	@Select("select * from user where id=#{id}")
	public User findUserById(@Param("id") int id);
}
4.2 建立service
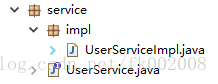
UserServiceImpl.java
package miaosha.service.impl;

import org.springframework.beans.factory.annotation.Autowired;
import org.springframework.stereotype.Service;

import miaosha.dao.UserDao;
import miaosha.dao.domain.User;
import miaosha.service.UserService;

/**
 * service
 * @author kaifeng1
 *
 */
@Service("userService")
public class UserServiceImpl implements UserService{

	@Autowired
	private UserDao userDao ;
	public User findUserById(int id) {
		return this.userDao.findUserById(id);
	}

}
4.3建立页面结果返回类
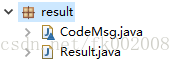
CodeMsg.java
package miaosha.result;

/**
 * 项目结果码
 * 这里把这个类设计为  默认的修饰,去掉public这样 这个类只能在当前包下面使用
 * 不会暴露给外面的包
 *
 * @author kaifeng1
 *
 */
 class CodeMsg {
	private int code;
	private String msg;

	public static CodeMsg SUCESS = new CodeMsg(200, "sucess");
	public static CodeMsg ERROR = new CodeMsg(300, "error");

	private CodeMsg(int code, String msg) {
		this.code = code;
		this.msg = msg;
	}

	public int getCode() {
		return code;
	}

	public String getMsg() {
		return msg;
	}

}
Result.java
package miaosha.result;

/**
 * 返回结果封装
 *
 * @author kaifeng1
 *
 * @param <T>
 */
public final class Result<T> {

	private int code;
	private String msg;
	private T data;

	/**
	 * 成功
	 * @param data
	 * @return
	 */
	public static <T> Result<T> sucess(T data) {
		Result<T> r = new Result<T>(CodeMsg.SUCESS);
		r.data = data;
		return r;
	}

	/**
	 * 失败
	 * @param data
	 * @return
	 */
	public static <T> Result<T> error(T data) {
		Result<T> r = new Result<T>(CodeMsg.ERROR);
		r.data = data;
		return r;
	}

	private Result(T data) {
		this.data = data;
	}

	private Result(CodeMsg codeMsg) {
		this.code = codeMsg.getCode();
		this.msg = codeMsg.getMsg();
	}

	public int getCode() {
		return code;
	}

	public String getMsg() {
		return msg;
	}

	public T getData() {
		return data;
	}

}
4.4 建立Controller
controller的写法和springmvc没有什么区别的
主要想说的是 如何返回到 我们thymeleaf的模板 hello.html
我们的application.proerties中已经配置了 头和尾,
我们controller中如果是一个页面跳转的方法,那么这个返回结果将和 配置中的进行拼接
从而找到我们指定的模板.
SampleController.java
package miaosha.controller;
import org.springframework.beans.factory.annotation.Autowired;
import org.springframework.stereotype.Controller;
import org.springframework.ui.Model;
import org.springframework.web.bind.annotation.RequestMapping;
import org.springframework.web.bind.annotation.ResponseBody;
import miaosha.dao.domain.User;
import miaosha.result.Result;
import miaosha.service.UserService;
/**
* controller
* @author kaifeng1
*
*/
@Controller
@RequestMapping("/sample")
public class SampleController {
@Autowired
private UserService userService ;
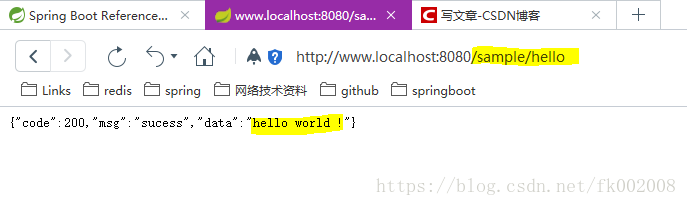
@RequestMapping("/hello")
@ResponseBody
Result<String> hello() {
return Result.sucess("hello world !");
}
@RequestMapping("/thymeleaf")
public String toHelloHtml(Model model) {
User user = this.userService.findUserById(1);
model.addAttribute("name", user.getName());
return "hello" ;
}
}
4.5建立启动springboot的类
需要说明的是,上面的controller也可以充当这个类的。
这个类其实呢就是为了启动用的。如同我们启动了tomcat服务一样的.
但是有一点要注意: 这个类的位置很重要
因为进行扫描的时候是从 这个类开始从上到下进行扫描的
像我们上面的controller和service都是分层好的。
如果使用 controller充当启动类,那么扫描就只会在 controller包和controller子包中进行,那么
service和dao下面的就扫描不到了
所以我们把启动类发到了 最顶层
MainApp.java
package miaosha;

import org.springframework.boot.SpringApplication;
import org.springframework.boot.autoconfigure.SpringBootApplication;

//@EnableAutoConfiguration
@SpringBootApplication
public class MainApp {

	public static void main(String[] args) {
		SpringApplication.run(MainApp.class, args);
	}
}
可以看到这个类有一个main函数,直接运行即可

打开浏览器:输入 http://www.localhost:8080/sample/hello
再次输入 http://www.localhost:8080/sample/thymeleaf

我们发现 数据库的数据展示到页面的了