有了一些对React Native开发的简单了解,让我们从实战出发,一起来构建一个简单的京东客户端。
这个客户端是仿照之前版本的京东客户端开发的Android版应用,来源于CSDN上的一位分享者,再次向他表示感谢!
本文会对京东客户端首页的布局进行简单的分析,并对搜索框部分的开发进行介绍,其他内容在后面的文章中继续介绍。
后继文章:
React Native入门——布局实践:开发京东客户端首页(二)TabBar的构建
欢迎交流!
1.京东客户端首页布局分析

如图所示,京东客户端首页布局基本分为以下几个部分:
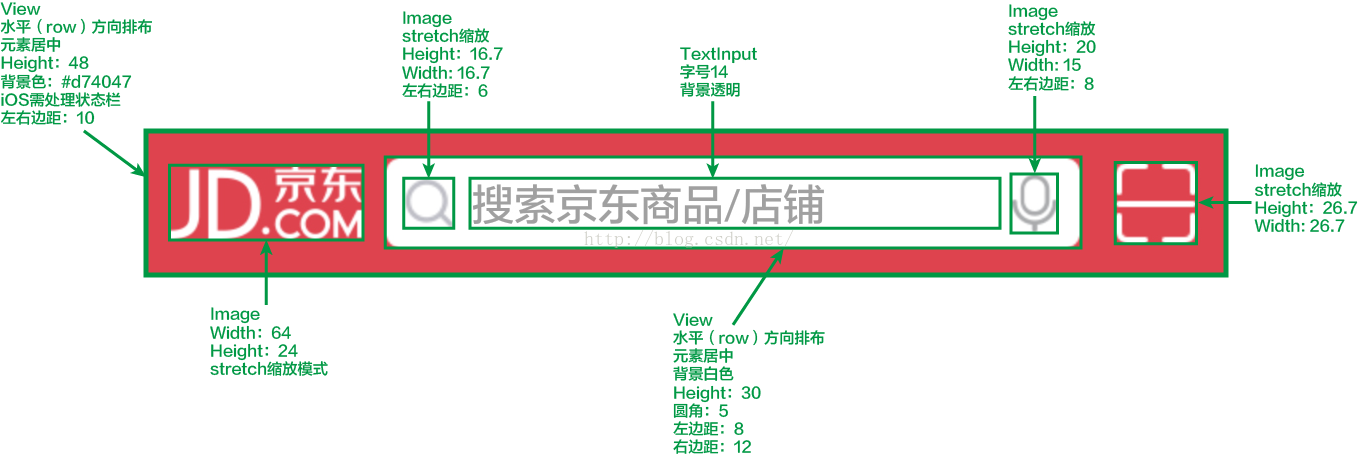
(1)头部:搜索栏,由京东logo、搜索输入框和扫描按钮组成

(2)内容部分:父级元素为ListView或ScrollView,可滑动,其中包括一个轮播图、一组功能按钮和秒杀、拍卖商品列表
(3)底部:TabBar,用于切换页面
2.创建工程和相关文件、目录

3.调研相关控件
4.分析搜索栏的基本布局
5.代码实现
- ’use strict’;
- import React, {
- Component
- Image,
- TextInput
- View,
- StyleSheet
- } from ’react-native’;
'use strict';

import React, {
    Component
    Image,
    TextInput
    View,
    StyleSheet
} from 'react-native';
接着声明类和样式,之所以使用export,是因为要在其他类中使用(如:MainScreen)
- export default class Header extends Component {
- }
- const styles = StyleSheet.create({
- });
export default class Header extends Component {

}

const styles = StyleSheet.create({

});
然后在Header类的render()方法中编写JSX代码,在StyleSheet.create()方法中,编写类CSS的样式,如下:
- export default class Header extends Component {
- render() {
- return (
- <View style={styles.container}>
- </View>
- )
- }
- }
- const styles = StyleSheet.create({
- container: {
- flexDirection: ’row’,
- paddingLeft: 10,
- paddingRight: 10,
- paddingTop: Platform.OS === ’ios’ ? 20 : 0, // 处理iOS状态栏
- height: Platform.OS === ’ios’ ? 68 : 48, // 处理iOS状态栏
- backgroundColor: ’#d74047’,
- alignItems: ’center’
- }});
export default class Header extends Component {
    render() {
        return (
            <View style={styles.container}>

            </View>
        )
    }
}

const styles = StyleSheet.create({
    container: {
        flexDirection: 'row',
        paddingLeft: 10,
        paddingRight: 10,
        paddingTop: Platform.OS === 'ios' ? 20 : 0,   // 处理iOS状态栏
        height: Platform.OS === 'ios' ? 68 : 48,   // 处理iOS状态栏
        backgroundColor: '#d74047',
        alignItems: 'center'
    }});
然后我们在模拟器或者真机上跑一下,看看效果


- const styles = StyleSheet.create({
- container: {
- flexDirection: ’row’, // 水平排布
- paddingLeft: 10,
- paddingRight: 10,
- paddingTop: Platform.OS === ’ios’ ? 20 : 0, // 处理iOS状态栏
- height: Platform.OS === ’ios’ ? 68 : 48, // 处理iOS状态栏
- backgroundColor: ’#d74047’,
- alignItems: ’center’ // 使元素垂直居中排布, 当flexDirection为column时, 为水平居中
- },
- logo: {
- height: 24,
- width: 64,
- resizeMode: ’stretch’ // 设置拉伸模式
- },
- searchBox: {
- height: 30,
- flexDirection: ’row’,
- flex: 1, // 类似于android中的layout_weight,设置为1即自动拉伸填充
- borderRadius: 5, // 设置圆角边
- backgroundColor: ’white’,
- alignItems: ’center’,
- marginLeft: 8,
- marginRight: 12
- },
- scanIcon: {
- height: 26.7,
- width: 26.7,
- resizeMode: ’stretch’
- },
- searchIcon: {
- marginLeft: 6,
- marginRight: 6,
- width: 16.7,
- height: 16.7,
- resizeMode: ’stretch’
- },
- voiceIcon: {
- marginLeft: 5,
- marginRight: 8,
- width: 15,
- height: 20,
- resizeMode: ’stretch’
- },
- inputText: {
- flex: 1,
- backgroundColor: ’transparent’,
- fontSize: 14
- }
- });
const styles = StyleSheet.create({
    container: {
        flexDirection: 'row',   // 水平排布
        paddingLeft: 10,
        paddingRight: 10,
        paddingTop: Platform.OS === 'ios' ? 20 : 0,  // 处理iOS状态栏
        height: Platform.OS === 'ios' ? 68 : 48,   // 处理iOS状态栏
        backgroundColor: '#d74047',
        alignItems: 'center'  // 使元素垂直居中排布, 当flexDirection为column时, 为水平居中
    },
    logo: {
        height: 24,
        width: 64,
        resizeMode: 'stretch'  // 设置拉伸模式
    },
    searchBox: {
        height: 30,
        flexDirection: 'row',
        flex: 1,  // 类似于android中的layout_weight,设置为1即自动拉伸填充
        borderRadius: 5,  // 设置圆角边
        backgroundColor: 'white',
        alignItems: 'center',
        marginLeft: 8,
        marginRight: 12
    },
    scanIcon: {
        height: 26.7,
        width: 26.7,
        resizeMode: 'stretch'
    },
    searchIcon: {
        marginLeft: 6,
        marginRight: 6,
        width: 16.7,
        height: 16.7,
        resizeMode: 'stretch'
    },
    voiceIcon: {
        marginLeft: 5,
        marginRight: 8,
        width: 15,
        height: 20,
        resizeMode: 'stretch'
    },
    inputText: {
        flex: 1,
        backgroundColor: 'transparent',
        fontSize: 14
    }
});
请认真注意上面代码中的注释,标有注释的地方,即为和普通iOS、Android开发不太一样的地方!
由于我们已经将父级元素的排布方向改为水平,所以我们只需将需要展现的元素放入<View>的子元素即可,如下代码所示:
- export default class Header extends Component {
- render() {
- return (
- <View style={styles.container}>
- <Image source={require(’./images/header/header_logo.png’)} style={styles.logo}/>
- <View style={styles.searchBox}>
- <Image source={require(’./images/header/icon_search.png’)} style={styles.searchIcon}/>
- <TextInput
- keyboardType=’web-search’
- placeholder=’搜索京东商品/店铺’
- style={styles.inputText}/>
- <Image source={require(’./images/header/icon_voice.png’)} style={styles.voiceIcon}/>
- </View>
- <Image source={require(’./images/header/icon_qr.png’)} style={styles.scanIcon}/>
- </View>
- )
- }
- }
export default class Header extends Component {
    render() {
        return (
            <View style={styles.container}>
                <Image source={require('./images/header/header_logo.png')} style={styles.logo}/>
                <View style={styles.searchBox}>
                    <Image source={require('./images/header/icon_search.png')} style={styles.searchIcon}/>
                    <TextInput
                        keyboardType='web-search'
                        placeholder='搜索京东商品/店铺'
                        style={styles.inputText}/>
                    <Image source={require('./images/header/icon_voice.png')} style={styles.voiceIcon}/>
                </View>
                <Image source={require('./images/header/icon_qr.png')} style={styles.scanIcon}/>
            </View>
        )
    }
}
需要注意的是:

项目源码及资源文件:https://github.com/yuanguozheng/JdApp
本次Commit:https://github.com/yuanguozheng/JdApp/commit/b34add1224fc02d25bd7a188e2cade73c122f59c
转载请注明出处:http://blog.csdn.net/yuanguozhengjust/article/details/50538651
        </div>
            </div>
有了一些对React Native开发的简单了解,让我们从实战出发,一起来构建一个简单的京东客户端。
这个客户端是仿照之前版本的京东客户端开发的Android版应用,来源于CSDN上的一位分享者,再次向他表示感谢!
本文会对京东客户端首页的布局进行简单的分析,并对搜索框部分的开发进行介绍,其他内容在后面的文章中继续介绍。
后继文章:
React Native入门——布局实践:开发京东客户端首页(二)TabBar的构建
欢迎交流!
1.京东客户端首页布局分析
如图所示,京东客户端首页布局基本分为以下几个部分:
(1)头部:搜索栏,由京东logo、搜索输入框和扫描按钮组成
(2)内容部分:父级元素为ListView或ScrollView,可滑动,其中包括一个轮播图、一组功能按钮和秒杀、拍卖商品列表
(3)底部:TabBar,用于切换页面
2.创建工程和相关文件、目录
3.调研相关控件
4.分析搜索栏的基本布局
5.代码实现
- ’use strict’;
- import React, {
- Component
- Image,
- TextInput
- View,
- StyleSheet
- } from ’react-native’;
'use strict';

import React, {
    Component
    Image,
    TextInput
    View,
    StyleSheet
} from 'react-native';
接着声明类和样式,之所以使用export,是因为要在其他类中使用(如:MainScreen)
- export default class Header extends Component {
- }
- const styles = StyleSheet.create({
- });
export default class Header extends Component {

}

const styles = StyleSheet.create({

});
然后在Header类的render()方法中编写JSX代码,在StyleSheet.create()方法中,编写类CSS的样式,如下:
- export default class Header extends Component {
- render() {
- return (
- <View style={styles.container}>
- </View>
- )
- }
- }
- const styles = StyleSheet.create({
- container: {
- flexDirection: ’row’,
- paddingLeft: 10,
- paddingRight: 10,
- paddingTop: Platform.OS === ’ios’ ? 20 : 0, // 处理iOS状态栏
- height: Platform.OS === ’ios’ ? 68 : 48, // 处理iOS状态栏
- backgroundColor: ’#d74047’,
- alignItems: ’center’
- }});
export default class Header extends Component {
    render() {
        return (
            <View style={styles.container}>

            </View>
        )
    }
}

const styles = StyleSheet.create({
    container: {
        flexDirection: 'row',
        paddingLeft: 10,
        paddingRight: 10,
        paddingTop: Platform.OS === 'ios' ? 20 : 0,   // 处理iOS状态栏
        height: Platform.OS === 'ios' ? 68 : 48,   // 处理iOS状态栏
        backgroundColor: '#d74047',
        alignItems: 'center'
    }});
然后我们在模拟器或者真机上跑一下,看看效果
- const styles = StyleSheet.create({
- container: {
- flexDirection: ’row’, // 水平排布
- paddingLeft: 10,
- paddingRight: 10,
- paddingTop: Platform.OS === ’ios’ ? 20 : 0, // 处理iOS状态栏
- height: Platform.OS === ’ios’ ? 68 : 48, // 处理iOS状态栏
- backgroundColor: ’#d74047’,
- alignItems: ’center’ // 使元素垂直居中排布, 当flexDirection为column时, 为水平居中
- },
- logo: {
- height: 24,
- width: 64,
- resizeMode: ’stretch’ // 设置拉伸模式
- },
- searchBox: {
- height: 30,
- flexDirection: ’row’,
- flex: 1, // 类似于android中的layout_weight,设置为1即自动拉伸填充
- borderRadius: 5, // 设置圆角边
- backgroundColor: ’white’,
- alignItems: ’center’,
- marginLeft: 8,
- marginRight: 12
- },
- scanIcon: {
- height: 26.7,
- width: 26.7,
- resizeMode: ’stretch’
- },
- searchIcon: {
- marginLeft: 6,
- marginRight: 6,
- width: 16.7,
- height: 16.7,
- resizeMode: ’stretch’
- },
- voiceIcon: {
- marginLeft: 5,
- marginRight: 8,
- width: 15,
- height: 20,
- resizeMode: ’stretch’
- },
- inputText: {
- flex: 1,
- backgroundColor: ’transparent’,
- fontSize: 14
- }
- });
const styles = StyleSheet.create({
    container: {
        flexDirection: 'row',   // 水平排布
        paddingLeft: 10,
        paddingRight: 10,
        paddingTop: Platform.OS === 'ios' ? 20 : 0,  // 处理iOS状态栏
        height: Platform.OS === 'ios' ? 68 : 48,   // 处理iOS状态栏
        backgroundColor: '#d74047',
        alignItems: 'center'  // 使元素垂直居中排布, 当flexDirection为column时, 为水平居中
    },
    logo: {
        height: 24,
        width: 64,
        resizeMode: 'stretch'  // 设置拉伸模式
    },
    searchBox: {
        height: 30,
        flexDirection: 'row',
        flex: 1,  // 类似于android中的layout_weight,设置为1即自动拉伸填充
        borderRadius: 5,  // 设置圆角边
        backgroundColor: 'white',
        alignItems: 'center',
        marginLeft: 8,
        marginRight: 12
    },
    scanIcon: {
        height: 26.7,
        width: 26.7,
        resizeMode: 'stretch'
    },
    searchIcon: {
        marginLeft: 6,
        marginRight: 6,
        width: 16.7,
        height: 16.7,
        resizeMode: 'stretch'
    },
    voiceIcon: {
        marginLeft: 5,
        marginRight: 8,
        width: 15,
        height: 20,
        resizeMode: 'stretch'
    },
    inputText: {
        flex: 1,
        backgroundColor: 'transparent',
        fontSize: 14
    }
});
请认真注意上面代码中的注释,标有注释的地方,即为和普通iOS、Android开发不太一样的地方!
由于我们已经将父级元素的排布方向改为水平,所以我们只需将需要展现的元素放入<View>的子元素即可,如下代码所示:
- export default class Header extends Component {
- render() {
- return (
- <View style={styles.container}>
- <Image source={require(’./images/header/header_logo.png’)} style={styles.logo}/>
- <View style={styles.searchBox}>
- <Image source={require(’./images/header/icon_search.png’)} style={styles.searchIcon}/>
- <TextInput
- keyboardType=’web-search’
- placeholder=’搜索京东商品/店铺’
- style={styles.inputText}/>
- <Image source={require(’./images/header/icon_voice.png’)} style={styles.voiceIcon}/>
- </View>
- <Image source={require(’./images/header/icon_qr.png’)} style={styles.scanIcon}/>
- </View>
- )
- }
- }
export default class Header extends Component {
    render() {
        return (
            <View style={styles.container}>
                <Image source={require('./images/header/header_logo.png')} style={styles.logo}/>
                <View style={styles.searchBox}>
                    <Image source={require('./images/header/icon_search.png')} style={styles.searchIcon}/>
                    <TextInput
                        keyboardType='web-search'
                        placeholder='搜索京东商品/店铺'
                        style={styles.inputText}/>
                    <Image source={require('./images/header/icon_voice.png')} style={styles.voiceIcon}/>
                </View>
                <Image source={require('./images/header/icon_qr.png')} style={styles.scanIcon}/>
            </View>
        )
    }
}
需要注意的是:
项目源码及资源文件:https://github.com/yuanguozheng/JdApp
本次Commit:https://github.com/yuanguozheng/JdApp/commit/b34add1224fc02d25bd7a188e2cade73c122f59c
转载请注明出处:http://blog.csdn.net/yuanguozhengjust/article/details/50538651
        </div>
            </div>