此系列:IDEA 搭建 基于 SSM 框架 的 Maven 项目, 完成一个基本的Web应用,实现 crud 功能。
(1) 在IDEA中,新建一个Maven工程,并创建好完整的项目结构
(2) 引入项目依赖的 jar 包,引入bootstrap前端框架,编写SSM整合的配置文件
(3) 创建数据库,生成bean文件 和 mapper文件,最后测试该部分
(4) 页面发送请求查询所有员工数据,得到 json 字符串
(5) 设计分页显示页面,解析 json 字符串,展示查询结果
(6) 添加“新增”功能
(7) 对用户输入数据进行校验
(8) 添加“修改”功能
(9) 添加“删除”功能
本节:创建数据库,生成bean文件 和 mapper文件,最后测试该部分
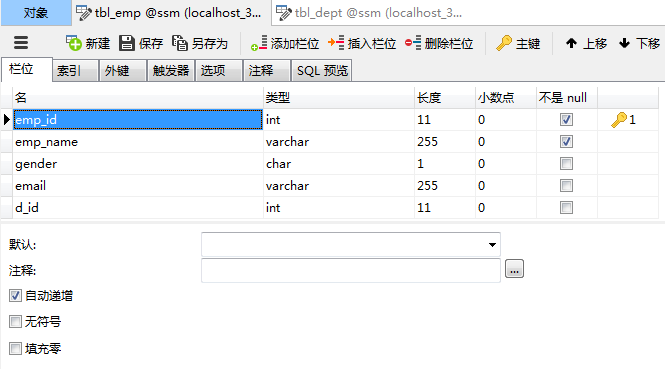
1. 创建数据库
create database ssm;
use ssm;

create table tbl_dept(dept_id int(11) not null primary key auto_increment,dept_name varchar(255) not null);
create table tbl_emp(emp_id int(11) not null primary key auto_increment, emp_name varchar(255), gender char(1), email varchar(255), d_id int(11));

2. 使用 MyBatis 逆向工程,生成数据库中表的 bean 文件和 mapper文件
- 在项目名上,右键,选择New,再选择 File,新建文件 mbg.xml,内容如下。
注意:
1.配置数据库连接信息,connectionURL中设置为要连接的表名,userId设置用户名,password设置密码
2.指定javaBean生成的位置,argetPackage中设置包名,比如在该项目中argetPackage=“com.demo.ssm.bean”
3.指定dao接口生成的位置,targetPackage中设置包名,比如该项目中targetPackage=“com.demo.ssm.dao”
4.指定每个表的生成策略,按照项目的数据库中表名自行设置,比如该项目中
<table tableName=“tbl_emp” domainObjectName=“Employee”></table>
<table tableName=“tbl_dept” domainObjectName=“Department”></table>
<?xml version="1.0" encoding="UTF-8"?>
<!DOCTYPE generatorConfiguration
        PUBLIC "-//mybatis.org//DTD MyBatis Generator Configuration 1.0//EN"
        "http://mybatis.org/dtd/mybatis-generator-config_1_0.dtd">
<generatorConfiguration>

    <context id="DB2Tables" targetRuntime="MyBatis3">
        <commentGenerator>
            <property name="suppressAllComments" value="true" />
        </commentGenerator>
        <!-- 配置数据库连接 -->
        <jdbcConnection driverClass="com.mysql.cj.jdbc.Driver"
                        connectionURL="jdbc:mysql://localhost:3306/ssm?serverTimezone=UTC" userId="root"
                        password="root1234">
        </jdbcConnection>

        <javaTypeResolver>
            <property name="forceBigDecimals" value="false" />
        </javaTypeResolver>

        <!-- 指定javaBean生成的位置 -->
        <javaModelGenerator targetPackage="com.demo.ssm.bean"
                            targetProject=".\src\main\java">
            <property name="enableSubPackages" value="true" />
            <property name="trimStrings" value="true" />
        </javaModelGenerator>

        <!--指定sql映射文件生成的位置 -->
        <sqlMapGenerator targetPackage="mapper" targetProject=".\src\main\resources">
            <property name="enableSubPackages" value="true" />
        </sqlMapGenerator>

        <!-- 指定dao接口生成的位置,mapper接口 -->
        <javaClientGenerator type="XMLMAPPER"
                             targetPackage="com.demo.ssm.dao" targetProject=".\src\main\java">
            <property name="enableSubPackages" value="true" />
        </javaClientGenerator>


        <!-- table指定每个表的生成策略 -->
        <table tableName="tbl_emp" domainObjectName="Employee"></table>
        <table tableName="tbl_dept" domainObjectName="Department"></table>

    </context>
</generatorConfiguration>
- 在 src \ main \ java \ com \ demo \ ssm \ test 文件夹下,New \ Java Class,新建 MBGTest.java 文件,内容如下。
public class MBGTest {
    public static void main(String[] args) throws Exception {
        List<String> warnings = new ArrayList<String>();
        boolean overwrite = true;
        File configFile = new File("mbg.xml");
        ConfigurationParser cp = new ConfigurationParser(warnings);
        Configuration config = cp.parseConfiguration(configFile);
        DefaultShellCallback callback = new DefaultShellCallback(overwrite);
        MyBatisGenerator myBatisGenerator = new MyBatisGenerator(config,
                callback, warnings);
        myBatisGenerator.generate(null);
    }
}
- 运行 MBGTest.main(),刷新一下整个项目。会发现,文件夹 bean、dao 和mapper 下已自动生成对应的文件。
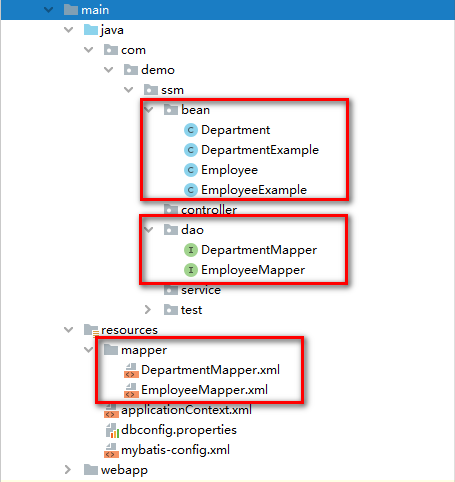
3. 修改 bean 文件
在 Department.java 和 Employee.java 文件中增加有参构造器和无参构造器,Employee.java有参构造器生成中,不带Department属性。
	public Department() {}

    public Department(Integer deptId, String deptName) {
        this.deptId = deptId;
        this.deptName = deptName;
    }
	public Employee() {}

    public Employee(Integer empId, String empName, String gender, String email, Integer dId) {
        this.empId = empId;
        this.empName = empName;
        this.gender = gender;
        this.email = email;
        this.dId = dId;
    }
4. 修改 mapper 文件
EmpoyeeMapper中,自动生成的方法如下所示。
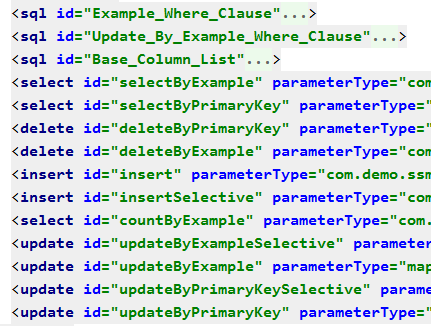
增加一个联合查询,查询员工信息时直接带上所在部门的信息。
在 dao \ EmployeeMapper.java 文件中,增加两个方法。
	List<Employee> selectByExampleWithDept(EmployeeExample example);
    Employee selectByPrimaryKeyWithDept(Integer empId);
在 bean \ Employee.java 文件中,增加一个department属性,以及对应的get和set方法。
	private Department department;

    public Department getDepartment() {
        return department;
    }

    public void setDepartment(Department department) {
        this.department = department;
    }
EmployeeMapper.xml文件中,增加如下内容。方法比较简单,照着自动生成的内容更改就好。
<resultMap id="WithDeptResultMap" type="com.demo.ssm.bean.Employee">
    <id column="emp_id" jdbcType="INTEGER" property="empId" />
    <result column="emp_name" jdbcType="VARCHAR" property="empName" />
    <result column="gender" jdbcType="CHAR" property="gender" />
    <result column="email" jdbcType="VARCHAR" property="email" />
    <result column="d_id" jdbcType="INTEGER" property="dId" />
    <association property="department" javaType="com.demo.ssm.bean.Department">
      <id column="dept_id" property="deptId" />
      <result column="dept_name" property="deptName" />
    </association>
  </resultMap>

  <sql id="WithDept_Column_List">
    e.emp_id, e.emp_name, e.gender, e.email, e.d_id, d.dept_id, d.dept_name
  </sql>

  <select id="selectByExampleWithDept" parameterType="com.demo.ssm.bean.EmployeeExample" resultMap="WithDeptResultMap">
    select
    <if test="distinct">
      distinct
    </if>
    <include refid="WithDept_Column_List" />
    from tbl_emp e left join tbl_dept d on e.d_id=d.dept_id
    <if test="_parameter != null">
      <include refid="Example_Where_Clause" />
    </if>
    <if test="orderByClause != null">
      order by ${orderByClause}
    </if>
  </select>

  <select id="selectByPrimaryKeyWithDept" parameterType="java.lang.Integer" resultMap="WithDeptResultMap">
    select
    <include refid="WithDept_Column_List" />
    from tbl_emp e left join tbl_dept d on e.d_id=d.dept_id
    where emp_id = #{empId,jdbcType=INTEGER}
  </select>
5. 测试数据库部分
在 test 文件夹下,新建 MapperTest.java 文件,内容如下。运行成功后,数据库中会自动生成数据。
@RunWith(SpringJUnit4ClassRunner.class)
@ContextConfiguration(locations={"classpath:applicationContext.xml"})
public class MapperTest {

    @Autowired
    DepartmentMapper departmentMapper;

    @Autowired
    EmployeeMapper employeeMapper;

    @Autowired
    SqlSession sqlSession;

    /**
     * 测试DepartmentMapper
     */
    @Test
    public void testCRUD(){
        System.out.println(departmentMapper);

        //1、插入几个部门
		departmentMapper.insertSelective(new Department(null, "开发部"));
		departmentMapper.insertSelective(new Department(null, "测试部"));

        //2、生成员工数据,测试员工插入
        employeeMapper.insertSelective(new Employee(null, "Alice", "F", "[email protected]", 1));

        //3、批量插入多个员工;批量,使用可以执行批量操作的sqlSession。
        EmployeeMapper mapper = sqlSession.getMapper(EmployeeMapper.class);
        for(int i = 0;i<100;i++){
            String uid = UUID.randomUUID().toString().substring(0,5)+i;
            mapper.insertSelective(new Employee(null,uid, "M", uid+"@mail.com", 1));
        }
        System.out.println("批量完成");
    }

}
