此系列:IDEA 搭建 基于 SSM 框架 的 Maven 项目, 完成一个基本的Web应用,实现 crud 功能。
(1) 在IDEA中,新建一个Maven工程,并创建好完整的项目结构
(2) 引入项目依赖的 jar 包,引入bootstrap前端框架,编写SSM整合的配置文件
(3) 创建数据库,生成bean文件 和 mapper文件,最后测试该部分
(4) 页面发送请求查询所有员工数据,得到 json 字符串
(5) 设计分页显示页面,解析 json 字符串,展示查询结果
(6) 添加“新增”功能
(7) 对用户输入数据进行校验
(8) 添加“修改”功能
(9) 添加“删除”功能
本节:添加“新增”功能
1. 点击“新增”按钮,弹出模态框
(1) 设计模态框的布局
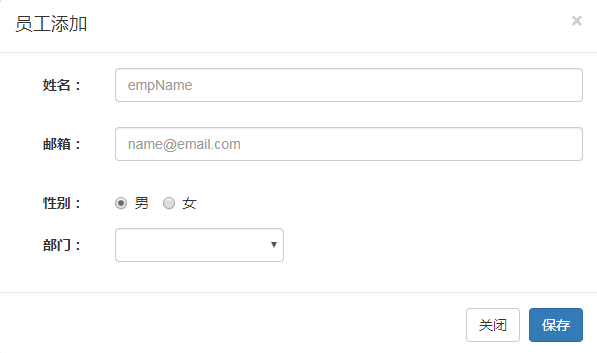
index.jsp文件,<body>标签中添加:
<!-- 员工添加的模态框 -->
<div class="modal fade" id="empAddModal" tabindex="-1" role="dialog" aria-labelledby="myModalLabel">
<div class="modal-dialog" role="document">
<div class="modal-content">
<div class="modal-header">
<button type="button" class="close" data-dismiss="modal" aria-label="Close"><span aria-hidden="true">×</span></button>
<h4 class="modal-title" id="myModalLabel">员工添加</h4>
</div>
<div class="modal-body">
<form class="form-horizontal">
<div class="form-group">
<label class="col-sm-2 control-label">姓名:</label>
<div class="col-sm-10">
<input type="text" name="empName" class="form-control" id="empName_add_input" placeholder="name">
<span class="help-block"></span>
</div>
</div>
<div class="form-group">
<label class="col-sm-2 control-label">邮箱:</label>
<div class="col-sm-10">
<input type="text" name="email" class="form-control" id="email_add_input" placeholder="[email protected]">
<span class="help-block"></span>
</div>
</div>
<div class="form-group">
<label class="col-sm-2 control-label">性别:</label>
<div class="col-sm-10">
<label class="radio-inline">
<input type="radio" name="gender" id="gender1_add_input" value="M" checked="checked"> 男
</label>
<label class="radio-inline">
<input type="radio" name="gender" id="gender2_add_input" value="F"> 女
</label>
</div>
</div>
<div class="form-group">
<label class="col-sm-2 control-label">部门:</label>
<div class="col-sm-4">
<!-- 部门提交部门id即可 -->
<select class="form-control" name="dId">
</select>
</div>
</div>
</form>
</div>
<div class="modal-footer">
<button type="button" class="btn btn-default" data-dismiss="modal">关闭</button>
<button type="button" class="btn btn-primary" id="emp_save_btn">保存</button>
</div>
</div>
</div>
</div>
(2) 为“新增”按钮,添加id属性, id=“emp_delete_all_btn”
<button class="btn btn-primary" id="emp_add_modal_btn">新增</button>
(3) <script>标签中,添加点击事件,弹出模态框
	$("#emp_add_modal_btn").click(function(){
        //弹出模态框
        $("#empAddModal").modal({
            backdrop:"static"
        });
    });
2. 完善模态框内容,增加从数据库中查询到的数据的显示
(1) 从数据库中查询到部门列表
在controller包下,新建DepartmentController.java
@Controller
public class DepartmentController {

    @Autowired
    private DepartmentService departmentService;

    /**
     * 返回所有的部门信息
     */
    @RequestMapping("/depts")
    @ResponseBody
    public Msg getDepts(){
        //查出的所有部门信息
        List<Department> list = departmentService.getDepts();
        return Msg.success().add("depts", list);
    }

}
在service包下,新建DepartmentService
@Service
public class DepartmentService {

    @Autowired
    private DepartmentMapper departmentMapper;

    public List<Department> getDepts() {
        // TODO Auto-generated method stub
        List<Department> list = departmentMapper.selectByExample(null);
        return list;
    }

}
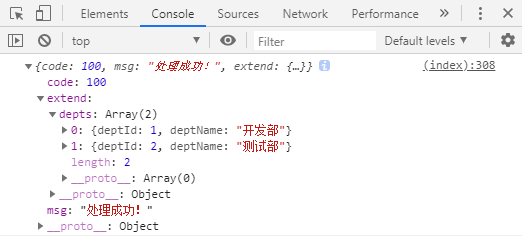
(2) 页面发送 ajax 请求,得到部门数据
弹出模态框前,添加getDepts()方法,得到部门数据,在控制台打印出来
<script>标签中添加:
	function getDepts(){
        $.ajax({
            url:"${APP_PATH}/depts",
            type:"GET",
            success:function(result){
                console.log(result)
            }
        });
    }
$("#emp_add_modal_btn").click(function(){}中添加一行 getDepts();,更改后如下:
	$("#emp_add_modal_btn").click(function(){
        getDepts();
        //弹出模态框
        $("#empAddModal").modal({
            backdrop:"static"
        });
    });
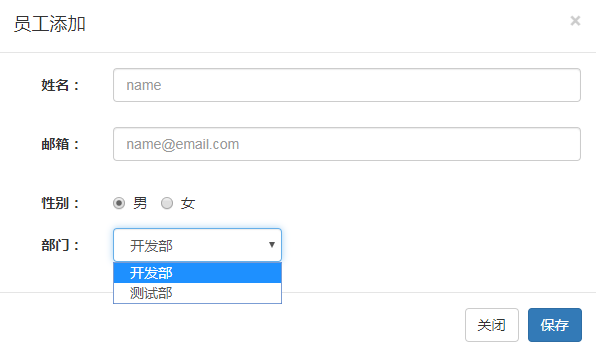
(3) 显示在模态框中,getDepts()函数更改为:
	function getDepts(){

        $.ajax({
            url:"${APP_PATH}/depts",
            type:"GET",
            success:function(result){
                //console.log(result)
                $("#empAddModal select").empty();
                $.each(result.extend.depts,function(){
                    var optionEle = $("<option></option>").append(this.deptName).attr("value",this.deptId);
                    optionEle.appendTo("#empAddModal select");
                });
            }
        });
    }
3. 将数据保存到数据库中
EmployeeService中添加saveEmp()函数
	public void saveEmp(Employee employee) {
		// TODO Auto-generated method stub
		employeeMapper.insertSelective(employee);
	}
EmployeeController中添加saveEmp()函数
	@RequestMapping(value="/emp",method= RequestMethod.POST)
    @ResponseBody
    public Msg saveEmp(Employee employee){
        employeeService.saveEmp(employee);
        return Msg.success();
    }
index.jsp文件, <script>标签中,添加保存按钮的点击事件
	$("#emp_save_btn").click(function(){
        $.ajax({
            url:"${APP_PATH}/emp",
            type:"POST",
            data:$("#empAddModal form").serialize(),
            success:function(result){
                alert(result.msg);
                $("#empAddModal").modal('hide');
            }
        });
    });
重新运行,填写表单数据,点击保存按钮,弹出“处理成功”提示。

4. 跳转至最后一页,显示新添加的数据
在<script>标签中定义一个全局变量totalRecord
var totalRecord;
在解析显示分页信息build_page_info()中,得到 totalRecord 的值
totalRecord = result.extend.pageInfo.total;
按钮的单击事件success函数中,添加跳转页面语句
to_page(totalRecord);
最后,注释掉 alert(result.msg); 语句
下一节:对用户输入数据进行校验
