使用scrapy实现爬虫实例——图片爬取
继前三章中Spider爬取数据,Item收集数据后交给Pipeline对数据进行处理,本章在前三章的基础上继续实现对图片的爬取。
一、Spider爬取数据
spider文件夹中booksSpider.py代码:
from scrapy import Request
from scrapy.spiders import Spider
from booksScrapy.items import BooksscrapyItem

class booksSpider(Spider):
    name = 'books'  # 给爬虫起一个名字
    # 初始请求,用于获取起始的url
    def start_requests(self):
        url = 'http://books.toscrape.com/catalogue/category/books_1/index.html'
        yield Request(url)
    # 解析数据的函数
    def parse(self, response):
        item = BooksscrapyItem()  # 定义Item类的对象,用于保存一条数据
        li_selector = response.xpath('//ol[@class="row"]/li')
        for one_selector in li_selector:
            # 获取书名
            name = one_selector.xpath('article[@class="product_pod"]/h3/a/@title').extract()[0]
            # 价格
            price = one_selector.xpath('article[@class="product_pod"]/div[@class="product_price"]/p[1]/text()').extract()[0]
            #图片的url
            url = price = one_selector.xpath('article[@class="product_pod"]/div[@class="image_container"]/a/img/@src').extract()[0]
            #src = "../../../media/cache/2c/da/2cdad67c44b002e7ead0cc35693c0e8b.jpg"
            #使用  url.split("..")[-1] 来获取   media/cache/2c/da/2cdad67c44b002e7ead0cc35693c0e8b.jpg 这部分
            url = url.split("..")[-1]
            url = "http://books.toscrape.com"+ url
            item["name"] = name
            item["price"] = price
            item["img_url"] = url
            yield item
        # 下一页
        next_url = response.xpath('//li[@class="next"]/a/@href').extract()
        if next_url:
            next_url = "http://books.toscrape.com/catalogue/category/books_1/" + next_url[0]
            yield Request(next_url)
注意:如何获取图片的url是一个新学习的知识点,详情见上述代码
二、Item封装数据
items.py代码(增加了保存图片的字段):
# -*- coding: utf-8 -*-

# Define here the models for your scraped items
#
# See documentation in:
# https://doc.scrapy.org/en/latest/topics/items.html

import scrapy


class BooksscrapyItem(scrapy.Item):
    # define the fields for your item here like:
    # 书名
    name = scrapy.Field()
    # 价格
    price = scrapy.Field()
    # 图片的url
    img_url = scrapy.Field()
三、Pipeline处理数据
pipeline.py代码:
新增了一个管道来下载并保存图片
# -*- coding: utf-8 -*-

# Define your item pipelines here
#
# Don't forget to add your pipeline to the ITEM_PIPELINES setting
# See: https://doc.scrapy.org/en/latest/topics/item-pipeline.html


class BooksscrapyPipeline(object):
    def process_item(self, item, spider):
        #对数据进行处理—写入到txt文件中
        with open("mybooks.txt","a",encoding="utf-8") as f:
            oneStr = item["name"]+";"+item["price"]+";"+item["img_url"]+"\n" #txt中不会自动换行
            f.write(oneStr)
        return item

from scrapy.pipelines.images import ImagesPipeline #用于下载图片的管道
from scrapy import Request
from scrapy.exceptions import DropItem #异常库
import logging   #python中专门有一个logging来打印消息
logger = logging.getLogger("SaveImagePipeline")
# 图片管道,继承于  ImagesPipeline
class SaveImagePipeline(ImagesPipeline):
    def get_media_requests(self, item, info):#用于下载图片的请求
        yield Request(url = item["img_url"])

    def item_completed(self, results, item, info):#判断是否正确下载
        if not results[0][0]:
            raise DropItem("下载失败")
        #打印日志
        logger.debug("下载图片成功")
        return item
操作setting.py,释放功能:
MAGES_STORE="./img"  #在当前文件夹下生成img文件

# Configure item pipelines
# See https://doc.scrapy.org/en/latest/topics/item-pipeline.html
ITEM_PIPELINES = {
   'booksScrapy.pipelines.BooksscrapyPipeline': 300,
   'booksScrapy.pipelines.SaveImagePipeline': 400,
}
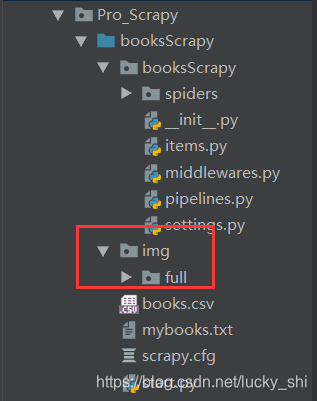
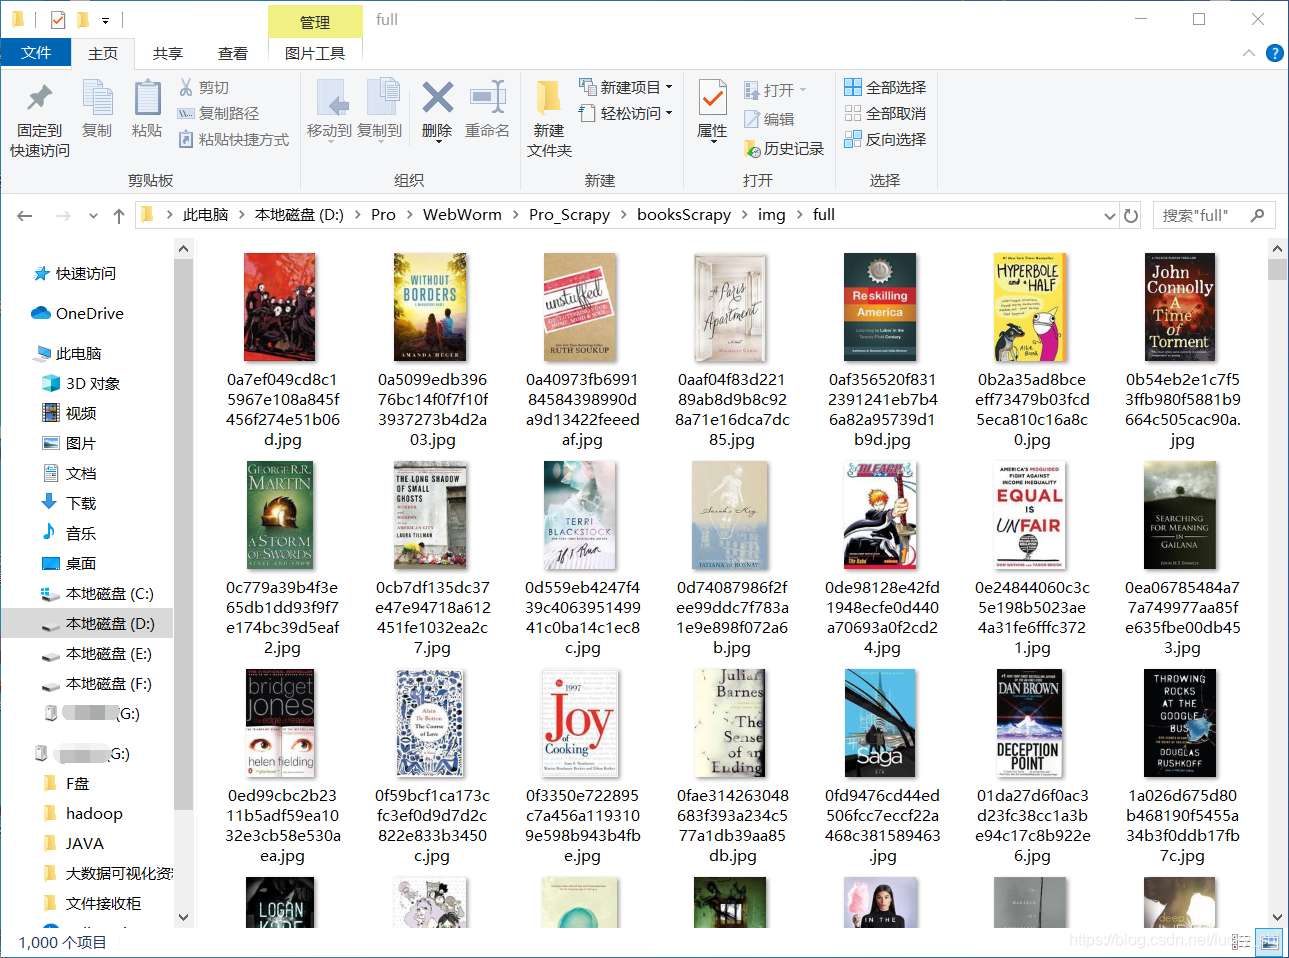
执行结果为:
系统自动在img文件夹下生成了一个full文件夹来保存图片
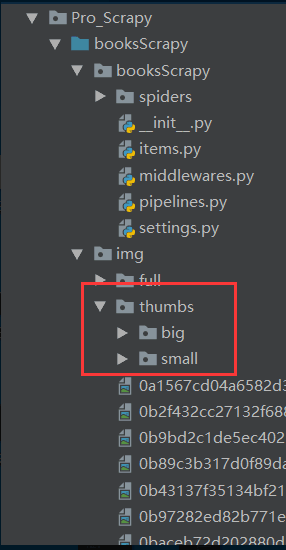
补充:对获取的图片进行操作,这里进行缩略和过滤操作在setting中设置,同时在pipeline中将图片名称改掉
pipeline.py代码为:
# -*- coding: utf-8 -*-

# Define your item pipelines here
#
# Don't forget to add your pipeline to the ITEM_PIPELINES setting
# See: https://doc.scrapy.org/en/latest/topics/item-pipeline.html


class BooksscrapyPipeline(object):
    def process_item(self, item, spider):
        #对数据进行处理—写入到txt文件中
        with open("mybooks.txt","a",encoding="utf-8") as f:
            oneStr = item["name"]+";"+item["price"]+";"+item["img_url"]+"\n" #txt中不会自动换行
            f.write(oneStr)
        return item

from scrapy.pipelines.images import ImagesPipeline #用于下载图片的管道
from scrapy import Request
from scrapy.exceptions import DropItem #异常库
import logging   #python中专门有一个logging来打印消息
logger = logging.getLogger("SaveImagePipeline")
# 图片管道,继承于  ImagesPipeline
class SaveImagePipeline(ImagesPipeline):
    def get_media_requests(self, item, info):#用于下载图片的请求
        yield Request(url = item["img_url"])

    def item_completed(self, results, item, info):#判断是否正确下载
        if not results[0][0]:
            raise DropItem("下载失败")
        #打印日志
        logger.debug("下载图片成功")
        return item

    #用于修改图片名称
    def file_path(self, request, response=None, info=None):
        #返回图片名称
        return request.url.split("/")[-1]
settings.py代码(只截取了本项目需要的部分,其他部分原封不动):
IMAGES_STORE = "./img"  #在当前文件夹下生成img文件
#生成缩略图
IMAGES_THUMBS ={
   'small':(100,100),
   "big":(260,260)
}
#过滤掉图片过小(5×5)的图片
IMAGES_MIN_WIDTH:5
IMAGES_MIN_HEIGHT:5


# Configure item pipelines
# See https://doc.scrapy.org/en/latest/topics/item-pipeline.html
ITEM_PIPELINES = {
   'booksScrapy.pipelines.BooksscrapyPipeline': 300,
   'booksScrapy.pipelines.SaveImagePipeline': 400,
}
执行结果为:
四、总结
项目流程:
①spider中获取图片url
②item中定义url字段
③pipeline中新建管道(类)用于保存图片
(1)pipeline中定义方法用于请求图片的下载
(2)pipeline中定义方法判断是否下载成功
④setting中添加管道的执行以及图片的操作保存
文章在前三章基础上主要多了一个爬取网页图片并对图片进行操作,最后将图片保存的演练。
