引言
CNN的下采样(subsample)在几乎所有的模型结构中都会出现,比如stride>1的卷积操作,pooling操作,都会减少特征图的长宽,起到下采样的效果。与之相对的就是上采样(upsample)操作了,顾名思义,上采样在CNN模型中的作用上增大特征图的长宽,比如都变为原来的2倍。上采样在模型构建中并不像下采样那么频繁被使用,一般情况下,会在下面几个应用中用到上采样操作:
1.segmetation网络,因为segmentation需要还原到特征图到原始输入图像的尺寸;
2.图像生成任务,比如GAN,AVE等,也需要还原到原始输入图像的尺寸;
3.CNN可视化,通过反卷积将卷积得到的feature map还原到像素空间,来观察feature map对哪些pattern相应最大,即可视化哪些特征是卷积操作提取出来的;
那么在Caffe中,都有哪些上采样操作呢?
转置卷积
原理
转置卷积又叫反卷积,及对常规卷积操作的一种逆运算,在这里我们不清晰说反卷积的原理,只是从输入输出尺寸方面说明如何实现上采样的。
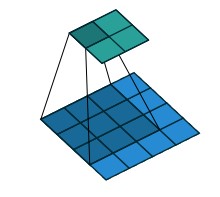
比如一个
尺寸的特征图(蓝色),用
尺寸的卷积核,以stride=1做卷积操作,并且不做padding,那么就会得到尺寸为
的特征图(绿色)。
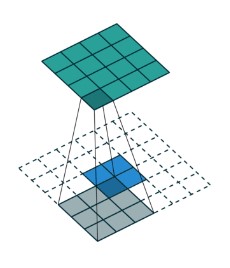
上面对应的反卷积过程是,将
尺寸的特征图padding到
(蓝色),用
尺寸的卷积核,以stride=1做反卷积操作,那么就会得到尺寸为
的特征图(绿色)。
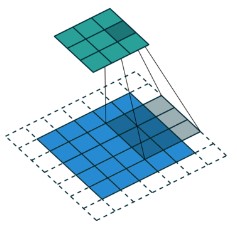
一个
尺寸的特征图(蓝色),padding到
,用
尺寸的卷积核,以stride=2做卷积操作,那么就会得到尺寸为
的特征图(绿色)。
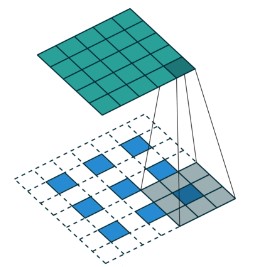
上面对应的反卷积过程是,将
尺寸的特征图padding到
(蓝色),用
尺寸的卷积核,以stride=1做反卷积操作,那么就会得到尺寸为
的特征图(绿色)。
需要注意的地方是,stride=2对应的反卷积,stride并不等于2,而是在padding的策略上有所区别。
实现
转置卷积在原版Caffe中就有对应的实现,就是Deconvlution layer,它具体由deconv_layer.cpp文件实现,继承自BaseConvlutionLayer类。
应用
转置卷积可以像下面这样使用:
layer {
  name: "upscore"
  type: "Deconvolution"
  bottom: "score_fr"
  top: "upscore"
  param {
    lr_mult: 0
  }
  convolution_param {
    num_output: 40
    bias_term: false
    kernel_size: 64
    stride: 32
  }
}
在全卷积网络(FCN)中,就是用转置卷积实现上采样操作,比如FCN使用了下采样经过5次卷积(和pooling)以后,图像的分辨率依次缩小了2,4,8,16,32倍。对于最后一层的输出图像,需要进行32倍的上采样,以得到原图一样的大小。
FCN具体的网络模型可以参考这里。
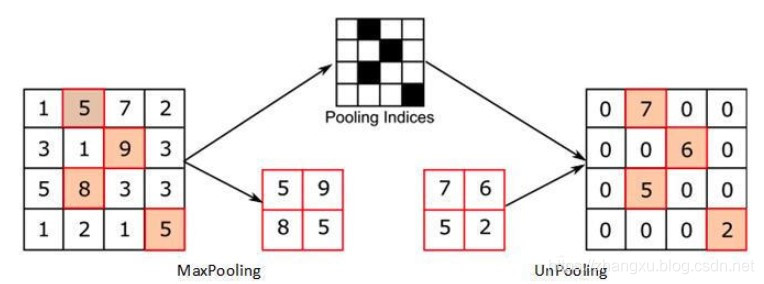
UnMaxPooling
原理
UnMaxPoolling,顾名思义就是max pooling的逆操作,我们都知道,max pooling是在池化核中选择最大的那个数作为池化后的结果,而这个数必然会对应一个原特征图位置的索引,这个索引就被后续用来做反maxpool操作,也就是将需要上采样的特征图,根据索引,放到上采样后的特征图的对应位置上去,其余的地方都补上0。
实现
UnMaxPoolling的实现在原版caffe中是没有的,需要加个自定义的layer,这个layer已经有人实现了,它被用于SegNet网络中,叫做upsample_layer。
如果大家仔细看看实现的源码的话,就会发现这个layer实现起来还是很容易的,因为它需要的索引
const Dtype* bottom_mask_data = bottom[1]->cpu_data()
在caffe的原始代码中就已经实现好了,就在pooling_layer中:
 case PoolingParameter_PoolMethod_MAX:
    // Initialize
    //如果使用top_mask的话,max pooling的第二个top,就是mask
    if (use_top_mask) {
      top_mask = top[1]->mutable_cpu_data();
      caffe_set(top_count, Dtype(-1), top_mask);
    } else {
      mask = max_idx_.mutable_cpu_data();
      caffe_set(top_count, -1, mask);
    }
    caffe_set(top_count, Dtype(-FLT_MAX), top_data);
    // The main loop
    for (int n = 0; n < bottom[0]->num(); ++n) {
      for (int c = 0; c < channels_; ++c) {
        for (int ph = 0; ph < pooled_height_; ++ph) {
          for (int pw = 0; pw < pooled_width_; ++pw) {
            int hstart = ph * stride_h_ - pad_h_;
            int wstart = pw * stride_w_ - pad_w_;
            int hend = min(hstart + kernel_h_, height_);
            int wend = min(wstart + kernel_w_, width_);
            hstart = max(hstart, 0);
            wstart = max(wstart, 0);
            const int pool_index = ph * pooled_width_ + pw;
            for (int h = hstart; h < hend; ++h) {
              for (int w = wstart; w < wend; ++w) {
                const int index = h * width_ + w;
                if (bottom_data[index] > top_data[pool_index]) {
                  top_data[pool_index] = bottom_data[index];
                  if (use_top_mask) {
                    top_mask[pool_index] = static_cast<Dtype>(index);
                  } else {
                    mask[pool_index] = index;
                  }
                }
              }
            }
          }
        }
        // compute offset
        bottom_data += bottom[0]->offset(0, 1);
        top_data += top[0]->offset(0, 1);
        if (use_top_mask) {
          top_mask += top[0]->offset(0, 1);
        } else {
          mask += top[0]->offset(0, 1);
        }
      }
    }
应用
UnMaxPooling可以像下面这样使用:
layer {
  name: "pool1"
  type: "Pooling"
  bottom: "conv1"
  top: "pool1"
  top: "pool1_mask"
  pooling_param {
    pool: MAX
    kernel_size: 2
    stride: 2
  }
}


layer {
  name: "upsample1"
  type: "Upsample"
  bottom: "conv_decode2"
  bottom: "pool1_mask"
  top: "upsample1"
  upsample_param {
    scale: 2
  }
}
可以看到,这个Upsample就是UnMaxPooling,它有两个bottom,分别是需要上采样的特征图“conv_decode2”和下采样时的索引“pool1_mask”;而这个索引就是pooling时得到的。
前面提到了SegNet,SegNet中使用的就是UnMaxPooling的上采样机制,它同样是个用于图像分割的网络。
线性插值
原理
一张图像做resize的时候,都是使用插值算法来完成的,在这里常见的插值算法就不过多介绍了,大家可以参考《图像几何变换(缩放、旋转)中的常用的插值算法》。
那么显然,特征图也可以使用插值算法来进行上采样的,下面这种方法就是使用线性插值方法的上采样机制,原理与图像缩放中的线性插值完全相同。

实现
线性插值的实现在原版caffe中同样是没有的,这个自定义的layer叫做interp_layer。
应用
线性插值层可以像下面这样使用:
layers {
  bottom: "label"
  top: "label_shrink"
  name: "label_shrink"
  type: INTERP
  interp_param {
    shrink_factor: 8
    pad_beg: -1
    pad_end: 0
  }
}
线性插值层被用于DeepLab系列网络中,同样用于图像分割。
