版权声明:本文地址http://blog.csdn.net/caib1109/article/details/51527258
欢迎非商业目的的转载, 作者保留一切权利
术语:
API服务器 - 用URL的形式提供一个网站资源的入口, 可以被用户访问前端页面间接调用, 也可以被用户通过浏览器地址栏直接调用
后端开发 - 用Java, php, python, ruby等实现服务器的业务逻辑
本文中, 我们的目标是开发一个服务器, 我们访问它, 它返回给我们一个字符串”Hello World!”
本文使用的Spring版本是最新的3.2.17, JDK 6, IDE是Eclipse for j2EE, 系统是Ubuntu16.04.
1 web项目架构图
层次架构图:
  Controller
      |
   Service
      |
     DAO
  |--------|
DBDAO   RemoteDAO
  |        |
 DB     Remote Resource
项目文件结构图:
src
  |--com.foo.controller/
  |--com.foo.service/
  L--com.foo.dao/

WEB-INF
  |--web.xml
  |--${servlet-name}-servlet.xml
  |
  |--lib/
  L--classes/ (从src目录下.java文件编译得到的.class文件)
0 第零步 - 在Eclipse里生成Maven的web模板项目
使用maven的目的:
1. 项目经常使用第三方包, 如hibernate, spring等等. Maven的自动下载jar包功能减少了您寻找官网(1分钟), 寻找下载链接(5分钟), 从国外的服务器龟速下载jar包(5分钟). 以一个项目10个第三方包计算, 使用maven就节约了您2小时的时间.
2. 项目的复制和迁移都很方便. jar包独立于项目. 不再需要把项目的jar包一起提交到版本控制系统上. 每个成员下载maven项目后执行maven build就获得了全部的jar包.(如果公司配置有私有maven仓库的话就更可靠了)
3. 用maven的Goals实现项目的clean, build, package等命令的一键化, 不再需要在Eclipse里用鼠标完成这些复杂的操作了.
使用自定义版本的maven
为了兼容jdk 6, 需要使用maven的2.x.x版本, 其中最新的是maven 2.2.1
搜索maven, 从apache官网下载maven 2.2.1, 并解压到某个目录下.
这里假设maven的目录为${M2_HOME}, 之后会用到.
Eclipse for J2EE版本自带了Maven 3和Maven的Eclipse插件. 我们只需要修改插件的配置就能支持maven 2.2.1了. 具体步骤:
Eclipse菜单栏–>Windows–>Preference–>Maven–>Installations
在右侧窗口把maven插件的目录修改目录为刚刚的${M2_HOME}
新建maven项目
菜单栏New–>Others–>Maven
输入公司名和项目名, 下一步
选择apache公司的web app模板(有好几个webapp模板, 不要选别的web app模板)
修改Project Facets
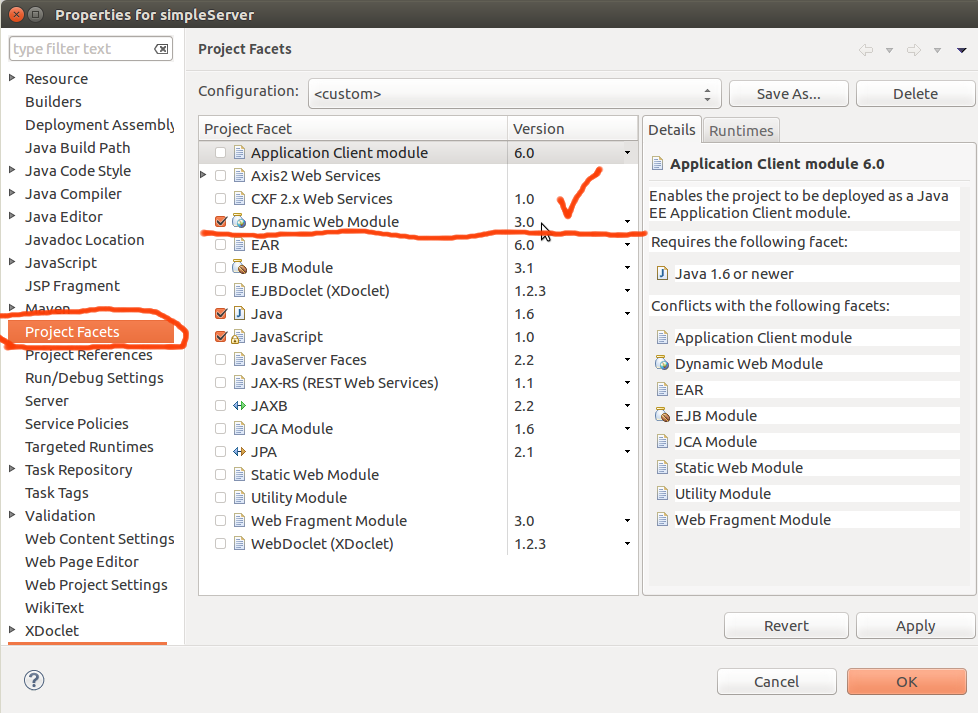
在导航侧边栏里右键刚刚生成的Project名–>Properties–>Project Facet
maven 2.2.1默认的web app版本是2.3, 为了支持tomcat 7和servlet3.0的重要功能 - 异步特性, 需要修改为3.0版本. 具体操作是:
在资源管理器打开Eclipse的工作目录, 进入刚刚新建的项目目录, 找到/.settings/文件夹(Linux中ls -a命令才能看到). 然后, 打开并编辑文件:
.settings/org.eclipse.wst.common.project.facet.core.xml
<?xml version="1.0" encoding="UTF-8"?>
<faceted-project>
  <fixed facet="wst.jsdt.web"/>
  <installed facet="jst.web" version="2.3"/>
  <installed facet="wst.jsdt.web" version="1.0"/>
  <installed facet="java" version="1.6"/>
</faceted-project>第四行修改为<installed facet="jst.web" version="3.0"/>
这个web app版本会影响最重要的配置文件web.xml的版本, 在下一节您将看到.
修改pom.xml添加Spring和SpringMVC的包依赖
pom.xml是maven唯一的最重要的配置文件!
pom.xml是maven唯一的最重要的配置文件!
pom.xml是maven唯一的最重要的配置文件!
1. 添加spring依赖
在pom.xml中, 添加spring 3.2.17的maven依赖(spring官网上有给):
<!--在dependencies标签里添加 -->
        <dependency>
            <groupId>org.springframework</groupId>
            <artifactId>spring-context</artifactId>
            <version>3.2.17.RELEASE</version>
        </dependency>
<!--在dependencies标签里添加 -->
只需要添加spring-context, 会自动下载除了springmvc包之外的所有的spring的包
2. 添加springmvc依赖
在pom.xml中, 添加springmvc 3.2.17的maven依赖(从maven仓库搜索神器上找到的):
<!--在dependencies标签里添加 -->
    <!-- http://mvnrepository.com/artifact/org.springframework/spring-webmvc -->
    <dependency>
        <groupId>org.springframework</groupId>
        <artifactId>spring-webmvc</artifactId>
        <version>3.2.17.RELEASE</version>
    </dependency>
<!--在dependencies标签里添加 -->
3. 添加日志依赖
选择slf4j(接口) + log4j(实现)的组合. 需要在pom.xml中, 添加三个包:
log4j-1.2.xx.jar,
slf4j-api-x.x.x.jar,
slf4j-log4j12-x.x.x.jar
因为apache的log4j日志系统久经考验, 并且兼容java 6. 这点很重要因为大多数服务器还在用java 6. 相比之下, 它的继任者log4j2必须要java 7才行. 截止2016-06-11, maven仓库的下载统计为:log4j - 7,211; log4j2 - 800. 两者相差几乎一个量级也说明了问题.
而使用slf4j的原因是可拓展性, 即日后替换log4j为别的日志系统时不用修改代码里的日志部分. 从某种程度上,SLF4J有点类似JDBC,不过比JDBC更简单,在JDBC中,你需要指定驱动程序,而在使用SLF4J的时候,不需要在代码中或配置文件中指定你打算使用那个具体的日志系统。
<!--在dependencies标签里添加 -->
    <!-- http://mvnrepository.com/artifact/log4j/log4j -->
    <dependency>
        <groupId>log4j</groupId>
        <artifactId>log4j</artifactId>
        <version>1.2.17</version> <!--May, 2012-->
    </dependency>
    <!-- http://mvnrepository.com/artifact/org.slf4j/slf4j-api -->
    <dependency>
        <groupId>org.slf4j</groupId>
        <artifactId>slf4j-api</artifactId>
        <version>1.7.5</version> <!--Mar, 2013-->
    </dependency>
    <!-- http://mvnrepository.com/artifact/org.slf4j/slf4j-log4j12 -->
    <dependency>
        <groupId>org.slf4j</groupId>
        <artifactId>slf4j-log4j12</artifactId>
        <version>1.7.5</version> <!--Mar, 2013-->
    </dependency>
<!--在dependencies标签里添加 -->
4. 添加maven build插件
maven 2本身不支持java 5以上的编译, 甚至也不支持项目打包成war格式, 不过没关系, maven插件都能够做到. 添加以下build时的插件:
<build>
        <finalName>foo</finalName>
        <plugins>
            <plugin>
                <groupId>org.apache.maven.plugins</groupId>
                <artifactId>maven-resources-plugin</artifactId>
                <version>2.4.3</version>
            </plugin>
            <plugin>
                <groupId>org.apache.maven.plugins</groupId>
                <artifactId>maven-compiler-plugin</artifactId>
                <version>2.3.2</version>
                <configuration>
                    <source>1.6</source>
                    <target>1.6</target>
                    <encoding>UTF8</encoding>
                </configuration>
            </plugin>
            <plugin>
                <groupId>org.apache.maven.plugins</groupId>
                <artifactId>maven-war-plugin</artifactId>
                <version>2.1.1</version>
                <configuration>
                    <webResources>
                        <resource>
                            <directory>src/main/resources</directory>
                            <excludes>
                                <exclude>**/*.jpg</exclude>
                            </excludes>
                        </resource>
                    </webResources>
                </configuration>
            </plugin>

        </plugins>
    </build>
都添加完了以后, 右键项目名–>Maven–>Update Project
会自动从maven仓库下载pom.xml里的包.
在国内请使用镜像(请自行搜索设置镜像的方法), 不然从国外的maven仓库下载的速度感人.
鄙人使用了OSChina的maven仓库镜像, Update Project的过程大概为2分钟, 最终的第三方包如下:

常见错误
index.jsp 页面报错:
The superclass "javax.servlet.http.HttpServlet" was not found on the Java Build Path
解决方案一:
转自http://blog.csdn.net/testcs_dn/article/details/36455669
(i) 先配置 tomcat:
Window -> show view -> Servers
选Apache/tomcat 7 (tomcat 7 最后一版兼容 jdk 6)
选你的 tomcat 7 安装路径(解压后文件根目录)
(ii) 在出现此错误的项目上右键 -> Build Path -> Configure Build Path -> Add Library
选Add Server -> 你刚刚配好的 tomcat 7 Server
解决方案二:
如果你的项目不需要页面展示, 仅仅是api server,直接删掉 index.jsp
1 第一步 - 修改web xml
web.xml是Java Web应用最核心的配置文件, 是应用启动时第一个被加载的文件!
web.xml是Java Web应用最核心的配置文件, 是应用启动时第一个被加载的文件!
web.xml是Java Web应用最核心的配置文件, 是应用启动时第一个被加载的文件!
现在我们来配置它, 打开web.xml后看到以下内容
<!DOCTYPE web-app PUBLIC
 "-//Sun Microsystems, Inc.//DTD Web Application 2.3//EN"
 "http://java.sun.com/dtd/web-app_2_3.dtd" >
<web-app>
  <display-name>xxx</display-name>
</web-app>注意到第3行的web-app_2_3.dtd. dynamic web module version是与你的servlet版本有关的,若使用tomcat7.0,一般是3.0;若tomcat6,则一般是2.4或2.5. tomcat7是目前(2016-06-10)比较主流的版本. 所以需要修改它为3.0, 一共需要修改两个地方(在万能的stackoverflow论坛看到的):
第一个地方:
<你的Web项目>
  └── .settings
      ├── .jsdtscope
      ├── org.eclipse.jdt.core.prefs
      ├── org.eclipse.m2e.core.prefs
      ├── org.eclipse.wst.common.component
      ├── org.eclipse.wst.common.project.facet.core.xml(就是这货在搞鬼!)
      ├── org.eclipse.wst.jsdt.ui.superType.container
      ├── org.eclipse.wst.jsdt.ui.superType.name
      └── org.eclipse.wst.validation.prefs
打开并编辑文件:
<你的Web项目>/.settings/org.eclipse.wst.common.project.facet.core.xml
<?xml version="1.0" encoding="UTF-8"?>
<faceted-project>
  <fixed facet="wst.jsdt.web"/>
  <installed facet="jst.web" version="2.3"/>
  <installed facet="wst.jsdt.web" version="1.0"/>
  <installed facet="java" version="1.6"/>
</faceted-project>第四行修改为<installed facet="jst.web" version="3.0"/>
第二个地方:
<你的Web项目>
  WEB-INF
    └--web.xml
打开后改为以下内容:
<web-app xmlns="http://java.sun.com/xml/ns/javaee"
         xmlns:xsi="http://www.w3.org/2001/XMLSchema-instance"
         xsi:schemaLocation="http://java.sun.com/xml/ns/javaee
          http://java.sun.com/xml/ns/javaee/web-app_3_0.xsd"
    version="3.0">
    <display-name>Servlet 3.0 Web Application</display-name>
</web-app>
两处地方都修改完以后, 右键项目名–>Maven–>Update Projects
检查一下, 右键项目名–>Properties, 如下图:
添加web-app元素
现在我们有了一个支持tomcat 7的web.xml了. 下面我们需要添加web-app元素.
- 最基本的元素有四个(按加载顺序排序)
- context-param(项目全局变量) -> listener(监听) -> filter(拦截) -> servlet(服务)
他们在web.xml中的位置先后不影响他们的加载顺序.
作为一个演示, 我们只添加servlet元素, 添加后的web.xml如下(spring mvc官方demo):
<web-app xmlns="http://java.sun.com/xml/ns/javaee"
         xmlns:xsi="http://www.w3.org/2001/XMLSchema-instance"
         xsi:schemaLocation="http://java.sun.com/xml/ns/javaee
          http://java.sun.com/xml/ns/javaee/web-app_3_0.xsd"
    version="3.0">
    <display-name>Servlet 3.0 Web Application</display-name>

    <servlet>
        <servlet-name>example</servlet-name>
        <servlet-class>org.springframework.web.servlet.DispatcherServlet</servlet-class>
        <load-on-startup>1</load-on-startup>
    </servlet>

    <servlet-mapping>
        <servlet-name>example</servlet-name>
        <url-pattern>/example/*</url-pattern>
    </servlet-mapping>

</web-app>
官网的例子
<web-appxmlns="http://java.sun.com/xml/ns/javaee"
         xmlns:xsi="http://www.w3.org/2001/XMLSchema-instance"
         xsi:schemaLocation="http://java.sun.com/xml/ns/javaee
         http://java.sun.com/xml/ns/javaee/web-app_3_0.xsd"
         version="3.0">
  <!-- Configure ContextLoaderListener to use AnnotationConfigWebApplicationContext
       instead of the default XmlWebApplicationContext -->
  <context-param>
      <param-name>contextClass</param-name>
      <param-value>
          org.springframework.web.context.support.AnnotationConfigWebApplicationContext
      </param-value>
  </context-param>

  <!-- Configuration locations must consist of one or more comma- or space-delimited
       fully-qualified @Configuration classes. Fully-qualified packages may also be
       specified for component-scanning -->
  <context-param>
      <param-name>contextConfigLocation</param-name>
      <param-value>com.acme.AppConfig</param-value>
  </context-param>

  <!-- Bootstrap the root application context as usual using ContextLoaderListener -->
  <listener>
      <listener-class>org.springframework.web.context.ContextLoaderListener</listener-class>
  </listener>

  <!-- Declare a Spring MVC DispatcherServlet as usual -->
  <servlet>
      <servlet-name>dispatcher</servlet-name>
      <servlet-class>org.springframework.web.servlet.DispatcherServlet</servlet-class>
      <!-- Configure DispatcherServlet to use AnnotationConfigWebApplicationContext
           instead of the default XmlWebApplicationContext -->
      <init-param>
          <param-name>contextClass</param-name>
          <param-value>
              org.springframework.web.context.support.AnnotationConfigWebApplicationContext
          </param-value>
      </init-param>
      <!-- Again, config locations must consist of one or more comma- or space-delimited
           and fully-qualified @Configuration classes -->
      <init-param>
          <param-name>contextConfigLocation</param-name>
          <param-value>com.acme.web.MvcConfig</param-value>
      </init-param>
  </servlet>

  <!-- map all requests for /app/* to the dispatcher servlet -->
  <servlet-mapping>
      <servlet-name>dispatcher</servlet-name>
      <url-pattern>/app/*</url-pattern>
  </servlet-mapping>
</web-app>
第二步 - 配置[servlet-name]-servlet.xml
引自Spring3.2.17官网文档
Upon initialization of a DispatcherServlet, Spring MVC looks for a file named [servlet-name]-servlet.xml in the WEB-INF directory of your web application and creates the beans defined there, overriding the definitions of any beans defined with the same name in the global scope.
加载完web.xml后, Tomcat识别出servlet标签中的Spring框架的DispatcherServlet. 于是在web.xml所在的目录下搜索名为 [servlet-name]-servlet.xml的文件. 这个文件中定义的Bean都会被初始化. 一个[servlet-name]-servlet.xml例子(Spring 3.2.x版本)的简化版本如下:
<?xml version="1.0" encoding="UTF-8"?>
<!-- Bean头部 -->
<beans xmlns="http://www.springframework.org/schema/beans"
    xmlns:xsi="http://www.w3.org/2001/XMLSchema-instance"
    xmlns:p="http://www.springframework.org/schema/p"
    xmlns:mvc="http://www.springframework.org/schema/mvc"
    xmlns:context="http://www.springframework.org/schema/context"
    xmlns:util="http://www.springframework.org/schema/util"
    xmlns:task="http://www.springframework.org/schema/task"
    xsi:schemaLocation="http://www.springframework.org/schema/beans
                http://www.springframework.org/schema/beans/spring-beans-3.0.xsd
                http://www.springframework.org/schema/context
                http://www.springframework.org/schema/context/spring-context-3.0.xsd
                http://www.springframework.org/schema/mvc
                http://www.springframework.org/schema/mvc/spring-mvc-3.0.xsd
                http://www.springframework.org/schema/util
                http://www.springframework.org/schema/util/spring-util-3.0.xsd
                http://www.springframework.org/schema/task
                http://www.springframework.org/schema/task/spring-task-3.2.xsd">
    <!-- Json返回格式化转换
    <bean id="mappingJacksonHttpMessageConverter"
        class="org.springframework.http.converter.json.MappingJacksonHttpMessageConverter" />
        -->
    <!-- 激活@Controller模式 -->
    <mvc:annotation-driven />
    <!-- 对包中的所有类进行扫描,以完成Bean创建和自动依赖注入的功能 需要更改 -->
    <context:component-scan base-package="com.foo" />
    <context:annotation-config />
    <!-- 激活计划任务注解
    <task:annotation-driven executor="myExecutor"/>
    <task:executor id="myExecutor" pool-size="5" />
    -->
</beans>
可选步 - 定义applicationContext.xml
引自万能的Stackoverflow的这个帖子:
Spring lets you define multiple contexts in a parent-child hierarchy.
The applicationContext.xml defines the beans for the “root webapp context”, i.e. the context associated with the webapp.
The spring-servlet.xml (or whatever else you call it) defines the beans for one servlet’s app context. There can be many of these in a webapp, one per Spring servlet (e.g. spring1-servlet.xml for servlet spring1, spring2-servlet.xml for servlet spring2).
Beans in spring-servlet.xml can reference beans in applicationContext.xml, but not vice versa.
All Spring MVC controllers must go in the spring-servlet.xml context.
In most simple cases, the applicationContext.xml context is unnecessary. It is generally used to contain beans that are shared between all servlets in a webapp. If you only have one servlet, then there’s not really much point, unless you have a specific use for it.
一句话说明就是, *-servlet.xml会覆盖applicationContext.xml的内容,所以我们只需要*-servlet.xml中配置好, spring可以正常工作了.
第三步 - 配置日志:本节内容已过时,请使用支持异步和缓存的 log4j 2(2.3 版本以上不兼容 jdk 6)
接上一步, 在pom.xml中, 我们已经添加了log4j日志的jar包.
接下来需要新建一个log4j配置文件, 位于:
[项目名]/src/main/resources/log4j.properties
打包成war以后, 根据maven的约定, 此配置文件位于WEB-INF/classes/log4j.properties, log4j会自动识别该文件.
下面给出一个最简单的log4j.properties, 它将Info和Error分别输出到两个文件中去.
# 每个Logger是一个日志输出
# trace < debug < info < warn < error < fatal < off
# 逗号前面的值是rootLogger的输出日志等级, 如:
# log4j.rootLogger=debug, stdout, RollFile
# log4j.rootLogger=error, stdout, RollFile
log4j.rootLogger=info, stdout, RollFile

# 每个appender是一种Logger的输出方式. log4j一共有以下几种Appender:
#    org.apache.log4j.ConsoleAppender(控制台),
#    org.apache.log4j.FileAppender(文件),
#    org.apache.log4j.DailyRollingFileAppender(每天产生一个日志文件),
#    org.apache.log4j.RollingFileAppender(文件大小到达指定尺寸的时候产生一个新的文件),
#    org.apache.log4j.WriterAppender(将日志信息以流格式发送到任意指定的地方)
# 名为stdout的Appender直接把日志打在Console里
log4j.appender.stdout=org.apache.log4j.ConsoleAppender
# stdout的日志输出字符串格式化
# 类似C语言的printf()中约定的格式化符号, log4j的格式化符号有以下这些:
#  %m 输出代码中指定的消息
#  %p 输出优先级,即DEBUG,INFO,WARN,ERROR,FATAL
#  %r 输出自应用启动到输出该log信息耗费的毫秒数
#  %c 输出所属的类目,通常就是所在类的全名
#  %t 输出产生该日志事件的线程名
#  %n 输出一个回车换行符,Windows平台为“rn”,Unix平台为“n”
#  %d 输出日志时间点的日期或时间,默认格式为ISO8601,也可以在其后指定格式,
#   比如:%d{yyy MMM dd HH:mm:ss,SSS},输出类似:2002年10月18日 22:10:28,921
#  %l 输出日志事件的发生位置,包括类目名、发生的线程,以及在代码中的行数。举例:Testlog4.main(TestLog4.java:10)
log4j.appender.stdout.layout=org.apache.log4j.PatternLayout
log4j.appender.stdout.layout.ConversionPattern=%d %5p [%t]  - %m%n

# 名为RollFile的Appender使用RollingFile(文件)输出日志
log4j.appender.RollFile=org.apache.log4j.RollingFileAppender
log4j.appender.RollFile.File=example.log
# 名为RollFile的appender的输出日志文件最大大小
log4j.appender.RollFile.MaxFileSize=100KB
# Keep one backup file
log4j.appender.RollFile.MaxBackupIndex=1
# RollFile的日志输出字符串格式化
log4j.appender.RollFile.layout=org.apache.log4j.PatternLayout
log4j.appender.RollFile.layout.ConversionPattern=%d %5p [%t]  - %m%n

#项目代码所在的包com.foo, 逗号之前无任何日志输出级别,则默认为rootLogger的级别
#log4j.logger.com.foo=info, stdout, RollFile
log4j.logger.com.foo=, stdout, RollFile
日志的重要性再怎么强调也不过分, 一个详细的日志可以让开发人员在一秒内发现错误的位置. 如果没有日志, web项目就是一个黑盒. 什么? 您想要修复一个黑盒里的bug, 这太难了!
日志小技巧
如何在父类中定义logger,并打印出子类的类名
转自《log4j子类怎么调用父类中定义的logger》
首先,定义一个父类,让logger作为其的一个成员变量,类型可以为protected或default,但不能有static,否则子类的logger是同一个logger;
使用getclass().getname(),可以成功将logger命名为子类的名称,同样能够丰富调试信息,帮助定位问题所在。
import org.slf4j.Logger;
import org.slf4j.LoggerFactory;

public abstract class AbstractParent {
    protected Logger logger ;
    public AbstractSPService() {
        logger = LoggerFactory.getLogger(this.getClass());
    }
}
第四步 - 定义Controller
终于配置完了, 人们把Spring框架称为”配置地狱”也不算过分. 下面开始正式的代码部分.
项目文件结构图:
src
  |--com.foo.controller/ (我们现在在这儿)
  |--com.foo.service/
  |--com.foo.dao/
package com.foo.controller;

import org.slf4j.Logger;
import org.slf4j.LoggerFactory;
import org.springframework.stereotype.Controller;
import org.springframework.web.bind.annotation.RequestMapping;
import org.springframework.web.bind.annotation.ResponseBody;

@Controller //需要xml配置文件中添加context:component-scan, 才被识别并实例化
public class FooController {
    private static final Logger logger = LoggerFactory.getLogger(FooController.class);

    @ResponseBody // 返回值以字符串形式写入http request的返回页面中去
    @RequestMapping("/hello") /hello/拦截以`/hello`结尾的全部URL请求
    public String returnHello(){
        logger.info("returnHello is called");
        return "Hello World!";
    }
}
当然,为了让@Controller注解有效, 我们还要在[项目]/WEB-INF/[servlet-name]-servlet.xml中添加:
  <!-- ... -->
  <context:component-scan base-package="com.company.projectname[替换为你的Controller类所在的包名]"/>
  <!-- ... -->
这样, 假设项目名为Hello, Hello.war放入tomcat/webapps/下, 并被加载后, 我们在浏览器里输入”http://localhost:8080/Hello/helloWorld“, 就会输出”helloWorld”.
版权声明:本文地址http://blog.csdn.net/caib1109/article/details/51527258
欢迎非商业目的的转载, 作者保留一切权利
可选步 - 中文编码
似乎我们的”Hello World!”服务器运行良好. 如果我们需要返回的是”Hello 世界!”呢?
URL中文编码 - 以下内容转自http://www.open-open.com/home/space-926-do-blog-id-5579.html
目前WEB的应用中, UTF-8编码和GB2312编码是并存在的,例如百度(baidu.com)和谷歌(google.com)的URL编码分别是GB2312编码和UTF-8编码。由于编码并存引起的乱码问题给WEB应用开发中带来不少麻烦,因此统一编码是在WEB开发中解决这个问题的主要途径。现在的问题是我们同时得处理UTF-8编码和GB2312,例如我们要统计一个网站由搜索引擎中带来的访问的关键词。
比如我们搜“中文”这个词,然后观察浏览器地址栏。
用Baidu得到的URL是:
http://www.baidu.com/s?wd=%D6%D0%CE%C4用Google得到的URL是:
http://www.google.cn/search?hl=zh-CN&source=hp&q=%E4%B8%AD%E6%96%87&aq=f&oq=“中文”这个词的URL编码, baidu_urlencode(”中文”)=%D6%D0%CE%C4 , google_urlencode(”中文”)=%E4%B8%AD%E6%96%87 ,由于编码不同,很明显不一样。
解决接收参数中文乱码
转自http://www.codingyun.com/article/78.html
具体解决方案如下:
方案一 配置tomcat目录下的service.xml文件(亲测有效)
tomcat7/conf/server.xml 给该行代码加上 URIEncoding=”UTF-8” 的编码属性
    <Connector port="8080" protocol="HTTP/1.1"
               connectionTimeout="20000"
               redirectPort="8443" URIEncoding="UTF-8" />
默认的tomcat配置,接收请求是以ISO-8859-1来转码,导致中文出现了乱码问题.
这样配置后,tomcat接收url请求后就会以utf-8解码传递的中文参数,也就能解决乱码问题
方案二 在controller接收参数时,对参数进行转码(亲测有效)
@RequestMapping(value="/{tag}")
    public String getArticleListByTag(HttpServletRequest request, @PathVariable String tag, QueryCondition queryCondition) throws Exception{
        tag = new String(tag.getBytes("ISO-8859-1"), "UTF-8");
        logger.info("tag: " + tag );
    }
这样的话,后台接收中文参数后就会将ISO-8859-1的编码格式转码为UTF-8形式,也能解决乱码问题。
严禁同时使用方案一和方案二!
方案一或方案二单独使用都有效, 同时使用两个方案则仍是乱码!
解决@ResponseBody返回中文乱码
转自《解决SpringMVC的@ResponseBody返回中文乱码》
解决返回中文乱码的问题有两种,第一种是局部的,只针对于某个方法的返回进行处理,第二种是全局的,针对于整个项目,如下:
方案一 在@RequestMapping中添加produces=”text/html;charset=UTF-8,如:
@RequestMapping(value="/login.do",method=RequestMethod.POST,produces="text/html;charset=UTF-8")
    @ResponseBody
    public String login(@RequestParam(value="username") String userName,@RequestParam(value="password") String password){
        return JSONMessageUtil.getSuccessJSON("登录成功");
    }
方案二 在配置文件中的mvc:annotation-driven中添加如下代码:
<mvc:annotation-driven >
        <!-- 消息转换器 -->
        <mvc:message-converters register-defaults="true">
            <bean class="org.springframework.http.converter.StringHttpMessageConverter">
                <property name="supportedMediaTypes" value="text/html;charset=UTF-8"/>
            </bean>
        </mvc:message-converters>
    </mvc:annotation-driven>
    <mvc:resources location="/resources/" mapping="/resources/**" />
对于乱码问题,这样就可以正常显示中文了
可选步 - 用json传数据(草稿)
常用json包
Gson(google)
new Gson().toJson(null); // "null"fastJson(alibaba)
第五步 - 项目打war包
以下内容引自http://tech.cncms.com/web/jsp/26350.html
原来Maven的Goal,不是“进球”, 而是指Maven能够执行的任务,跟Ant里面的Task差不多.
Goal定义里也可以直接使用Ant的Task定义,如delete,mkdir,echo之类。
maven -g我们可以看到maven支持如此众多的goal,也就是说已经替我们定制了一大堆门类齐全的goal供我们使用,甚至包括对JBuilder,Eclipse这样IDE的支持,可以生成它们特定的工程格式
Eclipse里设置Maven的Goal
需求:
1. 自动导入第三方jar包,
2. 不打test package下的文件
具体步骤:
1) 验证pom.xml中的package类型是不是war
<project xmlns="http://maven.apache.org/POM/4.0.0" xmlns:xsi="http://www.w3.org/2001/XMLSchema-instance"
    xsi:schemaLocation="http://maven.apache.org/POM/4.0.0 http://maven.apache.org/maven-v4_0_0.xsd">
    <modelVersion>4.0.0</modelVersion>
    <groupId>com.home</groupId>
    <artifactId>simpleServer</artifactId>
    <packaging>war</packaging> <!--没有这一行则为默认的jar-->
2) 验证pom.xml中的build标签定义了maven-war-plugin插件, 没有它maven无法打war包
    <build>
        <finalName>simpleServer1</finalName>
        <plugins>
            <plugin>
                <groupId>org.apache.maven.plugins</groupId>
                <artifactId>maven-resources-plugin</artifactId>
                <version>2.4.3</version>
            </plugin>
            <plugin>
                <groupId>org.apache.maven.plugins</groupId>
                <artifactId>maven-compiler-plugin</artifactId>
                <version>2.3.2</version>
                <configuration>
                    <source>1.6</source>
                    <target>1.6</target>
                    <encoding>UTF8</encoding>
                </configuration>
            </plugin>
            <plugin>
                <groupId>org.apache.maven.plugins</groupId>
                <artifactId>maven-war-plugin</artifactId>
                <version>2.1.1</version>
                <configuration>
                    <webResources>
                        <resource>
                            <directory>src/main/resources</directory>
                            <excludes>
                                <exclude>**/*.jpg</exclude>
                            </excludes>
                        </resource>
                    </webResources>
                </configuration>
            </plugin>

        </plugins>
    </build>
3) Eclipse中调用maven package命令
右键项目名–>Run as…–>找到m2Eclipse插件, 在右侧的Goals一栏里填写”package”. 如图:
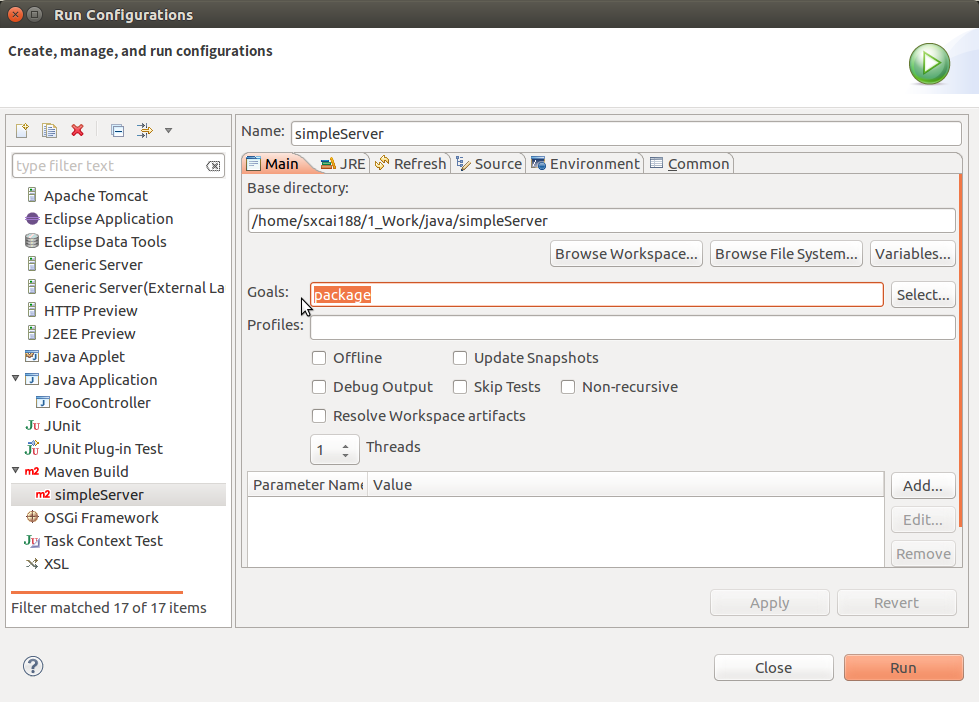
然后点击右下角的Run按钮, 就开始执行maven的package命令了.
打好的war包在
[项目名]/target/文件夹下.
可能遇到的问题
Miss tool.jar
maven package依赖于jdk目录下的tool.jar, 如果Eclipse的默认Java环境是jre是没有这个tool.jar的. 必须指定Eclipse的默认Java环境使用jdk.
解决方法:
- 1) Eclipse菜单栏–>Preferences–>Java–> Installed JREs
- 点击”Add..”按钮, 在下一页中直接点击”Next”按钮, 在新的一页中选择你的JDK(不是JRE)根目录.
- 2) 右键项目名–>Properties–>Java Build Path–>右侧选Libraries标签
- 删除原来的”JRE System Library”, 点击右边”Add Library..”–>”Next”–>选择”Alternative JRE”, 在下拉菜单里找到刚刚设置好的Eclipse的Java环境(JDK)
- 3) Eclipse菜单栏–>Project–>Clean…
- 清空项目的class文件, 重新编译. 现在, 项目使用JDK编译, 可以执行Maven的package Goal了.
执行完maven的package Goal或clean Goal后Eclipse窗口左侧项目结构图没变化
解决方法:
右键项目名–>Refresh
[项目名]/src/log4j.properties没有打进war包里
注意文件位置:
是 src/main/resources/log4j.properties
不是 src/log4j.properties
执行maven package Goal时resources文件夹下面的文件会自动copy到WEB-INF/classes目录下.
同时, log4j官方文档明确了: 只要运行时能在WEB-INF/classes下找到log4j.properties, log4j就能启动成功.
第六步 - 发布war包并运行
把war包扔到您电脑里的tomcat解压目录下的${tomcat_home}/webapps/下,
运行${tomcat_home}/bin/下的startup.sh就可以启动tomcat. tomcat启动后会自动加载${tomcat_home}/webapps/下的war包.
测试
在浏览器里输入
http://localhost:8080/[项目名]/hello
浏览器返回”Hello World!”
至此, SpringMVC的服务器项目开发完毕.
附录
附录A - Spring基础
SpringMVC和Spring框架的关系
web作用域
scope(作用域) - “信息共享的范围”,也就是说一个信息能够在多大的范围内有效
Servlet/JSP中的Session功能是通过scope来实现的。四种作用域:
page 在当前页面有效(仅用于JSP中)
request 在当前请求中有效
session 在当前会话中有效
application 在所有应用程序中有效
附录B - 数据库配置文件
spring配置文件applicationContext.xml中添加
<bean id="" class = "">
    <property name="locations">
        <array>
            <value>classpath:xxx.properties</value>
        </array>
    </property>
</bean>
附录C - 在Spring框架中声明web作用域
在spring2.0之前bean只有2种作用域(这时的spring还只是Struct框架下的小弟。与其说是作用域,不如说只是Bean的实例化策略)即:
singleton(单例)
non-singleton(也称 prototype)
在Spring2.0中加入了三个新的web作用域(符合servlet标准,可见spring框架从2.0版本开始就发力互联网了),分别为:
request
session
global session
如果你想让你的容器里的某个bean拥有其中某种新的web作用域,除了在bean级上配置相应的scope属性,还必须在WEB-INF/web.xml中添加以下listener
      <listener>
            <listener-class>org.springframework.web.context.request.RequestContextListener</listener-class>
      </listener>
基于LocalThread将HTTP request对象绑定到为该请求提供服务的线程上。这使得具有request和session作用域的bean能够在后面的调用链中被访问到。
举个例子:
${Tomcat_Home}/conf/web.xml中添加以下内容:
<context-para>
    <name>foo</name>
    <value>I'm a foo</value>
</context-para>
//假设WEB-INF/web.xml中已经添加RequestContextListener
class Abc{
public void doSomething(){
HttpServletRequest request = ((ServletRequestAttributes)RequestContextHolder.getRequestAttributes()).getRequest();
String propertiesName = request.getSession().getServletContext().getInitParameter("foo");
}
}简单两句话就可以获得${Tomcat_Home}/conf/web.xml中定义的变量. 注意:${Tomcat_Home}/conf/web.xml中定义的是Tomcat容器的全局变量. 而WEB-INF/web.xml定义的仅仅是项目变量.
附录D - Spring读取properties文件
1) 在spring配置文件WEB-INF/[项目名]-servlet.xml中配置
2) 现在可以使用@Value("#idname{['keyInPropertiesFile']}")修饰类的field变量, 就获得xxx.properties文件的值了
版权声明:本文地址http://blog.csdn.net/caib1109/article/details/51527258
欢迎非商业目的的转载, 作者保留一切权利