基本流程
1UART 初始化
通过XUartPs_LookupConfig函数,找到UART的基址------------>
通过XUartPs_CfgInitialize函数,初始化UART配置------------>

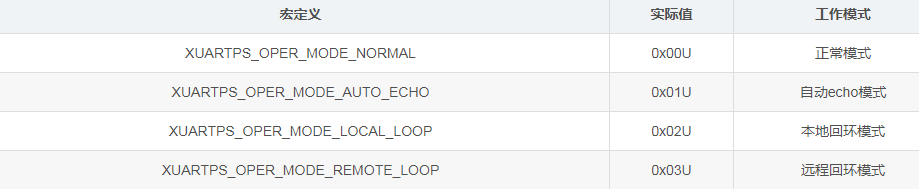
2.模式配置
void XUartPs_SetOperMode(XUartPs *InstancePtr, u8 OperationMode)
用 local loopback为自发自收

3.格式重载配置
使用XUartPs_SetDataFormat函数设置UART的数据格式,包括波特率、数据位数、停止位数和奇偶校验。调用此函数时应确保UART没有收发数据。
cfg里默认使用“8位数据、1位停止、无奇偶校验”,
可以仅使用XUartPs_SetBaudRate函数来设置波特率。
s32 XUartPs_SetBaudRate(XUartPs *InstancePtr, u32 BaudRate)
XUartPs_SetDataFormat
s32 XUartPs_SetDataFormat(XUartPs *InstancePtr, XUartPsFormat * FormatPtr)
typedef struct {
		u32 BaudRate;	/**< In bps, ie 1200 */
		u32 DataBits;	/**< Number of data bits */
		u32 Parity;		/**< Parity */
		u8 StopBits;	/**< Number of stop bits */
} XUartPsFormat;
4.数据发送
u32 XUartPs_Send(XUartPs *InstancePtr, u8 *BufferPtr, u32 NumBytes)
第二个参数是指向要发送的数据缓冲区的指针;第三个参数是发送的字节数;返回值标识实际发送的字节数。
5.数据接收
u32 XUartPs_Recv(XUartPs *InstancePtr, u8 *BufferPtr, u32 NumBytes)
第二参数指针指向接收到数据要存储的缓冲区;第三个NumBytes是“要”接收的字节数;返回的是实际接收到的字节数。
正是利用了第三个参赛和返回值,实现了接收特定数目数据的功能,
2 轮询模式
初始化
void Uart_init()
{
	XUartPs_Config *Config;
	Config = XUartPs_LookupConfig(UART_DEVICE_ID);
	XUartPs_CfgInitialize(&Uart_PS, Config, Config->BaseAddress);
	}
LOCAL_LOOP发收
int Uart_send_receive_LOCAL(XUartPs* Uart_Ps, u8 *SendBuffer, u8 *RecvBuffer, int length)
{
	//自收自发
	XUartPs_SetOperMode(Uart_Ps,XUARTPS_OPER_MODE_LOCAL_LOOP);
	u16 SentCount=0;
	u16 RecvCount=0;
	SentCount=XUartPs_Send(Uart_Ps,SendBuffer,length);
	if (SentCount != length)
		return XST_FAILURE;
	//发送等待
	while(XUartPs_IsSending(Uart_Ps));
	//接收
	while(RecvCount < length) {
		RecvCount += XUartPs_Recv(Uart_Ps, &RecvBuffer[RecvCount],
				(length - RecvCount));
	}
	XUartPs_SetOperMode(Uart_Ps,XUARTPS_OPER_MODE_NORMAL);

	for (u16 Index = 0; Index < length; Index++) {
		if (SendBuffer[Index] != RecvBuffer[Index]) {
			xil_printf("UART Polled Mode failed!\r\n");
			return XST_FAILURE;
		}
	}
	xil_printf("UART Polled Mode succeeded!\r\n");

	return XST_SUCCESS;
}
main.c
#include "sleep.h"

#include "xparameters.h"
#include "xuartps.h"
#include "xil_printf.h"


#define UART_DEVICE_ID              XPAR_XUARTPS_0_DEVICE_ID
#define TEST_BUFFER_SIZE 32
XUartPs Uart_PS;		/* Instance of the UART Device */

/*
 * The following buffers are used in this example to send and receive data
 * with the UART.
 */
static u8 SendBuffer[TEST_BUFFER_SIZE];	/* Buffer for Transmitting Data */
static u8 RecvBuffer[TEST_BUFFER_SIZE];	/* Buffer for Receiving Data */


int main(void)
{


	Uart_init();


	while(1)
	{
		sleep(3);
		for (u16 Index = 0; Index < TEST_BUFFER_SIZE; Index++) {
			SendBuffer[Index] = '0' + Index;
			RecvBuffer[Index] = 0;
		}
		Uart_send_receive_LOCAL(&Uart_PS,SendBuffer,RecvBuffer,TEST_BUFFER_SIZE);
	}
	return XST_SUCCESS;
}

Normal发收
int Uart_send_receive_Normal(XUartPs* Uart_Ps,  u8 *RecvBuffer, int length)
{
	//正常模式
	XUartPs_SetOperMode(Uart_Ps,XUARTPS_OPER_MODE_NORMAL);
	u16 RecvCount=0;
	u16 SentCount=0;
	//发送等待
	while(XUartPs_IsSending(Uart_Ps));
	//接收
	while(RecvCount < length) {
		RecvCount += XUartPs_Recv(Uart_Ps, &RecvBuffer[RecvCount],
				(length - RecvCount));
	}
	SentCount = XUartPs_Send(Uart_Ps, RecvBuffer, length);
	if (SentCount != length) {
		xil_printf("UART Polled Mode failed!\r\n");
		return XST_FAILURE;
	}
	xil_printf("UART Polled Mode succeeded!\r\n");
	return XST_SUCCESS;
}
main.c
int main(void)
{
	Uart_init();

	while(1)
	{
		sleep(0.1);

		Uart_send_receive_Normal(&Uart_PS,RecvBuffer,TEST_BUFFER_SIZE);
	}
	return XST_SUCCESS;
}
buffer 长10
只有我们发送够了10个数据后,UART的挂起状态才会结束。
如果我们一次性发送的数据超过了10个,则多余的数据会留在RxFIFO中,直到下一次轮询才被读取。

本文介绍了UART的轮询模式。除非是特别简单的应用,一般不会使用轮询模式。如果要使用轮询模式,一定要有个良好的程序架构或实现机制,避免程序无限挂起。
3 中断模式
uart0 59#
uart0 82#
通过Xil_ExceptionInit函数,避免与前版本有兼容性问题------------>
通过XScuGic_LookupConfig函数,找到通用中断控制器基址------------>
通过XScuGic_CfgInitialize函数,初始化通用中断控制器------------>
通过Xil_ExceptionRegisterHandler函数,使能异常中断处理------------>
通过XScuGic_Connect函数,绑定UART中断处理函数------------>
通过XScuGic_Enable函数,在通用中断控制器中使能UART中断------------>
通过XUartPs_SetInterruptMask函数,设置UART的中断触发方式------------>
通过Xil_ExceptionEnableMask函数,使能中断。
1. 触发方式
使用XUartPs_SetInterruptMask函数设置串口中断的触发方式。第二个参数是设置RxFIFO触发器中断。

XUartPs_SetInterruptMask(Uart_Ps, XUARTPS_IXR_RXOVR);

2.RxFIFO触发等级设置
UART初始化时中使用XUartPs_SetFifoThreshold函数设置RxFIFO的触发等级。RxFIFO中的字节数超过这个值时,会产生一个接收数据中断。不设置的时候默认为8.
void XUartPs_SetFifoThreshold(XUartPs *InstancePtr, u8 TriggerLevel)
第二个参数的取值应在1~64,因为RxFIFO最大只能存储64个字节。
3.中断处理函数
include define
#include "xparameters.h"
#include "xplatform_info.h"
#include "xuartps.h"
#include "xil_exception.h"
#include "xil_printf.h"
#include "xscugic.h"
#include "sleep.h"
#define UART_DEVICE_ID		XPAR_XUARTPS_0_DEVICE_ID
#define INTC_DEVICE_ID		XPAR_SCUGIC_SINGLE_DEVICE_ID
#define UART_INT_IRQ_ID		XPAR_XUARTPS_1_INTR

#define TEST_BUFFER_SIZE	16
XUartPs Uart_PS	;		/* Instance of the UART Device */
XScuGic InterruptController;	/* Instance of the Interrupt Controller */

static u8 RecvBuffer[TEST_BUFFER_SIZE];	/* Buffer for Receiving Data */

volatile int TotalReceivedCount;
volatile int TotalSentCount;

u8 *RecvBufferPtr;
uart init
void Uart_init()
{
	XUartPs_Config *Config;
	Config = XUartPs_LookupConfig(UART_DEVICE_ID);
	XUartPs_CfgInitialize(&Uart_PS, Config, Config->BaseAddress);
	}
interrupt init connect and enable
void inter_init_connect()
{
	XScuGic_Config *IntcConfig; /* Config for interrupt controller */

	/* Initialize the interrupt controller driver */
	IntcConfig = XScuGic_LookupConfig(INTC_DEVICE_ID);

	XScuGic_CfgInitialize(&InterruptController, IntcConfig,
						IntcConfig->CpuBaseAddress);
	XScuGic_Disable(&InterruptController,59);
	XScuGic_SetPriorityTriggerType(&InterruptController,59,16,1);//
	//connect and enable
	XScuGic_Connect(&InterruptController, 59U,
				  (Xil_ExceptionHandler) Handler,
				  &Uart_PS);
	XScuGic_Enable(&InterruptController, 59U);
	Xil_ExceptionInit();
	Xil_ExceptionRegisterHandler(XIL_EXCEPTION_ID_INT,
				(Xil_ExceptionHandler) XScuGic_InterruptHandler,
				(void *)&InterruptController);
	Xil_ExceptionEnable();

}
uart handler
void Handler(void *CallBackRef)
{
	u32 ReceivedCount = 0 ;
	u32 IsrStatus;
	XUartPs *UartInstancePtr = (XUartPs *) CallBackRef ;
	IsrStatus = XUartPs_ReadReg(UartInstancePtr->Config.BaseAddress,
				   XUARTPS_IMR_OFFSET);

	IsrStatus &= XUartPs_ReadReg(UartInstancePtr->Config.BaseAddress,
				   XUARTPS_ISR_OFFSET);//中断类型
	if (IsrStatus & (u32)XUARTPS_IXR_RXOVR)   /* 检查RxFIFO是否触发 */
	{
		ReceivedCount = XUartPs_Recv(UartInstancePtr, RecvBuffer, (TEST_BUFFER_SIZE-TotalReceivedCount)) ;
		TotalReceivedCount += ReceivedCount ;

		RecvBufferPtr += ReceivedCount ;
		/* 清除中断标志 */
		XUartPs_WriteReg(UartInstancePtr->Config.BaseAddress, XUARTPS_ISR_OFFSET, XUARTPS_IXR_RXOVR) ;
	}
	xil_printf("UART inter\r\n");
	if (TotalReceivedCount >= TEST_BUFFER_SIZE) {

			xil_printf("%s", RecvBuffer);
		xil_printf("\r\nI have received %d bytes.\r\n", TotalReceivedCount);
		RecvBufferPtr = RecvBuffer;
		TotalReceivedCount = 0;
	}
}
main
int main(void)
{
	u32 IntrMask;
	Uart_init();
	XUartPs_SetOperMode(&Uart_PS, XUARTPS_OPER_MODE_NORMAL);

	inter_init_connect();

	XUartPs_SetHandler(&Uart_PS, (XUartPs_Handler)Handler, &Uart_PS);
	IntrMask =XUARTPS_IXR_RXOVR;
	XUartPs_SetFifoThreshold(&Uart_PS,8);  //设置RxFIFO的中断触发等级
	XUartPs_SetInterruptMask(&Uart_PS, IntrMask);
	XScuGic_Enable(&InterruptController, 59);
	while(1)
	{
		sleep(1);
		xil_printf("UART 1s in main\r\n");
	}
	return 0;
}

