一、使用Sentinel代替Hystrix
1.修改POM文件
(1)cloud-dependencies模块加上spring-cloud-openfeign-dependencies依赖
注意:这里添加的目的是为了解决在spring-cloud-starter-openfeign2.2.0.RELEASE里接口方法名拼写错误的问题。
具体可以参考文章https://www.cnblogs.com/cdfive2018/p/12537412.html
<dependency>
<groupId>org.springframework.cloud</groupId>
<artifactId>spring-cloud-openfeign-dependencies</artifactId>
<version>${spring-cloud-alibaba.version}</version>
<type>pom</type>
<scope>import</scope>
</dependency>
(2)cloud-consumer模块加上spring-cloud-starter-alibaba-sentinel的依赖
<dependency>
<groupId>com.alibaba.cloud</groupId>
<artifactId>spring-cloud-starter-alibaba-sentinel</artifactId>
</dependency>
2.修改cloud-consumer模块配置文件
使用feign.sentinel.enabled=true替换feign.hystrix.enabled=true
修改后结果
#feign.hystrix.enabled=true
feign.sentinel.enabled=true
3.修改cloud-consumer模块代码
修改CloudConsumerApplication类
在public RestTemplate restTemplate() {
return new RestTemplate();
}
方法上增加@SentinelRestTemplate
修改后的效果变成
@LoadBalanced
@Bean
@SentinelRestTemplate
public RestTemplate restTemplate() {
return new RestTemplate();
}
二、使用Sentinel
1.修改cloud-consumer模块代码
(1)新增SentinelGlobalDefaultUtil类,作为统一的block和Fallback处理,这里要注意接口返回值必须统一
package com.plkd.consumer.sentinel;
import com.alibaba.csp.sentinel.slots.block.BlockException;
public class SentinelGlobalDefaultUtil {
public static final int BLOCK_FLAG = 88888;
public static final String FALLBACK_DEFAULT_RESULT = "fallback";
public static int globalBlockHandler(BlockException ex) {
System.out.println("blocked by: " + ex.getClass().getSimpleName());
return BLOCK_FLAG;
}
public static String globalDefaultFallback(Throwable t) {
System.out.println("Fallback caught: " + t.getClass().getSimpleName());
return FALLBACK_DEFAULT_RESULT;
}
}
(2)修改OrderController类增加使用SentinelResource注解
修改后结果:
@RequestMapping(value = "/getUserByOrderId/{id}",method = RequestMethod.GET)
@SentinelResource(blockHandler = "globalBlockHandler", blockHandlerClass = SentinelGlobalDefaultUtil.class,
defaultFallback = "globalDefaultFallback",fallbackClass = {SentinelGlobalDefaultUtil.class})
public String getUserByOrderId(@PathVariable("id") int id){
return userRemoteClient.findUserByUserName("michael").toString();
}
2.修改user-open-api模块代码
(1)新增UserFeignClientFallbackFactory类
package com.plkd.usercenter.client.sentinel;
import com.plkd.usercenter.client.UserRemoteClient;
import com.plkd.usercenter.dto.UseDto;
import feign.hystrix.FallbackFactory;
import org.springframework.stereotype.Component;
/*
推荐使用这个方式,fallbackFactory属性在fallback的基础上可以拿到异常信息
*/
@Component
public class UserFeignClientFallbackFactory implements FallbackFactory<UserRemoteClient> {
@Override
public UserRemoteClient create(Throwable throwable) {
return new UserRemoteClient() {
@Override
public UseDto findUserByUserName(String userName) {
System.out.println("远程调用被限流或降级了,throwable:"+throwable);
return null;
}
};
}
}
(2)修改UserRemoteClient类
将FeignClient注解修改成@FeignClient(name = "cloud-provider",fallbackFactory = UserFeignClientFallbackFactory.class)
三、部署Sentinel Dashboard
1.下载Sentinel控制台:https://github.com/alibaba/Sentinel/releases
执行命令启动dashboard:
java -Dserver.port=8081 -jar sentinel-dashboard-1.7.1.jar
这样默认是8081端口,在浏览器输入:http://localhost:8081。默认账号密码:sentinel:sentinel,看到控制台界面为部署成功
2.cloud-consumer模块引入配置:
# sentinel dashboard
spring.cloud.sentinel.transport.dashboard=localhost:8081
3.重新启动cloud-consumer模块
在浏览器访问http://localhost:8080/echo/2018,以及http://localhost:8080/order/getUserByOrderId/1
这个时候就会在Sentinel控制台出现应用cloud-consumer
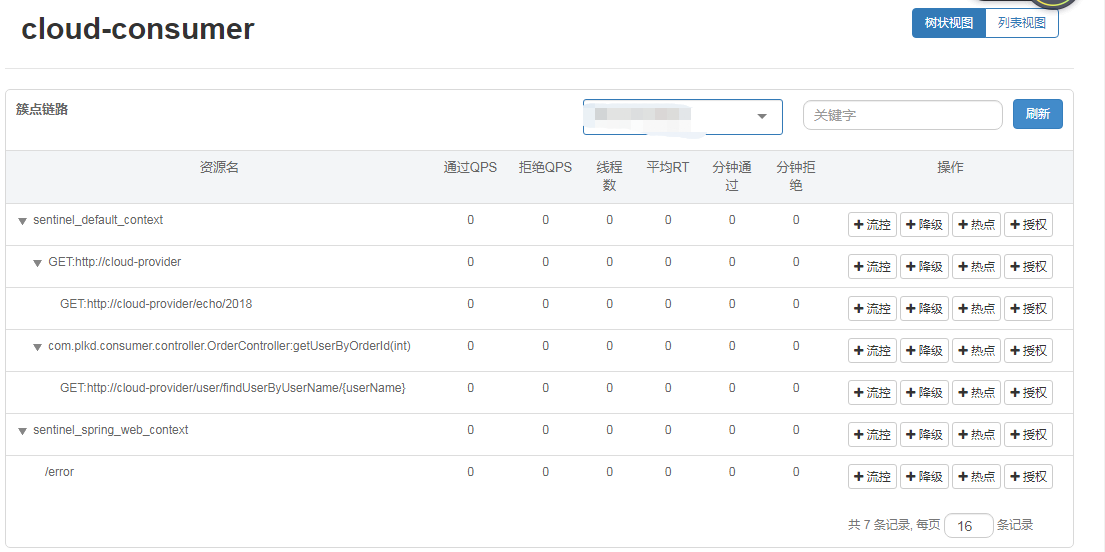
4.设置流控规则

5.连续访问http://localhost:8080/order/getUserByOrderId/1 结果被限流

