交互式前景提取GrabCut
GrabCut算法的具体实施过程
- 在图片中定义含有(一个或多个)物体的矩形框
- 矩形框外的区域被自动认为是“确定背景”
- 对于用户自定义的矩形区域,可用背景中的数据来区别矩形框区域内的前景和背景区域
用高斯混合模型(Gaussians Mixture Model, GMM)来对前景和背景建模。GMM会根据用户的输入学习并创建新的像素分布。对未分类的像素,根据其与已知分类像素的关系进行分类(标记为前景或背景) - 根据像素分布情况生成一幅图,图中的节点就是各个像素点。除了像素点外,还有“前景节点”和“背景节点”。每个像素连接到前景节点或背景节点的边的权重由像素是前景或背景的概率决定
- 每个像素都被看作通过虚拟边与周围像素相连接。两个像素连接的边的权重由它们的颜色上的相似性决定,两个像素的颜色越接近,变得权重越大。
- 完成节点连接后,需要解决的问题就变成了一幅连通的图。在该图上根据各自边的权重关系进行切割,将不同的点划分为前景节点和背景节点
- 不断重复上述过程,直至分类收敛为止
操作小记
import numpy as np
import cv2 as cv
from matplotlib import pyplot as plt

img = cv.imread('messi1.jpg')
if img is None:
    print('Could not open or find the image ')
    exit(0)
mask = np.zeros(img.shape[:2], np.uint8)
# plt.imshow(img),plt.colorbar(),plt.show()
bgdModel = np.zeros((1, 65), np.float64)
fgdModel = np.zeros((1, 65), np.float64)
rect = (50, 50, 850, 1700)  # (x, y, w, h)
cv.grabCut(img, mask, rect, bgdModel, fgdModel, 5, cv.GC_INIT_WITH_RECT)
# plt.imshow(mask),plt.colorbar(),plt.show()
# print(mask)
mask2 = np.where((mask == 2) | (mask == 0), 0, 1).astype('uint8')
img = img * mask2[:, :, np.newaxis]
img = cv.cvtColor(img, cv.COLOR_BGR2RGB)
plt.imshow(img), plt.colorbar(), plt.show()
效果:

附录
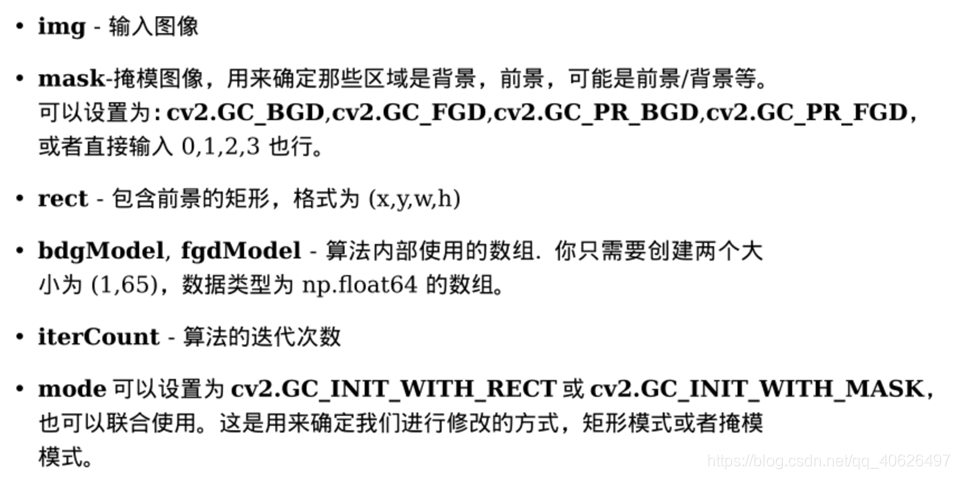
mask, bgdModel, fgdModel =cv2.grabCut(img,mask,rect,bgdModel,fgdModel,iterCouner,[, model]
grabcut.py文件
#!/usr/bin/env python
'''
===============================================================================
Interactive Image Segmentation using GrabCut algorithm.

This sample shows interactive image segmentation using grabcut algorithm.

USAGE:
    python grabcut.py <filename>

README FIRST:
    Two windows will show up, one for input and one for output.

    At first, in input window, draw a rectangle around the object using
mouse right button. Then press 'n' to segment the object (once or a few times)
For any finer touch-ups, you can press any of the keys below and draw lines on
the areas you want. Then again press 'n' for updating the output.

Key '0' - To select areas of sure background
Key '1' - To select areas of sure foreground
Key '2' - To select areas of probable background
Key '3' - To select areas of probable foreground

Key 'n' - To update the segmentation
Key 'r' - To reset the setup
Key 's' - To save the results
===============================================================================
'''

# Python 2/3 compatibility
from __future__ import print_function

import numpy as np
import cv2 as cv

import sys

class App():
    BLUE = [255,0,0]        # rectangle color
    RED = [0,0,255]         # PR BG
    GREEN = [0,255,0]       # PR FG
    BLACK = [0,0,0]         # sure BG
    WHITE = [255,255,255]   # sure FG

    DRAW_BG = {'color' : BLACK, 'val' : 0}
    DRAW_FG = {'color' : WHITE, 'val' : 1}
    DRAW_PR_FG = {'color' : GREEN, 'val' : 3}
    DRAW_PR_BG = {'color' : RED, 'val' : 2}

    # setting up flags
    rect = (0,0,1,1)
    drawing = False         # flag for drawing curves
    rectangle = False       # flag for drawing rect
    rect_over = False       # flag to check if rect drawn
    rect_or_mask = 100      # flag for selecting rect or mask mode
    value = DRAW_FG         # drawing initialized to FG
    thickness = 3           # brush thickness

    def onmouse(self, event, x, y, flags, param):
        # Draw Rectangle
        if event == cv.EVENT_RBUTTONDOWN:
            self.rectangle = True
            self.ix, self.iy = x,y

        elif event == cv.EVENT_MOUSEMOVE:
            if self.rectangle == True:
                self.img = self.img2.copy()
                cv.rectangle(self.img, (self.ix, self.iy), (x, y), self.BLUE, 2)
                self.rect = (min(self.ix, x), min(self.iy, y), abs(self.ix - x), abs(self.iy - y))
                self.rect_or_mask = 0

        elif event == cv.EVENT_RBUTTONUP:
            self.rectangle = False
            self.rect_over = True
            cv.rectangle(self.img, (self.ix, self.iy), (x, y), self.BLUE, 2)
            self.rect = (min(self.ix, x), min(self.iy, y), abs(self.ix - x), abs(self.iy - y))
            self.rect_or_mask = 0
            print(" Now press the key 'n' a few times until no further change \n")

        # draw touchup curves

        if event == cv.EVENT_LBUTTONDOWN:
            if self.rect_over == False:
                print("first draw rectangle \n")
            else:
                self.drawing = True
                cv.circle(self.img, (x,y), self.thickness, self.value['color'], -1)
                cv.circle(self.mask, (x,y), self.thickness, self.value['val'], -1)

        elif event == cv.EVENT_MOUSEMOVE:
            if self.drawing == True:
                cv.circle(self.img, (x, y), self.thickness, self.value['color'], -1)
                cv.circle(self.mask, (x, y), self.thickness, self.value['val'], -1)

        elif event == cv.EVENT_LBUTTONUP:
            if self.drawing == True:
                self.drawing = False
                cv.circle(self.img, (x, y), self.thickness, self.value['color'], -1)
                cv.circle(self.mask, (x, y), self.thickness, self.value['val'], -1)

    def run(self):
        # Loading images
        if len(sys.argv) == 2:
            filename = sys.argv[1] # for drawing purposes
        else:
            print("No input image given, so loading default image, lena.jpg \n")
            print("Correct Usage: python grabcut.py <filename> \n")
            filename = 'lena.jpg'

        self.img = cv.imread(cv.samples.findFile(filename))
        self.img2 = self.img.copy()                               # a copy of original image
        self.mask = np.zeros(self.img.shape[:2], dtype = np.uint8) # mask initialized to PR_BG
        self.output = np.zeros(self.img.shape, np.uint8)           # output image to be shown

        # input and output windows
        cv.namedWindow('output')
        cv.namedWindow('input')
        cv.setMouseCallback('input', self.onmouse)
        cv.moveWindow('input', self.img.shape[1]+10,90)

        print(" Instructions: \n")
        print(" Draw a rectangle around the object using right mouse button \n")

        while(1):

            cv.imshow('output', self.output)
            cv.imshow('input', self.img)
            k = cv.waitKey(1)

            # key bindings
            if k == 27:         # esc to exit
                break
            elif k == ord('0'): # BG drawing
                print(" mark background regions with left mouse button \n")
                self.value = self.DRAW_BG
            elif k == ord('1'): # FG drawing
                print(" mark foreground regions with left mouse button \n")
                self.value = self.DRAW_FG
            elif k == ord('2'): # PR_BG drawing
                self.value = self.DRAW_PR_BG
            elif k == ord('3'): # PR_FG drawing
                self.value = self.DRAW_PR_FG
            elif k == ord('s'): # save image
                bar = np.zeros((self.img.shape[0], 5, 3), np.uint8)
                res = np.hstack((self.img2, bar, self.img, bar, self.output))
                cv.imwrite('grabcut_output.png', res)
                print(" Result saved as image \n")
            elif k == ord('r'): # reset everything
                print("resetting \n")
                self.rect = (0,0,1,1)
                self.drawing = False
                self.rectangle = False
                self.rect_or_mask = 100
                self.rect_over = False
                self.value = self.DRAW_FG
                self.img = self.img2.copy()
                self.mask = np.zeros(self.img.shape[:2], dtype = np.uint8) # mask initialized to PR_BG
                self.output = np.zeros(self.img.shape, np.uint8)           # output image to be shown
            elif k == ord('n'): # segment the image
                print(""" For finer touchups, mark foreground and background after pressing keys 0-3
                and again press 'n' \n""")
                try:
                    if (self.rect_or_mask == 0):         # grabcut with rect
                        bgdmodel = np.zeros((1, 65), np.float64)
                        fgdmodel = np.zeros((1, 65), np.float64)
                        cv.grabCut(self.img2, self.mask, self.rect, bgdmodel, fgdmodel, 1, cv.GC_INIT_WITH_RECT)
                        self.rect_or_mask = 1
                    elif self.rect_or_mask == 1:         # grabcut with mask
                        bgdmodel = np.zeros((1, 65), np.float64)
                        fgdmodel = np.zeros((1, 65), np.float64)
                        cv.grabCut(self.img2, self.mask, self.rect, bgdmodel, fgdmodel, 1, cv.GC_INIT_WITH_MASK)
                except:
                    import traceback
                    traceback.print_exc()

            mask2 = np.where((self.mask==1) + (self.mask==3), 255, 0).astype('uint8')
            self.output = cv.bitwise_and(self.img2, self.img2, mask=mask2)

        print('Done')


if __name__ == '__main__':
    print(__doc__)
    App().run()
    cv.destroyAllWindows()
