(毕业设计)打算做个遥控小车,于是,就搜索了相关文章,其中值得参考的如下:
1、Sunny的树莓派小车(6篇博文教程),链接如下:
https://www.sunnyos.com/article-show-56.html
2、Mjpg-Streamer实现网络监控
https://blog.csdn.net/czy_1125/article/details/52636699
/********************************************************************/
首先,上面的第一篇教程实现了小车的运动控制,第二篇教程实现了实时视频监控。
于是,综合起来就能做出一个最简单的基于树莓派的遥控视频小车。
/********************************************************************/
先上图记录这第一阶段的小车:


/********************************************************************/
第一步:硬件连接。如上图,用充电宝给树莓派供电,用三个18650电池(约12V)给驱动和马达使用。两者共地(树莓派上,用一条杜邦线引出地线,接到驱动L298N的地线接口上)。摄像头接入树莓派的USB口。

第二步:上传代码。根据“Sunny的树莓派小车”这篇教程在树莓派上搭建环境,上传代码到树莓派。如下:
①(树莓派上安装)异步io框架tornado(官网http://www.tornadoweb.org/)
sudo pip install tornado②上传代码到树莓派上。注:代码仿自Sunny的树莓派小车
car.py文件
#!/usr/bin/python
#coding: utf8
import sys
import RPi.GPIO as GPIO
import time
import sys
import tornado.ioloop
import tornado.web
import tornado.httpserver
import tornado.options
import os

from tornado.options import define,options
define("port",default=80,type=int)
IN1 = 17
IN2 = 18
IN3 = 27
IN4 = 22
distance=2.0
fd=os.open('piptest2',os.O_RDONLY)
distance=os.read(fd,11)
print(distance)
os.close(fd)

def init():
        #distance=os.read(fd,11)
        #print(distance)
        GPIO.setmode(GPIO.BCM)
        GPIO.setup(IN1,GPIO.OUT)
        GPIO.setup(IN2,GPIO.OUT)
        GPIO.setup(IN3,GPIO.OUT)
        GPIO.setup(IN4,GPIO.OUT)

# 前进
def forward(tf):
        fd=os.open('piptest2',os.O_RDONLY)
        distance=os.read(fd,11)
        print(distance)
        os.close(fd)
        if(float(distance)>5.0):
            GPIO.output(IN1,GPIO.HIGH)
            GPIO.output(IN2,GPIO.LOW)
            GPIO.output(IN3,GPIO.HIGH)
            GPIO.output(IN4,GPIO.LOW)
            time.sleep(tf)
        GPIO.cleanup()

# 后退
def reverse(tf):
        GPIO.output(IN1,GPIO.LOW)
        GPIO.output(IN2,GPIO.HIGH)
        GPIO.output(IN3,GPIO.LOW)
        GPIO.output(IN4,GPIO.HIGH)
        time.sleep(tf)
        GPIO.cleanup()

# 左转弯
def left(tf):
        GPIO.output(IN1,GPIO.LOW)
        GPIO.output(IN2,GPIO.LOW)
        GPIO.output(IN3,GPIO.HIGH)
        GPIO.output(IN4,GPIO.LOW)
        time.sleep(tf)
        GPIO.cleanup()

# 右转弯
def right(tf):
        GPIO.output(IN1,GPIO.HIGH)
        GPIO.output(IN2,GPIO.LOW)
        GPIO.output(IN3,GPIO.LOW)
        GPIO.output(IN4,GPIO.LOW)
        time.sleep(tf)
        GPIO.cleanup()

class IndexHandler(tornado.web.RequestHandler):
        def get(self):
                self.render("index.html")
        def post(self):
                init()
                sleep_time = 0.1
                arg = self.get_argument('k')
                if(arg=='w'):
                        forward(sleep_time)
                elif(arg=='s'):
                        reverse(sleep_time)
                elif(arg=='a'):
                        left(sleep_time)
                elif(arg=='d'):
                        right(sleep_time)
                else:
                        return False
                self.write(arg)
if __name__ == '__main__':
        tornado.options.parse_command_line()
        app = tornado.web.Application(handlers=[(r"/",IndexHandler)])
        http_server = tornado.httpserver.HTTPServer(app)
        http_server.listen(options.port)
        tornado.ioloop.IOLoop.instance().start()
csb2.py 文件
import time
import RPi.GPIO as GPIO
import Adafruit_SSD1306
import os

from PIL import Image
from PIL import ImageDraw
from PIL import ImageFont

import subprocess

#CSB_BEGIN
GPIO.setwarnings(False)
GPIO.setmode(GPIO.BCM)
trig=19 #send-pin
echo=26 #receive-pin
GPIO.setup(trig,GPIO.OUT,initial=GPIO.LOW)
#GPIO.setup(trig,GPIO.OUT)
GPIO.setup(echo,GPIO.IN)
##CSB_END

RST = None     # on the PiOLED this pin isnt used

# 128x32 display with hardware I2C:
disp = Adafruit_SSD1306.SSD1306_128_32(rst=RST)

disp.begin()

disp.clear()
disp.display()

# Create blank image for drawing.
# Make sure to create image with mode '1' for 1-bit color.
width = disp.width
height = disp.height
image = Image.new('1', (width, height))

# Get drawing object to draw on image.
draw = ImageDraw.Draw(image)

# Draw a black filled box to clear the image.
draw.rectangle((0,0,width,height), outline=0, fill=0)

# Draw some shapes.
# First define some constants to allow easy resizing of shapes.
padding = -2
top = padding
bottom = height-padding
# Move left to right keeping track of the current x position for drawing shapes.
x = 0

font = ImageFont.load_default()

while True:
################################################
    #send
    GPIO.output(trig,True)
    time.sleep(0.00001) #1us
    GPIO.output(trig,False)

    #start recording
    while GPIO.input(echo)==0:
        pass
    start=time.time()

    #end recording
    while GPIO.input(echo)==1:
        pass
    end=time.time()

    #compute distance
    distance=round((end-start)*343/2*100,2)
#################################################

    draw.rectangle((0,0,width,height), outline=0, fill=0)

    draw.text((x, top), "distance: " + str(distance)+"cm",  font=font, fill=255)

#    print(distance)
    # Display image.
    disp.image(image)
    disp.display()
    time.sleep(.1)

    distance2='%f' %distance
    print(distance2)
    fd=os.open('piptest2',os.O_NONBLOCK|os.O_CREAT|os.O_RDWR)
    os.write(fd,distance2)
    os.close(fd)

GPIO.cleanup()
index.html 文件
<!DOCTYPE html>
<html>
<head>
    <meta charset="utf-8" />
    <title>毕业设计</title>
    <script src="http://libs.baidu.com/jquery/1.9.0/jquery.js"></script>
</head>
<body>
<script type="text/javascript">
    function go(k){
        $.post('/',{k:k},function(){});
    }
    $(function(){
        window.document.onkeydown = abc;
        function abc(env){
            env = (env) ? env : window.event;
            if(env.keyCode=='87'){
                go('w');
            }
            if(env.keyCode=='83'){
                go('s');
            }
            if(env.keyCode=='65'){
                go('a');
            }
            if(env.keyCode=='68'){
                go('d');
            }
        }
        var i = null;
        $('.before').mousedown(function(){
            i = setInterval(function(){
                go('w');
            },100);
        });
        $('.left').mousedown(function(){
            i = setInterval(function(){
                go('a');
            },100);
        });
        $('.right').mousedown(function(){
            i = setInterval(function(){
                go('d');
            },100);
        });
        $('.cabk').mousedown(function(){
            i = setInterval(function(){
                go('s');
            },100);
        });
        $('#main span').mouseup(function(){
            clearInterval(i);
        });
    });
</script>
<style type="text/css">
    #main{width: 150px;height: 150px;background: #ccc;}
    #main span{width: 50px;height: 50px;float: left;z-index: 999;}
    #main span.on2{background: #ff00ff;}
	#video{width:800px;height:550px;padding:auto}
</style>
<div id="main">
    <span></span>
    <span class="on2 before"></span>
    <span></span>
    <span class="on2 left"></span>
    <span></span>
    <span class="on2 right"></span>
    <span></span>
    <span class="on2 cabk"></span>
    <span></span>
</div>
<div id="webcam"><noscript><img src="./?action=snapshot" /></noscript></div>
<iframe id="video" src="http://192.168.43.16:8080/javascript_simple.html" ></iframe>
</body>
</html>
第三步:给树莓派设置固定IP。可参考:https://www.jianshu.com/p/308fb22a7dab
输入以下命令打开配置文件:
sudo nano /etc/network/interfaces修改为如下所示:

保存配置:ctrl + o
退出编辑:ctrl + x
第四步:树莓派上运行python脚本文件(我的文件名为car.py)。
sudo python ./car.py第五步:局域网内(即电脑与树莓派连接的是同一个WiFi),电脑浏览器访问树莓派的IP地址(我的是192.168.43.16)。
这时候车子已经可以动起来了。
第六步:使用mjpg-streamer获取USB摄像头图像,参考自:https://blog.csdn.net/bobsweetie/article/details/50814849
项目工程:https://github.com/jacksonliam/mjpg-streamer
将工程下载后,传送到树莓派系统中解压:
unzip mjpg-streamer-master.zip 编译此工程需要用到cmake:
sudo apt-get install cmake 编译前,还需要安装支持库:
sudo apt-get install libjpeg8-dev 进入工程mjpg-streamer-experimental,进行完全编译:
make clean all使能树莓派的摄像头(详略)
sudo raspi-config新建文件run.sh ,文件内容如下(文件路径需作适当修改):
cd  /home/pi/mjpg-streamer-master/mjpg-streamer-experimental
sudo ./mjpg_streamer -i "./input_uvc.so" -o "./output_http.so -w ./www"第七步:设置脚本自启动。参考:https://blog.csdn.net/qq_36501027/article/details/80360504
方法二:
1、在/etc/init.d/路径下编写开机脚本
如:run.sh文件
#!/bin/bash

cd /works/smartdoor/

sudo ./smartdoor
2、更改脚本文件的权限
sudo chmod 775 run.sh3、将该脚本添加到启动脚本中,执行以下指令 (完成)
sudo update-rc.d run.sh defaults 90注:此处的数字90表示的是执行的优先级,越高表示执行的越晚
4、在启动脚本中移除该执行脚本
sudo update-rc.d -f run.sh remove第八步:设计安卓APP。原创博文:https://blog.csdn.net/mm13420109325/article/details/88325148
第九步:增加OLED模块和超声波测距模块。
参考:http://shumeipai.nxez.com/2017/09/13/solve-the-raspberry-pi-drive-oled-problem.html
参考2:https://blog.csdn.net/ki1381/article/details/79291138
参考3:https://www.jianshu.com/p/61b3119ab3f5
参考4:http://www.cnblogs.com/maoguy/p/5678563.html
安装Adafruit_Python_SSD1306库
sudo apt-get update
sudo apt-get install build-essential python-dev python-pip
sudo pip install RPi.GPIO
sudo apt-get install python-imaging python-smbus
sudo apt-get install git
git clone https://github.com/adafruit/Adafruit_Python_SSD1306.git
cd Adafruit_Python_SSD1306
sudo python setup.py install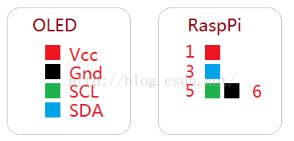
进入例程目录examples,运行shapes.py例程。
(记录一下这个美好的时候:)

接下来是超声波模块的事了:
参考一:https://blog.csdn.net/qq_38880380/article/details/78970526
参考二:https://blog.csdn.net/a497785609/article/details/78001972
参考三(c语言的):https://www.cnblogs.com/yuemo/p/8888342.html
参考四(分压电路):https://www.jianshu.com/p/293415ae3e9c
超声波模块5V供电,信号输出引脚需分压电路。

超声波模块的测试代码如下:
import RPi.GPIO as GPIO
import time
GPIO.setmode(GPIO.BCM)
trig=17 #send-pin
echo=27 #receive-pin
GPIO.setup(trig,GPIO.OUT,initial=GPIO.LOW)
GPIO.setup(echo,GPIO.IN)

def Measure():

    #send
    GPIO.output(trig,True)
    time.sleep(0.00001) #1us
    GPIO.output(trig,False)

    #start recording
    while GPIO.input(echo)==0:
        pass
    start=time.time()

    #end recording
    while GPIO.input(echo)==1:
        pass
    end=time.time()

    #compute distance
    distance=round((end-start)*343/2*100,2)
    print("distance:{0}cm,{1}m".format(distance,distance/100))

while True:
    Measure()
    time.sleep(1)

GPIO.cleanup();
记录一下这个美好的时候吧:

此时,超声波模块和OLED模块都可以独立工作了,下一步就是整合了。
整合之后:
import time
import RPi.GPIO as GPIO
import Adafruit_SSD1306

from PIL import Image
from PIL import ImageDraw
from PIL import ImageFont

import subprocess

#CSB_BEGIN
GPIO.setmode(GPIO.BCM)
trig=17 #send-pin
echo=27 #receive-pin
GPIO.setup(trig,GPIO.OUT,initial=GPIO.LOW)
GPIO.setup(echo,GPIO.IN)
##CSB_END

RST = None     # on the PiOLED this pin isnt used

# 128x32 display with hardware I2C:
disp = Adafruit_SSD1306.SSD1306_128_32(rst=RST)

disp.begin()

disp.clear()
disp.display()

# Create blank image for drawing.
# Make sure to create image with mode '1' for 1-bit color.
width = disp.width
height = disp.height
image = Image.new('1', (width, height))

# Get drawing object to draw on image.
draw = ImageDraw.Draw(image)

# Draw a black filled box to clear the image.
draw.rectangle((0,0,width,height), outline=0, fill=0)

# Draw some shapes.
# First define some constants to allow easy resizing of shapes.
padding = -2
top = padding
bottom = height-padding
# Move left to right keeping track of the current x position for drawing shapes.
x = 0

font = ImageFont.load_default()


while True:
################################################
    #send
    GPIO.output(trig,True)
    time.sleep(0.00001) #1us
    GPIO.output(trig,False)

    #start recording
    while GPIO.input(echo)==0:
        pass
    start=time.time()

    #end recording
    while GPIO.input(echo)==1:
        pass
    end=time.time()

    #compute distance
    distance=round((end-start)*343/2*100,2)
#################################################

    draw.rectangle((0,0,width,height), outline=0, fill=0)

    draw.text((x, top), "distance: " + str(distance)+"cm",  font=font, fill=255)

    # Display image.
    disp.image(image)
    disp.display()
    time.sleep(.1)

GPIO.cleanup()
到了这个时候,就可以开始做外网访问了。
参考1:https://www.jianshu.com/p/98a71bc3b690
参考2:https://www.linuxidc.com/Linux/2017-11/148192.htm
参考3(ssh反向):https://blog.csdn.net/little_bobo/article/details/78810137
参考4(frp可实现!!!):https://blog.csdn.net/weixin_40535588/article/details/89296894
github:https://github.com/fatedier/frp
首先,阿里云新买了一个服务器(学生价九块五每月)
新建个用户:
安装一下git:
sudo apt-get update
sudo apt-get install git
服务器和树莓派都安装frp(错误操作...):
git clone https://github.com/fatedier/frp或者(正确操作!!!):
服务器安装frp
wget https://github.com/fatedier/frp/releases/download/v0.20.0/frp_0.20.0_linux_amd64.tar.gz
tar -zxvf frp_0.20.0_linux_amd64.tar.gz
树莓派安装frp
wget https://github.com/fatedier/frp/releases/download/v0.20.0/frp_0.20.0_linux_arm.tar.gz
tar -zxvf frp_0.20.0_linux_arm.tar.gz
安装好之后,
树莓派修改frpc.ini
[common]
server_addr =云服务器IP  # frps所在的服务器的 IP
server_port = 7000                 # frp与服务器绑定进行通信的端口

[ssh]
type = tcp
local_ip = 192.168.43.16        # Pi所在局域网IP
local_port = 22                       # 本地端口
remote_port = 6000               # ssh远程访问端口

[web]
type = http
local_port = 8080                   # web 服务对应的端口——mjpg-streamer所需端口
custom_domains = 云服务器IP   # frps所在的服务器的 IP
服务器修改frps.ini
[common]
bind_port = 7000         # frp与客户端绑定进行通信的端口
auto_token = frp7
vhost_http_port = 9000   # http 访问端口
配置文件修改完成后,运行frp
服务器上:
./frps -c ./frps.ini树莓派上:
./frpc -c ./frpc.ini出错:
参考一:https://blog.csdn.net/jianghao_ava/article/details/81097980
出了无法解决的奇怪错误,需要重装系统从头来过。。。。
去系统官网下载镜像:
https://www.raspberrypi.org/downloads/raspbian/
安装好后发现,镜像默认是关闭SSH服务的,解决方法(根目录下新建文件夹ssh):http://shumeipai.nxez.com/2017/02/27/raspbian-ssh-connection-refused.html
默认的用户名: pi
默认的密码是: raspberry
开启VNC,参考:https://www.jianshu.com/p/b73f358849de
临时开启VNC:vncserver
开机自启动脚本,参考:https://www.jianshu.com/p/86adb6d5347b
最终run.sh文件改成如下:
#!/bin/bash
sudo /home/pi/myDesign/mjpg-streamer-master/mjpg-streamer-experimental/mjpg_streamer -i "/home/pi/myDesign/mjpg-streamer-master/mjpg-streamer-experimental/input_uvc.so" -o "/home/pi/myDesign/mjpg-streamer-master/mjpg-streamer-experimental/output_http.so -w /home/pi/myDesign/mjpg-streamer-master/mjpg-streamer-experimental/www" &
sudo python /home/pi/myDesign/car.py &
改动如下:
#!/bin/bash
sudo /home/pi/myDesign/mjpg-streamer-master/mjpg-streamer-experimental/mjpg_streamer -i "/home/pi/myDesign/mjpg-streamer-master/mjpg-streamer-experimental/input_uvc.so" -o "/home/pi/myDesign/mjpg-streamer-master/mjpg-streamer-experimental/output_http.so -w /home/pi/myDesign/mjpg-streamer-master/mjpg-streamer-experimental/www" &
sudo /home/pi/myDesign/frp_0.20.0_linux_arm/frpc -c /home/pi/myDesign/frp_0.20.0_linux_arm/frpc.ini &
sudo python /home/pi/myDesign/csb2.py &
sudo python /home/pi/myDesign/car.py &
添加到 /etc/rc.local 文件中:
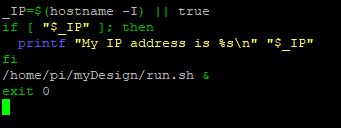
此时实现了开机自启动,浏览器访问对应的ip后界面如下:

外网访问完成,参考:https://blog.csdn.net/weixin_40535588/article/details/89296894
