翻译,原文来自CodeProject,有节选。作者Sacha Barber写文章很用心,希望我能很用心的看 。我更关注的是实际工程中的应用。
这篇文章主要讲解WPF中的Layout。
1)控件的属性参数Margin
通过使用Margin,我们可以指定当前的控件与四周的空间大小。WPF提供一个函数ValueConverter,可以接受一个字符串如5,5,5,5,指示当前控件与四周间隔5个像素,分别为left,top,Right,Bottom;
2)Canvas
比较简单的布局控件;是个X/Y位置控制的容器,但子容器需要指定以下四个参数:
Canvas.Left; Canves.Right; Canvas.Top; Canvas.Bottom
这看起来有些奇怪,因为我们已经有了一个Canvas.Left(文中没有更多的解释,只是说这不是我们在.Net 2.0下经常使用到的属性)。
Canvas属性就这些。另外如果碰到两个Canvas有重叠,如何确认一个在另一个上面?这时候就要考虑属性Canvas.ZIndex,用于确认哪个控件在上面,数值大的在上面;如果没有指定数值,则ZIndex的数值是按我们添加控件的顺序来改变的。
下图显示一个Canvas上包含两个子控件:
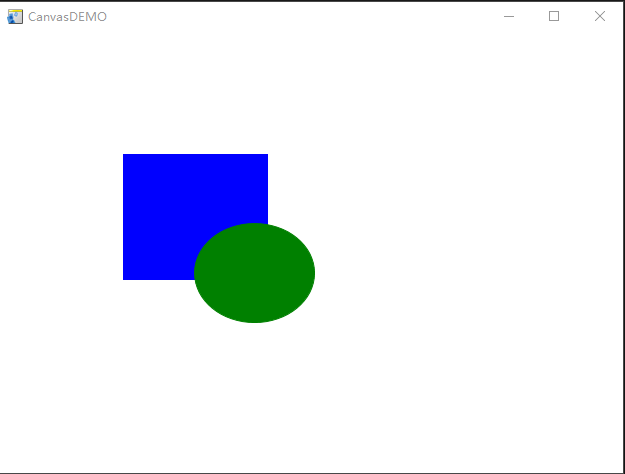
对应的XAML代码为:
<Window
	xmlns="http://schemas.microsoft.com/winfx/2006/xaml/presentation"
	xmlns:x="http://schemas.microsoft.com/winfx/2006/xaml"
	x:Class="WPF_Tour_Beginners_Layout.CanvasDEMO"
	x:Name="Window"
	Title="CanvasDEMO"
        WindowStartupLocation="CenterScreen"
	Width="640" Height="480">

		<Canvas Margin="0,0,0,0" Background="White">
			<Rectangle Fill="Blue"
				Stroke="Blue"
				Width="145"
				Height="126"
				Canvas.Left="124" Canvas.Top="122"/>
			<Ellipse Fill="Green"
				Stroke="Green"
				Width="121" Height="100"
				Panel.ZIndex="1"
				Canvas.Left="195" Canvas.Top="191"/>
		</Canvas>

</Window>
3)StackPanel
比较简单,只是stack它包含的控件,以竖直或水平方向,属性名为Orientation。
下图显示一个stackPanel包含两个子控件,一个在上,一个在下:
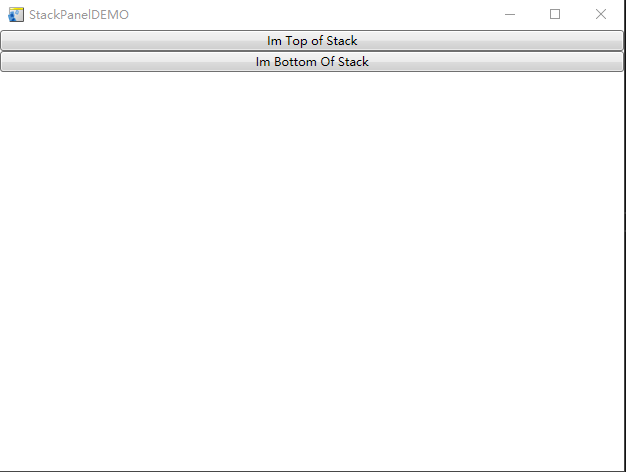
对应的XAML代码为:
<Window
	xmlns="http://schemas.microsoft.com/winfx/2006/xaml/presentation"
	xmlns:x="http://schemas.microsoft.com/winfx/2006/xaml"
	x:Class="WPF_Tour_Beginners_Layout.StackPanelDEMO"
	x:Name="Window"
	Title="StackPanelDEMO"
        WindowStartupLocation="CenterScreen"
	Width="640" Height="480">

        <StackPanel Margin="0,0,0,0" Background="White" Orientation="Vertical">
            <Button Content="Im Top of Stack"/>
            <Button Content="Im Bottom Of Stack"/>
        </StackPanel>

</Window>
4)WrapPanel
解释为;It simply wraps its contents.
下图显示一个WrapPanel包含10个子控件:

对应的XAML代码:
<Window
	xmlns="http://schemas.microsoft.com/winfx/2006/xaml/presentation"
	xmlns:x="http://schemas.microsoft.com/winfx/2006/xaml"
	x:Class="WPF_Tour_Beginners_Layout.WrapPanelDEMO"
	x:Name="Window"
	Title="WrapPanelDEMO"
        WindowStartupLocation="CenterScreen"
	Width="640" Height="480">

	<WrapPanel Margin="0,0,0,0" Background="White">
            <Rectangle Margin="10,10,10,10" Fill ="Blue" Width="60" Height="60"/>
            <Rectangle Margin="10,10,10,10" Fill ="Blue" Width="60" Height="60"/>
            <Rectangle Margin="10,10,10,10" Fill ="Blue" Width="60" Height="60"/>
            <Rectangle Margin="10,10,10,10" Fill ="Blue" Width="60" Height="60"/>
            <Rectangle Margin="10,10,10,10" Fill ="Blue" Width="60" Height="60"/>
            <Rectangle Margin="10,10,10,10" Fill ="Blue" Width="60" Height="60"/>
            <Rectangle Margin="10,10,10,10" Fill ="Blue" Width="60" Height="60"/>
            <Rectangle Margin="10,10,10,10" Fill ="Blue" Width="60" Height="60"/>
            <Rectangle Margin="10,10,10,10" Fill ="Blue" Width="60" Height="60"/>
            <Rectangle Margin="10,10,10,10" Fill ="Blue" Width="60" Height="60"/>
            <Rectangle Margin="10,10,10,10" Fill ="Blue" Width="60" Height="60"/>
        </WrapPanel>

</Window>
代码中·10个Rectangle一模一样,的确,WrapPanel什么都没做,只是提供一个容器的功能。
5)DockPanel
DockPanel用途比较广,可以作为窗体的基本容器,实现如:menu在上,左右内容显示区域,加底下一个状态显示栏。比较重要的属性是DockPanel.Dock及LastChildFill,后者会改变原来的布局(填满剩下的空间),如果设为true的话。
下图显示一个DockPanel包含两个子控件,一个在上面,另外一个填充了剩余的空间:

对应的XAML代码为:
<Window
	xmlns="http://schemas.microsoft.com/winfx/2006/xaml/presentation"
	xmlns:x="http://schemas.microsoft.com/winfx/2006/xaml"
	x:Class="WPF_Tour_Beginners_Layout.DockPanelDEMO"
	x:Name="Window"
	Title="DockPanelDEMO"
        WindowStartupLocation="CenterScreen"
	Width="640" Height="480">

    <DockPanel Width="Auto" Height="Auto" LastChildFill="True">
        <Rectangle Fill="CornflowerBlue" Stroke="CornflowerBlue" Height="20" DockPanel.Dock="Top"/>
        <Rectangle Fill="Orange" Stroke="Orange"  />
    </DockPanel>
</Window>
6)Grid
比较复杂,类似于一个HTML中的table控件,可以指定row,column数量及跨行跨列;同时还有一个比较奇怪的语法标识"*",如
<Grid.ColumnDefinitions>
    <ColumnDefinition Width="40"/>
    <ColumnDefinition Width="*"/>
    <ColumnDefinition Width="2*"/>
</Grid.ColumnDefinitions>
表示3列:第一列固定宽度40pixel;剩下空间被分成两列,第三列宽度是第二列的两倍。语法同样适用于行。
控制Grid上子控件的位置使用(Index从0开始的):
Grid.Column
Grid.Row
控制某一cell所占据的大小使用(Index从1开始):
Grid.ColumnSpan
Grid.RowSpan
下图显示Grid控件包含3列1行,第一个控件Column=1,第二个占据了2-3列,这是由于Grid.ColumnSpan=2的缘故。

对应的XAML代码为:
<Window
	xmlns="http://schemas.microsoft.com/winfx/2006/xaml/presentation"
	xmlns:x="http://schemas.microsoft.com/winfx/2006/xaml"
	x:Class="WPF_Tour_Beginners_Layout.GridDEMO"
	x:Name="Window"
	Title="GridDEMO"
        WindowStartupLocation="CenterScreen"
	Width="640" Height="480">

    <Grid Width="Auto" Height="Auto" >

        <Grid.ColumnDefinitions>
            <ColumnDefinition Width="40"/>
            <ColumnDefinition Width="*"/>
            <ColumnDefinition Width="2*"/>
        </Grid.ColumnDefinitions>

        <Rectangle Fill="Aqua" Grid.Column="0" Grid.Row="0"/>
        <Rectangle Fill="Plum" Grid.Column="1" Grid.ColumnSpan="2"/>

    </Grid>
</Window>
7)Putting it all Together
考虑上面所说的WinForm经典界面:

包括:菜单栏,按钮区及显示区,外加底部状态栏,用WPF来完成,XAML代码为:
<Window x:Class="WPF_Tour_Beginners_Layout.PuttingItAllTogether"
    xmlns="http://schemas.microsoft.com/winfx/2006/xaml/presentation"
    xmlns:x="http://schemas.microsoft.com/winfx/2006/xaml"
    WindowStartupLocation="CenterScreen"
    Title="PuttingItAllTogether" Width="640" Height="480" >

    <DockPanel Width="Auto" Height="Auto" LastChildFill="True">
        <!--Top Menu Area-->
        <Menu Width="Auto" Height="20" Background="SteelBlue" DockPanel.Dock="Top">
            <!-- File Menu -->
            <MenuItem Header="File">
                <MenuItem Header="Save"/>
                <Separator/>
                <MenuItem Header="Exit"/>
            </MenuItem>
            <!-- About Menu -->
            <MenuItem Header="Help">
                <MenuItem Header="About"/>
            </MenuItem>
        </Menu>

        <!--Bottom Status Bar area, declared before middle section, as I want it to fill entire
        bottom of Window, which it wouldnt if there was a Left docked panel before it -->
        <StackPanel Width="Auto" Height="31" Background="LightGray" Orientation="Horizontal" DockPanel.Dock="Bottom">
            <Label Width="155" Height="23" Content="Status Bar Message...." FontFamily="Arial" FontSize="10"/>
        </StackPanel>

        <!--Left Main Content area-->
        <StackPanel Width="136" Height="Auto" Background="Gray">
            <Button Margin="5,5,5,5" Width="Auto" Height="26" Content="button1"/>
            <Button Width="126" Height="26" Content="button2" Margin="5,5,5,5"/>
            <Button Width="126" Height="26" Content="button3" Margin="5,5,5,5"/>
        </StackPanel>


        <!--Right Main Content area, NOTE HOW this Grid is the last child
        so takes all the remaining room -->
        <Grid Width="Auto" Height="Auto" Background="White">

            <Grid.ColumnDefinitions>
                <ColumnDefinition Width="*"/>
                <ColumnDefinition Width="*"/>
            </Grid.ColumnDefinitions>

            <Grid.RowDefinitions>
                <RowDefinition Height="*"/>
                <RowDefinition Height="*"/>
            </Grid.RowDefinitions>

            <Rectangle Fill="Aqua" Margin="10,10,10,10" Grid.Row="0" Grid.Column="0"/>
            <Rectangle Fill="Aqua" Margin="10,10,10,10" Grid.Row="0" Grid.Column="1"/>
            <Rectangle Fill="Aqua" Margin="10,10,10,10" Grid.Row="1" Grid.Column="0"/>
            <Rectangle Fill="Aqua" Margin="10,10,10,10" Grid.Row="1" Grid.Column="1"/>
        </Grid>

    </DockPanel>
</Window>
设计DockPanel时依次是Menu->Bottom Staus -> leftButtons -> Right Shown,注意DockPanel的LastChildFill属性为true;同时status bar的StackPanel必须始于其它控件(声明为DockPanel.Dock=Left或DockPanel.Dock=Right)。
结果界面与WinForm相同(没有展示)。
8)Performance Considerations
考虑父控件中包含大量的子控件,如一个StackPanel中有一个ListBox,而ListBox与一个大型的询问数据库相连。这种情况下,ListBox包含很多子控件(使用StackPanel作为子控件?),看起来这不是个好主意。
然而,在ListBox使用VirtualizingStackPanel.IsVirtualizing,这意味着ListBox控件内部的StackPanel将会可见?
当一个Panel可见,意即可视化部分被创建,如当创建的ListBox与有100000行的数据库相连用于显示图像,这样加载ListBox会耗费很长时间。如果使用Virtualize Panel,只有UI上可见部分的图像被创建。当向下拉动滚动条,当前显示的部分被销毁,新的可见部分会被加载。目前只有一个Panel支持Virtualization,就是VirtualizingStackPanel。如果需要新的Virtualized Panel,就需要自己写。
9)Custom Layouts
创建自己喜欢的Panel,需要从System.Windows.Controls.Panel派生,然后重写函数:MeasureOverride,LayoutOverride,可以参考FishEye Panel。
10)后记
我在运行实例代码时,发现主界面很好看:

点击上面任何一个*.xaml Demo,弹出的窗体(上文有显示)会覆盖这个界面,类似于只看到一个界面,找到对应的XAML代码:
<Window
	xmlns="http://schemas.microsoft.com/winfx/2006/xaml/presentation"
	xmlns:x="http://schemas.microsoft.com/winfx/2006/xaml"
	x:Class="WPF_Tour_Beginners_Layout.DEMOLauncher"
	x:Name="Window"
	Title="DEMOLauncher"
        WindowStartupLocation="CenterScreen" Width="640" Height="480">

		<DockPanel Margin="0,0,0,0" Background="White" LastChildFill="true" x:Name="dockContainer">
			<Label Height="44" Content="From this page you can launch all the DEMO windows" FontFamily="Arial Rounded MT" FontSize="16" Margin="0,0,0,0" VerticalAlignment="Top" HorizontalAlignment="Center" Width="{Binding Path=ActualWidth, ElementName=dockContainer, Mode=Default}" Background="#FF000000" Foreground="#FFFFFFFF" DockPanel.Dock="Top"/>

			<ListBox x:Name="lstDEMOS" Width="Auto" Height="Auto" IsSynchronizedWithCurrentItem="True"/>

		</DockPanel>
</Window>
代码比较简单,其中Binding Path的Actual Width为DockPanel自身属性值,Element name就是DockPanel。
再看看C#代码:
using System.Windows;
using System.Windows.Controls;
using System.Windows.Data;
using System.Windows.Media;
using System.Windows.Media.Animation;
using System.Windows.Navigation;

namespace WPF_Tour_Beginners_Layout
{
	public partial class DEMOLauncher
	{
		public DEMOLauncher()
		{
			this.InitializeComponent();
                        lstDEMOS.SelectionChanged += new SelectionChangedEventHandler(lstDEMOS_SelectionChanged);
                        lstDEMOS.Items.Add("CanvasDEMO.xaml");
                        lstDEMOS.Items.Add("CanvasDEMOCodeBehind.xaml");
                        lstDEMOS.Items.Add("StackPanelDEMO.xaml");
                        lstDEMOS.Items.Add("StackPanelDEMOCodeBehind.xaml");
                        lstDEMOS.Items.Add("WrapPanelDEMO.xaml");
                        lstDEMOS.Items.Add("WrapPanelDEMOCodeBehind.xaml");
                        lstDEMOS.Items.Add("DockPanelDEMO.xaml");
                        lstDEMOS.Items.Add("DockPanelDEMOCodeBehind.xaml");
                        lstDEMOS.Items.Add("GridDEMO.xaml");
                        lstDEMOS.Items.Add("GridDEMOCodeBehind.xaml");
                        lstDEMOS.Items.Add("PuttingItAllTogether.xaml");
		}

                void lstDEMOS_SelectionChanged(object sender, SelectionChangedEventArgs e)
                {
                    switch (lstDEMOS.SelectedValue.ToString())
                    {
                        case "CanvasDEMO.xaml":
                            CanvasDEMO demoWin1 = new CanvasDEMO();
                            demoWin1.Owner = this;
                            demoWin1.ShowDialog();
                            break;
                        case "CanvasDEMOCodeBehind.xaml":
                            CanvasDEMOCodeBehind demoWin2 = new CanvasDEMOCodeBehind();
                            demoWin2.Owner = this;
                            demoWin2.ShowDialog();
                            break;
                        case "StackPanelDEMO.xaml":
                            StackPanelDEMO demoWin3 = new StackPanelDEMO();
                            demoWin3.Owner = this;
                            demoWin3.ShowDialog();
                            break;
                        case "StackPanelDEMOCodeBehind.xaml":
                            StackPanelDEMOCodeBehind demoWin4 = new StackPanelDEMOCodeBehind();
                            demoWin4.Owner = this;
                            demoWin4.ShowDialog();
                            break;
                        case "WrapPanelDEMO.xaml":
                            WrapPanelDEMO demoWin5 = new WrapPanelDEMO();
                            demoWin5.Owner = this;
                            demoWin5.ShowDialog();
                            break;
                        case "WrapPanelDEMOCodeBehind.xaml":
                            WrapPanelDEMOCodeBehind demoWin6 = new WrapPanelDEMOCodeBehind();
                            demoWin6.Owner = this;
                            demoWin6.ShowDialog();
                            break;
                        case "DockPanelDEMO.xaml":
                            DockPanelDEMO demoWin7 = new DockPanelDEMO();
                            demoWin7.Owner = this;
                            demoWin7.ShowDialog();
                            break;
                        case "DockPanelDEMOCodeBehind.xaml":
                            DockPanelDEMOCodeBehind demoWin8 = new DockPanelDEMOCodeBehind();
                            demoWin8.Owner = this;
                            demoWin8.ShowDialog();
                            break;
                        case "GridDEMO.xaml":
                            GridDEMO demoWin9 = new GridDEMO();
                            demoWin9.Owner = this;
                            demoWin9.ShowDialog();
                            break;
                        case "GridDEMOCodeBehind.xaml":
                            GridDEMOCodeBehind demoWin10 = new GridDEMOCodeBehind();
                            demoWin10.Owner = this;
                            demoWin10.ShowDialog();
                            break;
                        case "PuttingItAllTogether.xaml":
                            PuttingItAllTogether demoWin11 = new PuttingItAllTogether();
                            demoWin11.Owner = this;
                            demoWin11.ShowDialog();
                            break;
                    }
                }
	}
}
也很简洁,ListBox的SelectionChanged事件也是在C#声明并完成的,使用ShowDialog()显示Demo窗体,这样就看不到原来的窗体(关掉Demo窗体后才能看到)。
真正做到了界面与数据的分离。