上一篇介绍了如何在已有iOS项目中集成React Native。这一篇我们把上一篇的demo做下拓展,添加点击电影跳转到详情页。页面跳转使用React Native推荐的第三方导航控件:react-navigation
集成react-navigation
- 根据官方指引,在终端cd到项目根目录,分别输入以下命令进行集成:
npm install --save react-native-navigation
npm install --save react-native-gesture-handler
react-native link react-native-gesture-handler
- 在iOS项目中,打开Podfile文件,添加RCTLinkingIOS:
pod 'React', :path => '../node_modules/react-native', :subspecs => [
    . . . // other subspecs
    'RCTLinkingIOS',
    . . .
  ]
然后执行以下命令安装
pod install
至此,react-navigation集成完毕。
使用react-navigation
- 参考官方使用文档,在根目录创建Navigator.js文件,编辑内容如下:
import React from "react";
import { createStackNavigator, createAppContainer } from 'react-navigation'
import HotMovie from './src/page/HotMovie';
import MovieDetail from './src/page/MovieDetail'

const AppNavigator = createStackNavigator(
  {
    Home: HotMovie,
    Details: MovieDetail
  },
  {
    initialRouteName: "Home"
  }
)

const AppContainer = createAppContainer(AppNavigator);
export default class Navigator extends React.Component {
  render() {
    return <AppContainer />;
  }
}
其中HotMovie为上一篇中创建的电影列表,MovieDetail为新建的电影详情页,具体如下一步
- 创建MovieDetail.js文件,路径为./src/page/MovieDetail.js,编辑如下:
import React,{Component} from 'react';
import {StyleSheet,Image,Text,View} from 'react-native';

export default class MovieDetail extends Component<Props>{
	constructor(props){
		super(props)
		const { navigation } = props
    	const itemId = navigation.getParam('itemId', 'NO-ID')
    	const cover = navigation.getParam('cover')

    	this.state = {
    	  detail:null,
    	  cover:cover,
    	  itemId:itemId
    	}

    	this.fetchData = this.fetchData.bind(this)
	}

	componentDidMount(){
		const requrest_url = "https://movie.douban.com/j/subject_abstract?subject_id="+this.state.itemId
    	this.fetchData(requrest_url)
  	}

	fetchData(requrest_url){
    fetch(requrest_url)
      .then((response) => response.json())
      .then((responseJson) => {
        this.setState({
          detail:responseJson.subject
        });
      })
 	}

	render(){

		if (!this.state.detail) {
			return this.renderLoadingView();
		}
		const data =  this.state.detail
		const state = this.state
		return(
			<View>
			   <Text style={{fontSize:32,fontWeight:"400",padding:10}}>{data.title}</Text>
			   <View style={styles.detailView}>
			   	  <Image style={styles.thumbnail} source={{url:state.cover}}></Image>
			   	  <View style={styles.rightDetai}>
				   	  <Text>导演: {data.directors.join('/')}</Text>
			   	  	  <Text>评分:{data.rate}</Text>
			   	  	  <Text>时长:{data.duration}</Text>
			   	  	  <Text>类型:{this.state.detail.types.join('/')}</Text>
			   	  	  <Text>主演:{this.getDetaiActor()}</Text>
			   	  </View>
			   </View>
			</View>
		)
	}

	renderLoadingView(){
	    return (
	      <View style={styles.container}>
	        <Text>
	          正在加载...
	        </Text>
	      </View>
	    )
  	}

  	getDetaiActor(){
  		return this.state.detail.actors.slice(0,5).join('/')+' 等'
  	}
}

const styles = StyleSheet.create({
  container: {
    flex:1,
    flexDirection:'column',
    alignItems:'center',
    justifyContent: 'center',
    alignItems: 'center',
    height:300
  },

  detailView: {
    flexDirection:'row',
    justifyContent: 'flex-start',
    height:200,
    paddingLeft:20,
    paddingTop:10,
 	paddingRight:10,
  },

  thumbnail:{
    width:79.5,
    height:121.5,
  },

  rightDetai:{
  	flexDirection:'column',
    height:200,
    marginLeft:10
  }

});
- Index.js文件修改为:
import React from 'react';
import { AppRegistry } from 'react-native';
import HotMovie from './src/page/HotMovie';
import MovieDetail from './src/page/MovieDetail'
import Navigator from './Navigator';

AppRegistry.registerComponent('Navigator', () => Navigator);
AppRegistry.registerComponent('HotMovie', () => HotMovie);
AppRegistry.registerComponent('MovieDetail', () => MovieDetail);
- 在iOS项目中,跳转ViewController.m文件改为如下:
#import "ViewController.h"
#import <React/RCTRootView.h>

@interface ViewController ()

@end

@implementation ViewController

- (void)viewDidLoad {
    [super viewDidLoad];
    UIButton *button = [[UIButton alloc] initWithFrame:CGRectMake(0, 0, 200, 50)];
    button.center = self.view.center;
    [button setTitle:@"跳转RN" forState:0];
    [button setTitleColor:[UIColor greenColor] forState:0];
    [button addTarget:self action:@selector(clickButton:) forControlEvents:UIControlEventTouchUpInside];
    [self.view addSubview:button];
}

- (void)clickButton:(UIButton*)button{
    NSURL *jsCodeLocation = [NSURL URLWithString:@"http://localhost:8081/index.bundle?platform=ios"];

    RCTRootView *rootView =
    [[RCTRootView alloc] initWithBundleURL: jsCodeLocation
                                moduleName: @"Navigator"
                         initialProperties: nil
                             launchOptions: nil];
    UIViewController *vc = [[UIViewController alloc] init];
    vc.view = rootView;
    [self presentViewController:vc animated:YES completion:nil];
}
@end
- 在HotMovie.js中添加点击事件,HotMovie.js完整代码如下:
import React, { Component } from 'react';
import {StyleSheet, Image, Text, View, FlatList,TouchableOpacity} from 'react-native';
import { createStackNavigator, createAppContainer } from 'react-navigation'

var REQUEST_URL = "https://movie.douban.com/j/search_subjects?type=movie&tag=%E7%83%AD%E9%97%A8&sort=recommend&page_limit=20&page_start=0"

export default class HotMovie extends Component<Props> {

  _onItemClick(item) {
    this.props.navigation.navigate('Details',{itemId:item.id,cover:item.cover,title:item.title})
  }

  constructor(props){
    super(props);
    this.state = {
      movies:null,
    }

    this.renderMovie = this.renderMovie.bind(this)
    this.fetchData = this.fetchData.bind(this)
  }

  componentDidMount(){
    this.fetchData()
  }

  fetchData(){
    fetch(REQUEST_URL)
      .then((response) => response.json())
      .then((responseJson) => {
        this.setState({
          movies:responseJson.subjects
        });
      })
  }

  render() {
    if (!this.state.movies) {
      return this.renderLoadingView();
    }
    return (
      <FlatList
        data={this.state.movies}
        renderItem={this.renderMovie}
        style={styles.list}
        keyExtractor={item => item.id}
      />
    );
  }


  renderLoadingView(){
    return (
      <View style={styles.container}>
        <Text>
          正在加载...
        </Text>
      </View>
    )
  }


  renderMovie({item}){
    return(
      <TouchableOpacity style={styles.item} onPress={() => this._onItemClick(item)}>
        <Image source={{url:item.cover}} style={styles.thumbnail}/>
        <View style={styles.itemRight}>
          <Text>{item.title}</Text>
          <Text>{item.rate}</Text>
        </View>
      </TouchableOpacity>
    )
  }
}

const styles = StyleSheet.create({
  container: {
    flex:1,
    flexDirection:'row',
    alignItems:'center',
    justifyContent: 'center',
    alignItems: 'center',
  },
  item:{
    marginTop:1,
    flexDirection:'row',
    alignItems:'center',
    justifyContent: 'flex-start',
    height:100,
    backgroundColor:'lightgray',
    paddingLeft:10
  },
  thumbnail:{
    width:53,
    height:81,
    backgroundColor:'lightgray'
  },
  itemRight:{
    height:100,
    justifyContent: 'center',
    alignItems:'center',
    paddingLeft:10
  },
  list: {
    backgroundColor: "#F5FCFF"
  }
});
其中this.props.navigation.navigate('Details')即为react-navigation的导航跳转方法,但此方法不能跳转相同的页面(会没有效果),如果要多次push同样的页面,需要改为:
this.props.navigation.push('Details')
导航返回的话:
this.props.navigation.goBack()
- 设置导航标题
根据不同的需求,我们先看下官方的示例:
- 如果标题是固定的,定义一个名为navigationOptions的static的属性,返回一个包含配置的对象,如:
class HomeScreen extends React.Component {
  static navigationOptions = {
    title: 'Home',
  };

  /* render function, etc */
}
- 如果是需要从上层参数中获取,代码如:
class DetailsScreen extends React.Component {
  static navigationOptions = ({ navigation }) => {
    return {
      title: navigation.getParam('otherParam', 'A Nested Details Screen'),
    };
  };

  /* render function, etc */
}
- 如果要修改标题,代码如:
<Button
    title="Update the title"
    onPress={() => this.props.navigation.setParams({otherParam: 'Updated!'})}
  />
- 如果需要修改样式,代码如::
class HomeScreen extends React.Component {
  static navigationOptions = {
    title: 'Home',
    headerStyle: {
      backgroundColor: '#f4511e',
    },
    headerTintColor: '#fff',
    headerTitleStyle: {
      fontWeight: 'bold',
    },
  };

  /* render function, etc */
}
- 以上只是设置了首页的导航栏样式,我们希望全局设置,那直接回到最前面createStackNavigator代码处,修改:
const RootStack = createStackNavigator(
  {
    Home: HomeScreen,
    Details: DetailsScreen,
  },
  {
    initialRouteName: 'Home',
    /* The header config from HomeScreen is now here */
    defaultNavigationOptions: {
      headerStyle: {
        backgroundColor: '#f4511e',
      },
      headerTintColor: '#fff',
      headerTitleStyle: {
        fontWeight: 'bold',
      },
    },
  }
);
- 有时,我们想把标题改为自定义控件,例如显示图片或者按钮,我们可以这样:
class LogoTitle extends React.Component {
  render() {
    return (
      <Image
        source={require('./spiro.png')}
        style={{ width: 30, height: 30 }}
      />
    );
  }
}

class HomeScreen extends React.Component {
  static navigationOptions = {
    // headerTitle instead of title
    headerTitle: <LogoTitle />,
  };

  /* render function, etc */
}
回到我们的demo示例,我们希望整个App导航栏的背景颜色值是#f4511e,文字为白色,故在Navigator.js中统一配置,Navigator.js完整代码如下:
import React from "react";
import { createStackNavigator, createAppContainer } from 'react-navigation'
import HotMovie from './src/page/HotMovie';
import MovieDetail from './src/page/MovieDetail'

const AppNavigator = createStackNavigator(
  {
    Home: HotMovie,
    Details: MovieDetail
  },
  {
    defaultNavigationOptions: {
      headerTintColor: '#fff',
      headerStyle: {
        backgroundColor: '#f4511e',
      },
      headerTitleStyle: {
        fontWeight: 'bold',
      },
    },
    navigationOptions: {
      tabBarLabel: 'Home!',
    },
  }
)

const AppContainer = createAppContainer(AppNavigator);
export default class Navigator extends React.Component {
  render() {
    return <AppContainer />;
  }
}
首页(电影列表)的导航栏标题为指定图片movie.png (对应路径为:项目根目录/src/images/movie.png),故修改HotMovie.js为:
import React, { Component } from 'react';
import {StyleSheet, Image, Text, View, FlatList,TouchableOpacity} from 'react-native';
import { createStackNavigator, createAppContainer } from 'react-navigation'

var REQUEST_URL = "https://movie.douban.com/j/search_subjects?type=movie&tag=%E7%83%AD%E9%97%A8&sort=recommend&page_limit=20&page_start=0"

class LogoTitle extends React.Component {
  render() {
    return (
      <Image
        source={require('../image/movie.png')}
        style={{ width: 30, height: 30 }}
      />
    );
  }
}

export default class HotMovie extends Component<Props> {

  static navigationOptions = {
     headerTitle: <LogoTitle />,
  };

  //....省略代码
}

const styles = StyleSheet.create({
	//...省略代码
});
在电影详情页,我们根据上一页面传递来的电影名称参数来设置标题,缺省值为电影详情:
import React,{Component} from 'react';
import {StyleSheet,Image,Text,View} from 'react-native';

export default class MovieDetail extends Component<Props>{

	static navigationOptions = ({ navigation }) => {
		return {
			title:navigation.getParam('title','电影详情')
		}
	}

	//...省略代码
}

const styles = StyleSheet.create({
  //...省略代码
});
完整源代码:https://github.com/dolacmeng/RNProject/tree/master
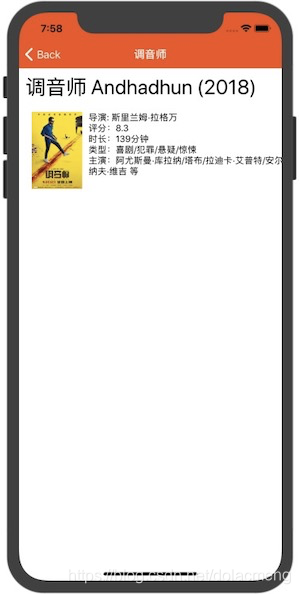
运行效果: