转载请注明本文出自maplejaw的博客(http://blog.csdn.net/maplejaw_)
开源库地址:https://github.com/square/okhttp
解读版本:3.4.1
OkHttp是目前非常流行的网络请求库,出自Square公司。对于该库的使用,相信大家已经比较熟悉了。今天,我将从源码角度对OkHttp3进行剖析。
基本使用
Okhttp的使用可以分为四步:
初始化客户端(实际应用中应当保持单例)
 //获取一个客户端
 OkHttpClient client = new OkHttpClient.Builder()
                  ...
                 .build();
构建Request
//构建一个Request
Request request = new Request.Builder()
  .url(url)
  .build();
获取Call对象
//获取Call对象
Call call=client.newCall(request);
发送请求(execute同步/enqueue异步)
//同步调用
Response response = call.execute();

//异步调用
call.enqueue(new Callback() {
   @Override
 public void onFailure(Call call, IOException e) {

 }

   @Override
 public void onResponse(Call call, Response response) throws IOException {

 }
});
当然,在使用类似POST等可以设置请求体的请求方法时,我们还可以如下构建请求体。
构建字符串,字节,文件请求体:
public static final MediaType TEXT = MediaType.parse("text/plain; charset=utf-8");
public static final MediaType STREAM = MediaType.parse("application/octet-stream");


 //构建字符串请求体
 RequestBody body1 = RequestBody.create(TEXT, string);

 //构建字节请求体
 RequestBody body2 = RequestBody.create(STREAM, byte);

 //构建文件请求体
 RequestBody body3 = RequestBody.create(STREAM, file);


 //将请求体设置给请求方法内
 Request request = new Request.Builder()
      .url(url)
      .post(xx)// xx表示body1,body2,body3中的某一个
      .build();
构建表单请求体:
 //构建表单RequestBody
 RequestBody formBody=new FormBody.Builder()
                 .add("name","maplejaw")
                 .add("age","18")
                  ...
                 .build();
构建分块表单请求体:
  public static final MediaType STREAM = MediaType.parse("application/octet-stream");
 //构建表单RequestBody
 RequestBody multipartBody=new MultipartBody.Builder()
                .setType(MultipartBody.FORM)//指明为 multipart/form-data 类型
                .addFormDataPart("name","maplejaw") //添加表单数据
                .addFormDataPart("age","20") //添加表单数据
                .addFormDataPart("avatar","111.jpg",RequestBody.create(STREAM,file)) //添加文件,其中avatar为表单名,111.jpg为文件名。
                .addPart(..)//该方法用于添加自定义Part,一般来说以上已经够用
                .build();
关于Okhttp的基本使用已经介绍完毕,在大多数情况下,只要掌握以上使用方法,就足以应付关于网络请求的日常使用。
接下来,将从源码角度剖析OkHttp这个网络框架,如果你到目前为止还弄不清请求行、状态行、请求头、响应头、请求体和响应体这些基本概念的话,建议先阅读你应该知道的HTTP基础知识这篇文章。
源码解读
初始化OkHttpClient
所谓初始化OkHttpClient,无非就是对其进行相关配置,在了解OkHttpClient相关配置前,先认识一下以下一些基本的类。
Proxy
代理类,默认有三种代理模式DIRECT(直连),HTTP(http代理),SOCKS(socks代理),这三种模式,折腾过科学上网的或多或少都了解一点吧。
ProxySelector
代理选择类,默认不使用代理,即使用直连方式,当然,我们可以自定义配置,以指定URI使用某种代理,类似代理软件的PAC功能。
Protocol
协议类,用来表示使用的协议版本,比如http/1.0,http/1.1,spdy/3.1,h2等
Dns
DNS这里就不用介绍了,用于根据主机名来查询对应的IP。
Cache
缓存类,内部使用了DiskLruCache来进行管理缓存,匹配缓存的机制不仅仅是根据url,而且会根据请求方法和请求头来验证是否可以响应缓存。此外,仅支持GET请求的缓存。
ConnectionSpec
连接规范,用于配置Socket连接层。对于HTTPS,还能配置安全传输层协议(TLS)版本和密码套件(CipherSuite)
Interceptor
拦截器,该类的功能还是比较强大的,通过拦截器可以监视、重写和重试请求。拦截器的源码如下:
public interface Interceptor {
  Response intercept(Chain chain) throws IOException;

  interface Chain {
    Request request();

    Response proceed(Request request) throws IOException;

    Connection connection();
  }
}拦截器的使用也非常简单,如果你只是想修改Request,那么就通过chain.request()获取原始的Request然后进行修改,比如添加cookie,代理等请求头,甚至还能修改请求方法和请求体。同理如果需要修改Response,则可以通过chain.proceed来获取Response后进行修改。此外我们还可以在其中进行打印日志等其他监视行为。
关于拦截器的使用例子如下:
   //通过addInterceptor添加拦截器
   OkHttpClient client = new OkHttpClient.Builder()
                ...
                .addInterceptor(new MyInterceptor())
                .build();


  //自定义拦截器
 class MyInterceptor implements Interceptor {

        @Override
       public Response intercept(Interceptor.Chain chain) throws IOException {
            //获取原始Request
            Request request = chain.request();

            //构建新的Request
            Request newRequest=request.newBuilder()//使用newBuilder,在原来request基础上修改,当然如果暴力点,可以完全重写Request。
                    .header("User-Agent", "OkHttp Example")
                    ...
                    .build();

            //获取Response
            Response response = chain.proceed(newRequest);

            //构建新的Response
            Response newResponse=response.newBuilder()
                     .header("Cache-Control", "max-age=60")
                      ....
                     .build();

            return newResponse;
        }
    }
CookieJar
用来管理cookie,可以根据url保存cookie,也可以通过url取出相应cookie。默认的不做cookie管理。该接口中有两个抽象方法,用户可以自己实现该接口以对cookie进行管理。
  //保存cookie
  void saveFromResponse(HttpUrl url, List<Cookie> cookies);

  //根据Url导入保存的Cookie
  List<Cookie> loadForRequest(HttpUrl url);
SocketFactory
Socket工厂,通过createSocket来创建Socket。
SSLSocketFactory
安全套接层工厂,HTTPS相关,用于创建SSLSocket。一般配置HTTPS证书信任问题都需要从这里着手。对于不受信任的证书一般会提示javax.net.ssl.SSLHandshakeException异常。配置信任所有证书的源码如下:
      OkHttpClient client = new OkHttpClient.Builder()
                .sslSocketFactory(getTrustAllSSLSocketFactory())//配置SSL工厂
                .build();

      //获取信任所有证书的SSLSocketFactory
      public static SSLSocketFactory getTrustAllSSLSocketFactory() {
        // 信任所有证书
        TrustManager[] trustAllCerts = new TrustManager[]{new X509TrustManager() {
            @Override
            public X509Certificate[] getAcceptedIssuers() {
                return new X509Certificate[]{};
            }

            @Override
            public void checkClientTrusted(X509Certificate[] certs, String authType) {
            }

            @Override
            public void checkServerTrusted(X509Certificate[] certs, String authType) {
            }
        }};

        try {
            SSLContext sslContext = SSLContext.getInstance("TLS");
            sslContext.init(null, trustAllCerts, null);
            return sslContext.getSocketFactory();
        } catch (Throwable ex) {

        }

        return null;
}对于信任自证书的配置问题,可以参考Android Https相关完全解析 当OkHttp遇到Https。这篇文章。
CertificateChainCleaner
证书链清洁器,HTTPS相关,用于从Java的TLS API构建的原始数组中统计有效的证书链,然后清除跟TLS握手不相关的证书,提取可信任的证书以便可以受益于证书锁机制。
HostnameVerifier
主机名验证器,与HTTPS中的SSL相关,当握手时如果URL的主机名不是可识别的主机,就会要求进行主机名验证。
public interface HostnameVerifier {

     //通过session验证指定的主机名是否被允许
    boolean verify(String hostname, SSLSession session);
}
CertificatePinner
证书锁,HTTPS相关,用于约束哪些证书可以被信任,可以防止一些已知或未知的中间证书机构带来的攻击行为。如果所有证书都不被信任将抛出SSLPeerUnverifiedException异常。
其中用于检查证书是否被信任的源码如下:
//检查证书是否被信任
 public void check(String hostname, List<Certificate> peerCertificates)
      throws SSLPeerUnverifiedException {
    List<Pin> pins = findMatchingPins(hostname);//获取Pin(网址,hash算法,hash值)
    if (pins.isEmpty()) return;

    if (certificateChainCleaner != null) {
       //通过清洁器获取信任的证书
       peerCertificates = certificateChainCleaner.clean(peerCertificates, hostname);
    }

    for (int c = 0, certsSize = peerCertificates.size(); c < certsSize; c++) {
      //对证书进行比对hash值,如果配对失败就抛出SSLPeerUnverifiedException异常
      X509Certificate x509Certificate = (X509Certificate) peerCertificates.get(c);

      // Lazily compute the hashes for each certificate.
      ByteString sha1 = null;
      ByteString sha256 = null;

      for (int p = 0, pinsSize = pins.size(); p < pinsSize; p++) {
        Pin pin = pins.get(p);
        if (pin.hashAlgorithm.equals("sha256/")) {
          if (sha256 == null) sha256 = sha256(x509Certificate);
          if (pin.hash.equals(sha256)) return; // Success!
        } else if (pin.hashAlgorithm.equals("sha1/")) {
          if (sha1 == null) sha1 = sha1(x509Certificate);
          if (pin.hash.equals(sha1)) return; // Success!
        } else {
          throw new AssertionError();
        }
      }
    }

    // ...
  }
Authenticator
身份认证器,当连接提示未授权时,可以通过重新设置请求头来响应一个新的Request。状态码401表示远程服务器请求授权,407表示代理服务器请求授权。该认证器在需要时会被RetryAndFollowUpInterceptor触发。
public interface Authenticator {

  Authenticator NONE = new Authenticator() {
    @Override public Request authenticate(Route route, Response response) {
      return null;
    }
  };

  Request authenticate(Route route, Response response) throws IOException;
}
关于授权的源码实现如下:
 class MyAuthenticator implements Authenticator {

        @Override
        public Request authenticate(Route route, Response response) throws IOException {
            String credential = Credentials.basic(...)

            Request.Builder builder=response.request().newBuilder();

            if(response.code()==401){
                builder .header("Authorization", credential);
            }else if(response.code()==407){
                builder .header("Proxy-Authorization", credential);
            }

            return  builder.build();

        }
    }
ConnectionPool
连接池,用于管理HTTP和SPDY连接的复用以减少网络延迟,HTTP请求相同的Address时可以共享同一个连接。
Cache
见名之意,缓存类
Dispatcher
调度器,里面包含了线程池和三个队列(readyAsyncCalls:保存等待执行的异步请求;runningAsyncCalls:保存正在运行的异步请求;runningSyncCalls:保存正在执行的同步请求)。
  //保存准备运行的异步请求(当运行请求超过限制数时会保存在此队列)
  private final Deque<AsyncCall> readyAsyncCalls = new ArrayDeque<>();
   //保存正在运行的异步请求
  private final Deque<AsyncCall> runningAsyncCalls = new ArrayDeque<>();
   //保存正在运行的同步请求
private final Deque<RealCall> runningSyncCalls = new ArrayDeque<>();当请求执行完毕后,调用finished将请求从runningAsyncCalls队列中移除,并且检查readyAsyncCalls以继续提交在队列中准备的请求。
  //移除执行完毕的请求
  synchronized void finished(AsyncCall call) {
    if (!runningAsyncCalls.remove(call)) throw new AssertionError("AsyncCall wasn't running!");
    promoteCalls();//推进请求队列
  }

//推进请求
private void promoteCalls() {
    if (runningAsyncCalls.size() >= maxRequests) return; //容量已满,不提交新请求
    if (readyAsyncCalls.isEmpty()) return; // 没有正在准备的请求,返回

   //从readyAsyncCalls中循环取出AsyncCall直到达到容量上限
    for (Iterator<AsyncCall> i = readyAsyncCalls.iterator(); i.hasNext(); ) {
      AsyncCall call = i.next();

      if (runningCallsForHost(call) < maxRequestsPerHost) {
        i.remove();
        runningAsyncCalls.add(call);
        executorService().execute(call);
      }

      if (runningAsyncCalls.size() >= maxRequests) return; // 达到上限后返回
    }
}提交异步请求通过enqueue进行:
  synchronized void enqueue(AsyncCall call) {
    //检查容量大小
    if (runningAsyncCalls.size() < maxRequests && runningCallsForHost(call) < maxRequestsPerHost) {
      runningAsyncCalls.add(call);//加入队列
      executorService().execute(call);//执行
    } else {
      //超过容量大小后,加入准备队列中
      readyAsyncCalls.add(call);
    }
}对于同步请求,由于不需要提交到线程池中执行,因此只需通过executed将其加入runningSyncCalls队列中。
  synchronized void executed(RealCall call) {
    runningSyncCalls.add(call);
  }
阅读完上面的类后,对于OkHttpClient的构建就不会一脸蒙蔽了。OkHttpClient的Builder中的源码如下所示,可以了解一下默认值。当然这些值都可可以自行配置的。
  public Builder() {
       //调度器
      dispatcher = new Dispatcher();
      //默认支持的协议列表
      protocols = DEFAULT_PROTOCOLS;
      //默认的连接规范
      connectionSpecs = DEFAULT_CONNECTION_SPECS;
      //默认的代理选择器(直连)
      proxySelector = ProxySelector.getDefault();
      //默认不进行管理cookie
      cookieJar = CookieJar.NO_COOKIES;
      socketFactory = SocketFactory.getDefault();
      //主机验证
      hostnameVerifier = OkHostnameVerifier.INSTANCE;
      //证书锁,默认不开启
      certificatePinner = CertificatePinner.DEFAULT;
      //默认不进行授权
      proxyAuthenticator = Authenticator.NONE;
      authenticator = Authenticator.NONE;
      //初始化连接池
      connectionPool = new ConnectionPool();
      //DNS
      dns = Dns.SYSTEM;
      followSslRedirects = true;
      followRedirects = true;
      retryOnConnectionFailure = true;
      //超时时间
      connectTimeout = 10_000;
      readTimeout = 10_000;
      writeTimeout = 10_000;
    }
构建Request
Request中主要有以下属性。
 //请求的url
  private final HttpUrl url;
  //请求方法,GET,POST等
  private final String method;
  //请求头
  private final Headers headers;
  //请求体
  private final RequestBody body;
  //该请求的标签
  private final Object tag;
HttpUrl
其中HttpUrl用于规范普通的url连接,并解析url的组成成分。
先来了解一下url的构成;
scheme://username:password@host:port/pathSegment/pathSegment?queryParameter#fragment;
现通过如下例子来示范HttpUrl的使用:
https://www.google.com/search?q=maplejaw
使用parse解析url字符串:
HttpUrl url = HttpUrl.parse("https://www.google.com/search?q=maplejaw");通过构建者模式创建:
HttpUrl url = new HttpUrl.Builder()
        .scheme("https")
        .host("www.google.com")
        .addPathSegment("search")
        .addQueryParameter("q", "maplejaw")
        .build();
Headers
Headers用于配置请求头,对于请求头配置大家一定不陌生吧,比如Content-Type,User-Agent和Cache-Control等等。
创建Headers也有两种方式。如下:
of创建:传入的数组必须是偶数对,否则会抛出异常。
Headers.of("name1","value1","name2","value2",.....);构建者模式创建:
 Headers mHeaders=new Headers.Builder()
            .set("name1","value1")//set表示name1是唯一的,会覆盖掉已经存在的
            .add("name2","value2")//add不会覆盖已经存在的头,可以存在多个
.build();Headers内部使用了一个数组进行保存private final String[] namesAndValues;,你可能会想,为什么不用map呢?因为map有一个致命的缺点,它的key是唯一的。
但是用数组取值方法吗?可以很严肃的告诉你,非常方便,内部已经封装好。
  public String name(int index) {
    return namesAndValues[index * 2];
  }

  public String value(int index) {
    return namesAndValues[index * 2 + 1];
  }
最后,通过toString转为字符串,以便写入请求头:
  @Override
  public String toString() {
    StringBuilder result = new StringBuilder();
    for (int i = 0, size = size(); i < size; i++) {
      result.append(name(i)).append(": ").append(value(i)).append("\n");
    }
    return result.toString();
  }
RequestBody
RequestBody也就是请求体了,对于请求体的创建在前面已经介绍过了,这里就仅仅看下源码:
public abstract class RequestBody {

  //返回该请求体的 Content-Type
  public abstract MediaType contentType();


   //返回请求体的大小(字节数),-1表示未知
  public long contentLength() throws IOException {
    return -1;
  }


  //写入内容,BufferedSink是Okio中的类,类似于java中的OutputStream
  public abstract void writeTo(BufferedSink sink) throws IOException;

  ...

}
MediaType这个类主要用于指定请求体的Content-Type的MIME类型,此外还能指定字符集,默认为utf-8。
创建MediaType如下般简单,;左边为MIME类型,右边为字符集编码。
MediaType.parse("text/plain; charset=utf-8")前面我们提到了表单和分块表单类型的请求体,现在来看一下对应的核心源码:
FormBody:
public final class FormBody extends RequestBody {
  private static final MediaType CONTENT_TYPE = MediaType.parse("application/x-www-form-urlencoded");

  @Override
 public MediaType contentType() {
    return CONTENT_TYPE;
  }

   @Override
  public long contentLength() {
    return writeOrCountBytes(null, true);
  }

   @Override
 public void writeTo(BufferedSink sink) throws IOException {
    writeOrCountBytes(sink, false);
  }

 ...
} 可以看出Content_Type为application/x-www-form-urlencoded,且通过writeOrCountBytes来计算请求体大小和将请求体写入BufferedSink。
 private long writeOrCountBytes(BufferedSink sink, boolean countBytes) {
    long byteCount = 0L;

    Buffer buffer;
    if (countBytes) {//计算大小
      buffer = new Buffer();
    } else {
      buffer = sink.buffer();
    }

    //写入表单内容(name1=value1&name2=value2&...)
    for (int i = 0, size = encodedNames.size(); i < size; i++) {
      if (i > 0) buffer.writeByte('&');
      buffer.writeUtf8(encodedNames.get(i));
      buffer.writeByte('=');
      buffer.writeUtf8(encodedValues.get(i));
    }

    if (countBytes) {//如果只是计算的话,请清空缓存
      byteCount = buffer.size();
      buffer.clear();
    }

    return byteCount;
}MultipartBody和FormBody大体上相同,主要区别在于writeOrCountBytes方法,分块表单主要是将每个块的大小进行累加来求出请求体大小,如果其中有一个块没有指定大小,就会返回-1。所以分块表单中如果包含文件,默认是无法计算出大小的,除非你自己给文件的RequestBody指定contentLength。
  private long writeOrCountBytes(BufferedSink sink, boolean countBytes) throws IOException {
    long byteCount = 0L;

    Buffer byteCountBuffer = null;
    if (countBytes) {
      //如果是计算大小的话,就new个
      sink = byteCountBuffer = new Buffer();
    }
    //循环块
    for (int p = 0, partCount = parts.size(); p < partCount; p++) {
      Part part = parts.get(p);
      //获取每个块的头
      Headers headers = part.headers;
      //获取每个块的请求体
      RequestBody body = part.body;

      //写 --xxxxxxxxxx 边界
      sink.write(DASHDASH);
      sink.write(boundary);
      sink.write(CRLF);

      //写块的头
      if (headers != null) {
        for (int h = 0, headerCount = headers.size(); h < headerCount; h++) {
          sink.writeUtf8(headers.name(h))
              .write(COLONSPACE)
              .writeUtf8(headers.value(h))
              .write(CRLF);
        }
      }

      //写块的Content_Type
      MediaType contentType = body.contentType();
      if (contentType != null) {
        sink.writeUtf8("Content-Type: ")
            .writeUtf8(contentType.toString())
            .write(CRLF);
      }

      //写块的大小
      long contentLength = body.contentLength();
      if (contentLength != -1) {
        sink.writeUtf8("Content-Length: ")
            .writeDecimalLong(contentLength)
            .write(CRLF);
      } else if (countBytes) {
        // We can't measure the body's size without the sizes of its components.
        //如果有个块没有这名大小,就返回-1.
        byteCountBuffer.clear();
        return -1L;
      }

      sink.write(CRLF);

      //如果是计算大小就累加,否则写入BufferedSink
      if (countBytes) {
        byteCount += contentLength;
      } else {
        body.writeTo(sink);
      }

      sink.write(CRLF);
    }

 //写 --xxxxxxxxxx-- 结束边界
    sink.write(DASHDASH);
    sink.write(boundary);
    sink.write(DASHDASH);
    sink.write(CRLF);


    if (countBytes) {
      byteCount += byteCountBuffer.size();
      byteCountBuffer.clear();
    }

    return byteCount;
  }
处理Response
为什么先介绍处理Response部分而不是newCall部分,是因为Request和Response相呼应,理解起来更加连贯一点。
Response类属性如下:
  private final Request request;//获取到此次Response的最终Request(所谓最终Request是因为Reque可能被拦截器处理过)
  private final Protocol protocol;//协议版本
  private final int code;//响应码
  private final String message; //响应消息
  private final Handshake handshake;//TLS握手记录,保存了客户端和服务器的证书,TLS版本,密码套件等
  private final Headers headers;//响应头
  private final ResponseBody body;//响应体
  private final Response networkResponse;//从网络返回的Response,如果没有从网络读取,networkResponse值为Null
  private final Response cacheResponse;//从缓存读取的Response,如果没有从缓存中取,为Null
  private final Response priorResponse;//之前的Response,一般发生重定向或者重试时有值
  private final long sentRequestAtMillis;//记录发送Request的时间戳(如果响应来自缓存,返回的时间戳为原始请求的时间)
  private final long receivedResponseAtMillis;//记录接收Response的时间戳(如果响应来自缓存,返回原始的响应时间)
ResponseBody是一次性的流,所以不能重复读取,此外务必记得要关闭流。
ResponseBody中常用的读取方法有如下几种:
  //获取InputStream,读取完后手动进行close,一般用于下载文件中
  public final InputStream byteStream() {
    return source().inputStream();
  }

 //获取字节,此方法无需close,因为已经写入内存中
 public final byte[] bytes() throws IOException {
    long contentLength = contentLength();
    if (contentLength > Integer.MAX_VALUE) {
      throw new IOException("Cannot buffer entire body for content length: " + contentLength);
    }

    BufferedSource source = source();
    byte[] bytes;
    try {
      bytes = source.readByteArray();
    } finally {
      Util.closeQuietly(source);
    }
    if (contentLength != -1 && contentLength != bytes.length) {
      throw new IOException("Content-Length and stream length disagree");
    }
    return bytes;
  }

  //获取String,此方法无需Close,已经写入内存中
  public final String string() throws IOException {
    return new String(bytes(), charset().name());
  }
构建Call
现在再回到OkHttpClient这个类,如果你看过我之前关于Retrofit源码解读,那你一定知道OkHttpClient实现了Call.Factory接口,Call.Factory的作用之前已经介绍过了,抽象方法为Call newCall(Request request);,用于将Request转换为Call对象。
核心源码实现如下:
   @Override
  public Call newCall(Request request) {
    return new RealCall(this, request);
  }
我们知道Call只是一个接口,而RealCall即为Call的一个实现。而我们最关心的无法在于两个点:同步调用,异步调用。
同步调用的源码如下:
   @Override public Response execute() throws IOException {
    synchronized (this) {
      if (executed) throw new IllegalStateException("Already Executed");
      executed = true;
    }
    try {
      //加入Dispatcher中的runningSyncCalls队列
      client.dispatcher().executed(this);
      //通过拦截链获取Response
      Response result = getResponseWithInterceptorChain();
      if (result == null) throw new IOException("Canceled");
      return result;
    } finally {
      //从runningSyncCalls队列中移除
      client.dispatcher().finished(this);
    }
}可以看出,核心的源码在getResponseWithInterceptorChain中,通过责任链模式进行添加拦截器。
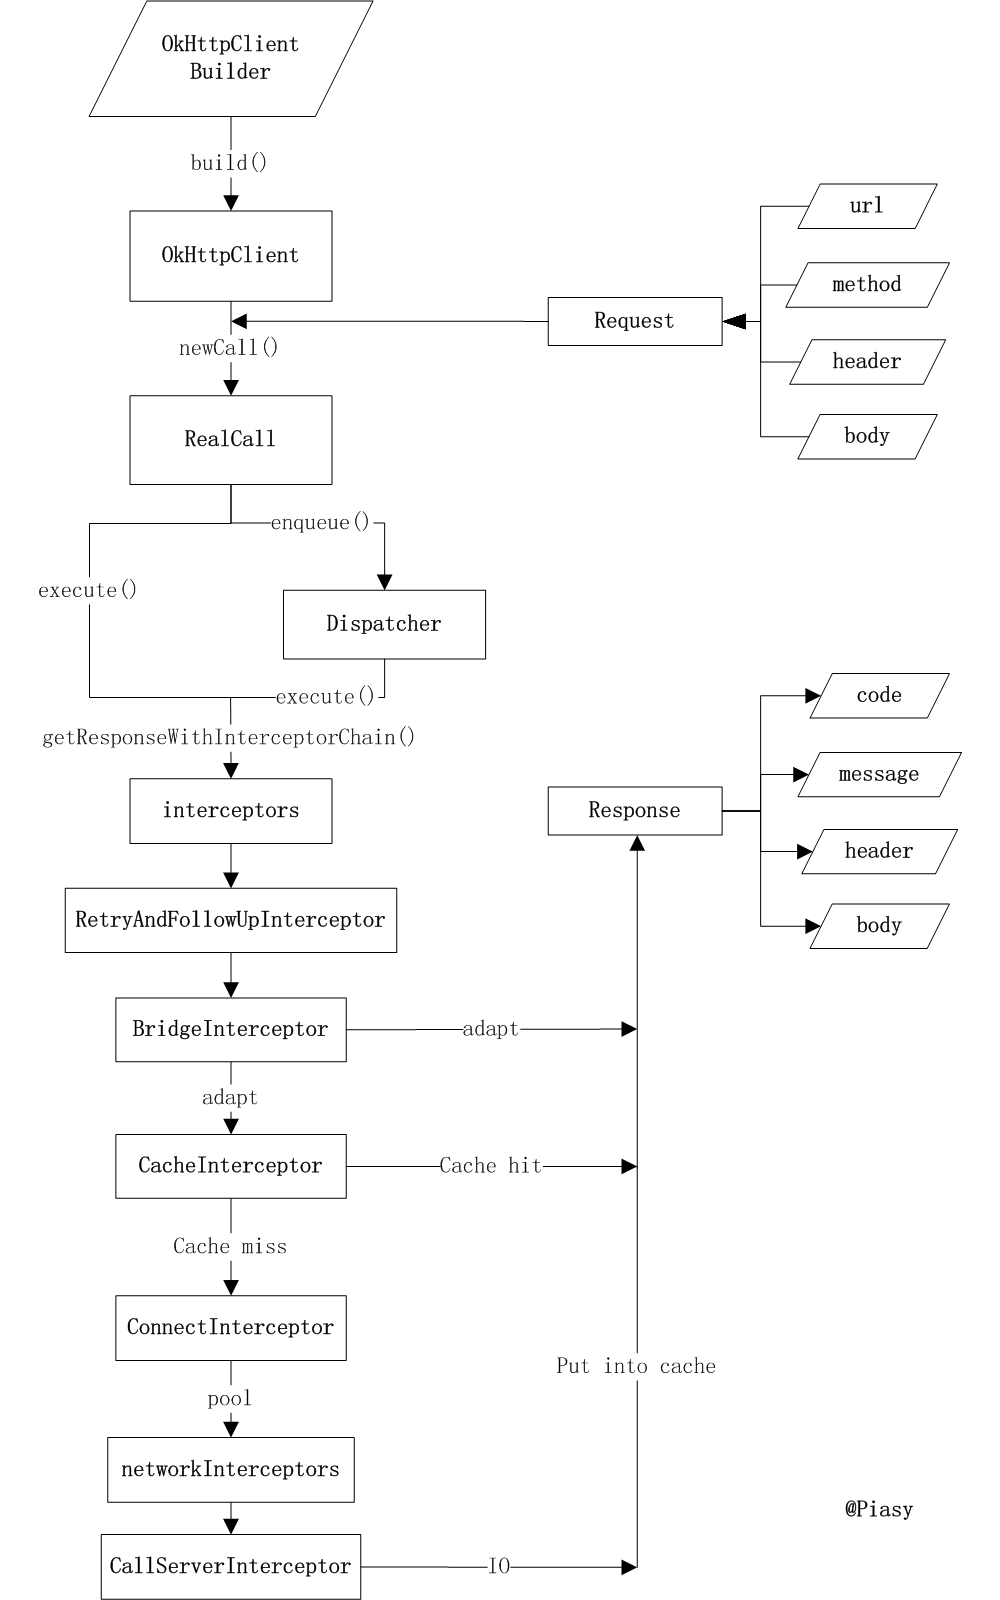
  private Response getResponseWithInterceptorChain() throws IOException {

    //构建全栈拦截器
    List<Interceptor> interceptors = new ArrayList<>();
    interceptors.addAll(client.interceptors());//自定义拦截器
    interceptors.add(retryAndFollowUpInterceptor);//重试拦截器
    interceptors.add(new BridgeInterceptor(client.cookieJar()));//桥接拦截器
    interceptors.add(new CacheInterceptor(client.internalCache()));//缓存拦截器
    interceptors.add(new ConnectInterceptor(client));//连接拦截器
    if (!retryAndFollowUpInterceptor.isForWebSocket()) {
      interceptors.addAll(client.networkInterceptors());//用户预定义的网络拦截器
    }
    interceptors.add(new CallServerInterceptor(
        retryAndFollowUpInterceptor.isForWebSocket()));//调用服务拦截器

    //内部通过责任链模式来使用拦截器
    Interceptor.Chain chain = new RealInterceptorChain(
        interceptors, null, null, null, 0, originalRequest);

    return chain.proceed(originalRequest);//获取Response
  }
RealInterceptorChain内部的责任链调用如下,可以看出,拦截器会依次对Chain进行处理。
  public Response proceed(Request request, StreamAllocation streamAllocation, HttpStream httpStream,
      Connection connection) throws IOException {
    ...
    //获取Chain
    RealInterceptorChain next = new RealInterceptorChain(
        interceptors, streamAllocation, httpStream, connection, index + 1, request);
    //获取当前拦截器
    Interceptor interceptor = interceptors.get(index);
    //拦截器通过Chain获取Response
    Response response = interceptor.intercept(next);
    ....

    return response;
}异步调用和同步调用基本相同,也是通过getResponseWithInterceptorChain来获取Response,只不过该操作是放在AsyncCall(实现了Runable接口)中提交给dispatcher执行的。
在了解一系列的拦截器前,我们再来认识一下其他几个类。
HttpStream
一个接口,源码如下。对应的实现有Http1xStream、Http2xStream。分别对应HTTP/1.1、HTTP/2和SPDY协议。我们可以大约知道,通过writeRequestHeaders开始写入请求头到服务器,createRequestBody用于获取写入流来写入请求体。readResponseHeaders用于读取响应头,openResponseBody用于打开一个响应体。关于相应实现的源码这里就不分析了,比较简单,无非就是读写操作。
public interface HttpStream {

  int DISCARD_STREAM_TIMEOUT_MILLIS = 100;

  //返回一个output stream(如果RequestBody可以转为流)
  Sink createRequestBody(Request request, long contentLength);

  //写请求头
  void writeRequestHeaders(Request request) throws IOException;

  //Flush Request
  void finishRequest() throws IOException;

  //读响应头
  Response.Builder readResponseHeaders() throws IOException;

  //返回一个ResponseBody
  ResponseBody openResponseBody(Response response) throws IOException;

  void cancel();
}
StreamAllocation
流分配器,该类用于协调连接、流和请求三者之间的关系。通过调用newStream可以获取一个HttpStream实现。
  public HttpStream newStream(OkHttpClient client, boolean doExtensiveHealthChecks) {
    int connectTimeout = client.connectTimeoutMillis();
    int readTimeout = client.readTimeoutMillis();
    int writeTimeout = client.writeTimeoutMillis();
    boolean connectionRetryEnabled = client.retryOnConnectionFailure();

    try {
      //获取连接
      RealConnection resultConnection = findHealthyConnection(connectTimeout, readTimeout,
          writeTimeout, connectionRetryEnabled, doExtensiveHealthChecks);

      //初始化HttpStream
      HttpStream resultStream;
      if (resultConnection.framedConnection != null) {
         //Http2xStream
        resultStream = new Http2xStream(client, this, resultConnection.framedConnection);
      } else {
        //Http1xStream
        resultConnection.socket().setSoTimeout(readTimeout);
        resultConnection.source.timeout().timeout(readTimeout, MILLISECONDS);
        resultConnection.sink.timeout().timeout(writeTimeout, MILLISECONDS);
        resultStream = new Http1xStream(
            client, this, resultConnection.source, resultConnection.sink);
      }

      synchronized (connectionPool) {
        stream = resultStream;
        return resultStream;
      }
    } catch (IOException e) {
      throw new RouteException(e);
    }
  }
获取RealConnection的流程是这样的,首先尝试从连接池中获取可复用的连接,如果获取不到,才会初始化RealConnection开启一个新连接。
在了解了HttpStream和StreamAllocation后,现在来分析getResponseWithInterceptorChain中的所有的拦截器。
RetryAndFollowUpInterceptor
重试与重定向拦截器,用来实现重试和重定向功能,核心实现如下面源码,
不难发现,内部通过while(true)死循环来进行重试获取Response(有重试上限,超过会抛出异常)。followUpRequest主要用来根据响应码来判断属于哪种行为触发的重试和重定向(比如未授权,超时,重定向等),然后构建响应的Request进行下一次请求。当然,如果没有触发重新请求就会直接返回Response。
 @Override public Response intercept(Chain chain) throws IOException {
    Request request = chain.request();

    //初始化流分配器
    streamAllocation = new StreamAllocation(
        client.connectionPool(), createAddress(request.url()));

    int followUpCount = 0;
    Response priorResponse = null;
    while (true) {//死循环
      //..
      //省略了部分源码
      Response response = null;
      boolean releaseConnection = true;

      try {

         response = ((RealInterceptorChain) chain).proceed(request, streamAllocation, null, null);
        releaseConnection = false;

      } catch (Exception e) {
        //..
      //省略了部分源码
        releaseConnection = false;
        continue;
      } finally {

        if (releaseConnection) {
          streamAllocation.streamFailed(null);
          streamAllocation.release();
        }
      }


      //将上次的请求放入priorResponse中
      if (priorResponse != null) {
        response = response.newBuilder()
            .priorResponse(priorResponse.newBuilder()
                .body(null)
                .build())
            .build();
      }

      //检查是否触发重定向重试等条件,并返回Request
      Request followUp = followUpRequest(response);

      if (followUp == null) {//null表示无需重试
        if (!forWebSocket) {
          streamAllocation.release();
        }
        return response;//返回response
      }

      //..
      //省略了部分源码

      request = followUp;
      priorResponse = response;
      //while循环进行下次请求
    }
  }
BridgeInterceptor
桥接拦截器,用于完善请求头,比如Content-Type、Content-Length、Host、Connection、Accept-Encoding、User-Agent等等,这些请求头不用用户一一设置,如果用户没有设置该库会检查并自动完善。此外,这里会进行加载和回调cookie。
  @Override public Response intercept(Chain chain) throws IOException {
    Request userRequest = chain.request();
    Request.Builder requestBuilder = userRequest.newBuilder();

    RequestBody body = userRequest.body();
    //将用户没有写入请求头的内容自动补充进去,比如Content-Type、Content-Length、Host、Connection、Accept-Encoding、User-Agent等等
    if (body != null) {

      MediaType contentType = body.contentType();
      if (contentType != null) {
        requestBuilder.header("Content-Type", contentType.toString());
      }

      //..
    }
    //获取cookie添加到请求头中
    List<Cookie> cookies = cookieJar.loadForRequest(userRequest.url());
    if (!cookies.isEmpty()) {
      requestBuilder.header("Cookie", cookieHeader(cookies));
    }
    //...
    Response networkResponse = chain.proceed(requestBuilder.build());

    //将响应cookie回调出去供用户保存
    HttpHeaders.receiveHeaders(cookieJar, userRequest.url(), networkResponse.headers());

    Response.Builder responseBuilder = networkResponse.newBuilder()
        .request(userRequest);

      //...
      //省略了部分源码
      responseBuilder.headers(strippedHeaders);
      responseBuilder.body(new RealResponseBody(strippedHeaders, Okio.buffer(responseBody)));
    return responseBuilder.build();
  }
CacheInterceptor
缓存拦截器,首先根据Request中获取缓存的Response,然后根据用于设置的缓存策略来进一步判断缓存的Response是否可用以及是否发送网络请求(CacheControl.FORCE_CACHE因为不会发送网络请求,所以networkRequest一定为空)。如果从网络中读取,此时再次根据缓存策略来决定是否缓存响应。
配置缓存策略的方法如下:
  Request request = new Request.Builder()
                  .cacheControl(CacheControl.FORCE_NETWORK)
                   .url("http://publicobject.com/helloworld.txt")
                .build();
拦截器的核心实现如下:
@Override public Response intercept(Chain chain) throws IOException {
    //通过Request从缓存中获取Response
    Response cacheCandidate = cache != null
        ? cache.get(chain.request())
        : null;

    long now = System.currentTimeMillis();

    //根据请求头获取用户指定的缓存策略,并根据缓存策略来获取networkRequest,cacheResponse。cacheResponse为null表示当前策略就算有缓存也不读缓存
    CacheStrategy strategy = new CacheStrategy.Factory(now, chain.request(), cacheCandidate).get();
    Request networkRequest = strategy.networkRequest;//表示发往网络的request,不请求网络应为null
    Response cacheResponse = strategy.cacheResponse;//返回从缓存中读取的response

    if (cache != null) {
      cache.trackResponse(strategy);
    }


    if (cacheCandidate != null && cacheResponse == null) {
      //cacheResponse表示不读缓存,那么cacheCandidate不可用,关闭它
      closeQuietly(cacheCandidate.body());
    }

    //..
    //省略了部分源码
    //返回从缓存中读取的Response
    if (networkRequest == null) {
      return cacheResponse.newBuilder()
          .cacheResponse(stripBody(cacheResponse))
          .build();
    }

      Response networkResponse = null;
      //..
      //省略了部分源码

      //获取网络Response
      networkResponse = chain.proceed(networkRequest);

    Response response = networkResponse.newBuilder()
        .cacheResponse(stripBody(cacheResponse))
        .networkResponse(stripBody(networkResponse))
        .build();

    if (HttpHeaders.hasBody(response)) {
      //如果可以缓存(用户允许,响应也允许)就进行缓存到本地
      CacheRequest cacheRequest = maybeCache(response, networkResponse.request(), cache);
      response = cacheWritingResponse(cacheRequest, response);
    }

    return response;
  }
ConnectInterceptor
连接拦截器,用于打开一个连接到远程服务器。说白了就是通过StreamAllocation获取HttpStream和RealConnection对象,以便后续读写。
  @Override public Response intercept(Chain chain) throws IOException {
    RealInterceptorChain realChain = (RealInterceptorChain) chain;
    Request request = realChain.request();
    StreamAllocation streamAllocation = realChain.streamAllocation();

    boolean doExtensiveHealthChecks = !request.method().equals("GET");
    //获取HttpStream
    HttpStream httpStream = streamAllocation.newStream(client, doExtensiveHealthChecks);
    //获取RealConnection
    RealConnection connection = streamAllocation.connection();

    return realChain.proceed(request, streamAllocation, httpStream, connection);
  }
CallServerInterceptor
调用服务拦截器,拦截链中的最后一个拦截器,通过网络与调用服务器。通过HttpStream依次次进行写请求头、请求头(可选)、读响应头、读响应体。
  @Override public Response intercept(Chain chain) throws IOException {
    HttpStream httpStream = ((RealInterceptorChain) chain).httpStream();
    StreamAllocation streamAllocation = ((RealInterceptorChain) chain).streamAllocation();
    Request request = chain.request();

    long sentRequestMillis = System.currentTimeMillis();
    //写请求头
    httpStream.writeRequestHeaders(request);

    if (HttpMethod.permitsRequestBody(request.method()) && request.body() != null) {
    //写请求体
      Sink requestBodyOut = httpStream.createRequestBody(request, request.body().contentLength());
      BufferedSink bufferedRequestBody = Okio.buffer(requestBodyOut);
      request.body().writeTo(bufferedRequestBody);
      bufferedRequestBody.close();
    }

    httpStream.finishRequest();

    //获取Response。
    Response response = httpStream.readResponseHeaders()
        .request(request)
        .handshake(streamAllocation.connection().handshake())
        .sentRequestAtMillis(sentRequestMillis)
        .receivedResponseAtMillis(System.currentTimeMillis())
        .build();

    if (!forWebSocket || response.code() != 101) {
      response = response.newBuilder()
          .body(httpStream.openResponseBody(response))
          .build();
    }

    //...
    return response;
  }
最后
在网上发现一张关于OkHttp的完整工作流程图,画的非常好,偷了个懒直接拿来用了,感谢作者。图片出自http://blog.piasy.com/2016/07/11/Understand-OkHttp/
本期解读到此结束,如有错误之处,欢迎指出。下一期,RxJava。
