边缘检测(英语:Edge detection)是图像处理和计算机视觉中的基本问题,边缘检测的目的是标识数字图像中亮度变化明显的点。图像属性中的显著变化通常反映了属性的重要事件和变化。这些包括(i)深度上的不连续、(ii)表面方向不连续、(iii)物质属性变化和(iv)场景照明变化。 边缘检测是图像处理和计算机视觉中,尤其是特征检测中的一个研究领域。
原理
边缘检测实质上就是通过对图像的卷积的结果,卷积是数学分析中一种重要的运算,主要区别在于卷积核的选择,通过卷积操作我们不仅可以做到边缘检测,还可以做到模糊图像、锐化图像等功能。
边缘检测的卷积核 也叫做 边缘检测算子
如:Roberts Cross算子, Prewitt算子, Sobel算子, Canny算子,罗盘算子
这里以Sobel算子为例子:
代表原始图像, 分别代表经横向及纵向边缘检测的图像,
通过以上公式就可以分别计算出横向 和 纵向 的梯度值,即
梯度值越大,边缘就越明显。
注意:
- 计算梯度值前需要先把图像置灰,方便我们计算梯度值
- 横向的梯度值检测出来的是纵向的边缘线,纵向的梯度值检测出来的是横向的边缘线。
以上是理论,可能有些小伙伴看得很懵逼,下面我们举一个例子来说明一下:
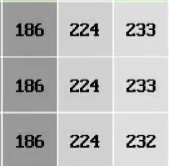
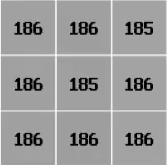
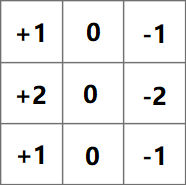
假如上图是我们在图像上随机选取的两块3*3的像素块,以及横向的Sobel算子
像素块一的梯度值:
像素块二的梯度值:
最后我们取他们的绝对值, 分别 187和1, 这里我们就很明显的看到了他们的区别,梯度值越大,说明该像素越有可能是边缘!
Shader 代码实现:
首先我们需要把图像置灰,置灰非常简单,通过灰度心理学公式 Gray = R*0.299 + G*0.587 + B*0.114 转换即可!
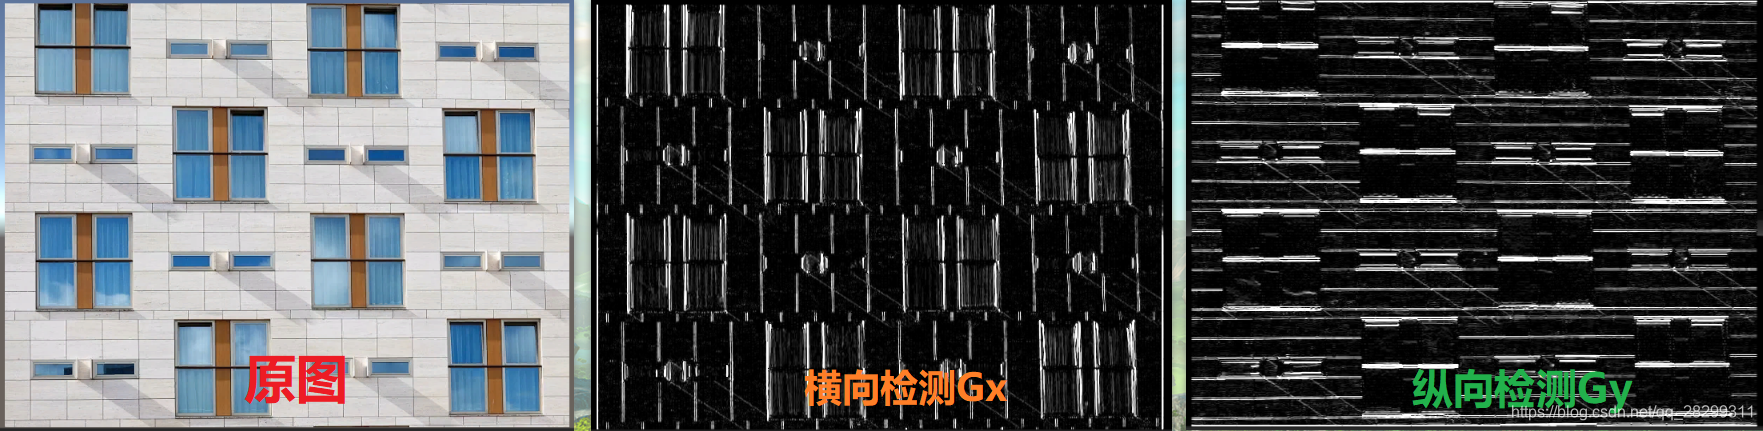
这里我们分别对横向和纵向做边缘检测,以便于我们做对比,理解。
创建一个C#脚本拖拽到摄像机上:
PS: PostEffectsBase 基类可以在我的这篇文章查看
或者到我的GitHub上获取
using UnityEngine;
using System.Collections;

//-----------------------------【边缘检测】-----------------------------
public class EdgeDetection : PostEffectsBase {

	public Shader edgeDetectShader;
	private Material edgeDetectMaterial = null;
	public Material material {
		get {
			edgeDetectMaterial = CheckShaderAndCreateMaterial(edgeDetectShader, edgeDetectMaterial);
			return edgeDetectMaterial;
		}
	}
	[Range(0.0f, 1.0f)]
	public float edgesOnly = 0.0f;
	public Color edgeColor = Color.black;

	public Color backgroundColor = Color.white;

	void OnRenderImage (RenderTexture src, RenderTexture dest) {
		if (material != null) {
			material.SetFloat("_EdgeOnly", edgesOnly);
			material.SetColor("_EdgeColor", edgeColor);
			material.SetColor("_BackgroundColor", backgroundColor);
			Graphics.Blit(src, dest, material);
		} else {
			Graphics.Blit(src, dest);
		}
	}
}
shader:(横向检测)
//-----------------------------【边缘检测】-----------------------------
Shader "lcl/learnShader3/002 Chapter 12/Edge Detection Test" {
	//-----------------------------【属性】-----------------------------
	Properties {
		_MainTex ("Base (RGB)", 2D) = "white" {}
	}
	//-----------------------------【子着色器】-----------------------------
	SubShader {
		Pass {
			ZTest Always Cull Off ZWrite Off

			CGPROGRAM

			#include "UnityCG.cginc"

			#pragma vertex vert
			#pragma fragment frag

			sampler2D _MainTex;
			uniform half4 _MainTex_TexelSize;

			struct v2f {
				float4 pos : SV_POSITION;
				half2 uv[9] : TEXCOORD0;
			};

			//-----------------------------【顶点着色器】-----------------------------
			v2f vert(appdata_img v) {
				v2f o;
				o.pos = UnityObjectToClipPos(v.vertex);

				half2 uv = v.texcoord;
				//计算周围像素的纹理坐标位置,其中4为原始点,
				o.uv[0] = uv + _MainTex_TexelSize.xy * half2(-1, -1);
				o.uv[1] = uv + _MainTex_TexelSize.xy * half2(0, -1);
				o.uv[2] = uv + _MainTex_TexelSize.xy * half2(1, -1);
				o.uv[3] = uv + _MainTex_TexelSize.xy * half2(-1, 0);
				o.uv[4] = uv + _MainTex_TexelSize.xy * half2(0, 0);		//原点
				o.uv[5] = uv + _MainTex_TexelSize.xy * half2(1, 0);
				o.uv[6] = uv + _MainTex_TexelSize.xy * half2(-1, 1);
				o.uv[7] = uv + _MainTex_TexelSize.xy * half2(0, 1);
				o.uv[8] = uv + _MainTex_TexelSize.xy * half2(1, 1);

				return o;
			}

			// 转换为灰度
			fixed luminance(fixed4 color) {
				return  0.299 * color.r + 0.587 * color.g + 0.114 * color.b;
			}

			// sobel算子
			half Sobel(v2f i) {
				const half Gx[9] = {-1,  0,  1,
									-2,  0,  2,
									-1,  0,  1};
				// const half Gy[9] = {-1, -2, -1,
				// 					0,  0,  0,
				// 					1,  2,  1};

				half texColor;
				half edgeX = 0;
				half edgeY = 0;
				for (int it = 0; it < 9; it++) {
					// 转换为灰度值
					texColor = luminance(tex2D(_MainTex, i.uv[it]));

					edgeX += texColor * Gx[it];
					// edgeY += texColor * Gy[it];
				}

				// half edge = 1 - abs(edgeX) - abs(edgeY);
				half edge = abs(edgeX);
				return edge;
			}
			//-----------------------------【片元着色器】-----------------------------
			fixed4 frag(v2f i) : SV_Target {
				half edge = Sobel(i);
				return edge;

 			}

			ENDCG
		}
	}
	FallBack Off
}
最终结果对比
最后我们合并一下横向和纵向的边缘及原图,最终边缘检测结果为:
最终Shader代码:
//-----------------------------【边缘检测】-----------------------------
Shader "lcl/learnShader3/002 Chapter 12/Edge Detection Test" {
	//-----------------------------【属性】-----------------------------
	Properties {
		_MainTex ("Base (RGB)", 2D) = "white" {}
		// 描边程度
		_EdgeOnly ("Edge Only", Float) = 1.0
		// 边缘颜色
		_EdgeColor ("Edge Color", Color) = (0, 0, 0, 1)
	}
	//-----------------------------【子着色器】-----------------------------
	SubShader {
		Pass {
			ZTest Always Cull Off ZWrite Off

			CGPROGRAM

			#include "UnityCG.cginc"

			#pragma vertex vert
			#pragma fragment frag

			sampler2D _MainTex;
			uniform half4 _MainTex_TexelSize;
			fixed _EdgeOnly;
			fixed4 _EdgeColor;

			struct v2f {
				float4 pos : SV_POSITION;
				half2 uv[9] : TEXCOORD0;
			};

			//-----------------------------【顶点着色器】-----------------------------
			v2f vert(appdata_img v) {
				v2f o;
				o.pos = UnityObjectToClipPos(v.vertex);

				half2 uv = v.texcoord;
				//计算周围像素的纹理坐标位置,其中4为原始点,
				o.uv[0] = uv + _MainTex_TexelSize.xy * half2(-1, -1);
				o.uv[1] = uv + _MainTex_TexelSize.xy * half2(0, -1);
				o.uv[2] = uv + _MainTex_TexelSize.xy * half2(1, -1);
				o.uv[3] = uv + _MainTex_TexelSize.xy * half2(-1, 0);
				o.uv[4] = uv + _MainTex_TexelSize.xy * half2(0, 0);		//原点
				o.uv[5] = uv + _MainTex_TexelSize.xy * half2(1, 0);
				o.uv[6] = uv + _MainTex_TexelSize.xy * half2(-1, 1);
				o.uv[7] = uv + _MainTex_TexelSize.xy * half2(0, 1);
				o.uv[8] = uv + _MainTex_TexelSize.xy * half2(1, 1);

				return o;
			}

			// 转换为灰度
			fixed luminance(fixed4 color) {
				return  0.299 * color.r + 0.587 * color.g + 0.114 * color.b;
			}

			// sobel算子
			half Sobel(v2f i) {
				const half Gx[9] = {-1,  0,  1,
									-2,  0,  2,
									-1,  0,  1};
				const half Gy[9] = {-1, -2, -1,
									0,  0,  0,
									1,  2,  1};

				half texColor;
				half edgeX = 0;
				half edgeY = 0;
				for (int it = 0; it < 9; it++) {
					// 转换为灰度值
					texColor = luminance(tex2D(_MainTex, i.uv[it]));

					edgeX += texColor * Gx[it];
					edgeY += texColor * Gy[it];
				}
				// 合并横向和纵向
				half edge = 1 - (abs(edgeX) + abs(edgeY));
				return edge;
			}
			//-----------------------------【片元着色器】-----------------------------
			fixed4 frag(v2f i) : SV_Target {
				half edge = Sobel(i);
				fixed4 edgeColor = lerp(_EdgeColor, tex2D(_MainTex, i.uv[4]), edge);
				edgeColor = lerp(tex2D(_MainTex, i.uv[4]),edgeColor, _EdgeOnly);
				return edgeColor;
 			}

			ENDCG
		}
	}
	FallBack Off
}
最后
有兴趣的小伙伴可以来我的GitHub上逛逛,里面有我学习Shader过程中的一些记录,实现的一些特效,喜欢的可以点个Star,嘿嘿,谢谢啦!
