Introduction
Features
It is an operating system, like windows and macos, with the following characteristics
Simple and efficient, everything is a file, all configurations are solved by modifying files, no cumbersome permissions and settings are required
High authority, leaving all details to the user, fully customizable
Safe, all programs will only start if they are executed by themselves
Classification
1. The debian system mainly includes Debian, Ubuntu, Mint, etc.;
2. The redhat system mainly includes RedHat, Fedora, CentOs, etc.
3. Others include Slackware, Gentoo, Arch linux, LFS, SUSE, etc.
4. If it is used for development, redhat is recommended. Servers of companies in the industry mostly use centos. Considering daily use, then choose fedora, and you can choose the latest release version.
5. If you want to simply use and develop, you can choose Debian system, recommend Ubuntu, Mint.
6. If you are a technology geek, then we recommend Gentoo, Arch linux, LFS, Slackware, etc.
The following tutorial takes ubuntu as an example
Install
virtual machine
Download the iso from Alibaba Cloud or Tsinghua mirror website. It is best to use the desktop version when studying.
Create a typical example directly in vmware and follow the steps
It is best to choose English when installing. Be sure to remember the password you set, for example 000000, to prevent it from being forgotten after a long time. Of course, you can also search for the corresponding solution if you forget it.
WSL2
This is just a command line, which is convenient for learning commands. For daily use, it is recommended to install the desktop version on a virtual machine.
Download the wsl2 kernel update package and install it directly
Then set wsl2 as default
wsl --set-default-version 2
Then download the required distribution version from the Microsoft store and install it, such as ubuntu
After the installation is complete, you can enter wsl in cmd to enter directly.
shell&terminal
A shell is an application that helps users interact with the operating system
Terminal is an interactive interface used to obtain input, hand it over to the shell for execution, and display the output in the terminal.
Applications are divided into two types according to whether they have a graphical interface:
CLI(Command Line Interface)和GUI(Graphical User Interface)
i.e. command line and graphical interface
Shell is a type of program, which can be in CLI form (such as sh, bash, zsh; cmd, powershell, etc.) or in GUI form (such as Windows Explorer explorer.exe, etc.)
File system
Directory Structure
Linux philosophy: everything is a file
Execute ls / to view the root directory and get the following results

By tree directory
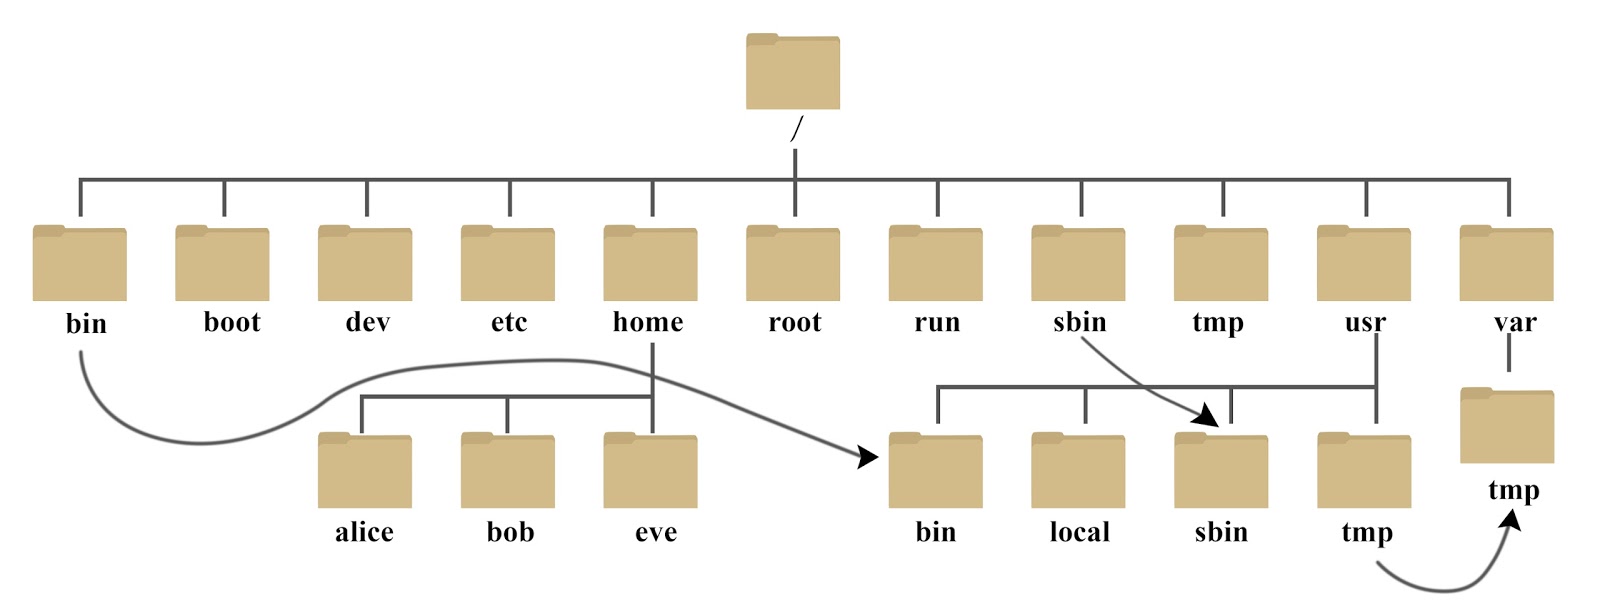
The directory is roughly divided into
common data
/bin Binaries,系统的二进制文件,存放着常用的命令,二进制文件由操作系统直接执行
/lib Library,存放动态链接库,类似windows中的dll
/var variable,习惯将那些经常被修改的目录放在这个目录下。包括各种日志文件。
/srv server, 该目录存放一些服务启动之后需要提取的数据
/usr unix shared resources,共享资源,大部分程序和文件都存在这里面,常用如下
/usr/src  /usr/bin /usr/sbin 分别是源码,普通用户的二进制文件,超级用户的二进制文件
/opt optional,可选目录,默认为空
/tmp temporary,存放一些临时文件
/lost+found,当系统非法关机后,这里就存放了一些文件
User data
/home 普通用户
/root 超级用户
operating system
/boot linux启动时的一些连接文件以及镜像文件
/dev device,存放Linux 的外部设备,在Linux中访问设备的方式和访问文件的方式是相同的
/etc 存放所有的系统管理所需要的配置文件和子目录
/media 系统自动识别一些设备,例如U盘,光驱等等.系统会把识别的设备挂载到这个目录下
/proc Processes,是一种伪文件系统,存储的是当前内核运行状态,它是系统内存的映射,并不在硬盘上
/run run是一个临时文件系统,存储系统启动以来的信息.当系统重启时,这个目录下的文件会被删掉或清除
/mnt mount,系统提供该目录是为了让用户临时挂载别的文件系统
/selinux Redhat/CentOS特有的安全功能规则的目录
File operations
All commands can man commandbe viewed in the form of (man:manual, the manual page of the command)
Table of contents
Directory classification
Absolute directory: /starting with, the full name of the directory
.Relative directory: represents the current directory starting from the current moment and ..represents the parent directory
Special directory: ~ represents the current user directory
pwd (print working directory), which prints the current directory
ls (list directory contents). List directory contents
可选参数
-a 显示所有文件及目录(“.”开头的隐藏文件也会列出),-A可以不列出`.和..`
-l 除文件名称外,亦将文件型态、权限、拥有者、文件大小等资讯详细列出
-t 将文件依建立时间之先后次序列出
-F 在列出的文件名称后加一符号;例如可执行档则加 "*", 目录则加 "/"
-R 若目录下有文件,则以下之文件亦皆依序列出

多个参数可以连写,如ls -al /
switch
cd [destination] 可以用tab补全目录
manage
Create a directory. mkdir [-p] directory_nameIf you create a multi-level directory, you can use -p to automatically create the missing parent directory.
To delete a directory rmdir [-p] directory_name , you can only delete empty directories. To delete files, use the rm command.
document
create
touch file_name
Copy and move
cp [options] source destination
options
    -i 在覆盖已有文件之前询问是否覆盖
    -r 若给出的源文件是一个目录文件,将复制该目录下所有的子目录和文件

mv [options] source destination
options
    -i 执行覆盖前询问
    -n 不执行覆盖
    -u 当源文件比目标文件修改时间更晚或目标不存在时,才执行移动
delete
rm [options] [file or directory]
options
    -i 删除前询问
    -r 递归地删除所有子目录和文件
    -f 强制删除,不给出任何提示
    -v 显示详细的删除过程
shell没有回收站,rm -rf谨慎使用
show
cat [options] file...
options
    -n 加上行号
    -s 将连续两行以上的空白行替换为一行
如果file不止一个文件,则会将它们连接起来
Filter display
grep [options] [想要匹配的正则表达式] [文件或目录...]
options
    -A [n] 除了显示匹配的那一行之外,还显示该行之后的n行(after)
    -B [n] 除了显示匹配的那一行之外,还显示该行之前的n行(before)
    -C [n] 除了显示匹配的那一行之外,还显示该行之前和之后的n行(contest)
    -c 计算总匹配的行数
    -r 查找目录而非文件时,必须加上这一参数,否则会报错
    -e 使用正则表达式进行匹配,默认也是这样
    -E 使用拓展的正则表达式进行匹配
    -i 忽略字符大小写的差别
    -l 列出含有匹配成功内容的文件名
    -n 在显示匹配的行之前,标示出该行的行号
    -v 显示不包含匹配表达式的所有行,相当于反向选择

正则表达式用单引号括起来
vim
Vim (Vi Improved) is a text editor, a classic editor on Unix and Unix-like systems, and an enhanced version of Vi.
Three modes
Command mode (command), the default mode when entering, press esc to enter
Input mode (insert), press i to enter
Bottom line command mode (last line): Press: enter, commonly used q and wq (exit and save and exit)
command mode
- hijk move the cursor left, lower, upper and right
- i – Switch to input mode and start typing text at the current cursor position.
- : – Switch to bottom line command mode to enter commands on the bottom line.
- x – Delete the character at the current cursor position.
- o : Insert a new row below the current row and enter insert mode.
- O – Inserts a new row above the current row and enters insert mode.
- dd – delete the current line.
- yy – Copy the current line.
- p (lowercase) – Pastes the clipboard contents below the cursor.
- P (capital) -- Paste the clipboard contents above the cursor.
- u – Undo the last operation.
- Ctrl + r – Redo the last undone operation.
- :w – Save the file.
- :q – Quit the Vim editor.
User Management
Use GID (group) and UID (user) to distinguish. Group is used to represent a type of users with the same permissions and is managed by the root user.
root
su,switch user
sudo superuserdo
Switching to root mode does not require sudo every time. The method is as follows:
- Set root password
sudo passwd root - Switch user
su root
general user
You need to switch to the root user to execute the following
New
sudo useradd [options] username
options
    -m 创建用户的主目录
    -d 指定用户的主目录(如果不使用默认的话)
    -g 指定用户登录组的GID或组名
    -p 指定默认密码
    -s 指定用户登录的shell
delete
sudo userdel [options] username
options
	-r 同时删除用户主目录
Revise
sudo usermod [options] username
Just like creating a new one, as follows, change the default shell of eesast from sh to bash
usermod -s /bin/bash eesast
Check
You can view all users and attributes in the current system by viewing the /etc/passwd file
cat /etc/passwd
Each line of user information uses ":" as the delimiter and is divided into 7 fields. The meaning of each field is as follows: Username: Password (hidden): UID: GID: Remarks (when creating a user or modifying a user) Added when): Home Directory: Default Shell
eesast:x:1001:1001::/home/eesast:/bin/bash
password
passwd [options] 修改自己的密码,需要知道自己的现有密码
sudo passwd [options] username 修改别人的密码,需要超级用户权限
user group
There can be multiple users in a group, and a user can be in multiple groups.
Same as user operation
新建用户组: groupadd
修改用户组: groupmod
删除用户组: groupdel
切换用户组: newgrp
查看用户所属的组: groups username
User rights
That is, what conditions does the user group have on files in this directory?
Check
ll (约等于 ls -al) 或 ls -l
get several
drwxr-xr-x 3 root root 4096 May 18 2022 ../
The drwxr-xr-x in the first paragraph indicates the file type and permissions:
The first bit indicates type d:directory-:file l:link
Every three characters in the following are a group, indicating owner permissions, group permissions, and other user permissions respectively.
r, w, x means having read, write, and excuate permissions, - means not having them
The second paragraph represents that there are 3 hard links pointing to the node corresponding to the file.
The third segment indicates that the file owner is root, and the fourth segment indicates that the file group is root.
The fifth paragraph indicates that the file size is 4096, and the sixth paragraph indicates the modification date and file name.
Revise
Modify file permissions
chmod: change mode, modify the permissions of the file, the syntax is as follows
chmod [–R] [u/g/o/a][+/-/=][r/w/x] [file]
	-R 表示递归修改
	 u:user | g:group | o:owner | a:all
	 + 增加 - 减少 = 设定
	 r:读 | w:写 | x:执行
Examples are as follows
为所有用户赋予1.txt的执行权限
chmod a+x 1.txt
为属主赋予读、写、执行权限,删除属组和其他用户的执行权限
chmod u=rwx,g-x,o-x 1.txt
Because the options are limited, they can be represented by bits, that is, using numbers to represent permissions.
Each of the above options has 3 independent options, all of which can be represented by three digits.
For example, granting all permissions to all users is expressed as:
chmod 777 1.txt
Modify file owner/group
chown : change owner
chgrp : change group
sudo chown [–R] [owner] [file]
sudo chown [-R] [owner]:[group] [file]
System Management
Disk management
Three commonly used commands
- df (disk free): Lists the overall disk usage of the file system
- du (disk used): Lists the disk space usage of a file or directory
- fdisk: used for disk partitioning
View usage
df
df [options] [file or directory path]
options
    -h 以人们较易阅读的 GB, MB, KB 等格式自行显示
    -a 列出所有的文件系统
    -T 显示文件系统格式
df命令会把file or directory path所在的文件系统的磁盘用量展示出来
of
du [options] [file or directory path]
options
    -h 以人们较易读的容量格式 (G/M) 显示
    -a 列出所有的文件与目录容量,因为不指定文件时默认仅统计目录的容量
    -s 列出总量,而不列出每个目录占用容量
du命令会把file or directory path自身占用的磁盘空间大小展示出来,不指定时默认为当前目录
Partition
sudo fdisk [option] [device name]
option -l 可以把整个系统内能够搜寻到的装置的分区均列出来
format
mkfs [option] [device name]
option: -t [filesystem] 将指定的磁盘格式化为指定文件系统格式
Disk mounting and unmounting
mount [device name] [directory] # 将文件系统挂载到某个目录下
umount [device name or directory] # 将某个文件系统或者某个目录挂载的文件系统卸载
System Management
View CPU usage
A real-time updated list will appear
top
View progress
ps : process status
ps [options]
options
    -a 列出所有的进程(包括其他用户的)
    -u 显示较详细的信息
    -x 也显示没有控制终端的进程
Terminate process
The kill instruction is used to send a signal to a process, and the final response is decided by the process. Generally used to "kill" a process, but cannot "kill" system
processes and daemon processes.
kill -l # 列出全部可以发送的信号名称和编号

kill [options] [PID]
options
    -s [要发送的信号名称或编号] # 如不指定该项参数,默认发SIGTERM(15),一般可终止进程
    -u [用户名] 向指定用户的所有进程发送信号
Software management
In different Linux distributions, there are different package management tools, the following two are common
debian series apt (Advanced Package Tool)
yum of redhat series (Yellowdog Updater, Modified)
Take apt as an example
Install
sudo apt install [package name...] # 可以一次性安装多个软件包
uninstall
sudo apt remove [package name] # 卸载软件包
sudo apt autoremove # 清理不再使用的依赖和库文件
renew
sudo apt update # 列出所有可更新的软件清单
sudo apt upgrade # 升级全部可升级的软件包
sudo apt upgrade [package name...] # 指定升级软件包
sudo apt full-upgrade # 升级全部可升级的软件包,并且在升级前将旧的包先卸载
Inquire
apt list --installed # 列出所有已安装的软件包
apt list --all-versions # 列出所有已安装的软件包的版本信息
sudo apt show [package name] # 显示指定软件包的具体信息
sudo apt search [keyword] # 查找可供安装的软件包
Other commands
alias nickname, don’t write it like this
alias cd='rm -rf > /dev/null'
shell
Find files
find [path] [options]
path是要查找的目录路径,可以是多个,未指定则默认为当前目录
options
    -name [name] 按文件名查找,支持通配符,-iname会忽略大小写
    -type [type] 按文件类型查找,f(普通文件),d(目录)等
    -path [p] 路径符合 p 的文件
    -amin [-n] 在过去 n 分钟内被读取过的文件
    -size [+nM] 大小大于 n M的文件
Redirect
enter
command < file #将指定的文件内容作为命令的输入
command << string #从标准输入设备(键盘)中读入,直到遇到string才停止
output
command  > file 将命令执行的标准输出结果(stdout)重定向输出到指定的文件中,会覆盖文件
command 2> file 同上,错误输出结果(stderr)重定向到此
command &> file 将二者同时重定向
command 2>&1 	>&表示将前面的输出2重定向到后面的文件描述符1中,这里 2>&1,即stderr重定向到stdout

command >>file 同理,会追加文件
pipeline
Use | to connect multiple commands together and use the output of the previous command as the input of the next command.
For example
ls -l | grep "txt"
Clear
There is too much terminal output, please clear it.
clear
shell script
Script programs run in the shell, using semicolons and newlines to separate different commands
variable
There cannot be a space between the variable name and the equal sign
alone
a=1 	#定义
unset a	#删除
a=2		#修改,通过覆盖定义实现
echo $a	#显示
array
array=(value0 value1 value2 value3)
echo ${array[0]}
echo ${array[@]} #遍历
control
branch
if condition1 then
command1
elif condition2 then
command2
else
commandN
fi
cycle
for var in item1 item2 ... itemN
do
command1
command2
...
commandN
done
for (( i = 1; i <= 10; i++ )) # 需要使用双括号,变量定义可以有空格
while condition
do
command
done
function
function test(){


    echo "参数1: ${1} !" # 通过${n}来获取传入函数的第n个参数
    echo "参数10: ${10} !" # 双引号括起来的字符串中可以引用变量
    n=$((${

    1}+${

    10}))
    return $n # 如果不加return,则返回值为最后一条命令的结果
}

test 1 2 3 4 5 6 7 8 9 10 # 调用函数时依序传递参数
echo $? # 可以通过变量$?来获取函数的返回值或者上一条命令的结果
run
./test.sh # 注意不能写成test.sh,否则会去环境变量中查找
shell environment variables
Environment variables store data about the shell's working environment so that programs or scripts running in the shell can access them.
The system will create some environment variables. When we install new programs and other operations, we should also pay attention to whether we need to set environment variables, otherwise the "command not found" error will occur.
Check
env # 查看全部全局变量
printenv HOME # 查看个别全局变量(HOME)
echo $HOME # 查看个别全局变量(HOME)
Commonly used environment variables
- HOME: The current user’s home directory
- PATH: List of directories where the shell looks for commands, separated by colons
- PWD: current working directory
set up
Temporary settings
variable="test"
export variable # 导出环境变量
unset variable # 删除环境变量
long term settings
export PATH=/usr/local/src/mongodb/bin:$PATH
SSH
secure shell, a commonly used security protocol for remote login sessions, data compression and encryption chuan'shu
Actual combat
Confirm the virtual machine IP address
Next, we will demonstrate how the host windows is connected to the virtual machine ubuntu.
First, confirm ifconfigthe IP address of the virtual machine. You need to install net-tools.
Then the output inet under ens33 is the intranet IP address of the virtual machine.
Configure virtual machine SSH
- Install openssh-client:
sudo apt install openssh-client - Install openssh-server:
sudo apt install openssh-server - Start ssh-server:
sudo /etc/init.d/ssh start - Confirm that ssh-server is working properly:
netstat -tpl
If you see the wordsssh"some ", it means ssh is running
Host connects to virtual machine
Open cmd input
ssh [email protected]
get
The authenticity of host '192.168.x.x (192.168.x.x)' can't be established.
ED25519 key fingerprint is SHA256:4MTn1ZNTkGQoN8ZEERWfqdhoTV0yuLnLhknyDtXGHfY.
This key is not known by any other names
Are you sure you want to continue connecting (yes/no/[fingerprint])?
Then enter yes to connect
Comics explanation
After reading all the previous knowledge about Linux, you can take a look at the comics from Turnoff to consolidate it.
structure
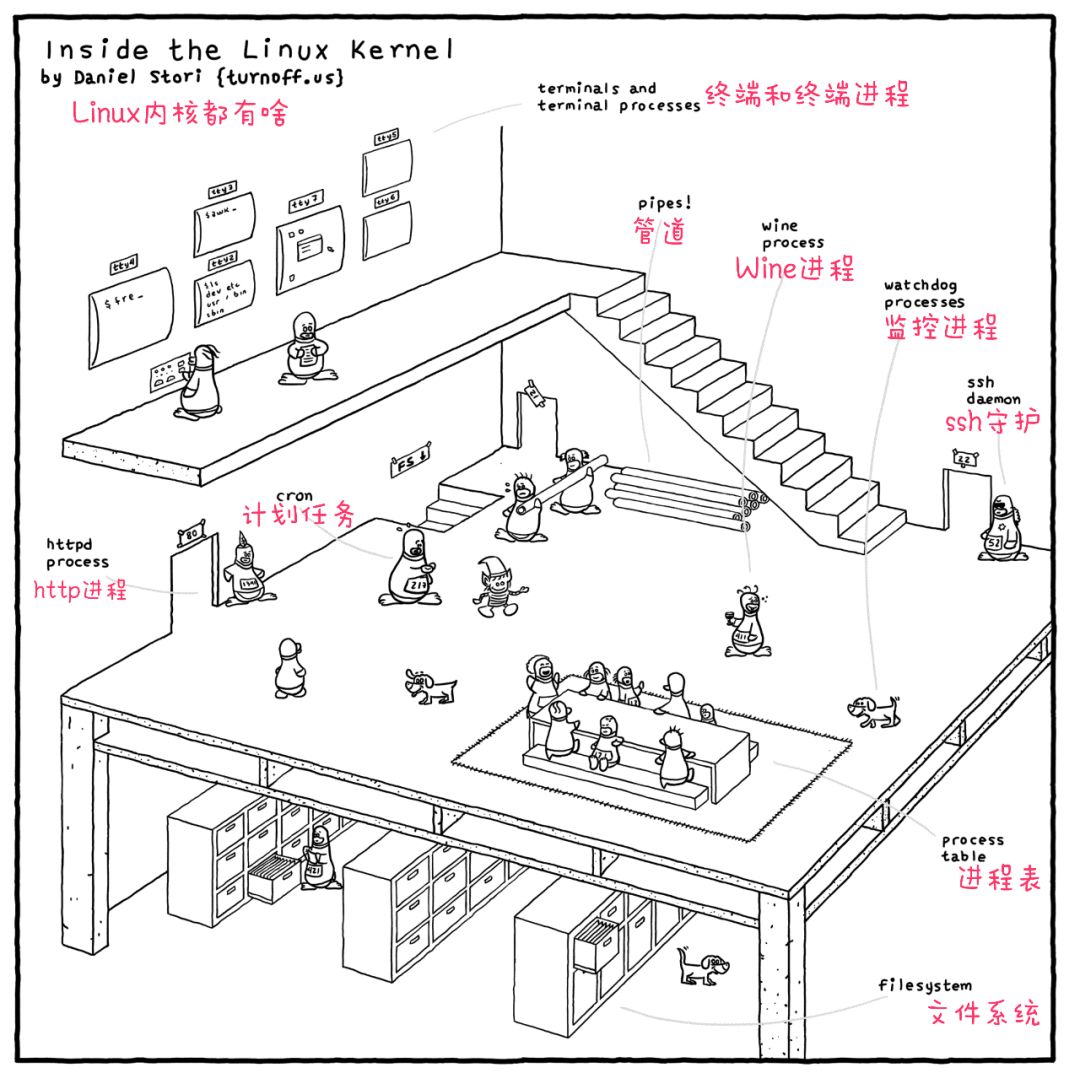
explain

POSIX
Features
Introduction: POSIX stands for "Portable Operating System Interface for UNIX", a set of standards proposed by IEEE to define the interface of the UNIX operating system.
Cause: Different operating systems provide different interface functions to implement system calls, which makes cross-platform more difficult.
Comprehensive functionality: The POSIX standard covers various operating system functions, including file systems, process control, system calls, etc.
Multi-platform, multi-language: Although POSIX was originally designed for UNIX, many other operating systems, including Linux, macOS, etc., have also adopted the POSIX standard or its variants. POSIX supports multiple languages, but it is defined by UNIX, so C language is its orthodox bloodline.
Function
- File system operations: including creation, deletion, reading, writing, positioning and permission management of files and directories.
- Process control: including process creation, termination, waiting, signal processing, and inter-process communication, etc.
- User and group management: including the creation, deletion, and permission management of users and groups.
- System call: Provides an interface for direct access to the core functions of the operating system, such as memory allocation, file I/O, process management, etc.
- Signal handling: allows programs to capture and handle signals from the operating system in order to respond to asynchronous events.
- Thread control: including thread creation, synchronization, destruction, etc.
- Network operations: including socket programming, network communications, etc.
- Time and timer: including obtaining system time, timer settings, etc.
- Shared memory: allows multiple processes to share a memory area.
- Mutex locks and condition variables: used for synchronization and mutual exclusion in multi-threaded programming.
daily use
Connect Network
Sometimes there is no network after Ubuntu is installed. It may be because the computer network is not shared.
The virtual machine virtualizes several private network connections to simulate different networks. We only need to share the host network with these virtual private networks.
Two steps are required: setting up the virtual machine’s private network,设置电脑的共享
Virtual machine->Properties->Network Adapter->Customize->VMnet8->OK
Computer->Find the network adapter settings->Open the properties of the network the computer is connected to->Sharing->Check Allow other users to connect through this computer's internet connection->Select the home network connection VMnet8->OK
At this time, you should be able to open firefox search
Install Chinese input method
Directly browse the Sosogou input method, there is a tutorial, just follow the tutorial.
ctrl+space switches input method
Share clipboard
Just install VMtools to solve it
First, change all hard disk link methods to use physical drives
- Connection: Then start the virtual machine, toolbar->virtual machine->install VMtools->then the installation file will be automatically mounted, and there will be an additional VMwate tools in the folder.
- Right-click something similar to VMwareTools.xxx-xxxx.tar.gz, copy it to the desktop, then extract it to the desktop, and then execute the following command
su root
cd  Desktop/vmware-tools-distrib
./vmware-install.pl #第一个yes后全部默认
reboot
If you can't share your clipboard after installation
apt-get update
sudo apt-get install open-vm-tools-desktop
Replace image source
The default source cannot be accessed in China or is extremely slow, so we replaced it with Tsinghua source or Alibaba source.
Note that replacement requires finding the source corresponding to your own version, that is, replacing the content of sources.txt
ubuntu 清华源 First, search for the Tsinghua image in your browser and then select the corresponding source to copy according to your own version.
Then change the source as follows, back up first, and then modify it.
cd /etc/apt/
cp sources.list sources.list_bak
vi sources.list